


So, you're ready to tackle that wobbly, outdated, or just plain broken interior door handle. Good news: this is one of those DIY projects that delivers a big win with minimal frustration. You can genuinely get this done in under an hour with just a couple of basic tools.
The whole process is pretty simple. You'll pop off the old handle, pull the latch mechanism out of the side of the door, and then fit the new hardware right back in its place. It's one of the fastest and most satisfying ways to give a room a quick facelift.
Getting to Know Your Door Handle
A faulty door handle is one of those small daily frustrations that just builds up over time. But swapping it out is a fantastic skill for any homeowner to have in their back pocket. Forget the confusing diagrams on the back of the hardware package; we’ll walk through this step-by-step.
This isn't just about fixing something broken; it's a chance to upgrade your home's style. Believe it or not, the global market for interior door handles was valued at a whopping $12.27 billion in 2025! That figure is still climbing as more people are choosing modern designs and smarter functionality during their home updates. You can read more about these hardware trends to see what’s popular.
Before you start unscrewing anything, let’s get the lay of the land. We need to figure out:
- What kind of handle are you working with—a classic knob or a modern lever?
- How the core pieces like the latch, spindle, and strike plate all work together.
- Most importantly, how to choose a new handle that will fit the holes already in your door.
A smooth replacement all comes down to knowing what you have before you go to the hardware store. Take a second to look at your current handle. Is it a simple "passage" knob for a closet, or does it have a lock, making it a "privacy" lever for a bathroom? Getting this right from the start is the key to a hassle-free job.
Once you know what you’re dealing with, you’ll be ready to take things apart and put the new one in with confidence.
To help you figure out what you've got, here’s a quick guide to the most common types you’ll find in a home.
Common Interior Door Handle Types
| Handle Type | Common Use Case | Key Feature |
|---|---|---|
| Passage Knob/Lever | Hallways, closets, laundry rooms | No locking mechanism. Simply latches the door closed. |
| Privacy Knob/Lever | Bathrooms, bedrooms | Features a push-button or turn-lock on the interior side. |
| Dummy Knob/Lever | French doors, pantries, shallow closets | Non-functional. Used as a pull and has no latch. |
| Keyed Entry Knob/Lever | Exterior doors, home offices, supply closets | Has a key lock on the exterior and a turn-button on the interior. |
Having this basic info makes it so much easier to pick the right replacement and avoid a second trip to the store. Now, let’s get to the tools you'll need.
Getting Your Tools and the Right Handle Ready
Before you even think about touching a screwdriver, let's get everything lined up. Trust me, a few minutes of prep work now will save you a massive headache later. Getting your tools and the right replacement handle sorted out first is the key to getting this done in one go.
The good news? You probably have most of what you need already.
For the basics, you'll just need a good Phillips head screwdriver and a tape measure. If your old handle and door have been painted over a dozen times, I'd also grab a utility knife. You can use it to carefully score around the edges of the old hardware, which keeps the paint from chipping off the door when you pull it free.
Here’s a look at the simple setup that will get you through this project.
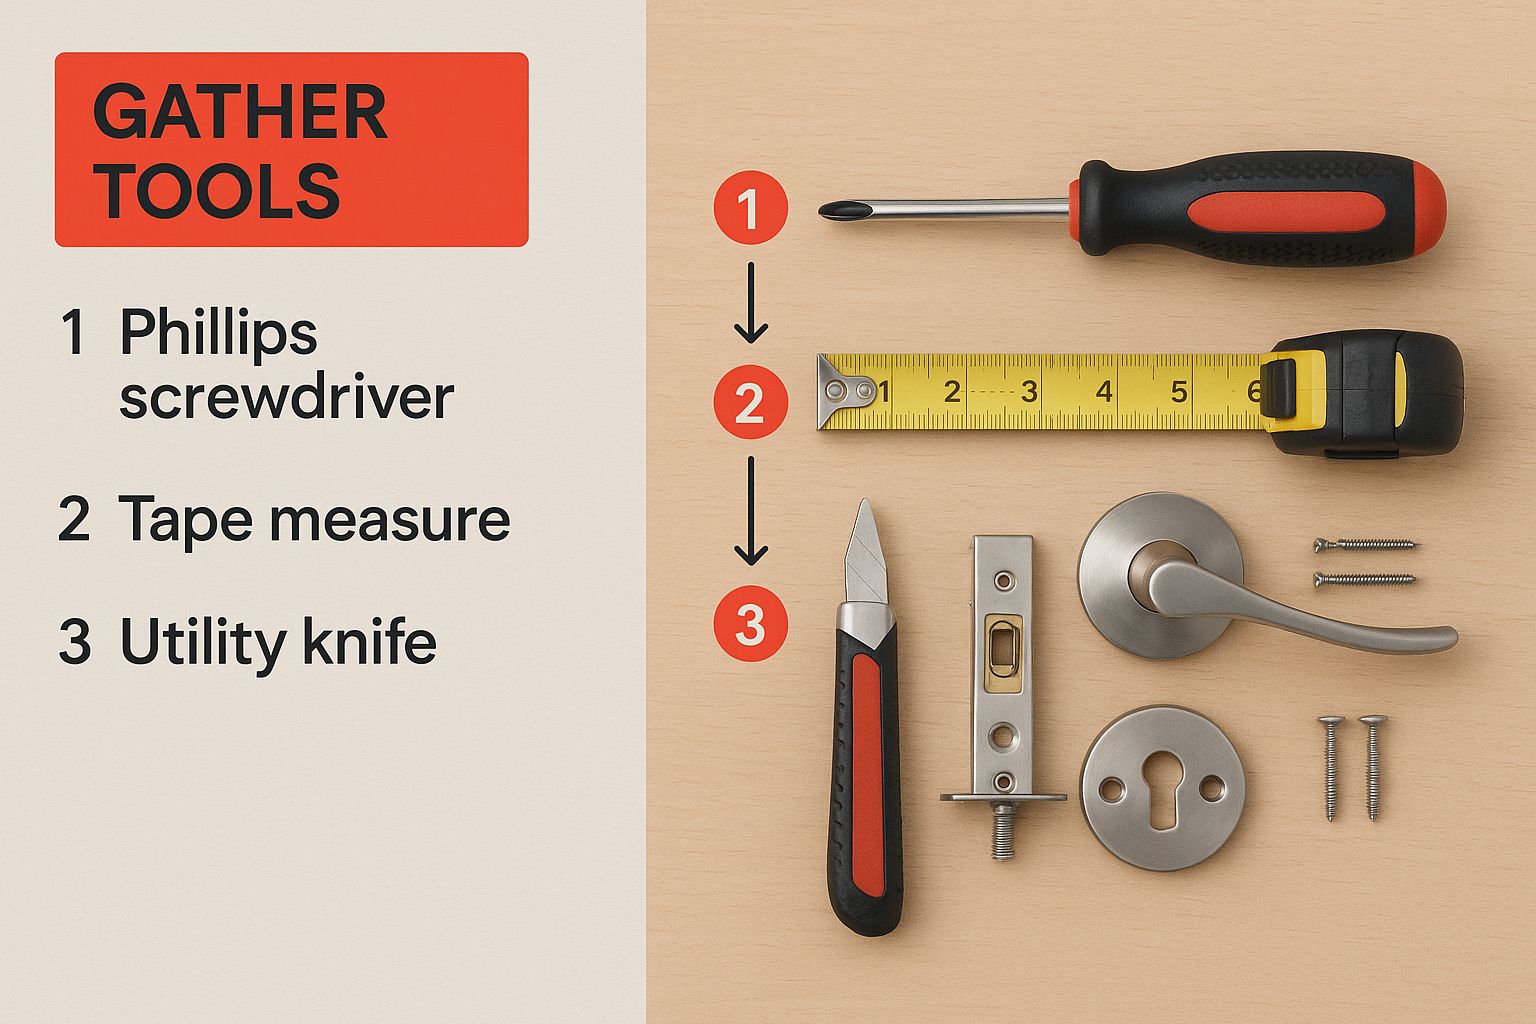
As you can see, you don't need a professional's tool chest for this. It’s a very straightforward job.
Choosing the Perfect Replacement Handle
This is the most important part of your prep. Picking a new handle that's an exact match for your old one means you won't have to drill new holes in your door. To do that, you need two quick but critical measurements from the handle that's already on there.
- The Backset: Measure from the edge of your door straight to the center of the handle. The most common size you'll see is 2 ⅜ inches, but don't be surprised if you find one that's 2 ¾ inches.
- The Bore Hole: This is just the diameter of that big hole the handle assembly sits in. The industry standard is 2 ⅛ inches.
Nailing these measurements ensures your new handle will drop right into place. Beyond fit, think about function. A "passage" handle is what you want for a hallway or closet door—it doesn't lock. For a bedroom or bathroom, you’ll need a "privacy" handle with a small push-button lock.
If you're thinking about upgrading, it's worth looking into the benefits of a metal door handle replacement for a more durable and long-lasting option.
Pro Tip: Before you go to the hardware store, snap a quick picture of your old handle and your measurements with your phone. It’s a simple trick that has saved me countless return trips because I bought the wrong part.
Getting the Old Door Handle Off Without a Scratch
Alright, you've got your tools, and you're ready to go. The first real step is getting that old handle off, and the trick here is to be patient. Rushing is how you end up with a nasty scratch on your door panel.
For Handles with Visible Screws
Most of the time, this part is pretty simple. Look at the base of the handle on the inside of the door—that decorative plate is called a rose. You'll usually spot a couple of Phillips head screws holding the whole assembly together.

Just unscrew them and set them aside. I usually keep a little magnetic bowl handy so they don't roll away. Sometimes, you can even reuse these if your new handle didn't come with any.
It's no surprise this design is so common. The residential market dominates the door hardware industry, making up over 54.6% of it. This means most handles are built with the DIYer in mind, prioritizing straightforward installation over complex mechanisms.
What to Do About Hidden Fasteners
Of course, not every handle makes it that easy. A lot of modern lever-style handles hide their screws for a cleaner look.
If you don't see any screws, feel around the neck of the lever itself, often on the underside. You're looking for a tiny set screw. This usually requires a small flathead screwdriver or, more commonly, an Allen wrench. Just loosen it a bit, and the lever should slide right off the post.
Once the lever is off, you'll see the mounting screws you need to get to. Some other designs might have a small pin or a spring-loaded clip instead of a set screw. For those, you'll just need to push the pin in with a pointy tool or even the tip of your screwdriver to release the handle.
Pro Tip: Is the handle stuck? Don't just yank on it. Years of paint can basically glue it to the door. Take a utility knife and carefully score a line around the edge of the rose. This breaks that paint seal and will save you from chipping your door's finish when the handle finally comes free.
With both sides of the handle removed, the last piece of the puzzle is the latch assembly. That's the part sticking out from the edge of the door. It's held in by two more screws. Take those out, and the whole mechanism should slide right out.
Now you have a clean slate, ready for your new hardware. Having the right automotive and home repair tools on hand always makes these projects go a whole lot faster.
Time to Install the New Interior Door Handle
With the old, broken handle out of the way, you can finally move on to the satisfying part: installing the new one. This is where your careful work pays off. Getting this right means your door will work like new for a long time to come.
First up is the new latch assembly. Gently slide it into the opening on the edge of the door. Before you go any further, take a close look at the latch bolt—that's the angled, spring-loaded part. The beveled side must face the door jamb. This is a non-negotiable detail; it’s what allows the door to glide shut and click into place properly.
Go ahead and secure the latch with the two screws it came with. Just get them snug for now. You don't want to crank them down all the way just yet.
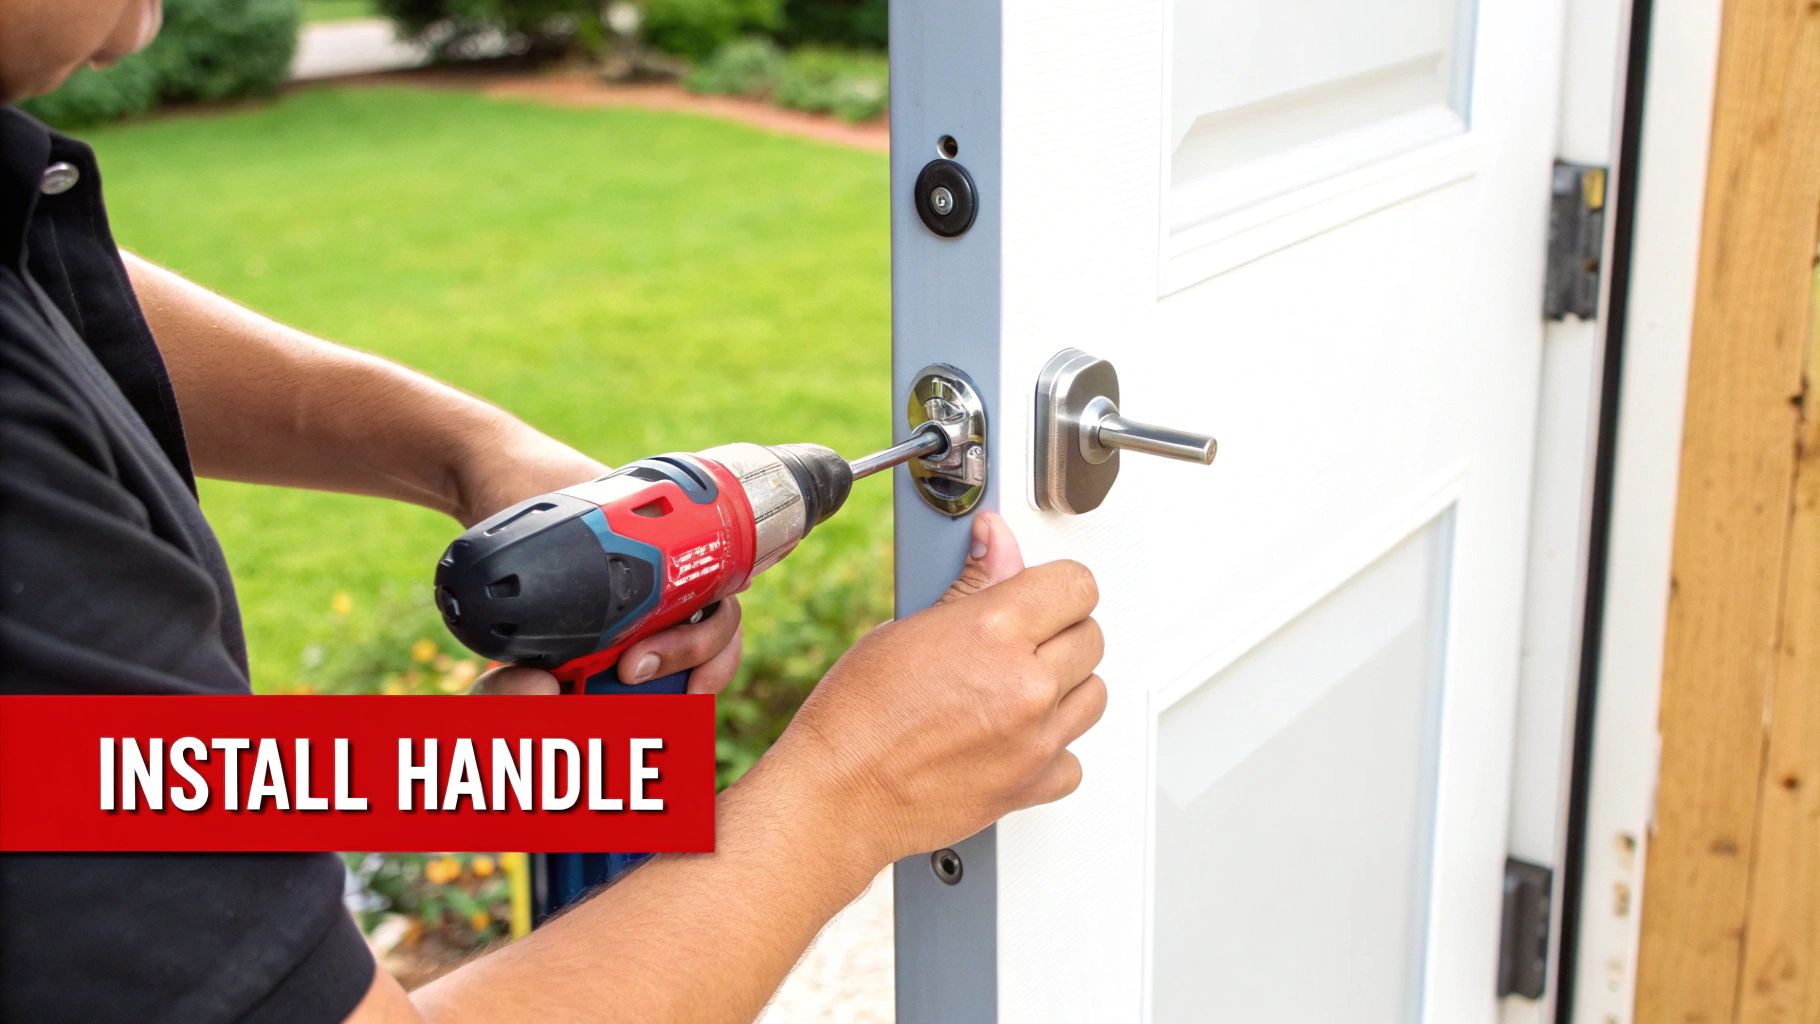
Getting the Handles and Spindle Aligned
Now, grab your shiny new handles. Start with the exterior piece (the one that doesn't have the screw holes showing) and guide its spindle through the square hole in the middle of the latch you just installed. It should poke right out the other side.
Next, take the interior handle and line it up with the spindle. Press it firmly into place. The two halves should now be sitting flush against the door, looking like they belong there. If you're in the market for a new part, you can find a solid selection of quality interior handle replacements that are often built tougher than the factory originals.
With everything aligned, it's time to lock it all down. Thread the two long mounting screws through the holes on the interior handle's plate, connecting them to the exterior handle on the other side.
My Pro Tip: Don't just tighten one screw all the way and then the other. Instead, tighten them down a little at a time, alternating between them. This pulls the handles together evenly and prevents the mechanism from binding up. If you overtighten, the handle will feel stiff and hard to turn. You’re looking for a snug fit with zero wobble, not a death grip.
Once the handles feel solid, you can go back and give those two smaller screws on the edge of the door a final tighten.
The Final Touches: Strike Plate and a Quick Test
The last piece of the puzzle is the new strike plate for the door jamb. Simply unscrew the old one and put the new one on using the provided screws. Using the new plate is always a good idea, as it guarantees the finish matches and the alignment is perfect.
Now for the moment of truth. Gently close the door a few times. You should hear a satisfying click as the latch engages the strike plate. Give the handle a turn to make sure the latch retracts smoothly, and if you have a lock, test that too. A perfectly installed handle doesn't just look great—it functions flawlessly.
Even the best-laid plans can go sideways. You’ve followed all the steps, but your new door handle just isn’t working right. Don't throw in the towel just yet—most of these hiccups are pretty common and, better yet, easy to fix.
Let's walk through some of the usual suspects.
https://www.youtube.com/embed/TbT3zrwsLkw
Fine-Tuning for a Perfect Fit
One of the most frequent complaints I hear is about a handle that feels wobbly or loose, even after you’ve cranked down on the screws. This is almost always caused by uneven tightening. When one screw is much tighter than the other, it pulls the whole assembly off-kilter.
The fix is simple: just back both screws out a bit. Then, tighten them down again slowly, alternating between them—a few turns on one, then a few turns on the other—until they’re both snug. This ensures the pressure is even and the handle sits flush.
Another classic issue is a latch that won’t cooperate with the strike plate on the door jamb, making the door impossible to close properly. It’s frustrating, but you can usually solve it in a few minutes.
To fix a misaligned latch, start by closing the door slowly and watching exactly where the latch bolt hits the strike plate. If it’s hitting too high or too low, a couple of passes with a small metal file inside the strike plate opening is often all you need to create enough clearance.
What if the door closes but rattles in the frame? This means the strike plate is probably set a little too far from the latch.
Here's a trick I've used countless times: look for the small metal tab inside the strike plate opening. Using a flathead screwdriver, gently bend that tab just a little bit towards the door stop. This small adjustment is usually enough to tighten the fit and get rid of that annoying rattle for good.
Fixing Common Handle Problems
Sometimes a quick visual check is all you need. If you're running into trouble, this little cheat sheet can help you diagnose the problem and get it sorted out fast.
| Symptom | Likely Cause | Solution |
|---|---|---|
| Handle feels wobbly | Screws were tightened unevenly. | Loosen both screws and retighten them gradually, alternating between them. |
| Latch won't engage | The latch and strike plate are misaligned. | Slowly close the door to see where the latch hits. File the strike plate opening slightly to adjust. |
| Door rattles when closed | There’s a gap between the latch and the strike plate. | Gently bend the small tab inside the strike plate opening towards the door stop. |
| Handle is stiff | Internal mechanism is binding. | Loosen the handle screws slightly. If that fails, remove and reinstall, ensuring no wires are pinched. |
These little adjustments make a huge difference and are part of what separates a frustrating job from a successful one.
It’s a handy skill to have, too. With massive construction projects underway globally, the Asia Pacific region alone is expected to be a leader in the door handle market through 2034. As these new buildings age, knowing your way around a basic handle replacement will definitely come in handy. You can discover more insights about the global door handle market on gminsights.com.
Got a Few More Questions?
You've got the new handle on, and it looks great. But it's natural to have a few questions pop up, especially if this was your first time tackling a project like this. Let's run through some of the most common things people ask after wrapping up an interior door handle replacement.
Are All Door Handles the Same Size?
This is a big one. It's tempting to think you can grab any handle off the shelf, but they are not truly universal. While many parts share some standard dimensions, things like mounting hole locations and the length of the connecting rods can vary quite a bit between models.
The golden rule is to always match the new part to your vehicle's specific year, make, and model. It saves you from that frustrating moment when you realize the new handle just won't line up.
Do I Really Need to Replace the Whole Thing?
So, the new handle came with a bunch of extra clips and maybe even a new rod. Do you have to use them all? Yes, it's a very good idea. Swapping out the entire assembly ensures all the components are fresh and designed to work together seamlessly.
Using old clips or rods with a new handle can sometimes cause a sloppy feel or, worse, lead to another failure down the line. It's worth the extra minute to do it right.
Can I Just Flip the Handle for the Other Side?
Let's say you accidentally bought a handle for the driver's side front door but need one for the passenger side. Can you just flip it? Unfortunately, with vehicle interior door handles, what you see is what you get. They are almost always side-specific.
The molding, cable attachment points, and screw holes are custom-made for either the left or right side of the vehicle. You'll need to make sure you have the correct part for the specific door you're working on.
Key Takeaway: Always use the complete, correct part for your specific door. Trying to mix, match, or flip parts is a recipe for a headache and a job you'll likely have to do all over again.
For reliable, high-quality hardware that guarantees a perfect fit every time, trust T1A Auto. Our premium aftermarket parts are engineered for durability and easy installation. Explore our collection at t1aauto.com.