


You pull the door handle, feel it move, and the door stays shut. Now you're looking at replacement listings that call similar-looking pieces a handle, carrier, release lever, or latch assembly. Buying the part you can see is tempting, but the failed piece may be a small clip hidden behind the door trim.
The most useful door handle parts names tell you more than what a component looks like. They tell you where it sits, what moves when you operate it, and how much of the assembly you need to replace. Start with the part in your hand, then follow its connection toward the latch.
Table of Contents
- Door Handle Parts Names Lookup Chart
- Why the Handle Is Only Part of the System
- Exterior and Interior Handle Assemblies
- Rods Clips Cables Springs and Fasteners
- Latches Strikers and Lock Controls
- Flush Electronic Handles and Backup Releases
- Which Part Fails When the Door Will Not Open
- Confirm the Part Name Before You Buy
Door Handle Parts Names Lookup Chart
| Part name | Where it sits | What it does | Also called | Replace when |
|---|---|---|---|---|
| Exterior handle | Outside door skin | Starts the outside release | Outside handle, pull handle | Cracked or loose after mounts are checked |
| Interior opening lever | Door trim | Provides inside release input | Interior handle, release lever | Pivot breaks or lever has no usable travel |
| Bezel or carrier | Around or behind the handle | Bezel frames it; carrier supports it | Escutcheon, base, housing | Mounting ears break or housing cracks |
| Lock cylinder | Exterior handle or adjacent bezel | Accepts mechanical key input | Key barrel, lock plug | Correct key won't turn after diagnosis |
| Pivot pin | Handle base | Provides the lever's hinge axis | Handle pin | Pin wears or pivot hole becomes oval |
| Return spring | Handle pivot, linkage, or latch | Returns the handle to rest | Handle spring | Handle fails to return after binding is excluded |
| Release rod | Between handle and latch | Pushes or pulls the release lever | Control rod, linkage rod | Bent or damaged |
| Release cable | Between handle and latch | Pulls through a supported sheath | Bowden cable, latch cable | Frayed or damaged |
| Cable-end retainer | Cable connection at handle or latch | Keeps cable end or sheath seated | End fitting, cable clip | Broken or unable to retain the cable |
| Rod clip | Rod end | Secures rod in a lever hole | Push clip, retainer clip | Broken or unable to secure the rod |
| Lock rod | Lock button or cylinder to latch | Moves the lock lever between locked and unlocked positions | Lock link | Bent, disconnected, or ineffective |
| Bell crank | Inside the door | Redirects linkage motion | Relay lever | Cracked, loose, or binding |
| Lock actuator | Inside door, often with latch | Operates the power lock | Door lock actuator | Fails after power and wiring checks |
| Door latch | Door edge | Retains door against striker | Latch assembly | Won't catch or release correctly |
| Fork-bolt | Inside latch | Rotates around and retains striker | Claw, ratchet | Cannot achieve proper latch engagement |
| Striker | Body pillar or jamb | Provides fixed engagement target | Striker pin, striker loop | Worn, damaged, or misaligned |
| Child safety lock | Rear door edge or integrated control | Intentionally disables inside opening | Child lock lever | Control fails, not merely because it's engaged |
| Gasket | Behind exterior handle | Seals handle opening against water | Handle pad, seal | Torn, missing, or incorrectly seated |
| Fasteners | Handle, latch, and striker mounts | Hold components in position | Bolts, screws, nuts | Stripped, damaged, or missing |
Use the Replace when column as a starting point
A symptom can point to more than one part. For example, a handle that does not return may have a failed spring, or its pivot or connected linkage may be binding. Check where movement stops before choosing a replacement. A rear door that opens only from outside may have its child safety lock engaged.
Bezel and carrier deserve special attention when comparing catalog listings. These terms can describe different pieces: the bezel is the visible surround, while the carrier supports the handle. A replacement bezel may not include the structural bracket behind it. Compare the replacement's rear side and mounting points with the old part.
The terminology also has a safety context. Federal Motor Vehicle Safety Standard No. 206 covers components including the latch, striker, mechanically operated exterior handle, interior opening lever, and locking device. That vocabulary helps distinguish the visible control from the parts that retain and release the door.
Copy the identifiers before ordering
Record these details beside the part name:
- Door position: Front or rear, plus left or right as viewed from the seated driving position.
- Operating side: Interior release or exterior handle.
- Access provision: Keyhole, no keyhole, or smart-key equipment.
- Appearance: Finish, color, and separate cover arrangement.
- Connection: Rod end, cable end, mounting pattern, and electrical connector.
- Package scope: Bare handle, handle with carrier, or a larger assembly.
Then match the identifiers to the component you need. A broken carrier mounting ear, for example, does not by itself mean the latch needs replacement.
Why the Handle Is Only Part of the System
Say the driver's exterior handle reaches its normal stop, but the door doesn't release. The handle has moved; that doesn't establish whether the release rod moved, the cable sheath stayed seated, or the latch received enough travel.
That separation explains the names. Early automotive handles worked much like carriage or household hardware, turning a bar or pin directly. According to New Atlas's history of automotive door handles, manufacturers increasingly separated handles from latches by the 1950s, while push-button handles became popular during the 1960s and 1970s.
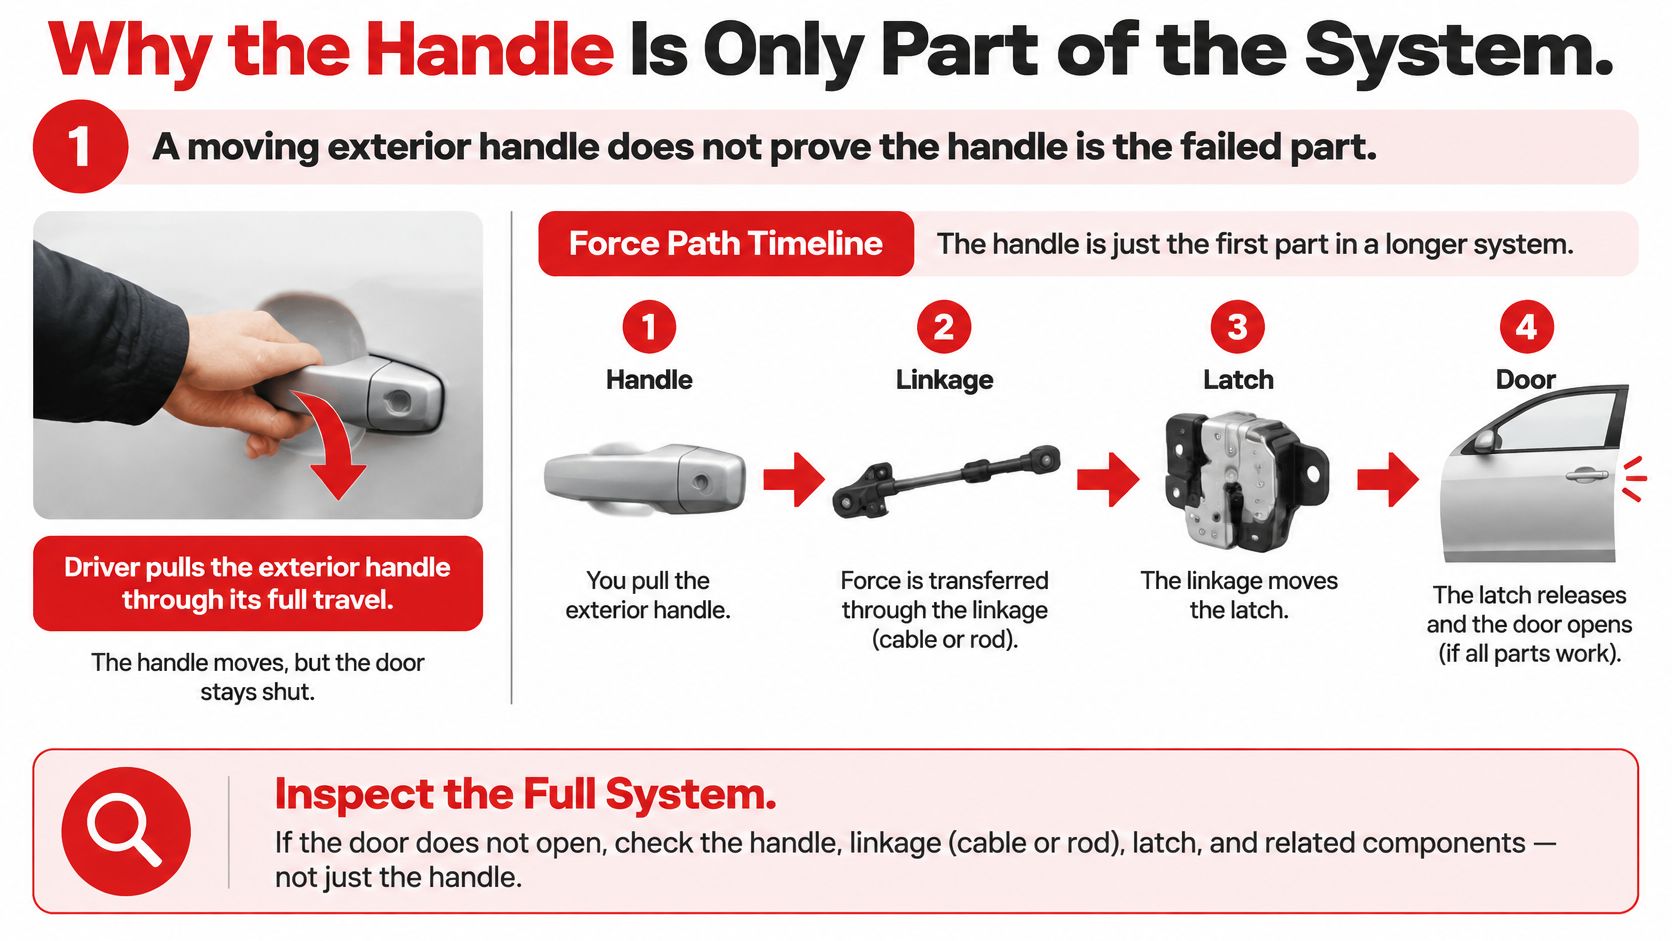
Twist, push-button, and pull-out describe the part your hand operates. They don't describe everything behind it. Flush designs add another possibility: an actuator may extend the handle, or hold a spring-loaded handle in its recessed position.
The working distinction is input versus retention. Your hand supplies input through a linkage or actuator; the door-mounted latch performs the retaining and releasing work. The striker stays on the vehicle body.
Practical rule: Watch where the motion stops before deciding which part has failed.
On a frequently used truck or fleet door, inspect clips and plastic pivots even when the outer grip looks intact. Repeated operation can expose a weak connection without leaving an obvious crack in the visible handle. The useful question isn't whether the handle moves, but whether its movement reaches the release mechanism.
Exterior and Interior Handle Assemblies
Position, equipment, and package contents change the part number. A front driver handle with a keyhole isn't automatically interchangeable with the passenger handle beside it. A similar outline only establishes that the parts look related.
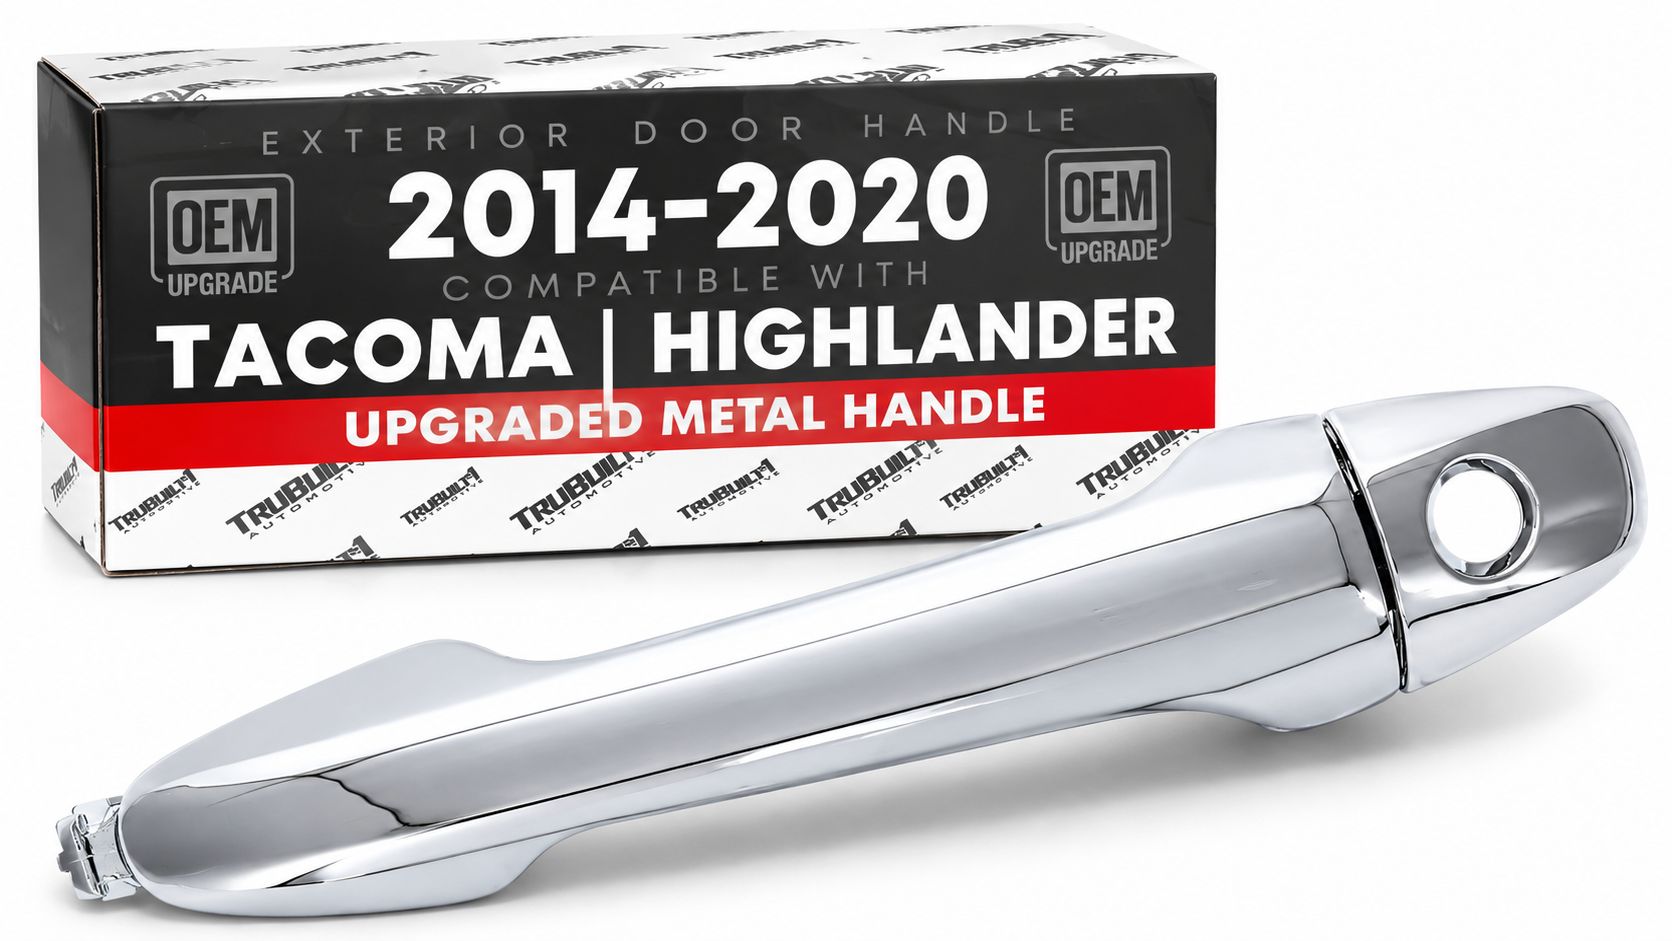
Start by comparing the actual door with the listing. Check whether the lock cylinder sits inside the moving grip, in a stationary end cover, or beside the handle. A replacement with a keyhole provision may require transferring the existing cylinder rather than arriving with a keyed cylinder installed.
Match what the door actually carries
A chrome pull with a separate end cover needs the correct cover arrangement, not merely a chrome-colored grip. A body-color handle may have different supplied trim pieces. Verify what's included rather than assuming the photograph represents a complete installation kit.
A smart-key handle adds another ordering distinction. It may carry a touch pad, sensor, connector, or wiring that a plain mechanical handle lacks. Matching the mounting holes won't compensate for missing electrical equipment.
For a concrete catalog example, the Exterior Front Driver Door Handle & Cover, Upgraded Metal - Compatible with 2016-2020 Toyota Tacoma, 14-19 Toyota Highlander - All Chrome w/Keyhole - OEM 69211-0E010-C1, 69217-0E030-C1 - Front Driver Side Handle identifies the side, finish, keyhole provision, cover, fitment, and reference numbers in its title. Those are separate checks, not decorative wording.
Separate the grip from its support
An interior lever and exterior pull on the same door are different service parts. Replacing the outside grip won't repair a cracked inside lever, even if both operate the same latch.
- Handle only: Inspect the carrier you'll reuse, especially its pivot supports and mounting ears.
- Handle with carrier: Compare the complete rear mounting geometry and linkage attachment.
- Interior and exterior set: Confirm which door positions and trim colors the package includes.
Pull an uninstalled mechanical handle gently and watch its pivot. The lever should move without scraping or excessive sideways play, then return under spring force. A handle that remains proud needs its pivot, spring, and surrounding clearance checked before condemning the latch.
A complete-looking handle isn't necessarily a complete service assembly.
For custom fabrication or development work, engineers can find automotive additive production support through American Additive Manufacturing. That's a different route from choosing a catalog replacement, and a custom shape alone doesn't establish safe door-system operation.
Before assuming left and right parts are mirror images, compare their attachment features. A sound new grip still needs a sound connection behind it.
Rods Clips Cables Springs and Fasteners
A handle can move normally while the latch receives no useful motion. Follow the connection from the handle toward the latch to identify which link has failed, rather than ordering a complete handle assembly by appearance alone.
The release rod is a rigid link, often with a bent end seated in a lever hole. It transfers push or pull motion, while a rod clip holds the rod in place. If the clip breaks, the handle lever may still move, but the rod slips beside it and the latch gets no release travel. That sequence points to the retainer or its attachment, not automatically to the handle.
A release cable carries motion through an inner wire while its outer sheath remains supported at the handle and latch. If the sheath ferrule lifts out of its bracket, pulling the handle may shift the housing instead of drawing the wire through it. Inspect both ends with a flashlight and mirror: the cable barrel should sit in its pocket, the retainer should hold, and the sheath should remain seated. A sharply bent cable may indicate incorrect routing, not a need to force it into place.
| Component | Motion or support to inspect | Replacement scope to verify |
|---|---|---|
| Release rod | Travels straight without rubbing | Separate rod or handle linkage package |
| Rod clip | Holds the rod end in the lever hole | Correct clip orientation and rod size |
| Release cable | Inner wire pulls while sheath stays seated | Cable alone or cable with retainers |
| Cable-end fitting | Remains seated through handle travel | Separate retainer or complete cable |
| Bell crank | Rotates smoothly at its pivot | Separate relay lever or larger assembly |
The lock rod changes lock state and does not carry release travel. A lock button can move even when the opening linkage has come loose, so keep the rods' routes distinct during trim removal and note where each connection sits before disconnecting it.
A bell crank redirects motion at a pivot. If its body or attachment hole cracks, the lever can flex and absorb travel even though the rods still appear connected. Check the pivot and holes for movement or damage.
Springs and other support pieces
A return spring may be mounted on the handle, linkage, or latch. Use this door handle spring mechanism guide to identify the arrangement before transferring or replacing a spring. A spring that is part of an assembly may not be sold as a separate service part.
Before reassembly, check the surrounding hardware too. The handle pad should lie flat without torn or trapped edges. Damaged fastener threads need attention, and tightening should follow the vehicle's specified procedure. Confirm whether a replacement includes clips and cable fittings; catalog listings may cover the main part alone or a larger package.
Some retainers are separate clips, while others are molded into a cable end or handle housing. When an integral retaining feature breaks, a generic clip cannot restore the original attachment. Match the replacement scope to the failed feature, so the part you order contains the connection that no longer holds.
Latches Strikers and Lock Controls
A door that bounces off the body or stays shut after a handle pull can point to different parts. The primary latch is mounted in the door. Its fork-bolt, also called the claw, rotates around the fixed pin or loop on the body pillar, the striker, and retains the door. The latch and striker must meet in the correct position for the door to close and release.
Under the federal door-lock and retention-component rule, a primary latch must provide fully latched and secondary latched positions. Applicable latch systems must also meet a 30-g longitudinal and transverse inertial requirement. An auxiliary latch supplements a primary system and may provide only a fully latched position. The door latch assembly diagram guide can help identify the latch body, release connections, and body-side striker when comparing parts.
Retention, release, and locking
These parts do different jobs. The fork-bolt captures the striker; the release linkage moves the latch out of engagement. The locking mechanism determines whether a release input can open the door. A power-lock actuator operates the locking function and may be packaged with the latch assembly. If the handle moves but the door stays closed, the failed link may be in the release path or lock control, rather than the visible handle.
A child safety lock controls a separate condition. It prevents opening from the inside on the rear door, so an inside handle that does not open the door may be functioning as intended. With the normal door lock released, the exterior handle can still open the door when the child safety lock is engaged.
NHTSA's door-lock interpretation distinguishes lockout behavior: an engaged front-door lock disables the outside release, while a locked rear door disables both inside and outside releases. These are not the same as the child-lock setting, and the release sequence varies by vehicle.
Check before closing the door
After working on a handle, cable, rod, latch, or actuator, follow the vehicle's service procedure and test each function:
- Striker alignment: Check door gaps, hinge condition, and rubbing marks before adjusting the striker. Mark its original position if adjustment is needed.
- Latch engagement: Verify the specified secondary and fully latched positions. Keep fingers clear of the fork-bolt.
- Handle return: Release each handle and confirm it returns freely without holding the linkage under tension.
- Lockout operation: Test the correct inside and outside controls, including the rear child-lock setting.
- No binding: Check cable routing, rod clearance, and movement with trim and connectors in their proper positions.
If the service procedure calls for simulating striker engagement with the door open, use the specified tool, then release the latch to its open position before closing the door. Never close a door against a latch that is already tripped.
Safety check: Don't slam a door to overcome an unidentified fault.
A door that needs force, lifting, or repeated attempts has not passed inspection. If engagement or release remains uncertain, have the retention system checked before driving.
Flush Electronic Handles and Backup Releases
A recessed handle may sit flush with the door, then move outward when touched, or stay in place while an electronic latch releases. Flush names the resting position; the release may be mechanical, powered, or electronic. For parts identification, follow the action from the driver's input to the latch. That points to the failed link, rather than just the visible handle.
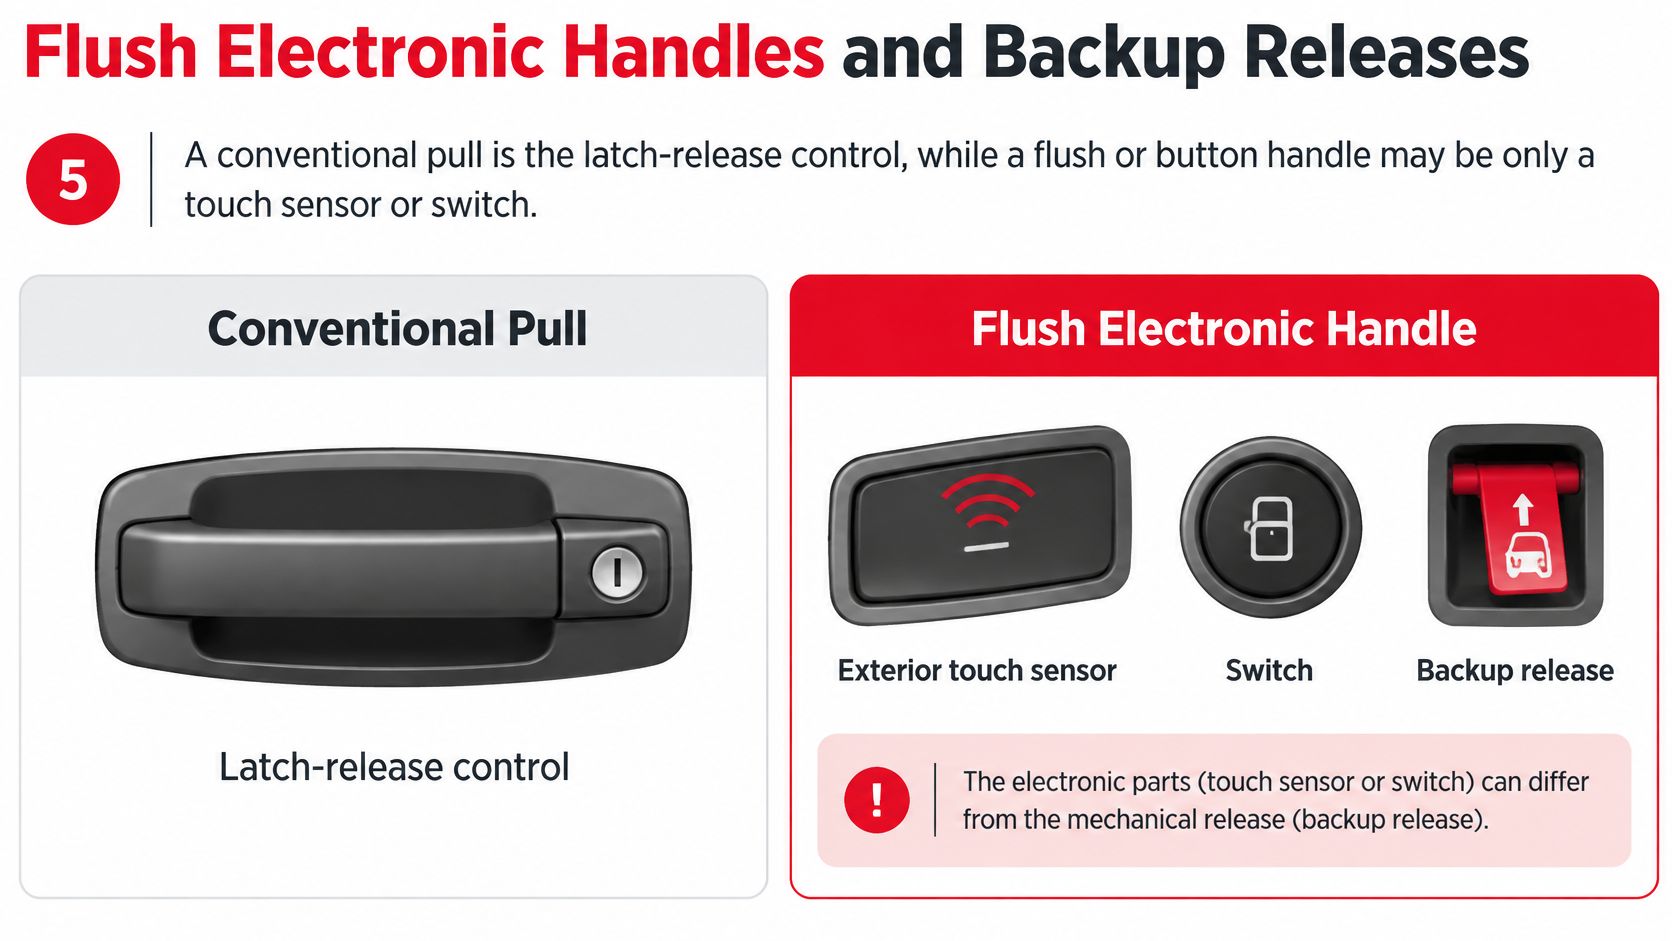
| Part | Conventional pull | Flush electronic |
|---|---|---|
| Control input | Pull handle | Touch sensor or button |
| Actuation | Rod or cable moves the latch lever | Electronic latch actuator responds to a module command |
| Power dependence | Mechanical pull operates without electrical power | Normal operation needs power unless a mechanical backup is available |
| Emergency path | Same mechanical pull, subject to lock state | Vehicle-specific mechanical backup or interior emergency release |
| Hidden parts | Clips and cable ends | Wiring, connectors, sensors, control module |
The motion helps separate parts that can look alike in a catalog. A touch sensor detects the user's input. The control module processes it and sends a command; the electronic latch actuator carries out the release. Wiring and connectors connect these components.
Handle deployment and latch release are separate jobs. A motor may present the handle, while another component operates the power lock or releases the latch. If a handle extends but the door remains shut, the deployment motor may be working while the latch actuator, wiring, or control command is not. If the handle fails to extend, that alone does not prove the latch has failed.
Emergency access depends on the vehicle's design. A Reuters report on China's door-handle recall described concerns about opening doors after electrical power loss, and manual releases located in door pockets or beneath panels that may be poorly marked. The report does not identify the equipment or recall coverage of an individual vehicle.
A mechanical backup release uses a lever or cable to operate the latch without the normal electrical command. An interior emergency release may be exposed or placed behind a designated cover. Check the owner's manual for the exact location and procedure, since the route differs by vehicle.
Learn the release path while the vehicle is working, and show regular passengers how it operates. For rear doors, confirm how the emergency release works with the child-lock setting. After collision repairs, technicians should check wiring, connectors, release cables, and access after the trim is restored. Before replacing a handle or latch, check the vehicle's recall status and manufacturer instructions.
Avoid pulling random trim panels or unlabeled cables to diagnose the system. Follow the manufacturer's procedure, including any warnings about window operation or possible door damage. If the specified emergency release does not operate, identify whether the fault lies in its cable, the latch, or the electrical control path before returning the vehicle to use.
Which Part Fails When the Door Will Not Open
When the handle travels but the door stays shut, inspect the connection before ordering the grip. Each complaint points to a location and a missing action, but it doesn't prove a part is defective until you check it.
Use this table to choose the first inspection, not to skip diagnosis.
| Symptom | Check first | Also check | Do not assume |
|---|---|---|---|
| Handle travels, door stays shut | Cable-end retainer or rod clip | Unseated latch cable or latch lever | A new handle shell will fix it |
| Handle flops with no return | Return spring or pivot pin | Broken handle mount | The latch failed |
| Rod is off the lever | Rod clip | Bent release rod | The exterior handle is broken |
| Opens outside, not inside | Child safety lock | Interior opening lever | The striker is bad |
| Will not stay latched | Fork-bolt and secondary position | Striker alignment | The handle spring is weak |
| Lock button does nothing | Lock rod and its clip | Lock actuator | The release cable is the lock |
| Wet carpet after handle work | Handle gasket | Carrier seal and disturbed moisture barrier | The latch is leaking |
| Flush handle dead with no power | Mechanical backup release procedure | Actuator, wiring, or module | A painted handle restores egress |
A moving handle with no release
Watch the cable sheath or rod attachment while a helper operates the handle gently, with the door safely accessible. If the handle moves but the connected lever doesn't, inspect the attachment between them. If motion reaches the latch, investigate release travel, lock state, and latch operation instead.
A NHTSA recall report concerning an improperly seated interior handle cable specified replacement of the latch cable and pivot clip. The repair scope matters: another interior lever wouldn't address the identified cable connection.
Don't turn that example into a universal reseating instruction. A damaged retainer may appear secure when pushed back into place but fail again under use. Follow the applicable repair or recall procedure.
A floppy handle or inside-only failure
For a loose grip, separate movement at the pivot from movement of the entire housing. A rocking housing suggests mounting trouble; a lever that sags within a secure housing suggests a pivot, spring, or internal support problem. Check for cracks on the hidden side before deciding the outer surface is sound.
For a rear door that opens from outside but not inside, verify the child-lock setting before removing trim. If the setting is correct, compare interior lever movement with its cable or rod connection. A striker fault is a poor first assumption when the exterior release opens the door normally.
Replace the failed connection, not the most visible component near it.
Water complaints also need confirmation. Moisture can travel from a disturbed seal or barrier to carpet some distance away, so inspect the area worked on rather than declaring the latch a leak source.
Manufacturer, regional, and catalog terminology can differ. Match location, movement, and attachment geometry to the listing's alias, then select the smallest serviceable assembly containing the confirmed fault.
Confirm the Part Name Before You Buy
A handle can look right in a product photo and still be wrong for the door. Record the vehicle details and identify the failed component while the old part is available for comparison.
- Vehicle identity: Year, make, model, and relevant body or equipment configuration.
- Part identity: Handle, carrier, cable, clip, latch, actuator, or another confirmed component.
- Door location: Front or rear, left or right, interior or exterior.
- Equipment: Keyhole, smart-key provision, connector arrangement, and lock-cylinder transfer requirements.
- Finish: Color, texture, plating, and separate covers.
- Attachment: Mounting locations, rod bends, cable fittings, and connector shape.
- Replacement scope: Subcomponent, bare handle, handle with carrier, or complete assembly.
Use an OEM reference number from the old part or a vehicle-specific listing when available. A molded number may identify only the housing, not a separately orderable service part. The parts cross-reference guide can help compare numbers and catalog names.
Match the purchase to the damage
A cracked exterior handle body points to replacing the handle. If the handle remains intact but the linkage has come detached, identify the failed retaining hardware before ordering. Both problems may be described as a broken handle, yet they call for different parts.
Fitment also depends on vehicle category. Sixrace's guide to abbinare i ricambi al modello giusto concerns motorcycle parts, so use an automotive vehicle-specific catalog and service information to confirm a door-handle match.
Check the package contents against the parts you need to reuse. A handle may fit while a missing carrier, gasket, clip, or end cover leaves the repair incomplete.
Close the job only after functional checks
Keep the old hardware until you have compared the new attachment points and confirmed operation. For the prove-operation steps before fully closing the door, follow the checklist in the Latches section.
T1A Auto offers replacement interior and exterior door handles, tailgate hardware, cables, latches, and related fasteners. Use your vehicle details, part reference, and confirmed failure point when comparing fitment and assembly contents at T1A Auto before ordering.
