


You're usually facing the same issue when a door starts bouncing open, the outside handle feels normal, or the interior release suddenly goes dead. The instinct is to buy the visible part and move on, but door latch assembly parts are part of a regulated retention system, and the wrong replacement can leave the underlying fault untouched.
That matters because the latch isn't there just to keep the door shut in traffic. Under FMVSS No. 206, a fully latched door must withstand 11,000 newtons in one loading condition and 9,000 newtons in another, while the secondary latch must withstand 4,500 newtons in both (NHTSA FMVSS No. 206 test procedure). Treating that assembly like a simple catch is how owners end up replacing the wrong piece twice.
Table of Contents
- Why a Door Latch Is a Safety System, Not Just a Catch
- The Engineering Reference Frame Behind Every Latch Assembly
- Core Components of a Door Latch Assembly Explained
- OEM Versus Upgraded Metal Versus Replacement Plastic
- Symptom to Component Diagnostic Matrix
- Fitment Variables Beyond Year, Make, and Model
- Electronic Integration and Corrosion Risks in Modern Latches
- Post-Installation Testing and Functional Verification
- When Recalls, Cable Seating, and Secondary Retention Change the Repair Plan
- Quick Reference for Verifying the Right Part Before Checkout
Why a Door Latch Is a Safety System, Not Just a Catch
A door latch assembly is a structural safety device before it is a convenience mechanism. The primary latch holds the door closed during normal driving, while the secondary latch provides backup retention. Together, they form part of the crash-retention path that helps keep occupants inside the vehicle.
That makes fitment and construction direct safety concerns. A replacement can look identical on the bench yet fail in service if its geometry, engagement depth, cable seating, or striker interface differs from the original. In practice, those mismatches can produce a door that needs a hard shove to close, feels weakly secured, or will not release cleanly after installation.
A cheap latch may also hide problems behind a familiar housing. Corroded microswitch contacts can affect door-ajar or lock-status signals, a poorly seated cable can prevent full release, and weak secondary retention can leave little margin when the primary engagement is incomplete. The replacement decision should therefore match the symptom to the component, rather than treating every failure as a broken handle.
Why the standard changed the way techs think
Rear closures entered the safety discussion for a clear reason. NHTSA extended FMVSS No. 206 latch, hinge, and lock requirements to back doors of passenger cars and multipurpose passenger vehicles in a final rule published on September 28, 1995, after reports connected 37 deaths and 98 injuries with Chrysler minivan rear-liftgate ejections (Los Angeles Times report on the rear-liftgate rule). That history still matters when diagnosing pickups, SUVs, vans, hatchbacks, and wagons.
Practical rule: if the door will not stay closed or will not release normally, inspect the retention system, cable routing, striker, and latch operation, not just the handle.
Judge every replacement against fit, retention, and release. The part's appearance is only a starting point. The surrounding hardware and its adjustment determine whether the assembly works as intended.
The Engineering Reference Frame Behind Every Latch Assembly
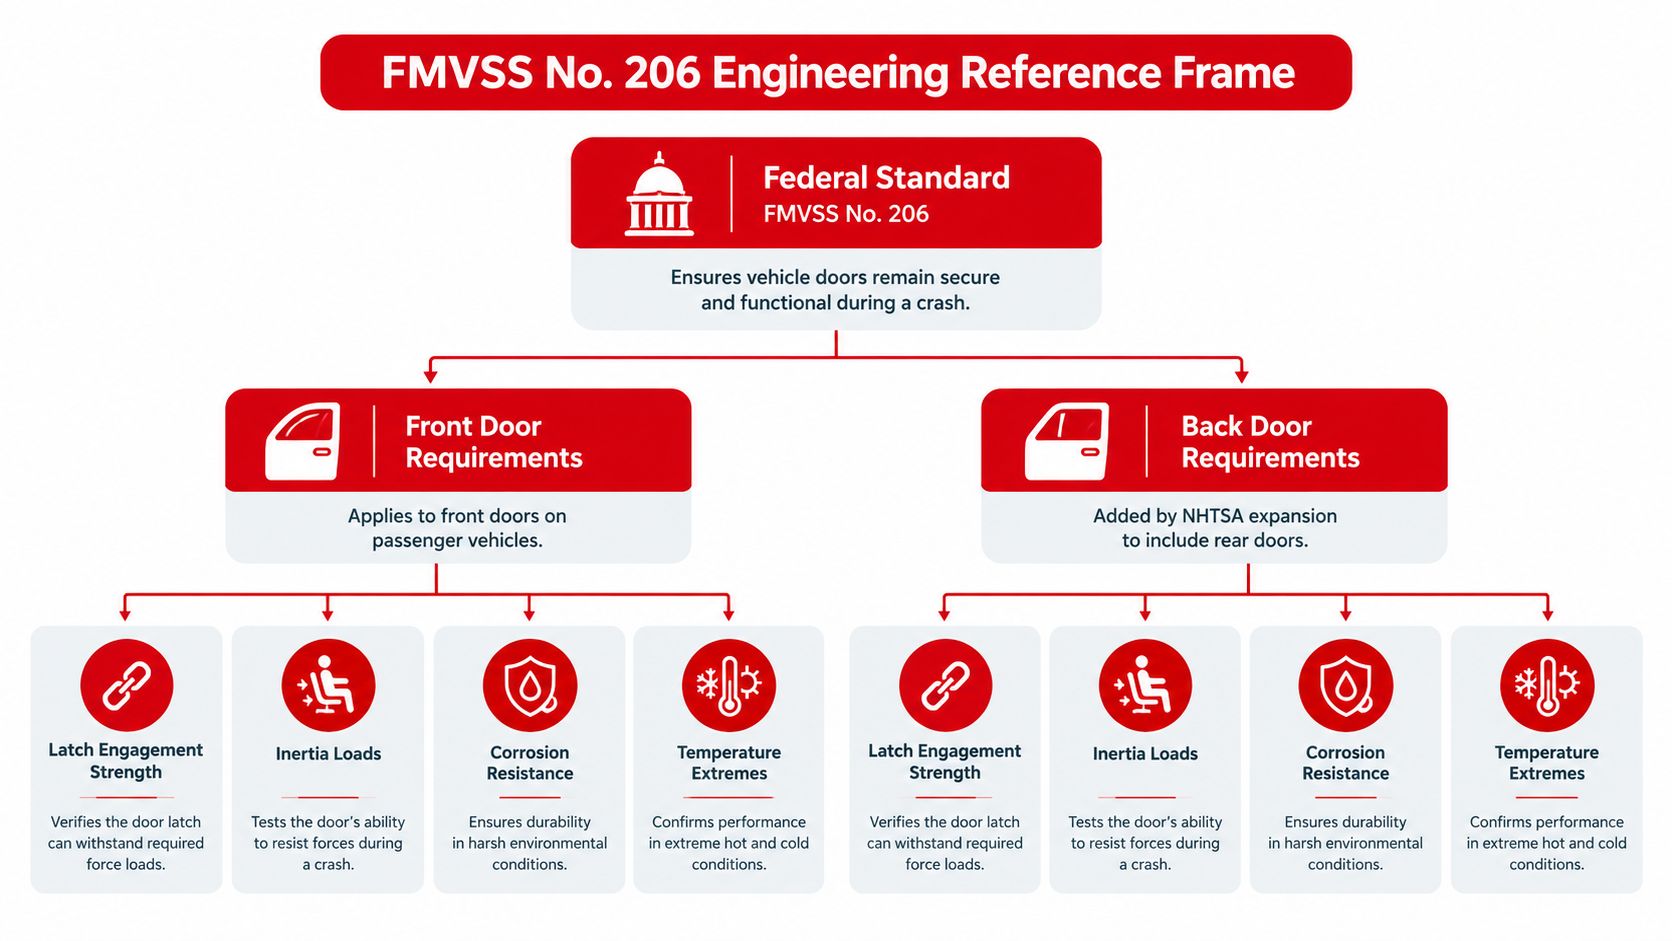
A replacement latch has to survive the same load paths as the original, not merely fit the door. NHTSA's interpretation separates loads by direction. A latch that survives one pull direction can still be unsuitable if the striker path, fork-bolt opening direction, or mounting geometry differs from the original design (NTEA explanation of FMVSS 206 load directions).
In the fully latched position, the latch and striker assembly must resist 11,000 N perpendicular to the latch face and 8,900 N parallel to the latch face in the direction of fork-bolt opening. The secondary latched position must resist 4,450 N perpendicular to the latch face. These requirements make the striker, fasteners, door structure, and attachment points part of the same retention system.
A loose striker or distorted door shell can defeat a correctly built latch. Check the complete load path before blaming the replacement part, especially when the door closes but feels loose or requires unusual force to seat.
One 2017 Mazda3 test illustrates the margin available in a properly engineered assembly. The fully latched mechanism withstood 13,910 newtons against an 11,000-newton requirement and was recorded as compliant under the NHTSA test procedure cited earlier. The result supports judging a latch by its engagement geometry and structural design, not by housing appearance alone.
Why rear doors changed the parts conversation
Once rear closures entered the standard, tailgates, liftgates, and rear doors became safety hardware rather than secondary convenience parts. That distinction matters on SUVs, vans, pickup truck tailgates, and hatchbacks, where release rods, child-lock features, and lock-state components may be integrated into the latch assembly.
Use the standard as an engineering reference when comparing parts. Confirm the original engagement points, release travel, and mounting geometry before ordering. For deeper technical reading useful during that comparison, the engineering-focused marketing resources at Machine Marketing provide a practical reference point.
Core Components of a Door Latch Assembly Explained
A complete door latch assembly is a cluster of working parts, not one part with a handle attached. If one element is worn, bent, corroded, or out of position, the door can still open and close in ways that look normal until the wrong moment.
The main mechanical parts
Latch body. This is the housing that holds the working geometry together. It typically carries the pawl, fork bolt, spring points, and release interfaces. When the body is distorted or cracked, alignment suffers and the whole assembly loses consistency.
Pawl or claw. This is the locking element that captures the striker. Wear here often shows up as poor retention, a weak closed feel, or a door that needs an extra push to seat fully.
Fork bolt. The fork-bolt geometry is part of what the test load acts on. If it's rounded, sticky, or contaminated, the latch can click but fail to fully engage.
Striker. The striker is mounted to the body or frame side and gives the latch something rigid to grab. A loose striker, wrong spacer stack, or crooked installation can mimic a bad latch even when the latch itself is still serviceable.
Return springs. Springs reset the pawl and release path. A tired or broken spring can create delayed release, a sticky handle, or a latch that doesn't re-arm correctly after opening.
The linkage and release path
Linkage rods or cables. These connect the handle or actuator to the latch. A detached rod clip or a cable that's not seated in the latch can leave the handle moving normally while nothing happens at the latch.
Clips and retainers. Small as they are, these pieces decide whether the linkage stays in the groove. Cheap replacements often fail here first because the clip shape or material stiffness is off.
Handle interface. The handle isn't the failure just because it feels loose. It only matters as part of the release path, which is why a handle replacement sometimes masks the actual problem.
A latch that feels fine by hand can still fail under load or when the door is shut against the striker.
The electrical pieces
Lock actuator and microswitches. On powered systems, the actuator moves the lock and the microswitch tells the vehicle what position the door is in. When those parts fail, the door may still latch mechanically while the vehicle's logic no longer knows what's happening.
That distinction matters when you're comparing assemblies, because a visually similar unit may omit a sensor, use a different connector, or have a different child-lock arrangement. If you want a visual breakdown alongside the parts list, the door latch assembly diagram is a useful companion reference.
OEM Versus Upgraded Metal Versus Replacement Plastic
Buying a latch by price alone is where people get burned. The body style, duty cycle, and material choice all affect how long the part holds alignment and how well it survives repeated slams, vibration, and temperature swings.
| Option | Typical Material | Warranty | Best Fit |
|---|---|---|---|
| OEM assembly | Factory-spec mix of metal and polymer | Varies by brand | Exact-match repairs where original fit and features matter most |
| Upgraded metal replacement | Reinforced metal hardware | Lifetime on metal components | High-use doors, pickups, fleet vehicles, and repeated-entry applications |
| Replacement plastic | Polymer-heavy construction | 3-year on standard items | Lower-wear applications where cost matters more than long-term rigidity |
Upgraded metal hardware earns its keep in places where the latch gets worked hard every day. Pickup trucks, work vans, and family SUVs with constant rear-door use put more stress on the pawl, striker interface, and release path than a lightly used commuter car does. Plastic-bodied units can function fine when new, but they're less forgiving when the door is heavy, the striker is slightly off, or the handle gets yanked hard.
Body shops and collision centers also pay attention to CAPA certification because it gives them another compatibility checkpoint when they're matching a replacement to a repair standard. For a shop, that matters less as a badge and more as a way to reduce rework, especially when the latch has to line up cleanly with surrounding trim and lock hardware.
For shoppers comparing options, the key question isn't just “Will it bolt in?” It's “Will it stay aligned, release consistently, and keep the door closed after real-world use?”
If you're weighing aftermarket choices against original equipment, the comparison at aftermarket parts vs OEM is worth reviewing before you order. In my experience, the right answer usually comes down to how hard the door is used, not just how the part is priced.
Symptom to Component Diagnostic Matrix
A lot of wasted money starts with a bad diagnosis. Owners blame the handle because that's the part they touch, but the actual fault is often in the latch body, the linkage, the striker, or the electronic feedback path.
Fast symptom matching
| Symptom | Likely component | What to inspect first |
|---|---|---|
| Door won't stay closed | Fork bolt, striker, pawl | Check engagement depth, striker alignment, and whether the latch fully re-arms |
| Clicking with no unlock | Actuator, connector, blocked release lever | Listen for movement at the latch, then check power and connector seating |
| Outside handle moves but door won't open | Cable, rod clip, release linkage | Inspect the handle-to-latch path for detachment or missed seating |
| Interior release inoperative | Cable, handle interface, child lock on rear doors | Verify the linkage at the latch and confirm child-lock status |
| Door rattles while driving | Striker alignment, partial engagement | Check if the door is sitting on the secondary catch instead of the primary latch |
If the handle moves and the door doesn't, don't jump straight to a full latch assembly. First verify whether the release force is reaching the latch. A disconnected rod clip can leave the handle feeling normal, which is why visible symptoms can mislead you.
Shop rule: test the latch with the door open before you condemn the part. If it won't cycle cleanly by hand, the problem is inside the latch or its linkage, not the sheet metal around it.
Mechanical, linkage, and electrical failures
Mechanical faults usually show up as worn engagement points, weak springs, or a striker that's out of position. Linkage faults are the common “looks fine but won't open” failures, especially when a cable isn't seated in the latch or a rod clip has popped off. Electrical faults are different, because the latch may still function mechanically while the actuator or microswitch no longer tells the vehicle what happened.
That's where a clean diagnostic saves money. If the door opens from one side but not the other, or if the lock cycles but the release is dead, the visible handle may be innocent. Replace the part that failed, not the part that was easiest to see.
Fitment Variables Beyond Year, Make, and Model
Year, make, and model get you close. They do not guarantee the right latch.
Front and rear positions can differ, and left and right sides aren't interchangeable on many vehicles. A hatchback, SUV, sedan, and pickup can all use a different latch body shape even when the outside handle looks similar. Powered locking and manual locking also change the connector, actuator, and internal release design.
What has to match
- Door position. Front, rear, liftgate, or tailgate hardware can differ in release travel and striker geometry.
- Side of vehicle. Left and right assemblies often mirror each other in ways that aren't obvious from a photo.
- Body style. Sedan, hatchback, SUV, van, and pickup applications can use different mounting points and trim clearance.
- Locking type. Manual systems, powered systems, and child-lock-equipped rear doors each change the part's internal layout.
- Connector shape and pin count. Electrically integrated assemblies can look similar and still be wrong at the plug.
- Integrated sensor or actuator. Some parts include door-open detection or lock actuation hardware that a plain latch doesn't have.
VIN verification is essential on late-model vehicles. A part number that fits one trim can miss by connector, child-lock feature, or sensing function on another trim built the same year. That's why a vehicle search is more reliable than guessing from a catalog thumbnail.
The practical check is simple. Match the VIN, confirm the door position, verify the side, and read the listing for powered versus manual operation before you buy. If the listing doesn't clearly state the integrated features, assume it may not match your original unit.
When you're comparing a replacement, don't stop at “it mounts the same.” A visually similar latch can still have a different release path, different sensor behavior, or different striker engagement depth. Those differences matter more than cosmetics once the door is shut.
Electronic Integration and Corrosion Risks in Modern Latches
A latch can work perfectly by hand and still be unsafe. That's the uncomfortable part a lot of casual repair guides skip, and it's why electronic checks belong in the diagnosis.
A 2026 Mercedes-Benz recall involved corrosion in a driver-door-lock microswitch that could prevent the vehicle from detecting an open door and stop the electronic parking brake or Auto-Park function from engaging automatically, creating a potential rollaway hazard (Mercedes-Benz recall notice). The door still latches and releases, but the vehicle's logic no longer knows the door state correctly.
What corrosion changes
Moisture intrusion can attack the microswitch, connector pins, springs, and cable interfaces inside or around the latch. Once that happens, symptoms can look mechanical even when the root cause is electrical. A sticky door in cold weather, an inconsistent lock indicator, or a dead door-open signal can all come from a corroded or compromised electronic path.
That's why surface lubrication isn't a cure-all. It can quiet a dry mechanism, but it won't restore failed sensing or replace oxidized contacts. If the vehicle uses lock-state data for park logic, warning logic, or central locking behavior, a scan-tool check or recall lookup needs to happen before the parts counter gets involved.
A proper inspection should include the connector, seal, and harness entry point, not just the latch body. If the connector is green, wet, loose, or heavily oxidized, the right fix may be electrical cleanup or replacement rather than a complete latch swap. For owners comparing repair paths, the guidance on corrosion prevention methods is useful before reinstalling any new hardware.
Post-Installation Testing and Functional Verification
A replacement latch earns its place only after a functional test. Check the complete system, including the latch, striker, release controls, and lock, rather than relying on visual alignment alone.
The driveway test sequence
- Cycle the latch by hand. With the door open, move the mechanism into the secondary and fully latched positions. Confirm that it releases cleanly without sticking.
- Watch the striker entry. Close the door gently. The striker should enter centrally without slamming, lifting, or pushing the door into position.
- Test both release paths. Operate the interior and exterior controls separately. Each should release the door through its intended cable or linkage path.
- Check the lock function. Confirm the lock reliably blocks the release when engaged.
- Apply controlled pull force. A hard slam can hide poor fitment. Pull carefully against the closed door to check that the latch and striker remain properly engaged.
- Verify rear-door child locks. On rear doors, test engagement and disengagement separately, then confirm the interior control behaves as intended.
The FMVSS No. 206 load directions covered earlier explain why a controlled pull, not a hard slam, is the meaningful check here. A driveway test will not reproduce laboratory loading, but it can expose poor engagement, misalignment, excess movement, and release problems before the vehicle returns to service.
Cable seating deserves a close look during this process. If an exterior handle has excessive travel while the interior handle works normally, inspect the cable end and its retainer. If either control feels rough or fails to release the latch, stop testing and correct the mechanical connection rather than forcing the handle.
If the door sticks, needs extra force, or closes only when pushed a certain way, stop and correct the alignment before driving.
This short check prevents comeback work. It also confirms that the replacement matches the original operating system, rather than merely resembling the old part in the box.
When Recalls, Cable Seating, and Secondary Retention Change the Repair Plan
Not every latch problem is a worn latch body. Some failures are about the cable, the retainer, or a recall condition that makes replacement the wrong first move.
A 2025 Volvo truck recall involved an interior-handle cable that was not properly seated in the latch, preventing occupants from exiting, while a 2025 Grand Design RV recall involved a failed retainer and secondary retention issue rather than a conventional latch-body defect (Volvo and Grand Design recall report). That distinction matters because the visible handle or latch cover may not be the part that failed.
How to decide what gets replaced first
If the door won't open from one handle but works from another, inspect the cable seating before ordering a full assembly. If the door won't stay closed, check the striker, retainer, and engagement points before blaming the latch shell. If the failure appears in a vehicle with an active recall, the recall path should take priority over aftermarket replacement.
The cheapest repair is the one that fixes the actual component. Replacing only the visible handle can leave the cable still detached, the retainer still weak, or the secondary retention issue still unresolved. That's how repeat repairs happen.
A recall lookup by VIN is worth doing any time the failure involves release, retention, or egress. Once you know whether the issue is mechanical wear or a known defect pattern, the parts order becomes much more precise.
Quick Reference for Verifying the Right Part Before Checkout
Start with the VIN, then confirm the door position, side, and locking style. If the vehicle has powered locking, a sensor, child-lock hardware, or an integrated actuator, make sure the replacement lists those features explicitly.
Use this quick check before you buy:
- VIN match. Confirm the part is built for your exact vehicle configuration.
- Door and side. Front or rear, left or right, liftgate or tailgate.
- Connector and function. Powered, manual, sensor-equipped, or actuator-integrated.
- Material and warranty. Metal hardware for higher-cycle use, standard replacement when the duty cycle is lighter.
- Return path. Make sure the seller's fitment support and return window are clear.
T1A Auto offers vehicle-specific door latch assemblies and related hardware with fitment tools that help narrow the correct part before checkout. If the listing doesn't clearly match your vehicle's door position and locking setup, don't guess.
If you need a direct replacement path for a worn or misfit latch, use a vehicle-specific search and compare the part against your VIN before ordering. T1A Auto carries latch assemblies and related hardware built for fitment-focused replacement, which is the cleanest way to avoid a wrong-side, wrong-feature, or wrong-connector mistake.
