


You pull the front door of your pickup, hear the latch click, and feel it fail to catch. On the first bump, the door pops back against the safety catch, or worse, swings open far enough to get your attention immediately. A similar problem shows up on daily drivers as a handle that suddenly feels loose, a power lock that makes noise without releasing anything, or a door that closes only when you lift it.
Exterior door latch replacement is often treated as a straightforward parts swap. In practice, it's a diagnosis-first repair. The latch may be worn, but the same no-close or no-open symptom can come from a shifted striker, disconnected handle linkage, failed actuator, or corrosion inside the mechanism. Replace the wrong part and you'll still have the same unsafe door.
Table of Contents
- Why Your Door Won't Latch and What You're About to Fix
- Tools, Parts, and a Safe Workspace Before You Start
- Diagnosing the Real Problem Before You Replace Anything
- Removing the Old Latch Step by Step
- Installing the New Latch and Testing the Door
- Compatibility Upgrades and Warranty Considerations
- Exterior Door Latch Replacement Questions Answered
Why Your Door Won't Latch and What You're About to Fix
The exterior latch is the mechanism that captures the striker, the fixed post mounted to the vehicle body. When the door shuts, a rotating pawl inside the latch grabs that striker and holds the door against the body. The interior handle, exterior handle or key cylinder, and power-lock actuator each operate levers connected to that mechanism.
A typical late-model assembly may combine glass-filled nylon, zinc die-cast components, and stamped steel. Those materials keep the unit compact and light, but the pawl, return springs, pivot points, and plastic levers still take repeated impacts, moisture, dust, and cable or rod tension. A weak spring can create an intermittent problem. A worn pawl may catch sometimes and release when the body flexes or the door hits a bump.
Safety rule: A door that doesn't reliably engage the striker isn't ready for normal road use. Secure it only long enough to move the vehicle to a safe repair location.
The scale of the vehicle parc explains why replacement parts are common. One market analysis estimates that about 82 million vehicles are produced annually worldwide, with each vehicle typically using 4–5 latches across door, hood, and trunk or tailgate assemblies. The same analysis places automotive applications at 68.5% of the global side door latch market in 2025, representing roughly $2.08 billion, while the aftermarket accounts for 12–15% of latch demand across a global vehicle parc of more than 1.2 billion vehicles. Those figures come from global side door latch market analysis, not from a guarantee that a particular vehicle's latch will fail.
What the latch is doing when it fails
A latch can fail in several distinct ways:
- It won't capture the striker. The pawl may be worn, stuck, or prevented from resetting.
- It captures but won't release. A seized pivot or failed release lever can trap the door.
- The handle moves with no resistance. A rod clip or cable may have separated.
- The lock changes state but the handle does nothing. The actuator or linkage may be the issue.
- The door needs to be lifted or pushed sideways. Striker alignment or hinge sag may be loading the latch.
The job ahead is therefore two jobs in sequence. First, identify whether the latch itself fails under direct mechanical input. Then, if it does, replace the assembly without disturbing alignment, linkage routing, or electrical connectors. The sections below follow the order I'd use in a shop bay, starting with a controlled diagnosis instead of a blind parts order.
Tools, Parts, and a Safe Workspace Before You Start
Stage the bay before removing the first trim clip. You'll need a trim clip and fork remover, a short Phillips #2 screwdriver, T20 and T25 Torx drivers, a 10 mm and 13 mm socket on a small ratchet, a flat-blade screwdriver for lifting gasket edges, and a flashlight or small headlamp. A magnetic tray matters more than people expect. Door hardware has a habit of disappearing into carpet, drain openings, and the gap beneath the seat.
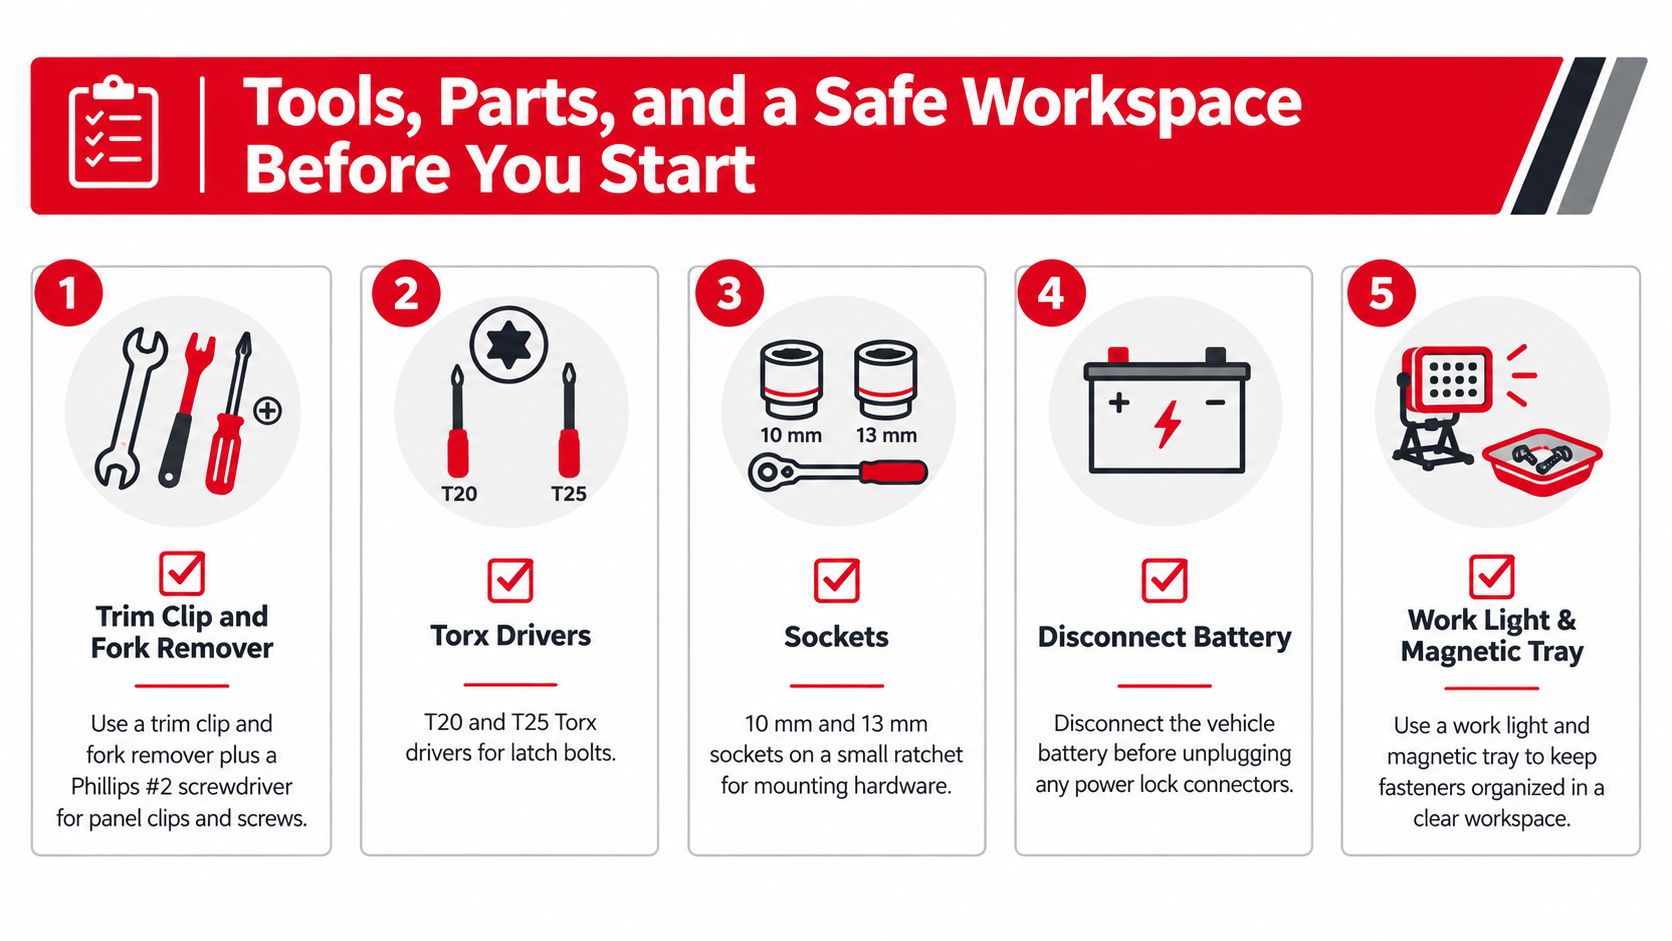
Order the latch by the exact OEM part number, not just by year, make, and model. Confirm the door position, cab configuration, manual or power locking, handle type, and any integrated electrical connector. Add new handle-to-latch rod clips, dielectric grease for the connector, and a striker shim if the door has sagged. A shim isn't a cure for a damaged hinge or bent body structure, but it can restore engagement when the striker has moved slightly.
Set up the vehicle before disconnecting anything
Park on level ground and chock the opposite wheel. Open the window if access allows, because it gives you another way to reach the vehicle if the lock or handle becomes unavailable during the repair. Apply painter's tape along the door edge and adjacent fender area to protect the paint while the panel and latch move through the opening.
Disconnect the battery before unplugging a power-lock or keyless-entry harness. Follow the vehicle maker's specified wait time for capacitor discharge, especially if the door contains an airbag-related connector or other restraint wiring. Pull the power-lock fuse only when the service information identifies it correctly, and treat the fuse as an added precaution rather than a substitute for proper battery isolation.
Wear safety glasses when removing clips and gloves when reaching into the inner door shell. Keep the moisture barrier intact, work in good light, and photograph rod routing before you touch it. The door latch replacement parts guide is also useful when comparing the assembly, clips, and related hardware before ordering.
Diagnosing the Real Problem Before You Replace Anything
Start with the door open. Rotate the latch pawl into the closed position with a screwdriver, then operate the interior handle, exterior handle, and key cylinder separately. The pawl should release smoothly and reset completely each time. If direct mechanical input won't move it, the latch is a strong suspect. If the pawl works but a handle doesn't, stay focused on the rod, cable, clip, or handle.
That screwdriver test is more useful than repeatedly slamming the door. Diagnostic guidance recommends simulating striker engagement and observing whether the latch resets smoothly. If it does, the cause may be striker alignment, corrosion, or a disconnected linkage rather than the latch body itself. A guide to fixing a stuck door latch can help when the pawl is stuck in a partially engaged position.
Separate the four common failure points
Inspect the striker before removing the door panel. Look for a worn chamfer, a bent post, loose mounting hardware, and paint rub around the contact area. If the door closes only when you lift it, push it inward, or pull it outward, suspect hinge sag or striker position before condemning the latch.
For a power-lock door, press the lock switch while listening at the door. A motor sound with no lock movement points toward a linkage or actuator problem. Silence can indicate the actuator, wiring, fuse, switch, or control circuit. A latch can be mechanically healthy while its powered release function remains inoperative.
Once the panel is off, check every connecting rod. Look for stretched retainer clips, bent rod ends, separated joints, and a rod that has popped off its latch stud. A freely moving handle with no corresponding movement at the latch is usually a linkage problem, not an internal latch failure.
| Symptom | Likely Cause | Confirm By |
|---|---|---|
| Door won't catch the striker | Worn or jammed latch, or severe misalignment | Test the pawl directly with a screwdriver and inspect striker contact |
| Door closes only when lifted or pushed | Striker shift, hinge sag, or body alignment | Check paint rub and engagement with the door held in its normal position |
| Handle moves freely | Disconnected rod, cable, or retainer clip | Watch the linkage while operating the handle |
| Power lock is silent | Actuator, fuse, harness, switch, or control issue | Check power and listen for actuator operation |
| Latch binds after lubrication | Internal wear or damaged pivot | Clean and retest, then replace if binding returns |
| Door opens from one control but not another | Specific handle, cylinder, or linkage fault | Test each release input independently |
Common shop patterns include broken return springs on older trucks, cracked plastic levers on many 2010s crossovers, and corroded pivots on vehicles exposed to road salt. Dust, moisture, and repeated slam cycles also make false latch diagnoses common on work trucks and fleet vehicles. Use the door latch assembly diagram to identify the release levers and rod connections before deciding which part has failed.
Replace the latch only when the mechanism fails under direct mechanical input, not merely because the door feels difficult to close.
Removing the Old Latch Step by Step
Disconnect the battery first on any vehicle with power locks or keyless entry. Give the vehicle the manufacturer-specified drain time, then make sure the window is positioned where it won't interfere with your hands or the panel. Keep the door supported and avoid leaning your weight against the trim.
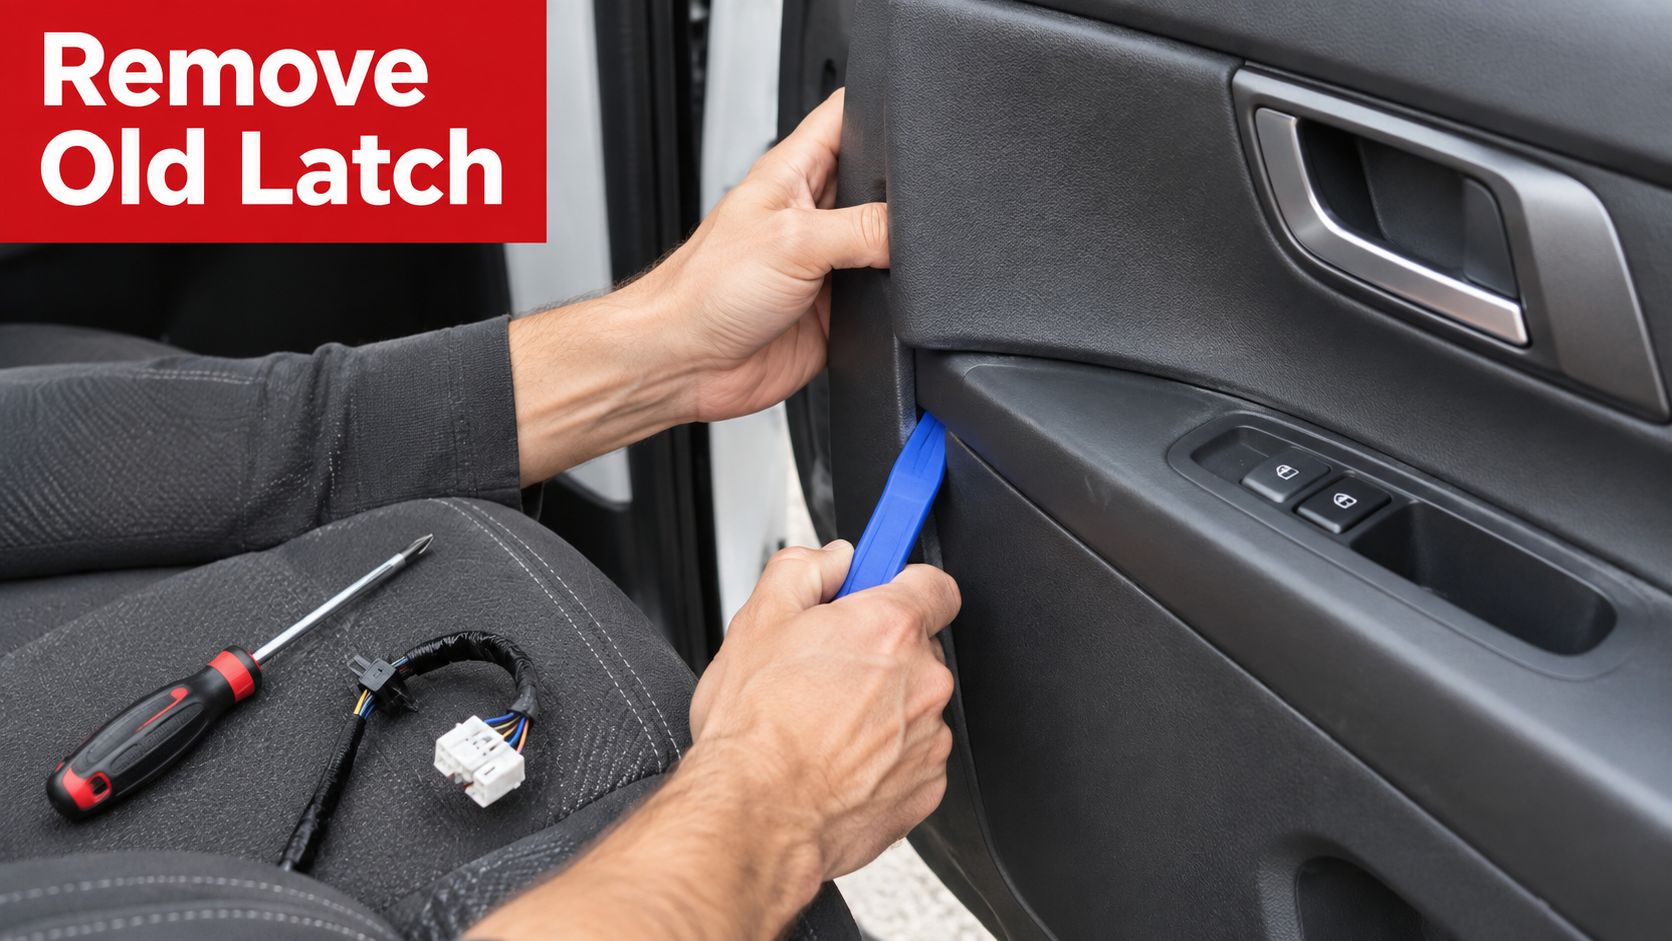
Remove the interior handle bezel, armrest screws, switch panel, and visible fasteners according to the vehicle's layout. Use the fork remover close to each clip and pry straight outward. Yanking the panel from one corner bends the board, tears retainers, and can leave clips inside the door. Disconnect the window and lock switches as you gain access, then place every screw and clip in the magnetic tray.
Preserve the linkage routing
Before disconnecting a rod, photograph both ends and mark its orientation with painter's tape. Door latches often use several rods that look similar but have different bends, retainers, and attachment points. Release the plastic clips by rotating or lifting them as designed. Don't pry against a thin rod until the clip itself is free.
Peel the moisture barrier back carefully rather than tearing it. The adhesive can usually be separated around the access area and pressed back into place later. Locate the latch behind the rods and note which guide channels keep the rods away from the window regulator and glass.
The latch mounting bolts are commonly hidden behind the linkage and moisture barrier. Remove the applicable Torx or socket fasteners while supporting the assembly through the access opening. Thread each fastener into the tray as it comes out, and don't let one fall into the lower door cavity where it can rattle or block a drain.
With the bolts removed, rotate the old latch through the access hole. Work it around the rods and the window channel without forcing the stamped door shell. If it refuses to move, stop and look for a missed connector, hidden bracket, or retained rod. Forcing the assembly can bend a mounting tab or damage the glass.
Inspect what stays on the vehicle
Compare the old unit with the replacement before discarding anything. Examine the striker for a groove or sharp wear pattern, the door shell for bent mounting tabs, and the rod retainers for cracks. Check the lower door for standing water or heavy corrosion, since moisture can explain a rusty pivot and may damage the replacement if the underlying leak remains.
The following video provides a visual reference for the trim and latch access process. Vehicle layouts differ, so use it to understand the physical sequence rather than as a substitute for the service information for your vehicle.
Don't reuse a visibly damaged rod clip just because it still grips the stud. A clip that releases during the first hard pull can leave the door handle disconnected again. Replacement clips are inexpensive compared with repeating the panel removal.
Installing the New Latch and Testing the Door
Hold the new assembly next to the old one before putting it into the door. Confirm the mounting holes, rod attachment points, spring orientation, connector position, and overall shape match. A latch can look nearly identical while having a different release lever or lock configuration for the opposite door.
Feed the replacement through the access opening and seat it against the door shell. Start every mounting bolt by hand. Thin sheet metal can cross-thread easily, and a ratchet can hide the problem until the threads are damaged. Once the bolts are engaged, tighten them evenly according to the vehicle's service information rather than guessing at force.
Reconnect every control before closing the door
Install the rods in the same orientation recorded during removal. Each C-clip or plastic bushing retainer should close fully, and you should feel a definite snap or positive lock. Pull each rod lightly after installation. It should stay attached while still moving the intended lever through its full travel.
Reconnect the electrical connector and check that the harness is routed away from the glass and regulator. Apply dielectric grease only where appropriate for the connector seal and terminal environment. Don't pack grease into a mechanical latch unless the replacement instructions specify the lubricant, because excess material can collect grit.
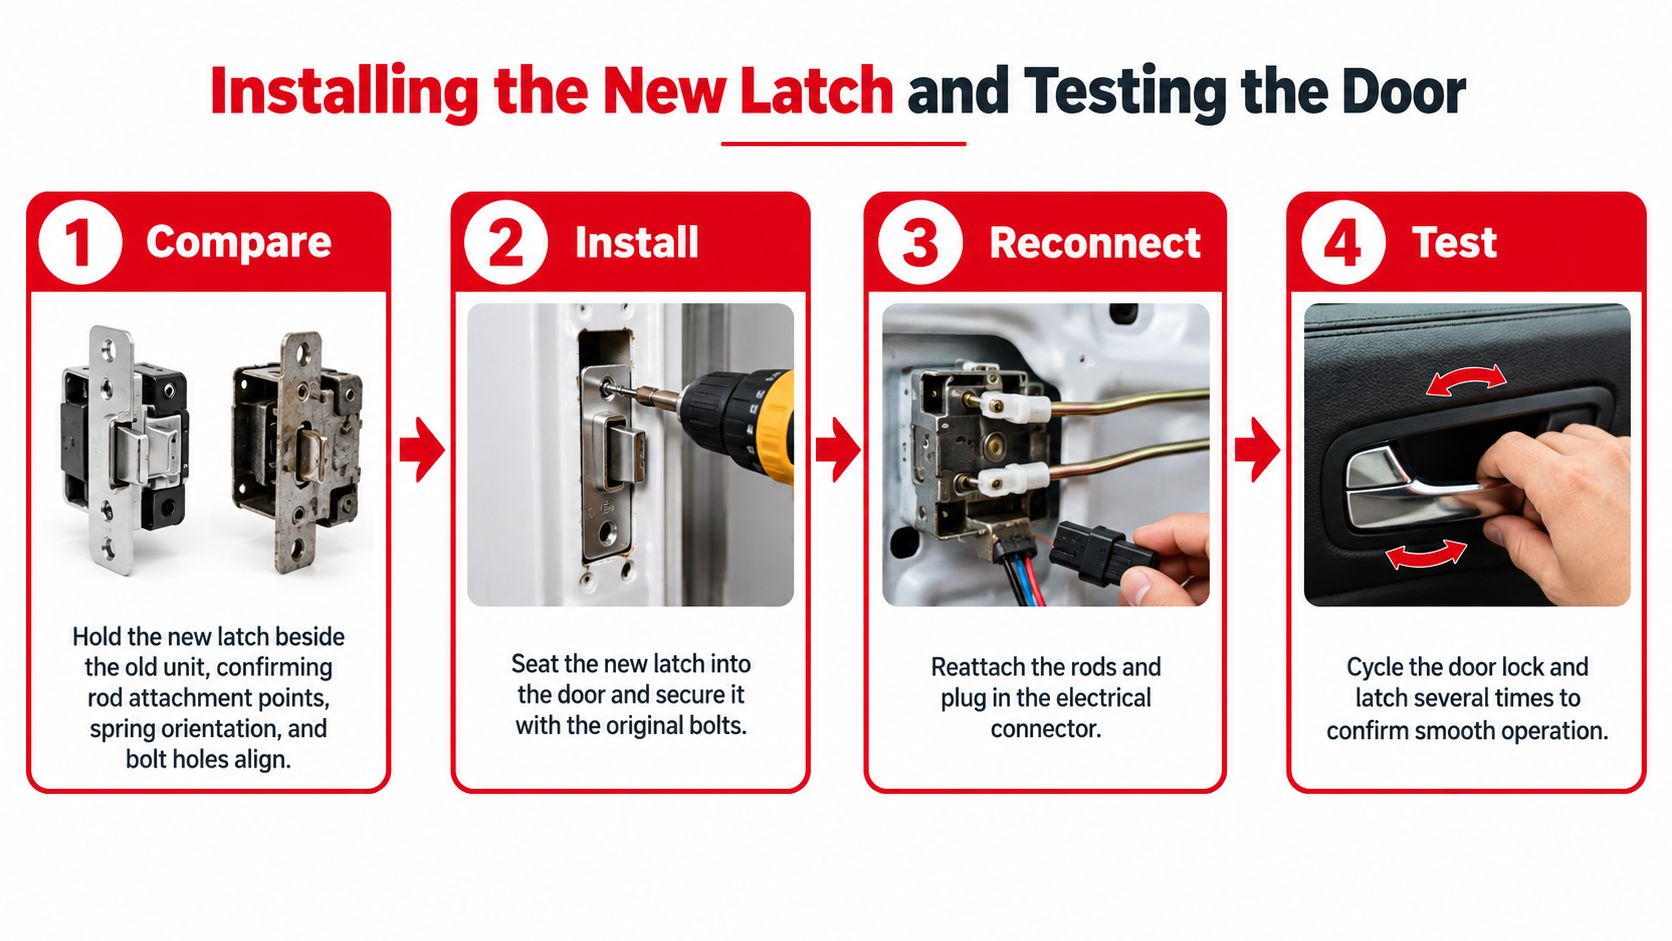
Reconnect the battery before reinstalling the moisture barrier and panel. With the door still open, test the interior handle, exterior handle, key cylinder or paddle, and power-lock switch. Move each control separately and watch the latch respond. If one function fails now, fix it before hiding the mechanism behind trim.
Close the door gently onto the striker. You want a firm, complete engagement, not a loose rattle or a latch that needs a second slam. If it feels stiff, stop and inspect the striker position, door sag, and rod routing. A new latch won't correct a door that arrives at the striker from the wrong angle.
Test repetition, not just one successful close
Cycle the latch and door twenty times before calling the repair complete. Test with the interior handle, exterior handle, lock switch, and key or mechanical release. Watch for a handle that doesn't return, a lock button that stops short, a rattle inside the door, or a latch that catches only after pressure is applied.
Only after those tests pass should you reinstall the moisture barrier and door panel. Confirm every clip is seated, reconnect the switches, and operate the window through its travel while listening for interference. Finish with another series of gentle closes and verify that the door remains latched when you pull against it by hand.
Compatibility Upgrades and Warranty Considerations
Once diagnosis points to the latch rather than the striker, linkage, or power-lock circuit, confirm compatibility before ordering a replacement. Start with the exact OEM part number, then verify door position, cab configuration, manual or power locking, child-safety-lock layout, power-release features, and the electrical connector. Late-model vehicles can share a latch housing while using different internal electronics, so a part that bolts in may still trigger a lock or alarm fault.
For newer vehicles, ask whether the replacement applies to the specific model year and whether the supplier provides documentation for retention performance and certification status. Updated U.S. latch-retention requirements took effect for newly certified vehicles in 2026, which raises the standard expected of OEM-equivalent replacement parts. The 2026 latch safety and compliance guidance explains why physical fitment alone does not settle the question.
Compare durability and documentation
An upgraded metal latch can address wear in a plastic pawl, lever, or internal support. Material alone does not make the part a sound choice. It must maintain the original geometry, release travel, striker engagement, and electrical functions. See the OEM vs aftermarket parts guide for a closer comparison of fitment and warranty trade-offs.
| Feature | OEM Plastic Latch | Aftermarket Metal Latch |
|---|---|---|
| Fitment basis | Vehicle-specific OEM design and part number | Supplier application and cross-reference |
| Internal construction | Molded plastic components with metal hardware may be used | Cast or stamped metal may reinforce high-wear areas |
| Main advantage | Factory integration and original configuration | Potentially stronger wear resistance in upgraded areas |
| Main risk | Plastic wear, spring fatigue, or corrosion over time | Incorrect application or unsupported compliance claims |
| Purchase check | Match the VIN and factory part number | Match the part number, model year, functions, and warranty terms |
Keep the receipt, packaging, part number, and failed latch. A warranty provider may inspect the returned unit, and labor reimbursement is not automatic. Read the coverage before installation, including defect coverage, return conditions, shipping responsibility, and labor terms.
Choose an OEM unit when factory integration or documented certification takes priority. An upgraded metal replacement can make sense when its fitment, functions, and compliance documentation match the vehicle and the supplier supports the warranty in writing. Stop if the seller cannot substantiate those points. A stronger material claim does not compensate for incorrect engagement, missing electronics, or an unsupported safety requirement.
Exterior Door Latch Replacement Questions Answered
Can I drive with a faulty door latch?
Don't drive normally if the door won't engage the striker consistently, opens on a bump, or remains held only by a secondary catch. Secure the vehicle and move it only as necessary to a safe repair location, or arrange transport. A latch problem is a retention problem, not merely an irritating noise.
How long will the job take?
A first-time DIYer should allow a generous work window because panel clips, hidden fasteners, and unfamiliar rod retainers slow the job. A truck may provide more access than a compact car in one area and less in another, particularly around a large door shell, power equipment, or weather sealing. The diagnosis often takes longer than the actual bolt removal, and rushing that diagnosis is what creates repeat repairs.
What does professional service cost?
The final bill depends on access, vehicle design, part choice, and whether the shop finds a striker or linkage issue instead of a failed latch. As a benchmark, one industry report places door-latch replacement labor at $200–$400 per vehicle in service centers. That estimate is cited in aftermarket door latch replacement data, and it doesn't establish the total price for every repair.
Will an aftermarket metal latch work on a 2026 vehicle?
It can, but metal construction alone doesn't prove compatibility. Confirm the exact model year, door position, connector, lock and alarm functions, retention performance, and supplier documentation. For a vehicle covered by newer U.S. requirements, choose a replacement with support for the applicable certification and retention standard rather than relying on a visual match.
Why did the replacement fail when the latch is new?
A failed replacement often points back to a disconnected rod, a bad actuator, an incorrectly routed harness, or a striker that still loads the mechanism. If the latch works normally with the door open but binds when closed, alignment remains the first place to look. A stiff new latch may also need striker adjustment, but don't file or force parts until you know the door and striker are correctly positioned.
How long does an aftermarket warranty last?
Warranty length depends on the supplier and product category. Some parts carry coverage for manufacturing defects only, while others include longer limited coverage. Read the actual terms before purchase, and retain the failed unit and receipt until the coverage period has ended.
For exterior door latch replacement, T1A Auto offers vehicle-matched latch assemblies and related exterior hardware, including upgraded metal components backed by a lifetime warranty on metal parts and a 3-year warranty on standard items. Check the fitment details and warranty terms for your vehicle, then visit T1A Auto to choose the correct replacement before you open the door panel.
