


A loose Tundra tailgate handle usually gives you warning before it quits. The lever feels floppy, the latch releases only when you pull at an angle, or the key turns while the tailgate stays shut. Many owners order the first replacement handle they find, only to discover that a seized latch rod, broken clip, damaged lock cylinder, or camera connector caused the original problem.
A proper Tundra tailgate handle replacement treats the handle as one part of a larger system. You'll identify the failure, select the correct configuration, release the rods without breaking their clips, transfer the lock cylinder when necessary, and test the latch and camera before closing everything up.
Table of Contents
- Why Tundra Tailgate Handles Fail and What to Look For First
- Tools, Parts, and Fasteners You Will Need
- Choosing the Right Replacement Handle for Your Tundra
- Step-by-Step Removal and Installation
- Handling Camera Wiring and Lock Cylinder Transfer
- Preventing Repeat Failures After the Swap
- Troubleshooting, Warranty, and Final Checklist
Why Tundra Tailgate Handles Fail and What to Look For First
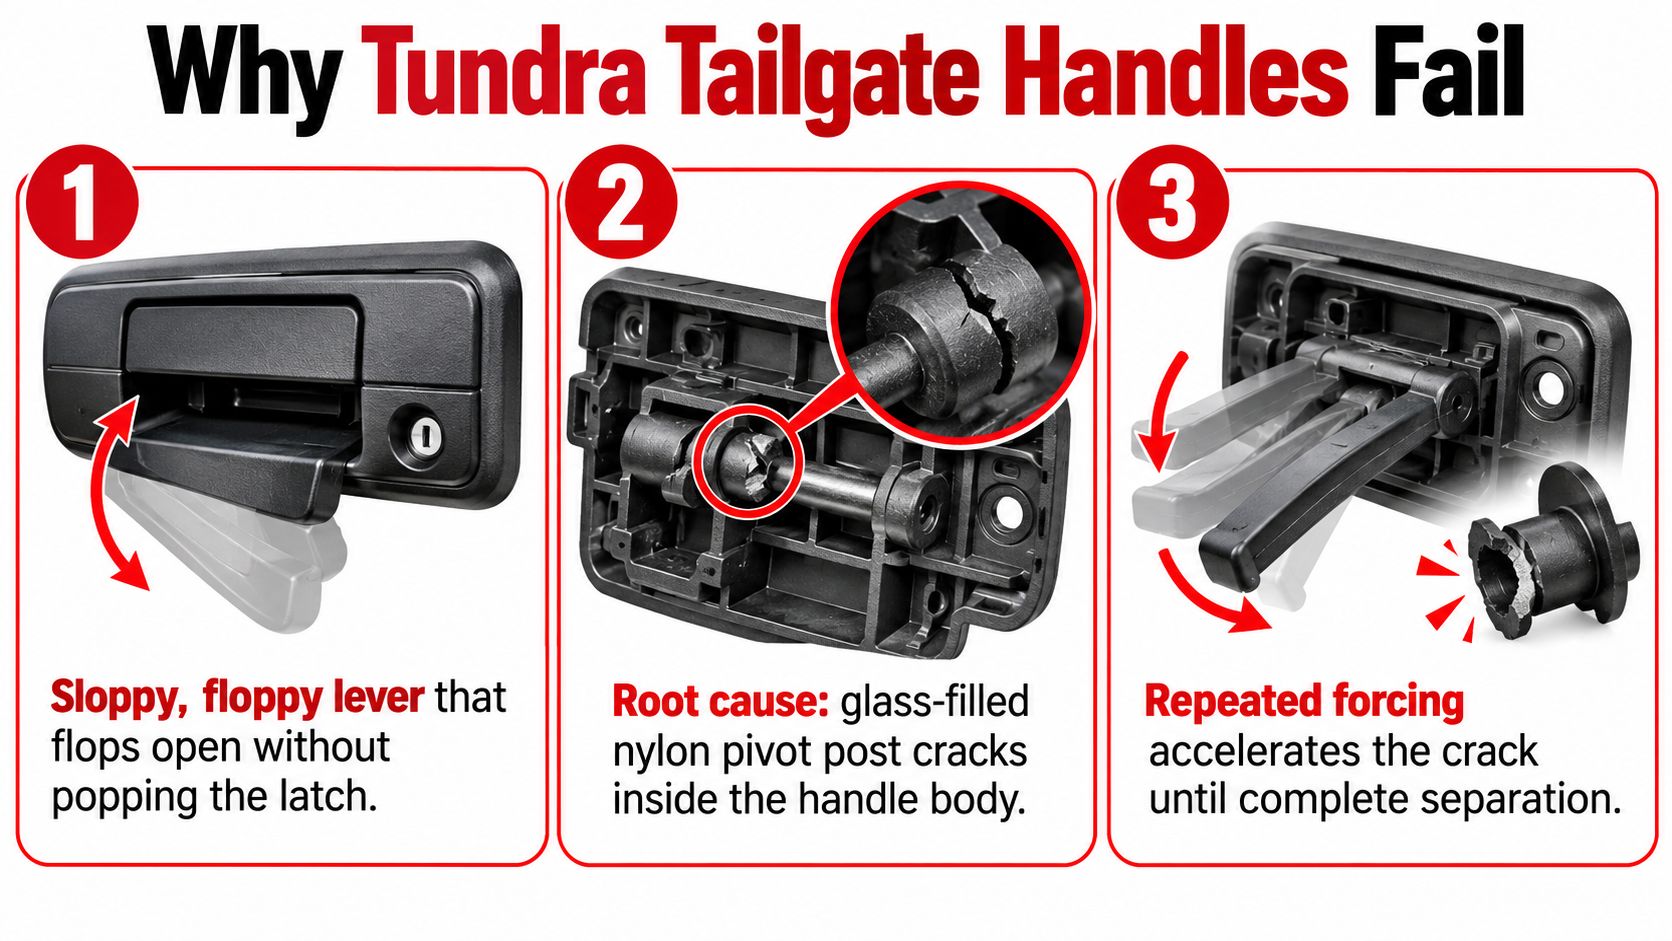
The usual scene is familiar. You grab the handle, feel far too much sideways movement, and pull harder. The lever moves, but the tailgate doesn't release. On the next attempt, the handle separates completely, leaving you wondering whether the handle, the latch, or the linkage failed first.
A broken internal pivot is a common explanation. The handle may still look intact from outside while its internal mounting point no longer transfers force to the latch mechanism. The handle then becomes the visible symptom, while the rods, clips, latch, and lock cylinder remain hidden behind the inner panel.
Diagnose the release paths
Test the tailgate through each available release method before buying parts. Try the exterior handle, the key cylinder, and the interior linkage if your truck has one. Record exactly what happens:
- Handle moves with little resistance: The handle pivot, rod connection, or retaining clip may be broken.
- Handle feels normal but the latch stays closed: Look for a disconnected rod, seized latch, or binding cable.
- Key turns but doesn't release the gate: The lock cylinder may no longer engage the release mechanism.
- One side releases and the other stays fixed: A rod may have slipped out of its clip, or one latch may be corroded.
- The handle is difficult to pull: Don't force it until you inspect the latch and linkage.
Toyota Tundra tailgate handles have broad parts coverage across several generations. OEM and direct-fit listings document applications for 2000–2006, 2007–2013, 2014, and later trucks through at least 2020, while the 2007–2013 replacement is identified in a repair guide as part number 69090-0C051. Earlier OEM catalog listings include 69090-0C010 and 69090-0C030. That range is why year, body configuration, lock provision, and camera provision matter before ordering. See the Toyota Tundra tailgate handle parts coverage before relying on a generic photograph.
Inspect what the handle is pulling
Open the inner access area and look at the rod ends, plastic clips, latch pivots, and cable interfaces. Dirt, dried lubricant, and corrosion can stop the latch pawl from moving even when the replacement handle is perfect. The Tundra tailgate handle repair guide+Tailgate+Handle+Replacement/132713) specifically emphasizes checking the rods, clips, and bellcrank instead of assuming the complete assembly is at fault.
Practical rule: If the new handle still requires excessive force, stop pulling. A new handle won't survive a latch that's binding.
Tools, Parts, and Fasteners You Will Need
Lay out the tools before removing the first panel. The job is straightforward when the right Torx bit, pliers, light, and replacement clips are within reach. It becomes frustrating when a rod clip drops inside the tailgate and you're trying to retrieve it with a screwdriver.
For second-generation trucks, the documented sequence uses Torx T25 screws on the inside tailgate panel, followed by the handle retaining fasteners. One practical repair guide identifies 23.2 mm Torx-head screws and 18.5 mm handle bolts as the key fasteners for that procedure. Fastener details can vary by generation and replacement assembly, so compare the truck and the supplied hardware rather than forcing a mismatched bit. A general fastener specification reference can help when you're sorting original and replacement hardware.
| Item | Specification | Qty |
|---|---|---|
| Torx driver | T25 for the documented inner panel procedure | As required |
| Socket and extension | Sized to the handle retaining bolts | As required |
| Trim tool | Plastic pry tool for the inner panel | 1 |
| Needle-nose pliers | For rod clips and linkage removal | 1 pair |
| Inspection light | Flashlight or work light | 1 |
| Parts tray | Magnetic or covered tray | 1 |
| Replacement clips | Match the original linkage clips | As needed |
| Handle gasket | Correct shape for the replacement handle | 1 if damaged |
| Painter's tape | Mark rod positions before removal | 1 roll |
| Grease | Suitable lubricant for latch pivots and rods | As required |
| Dielectric grease | For inspecting and protecting camera connector contacts | As required |
Prepare for the failure points
Use a plastic trim tool instead of a metal screwdriver against painted or textured surfaces. Keep one hand near each rod clip as you release it, because the clips can spring away when they're under tension. Tape each rod or photograph its position before disconnecting it. That small step prevents a surprisingly common reassembly mistake.
A magnetic tray is more useful than a pocket. It keeps the panel screws separate from the handle bolts and makes it obvious when a fastener is missing. If you're adding powered assistance to the job, review this automotive power tools guide from Value Tools Co, but use powered tools cautiously around small Torx heads and painted tailgate hardware. Hand tools give better control during final tightening.
Choosing the Right Replacement Handle for Your Tundra
The correct handle is defined by more than the truck's badge. Match the model year and generation, then confirm whether the tailgate has a key cylinder, factory backup camera, and the correct latch or lock interface. A handle that looks identical in an online photograph can have a different mounting arrangement or camera opening.
For 2007–2013 Tundras, the documented replacement sequence uses a handle identified as part number 69090-0C051 in one practical repair guide. Earlier trucks use different catalog references, including 69090-0C010 and 69090-0C030, as shown in OEM parts listings. Treat those references as fitment clues, not permission to order by number alone. Verify the vehicle details and compare the connector, mounting points, gasket profile, and lock-cylinder opening.
Plastic, aftermarket, and metal choices
Factory-style plastic handles usually offer the most familiar appearance and a straightforward fit. Their weakness is that the internal pivot or mounting structure can fail after years of use, especially when the latch becomes difficult to move. A replacement with the same construction restores operation, but it doesn't remove that vulnerability.
Aftermarket plastic handles can be a sensible repair when the original appearance matters and the surrounding latch is clean. Fit and surface texture vary, so inspect the bezel and gasket before final installation. A low-cost handle that sits crooked or leaves the gasket compressed unevenly can admit water and create new problems.
Metal replacement handles address the common snap-at-the-pivot failure mode, but they aren't automatically perfect. Some have thicker bezels, different surface finishes, or less forgiving alignment around the tailgate skin. The mounting surface must be flat, and the supplied gasket must seat evenly.
| Handle Type | Material | Price Range | Warranty | Key Considerations |
|---|---|---|---|---|
| OEM-style replacement | Factory-style plastic | Varies by seller and configuration | Confirm with seller | Familiar fit, finish, and vehicle-specific options |
| Direct-fit aftermarket | Plastic or composite | Varies by brand and configuration | Confirm written terms | Check clips, gasket, lock opening, and camera provision |
| Upgraded replacement | Metal construction | Varies by construction and seller | Confirm written terms | Stronger pivot area, but verify bezel thickness and alignment |
| Camera-equipped assembly | Plastic or metal, with camera provision | Varies by configuration | Confirm written terms | Must match the camera opening, connector, and vehicle display |
For a broader comparison of replacement-handle construction and fitment, see this guide to aftermarket auto door handles. The same buying discipline applies here: the cheapest visible match isn't necessarily the correct assembly.
Step-by-Step Removal and Installation
Work with the tailgate fully open and supported securely. Keep fingers clear of the latch path, and don't let the gate hang from a partially released cable or linkage while you're working.
Remove the inner panel
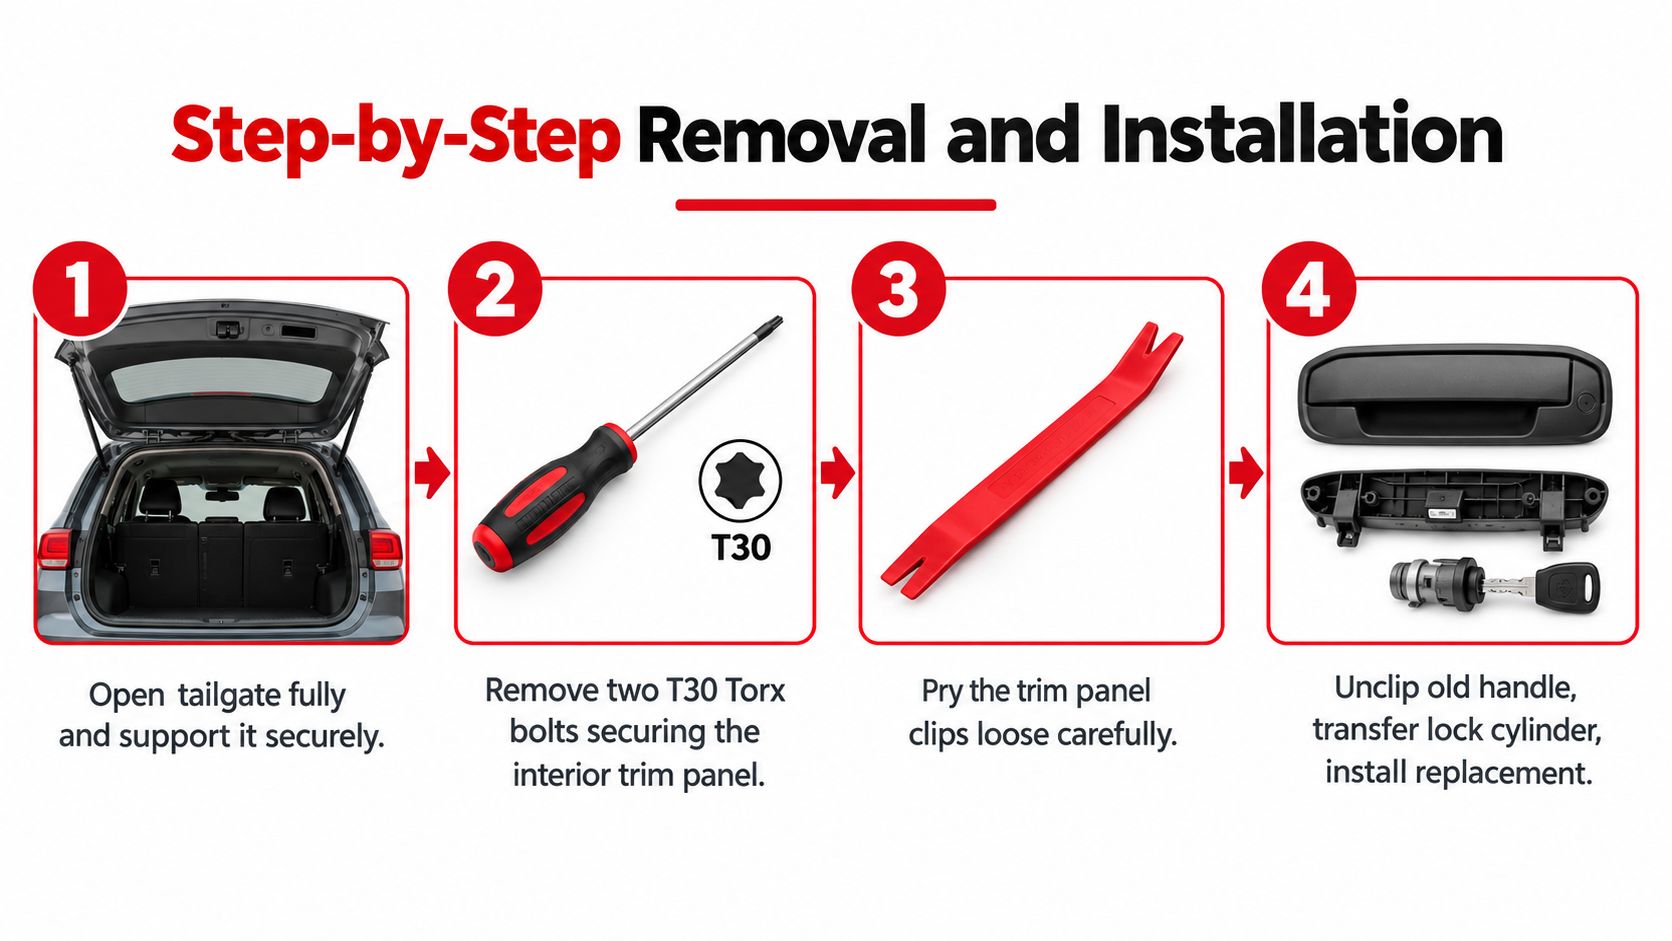
- Remove the panel fasteners. Use the correct Torx bit for the inner tailgate panel. On the documented 2007–2013 procedure, the panel uses T25 screws. Press the bit firmly into each head before turning so you don't round the Torx recess.
- Release the panel carefully. Start at a lower corner with a plastic trim tool. Work around the perimeter and release the clips one at a time. If a clip stays in the metal instead of the panel, remove it separately and set it aside for inspection.
- Expose the handle and linkage. Use a flashlight to identify the handle bracket, rod ends, clips, cable interface, and any camera connector. Don't pull the handle outward until every attached linkage is free.
The exact fastener arrangement differs between Tundra generations, so compare what you see with the replacement assembly. A second-generation repair guide describes removing the inner panel, disconnecting the latch and cable interface, and then removing the handle retaining bolts before the handle is swapped.
Disconnect and remove the handle
- Mark the rod positions. Place painter's tape on each rod and the nearby bracket. The markings don't replace a photograph, but they give you a quick reference if both rods look similar once they're loose.
- Release the clips. Use needle-nose pliers to move the plastic rod clips away from the rod ends. Lift the rods off their posts without twisting them. The main danger is pulling the handle with a rod still attached, which can snap a clip or bend the linkage.
- Remove the retaining fasteners. Support the handle from outside while you remove the bolts from inside. Keep the fasteners in a tray. Slide or angle the old assembly out according to the shape of the opening, taking care not to scrape the tailgate skin.
- Compare old and new parts. Place the assemblies side by side. Check the mounting points, rod posts, lock-cylinder opening, gasket, and camera provision. If anything important differs, stop before transferring parts.
Install and test before closing
- Transfer the rods and cylinder as required. Seat each rod fully on its correct post, then return the clip past the rod groove. The rod should pivot freely without popping off when you operate the handle.
- Install the handle loosely at first. Start the retaining fasteners by hand. This keeps the bracket adjustable while you confirm that the handle sits flush and the rods aren't under side load.
- Operate the mechanism by hand. Pull the handle and watch both latch linkages. They should move together and return without hesitation. If one rod binds, remove the handle again and correct the routing rather than tightening the bracket over a problem.
- Secure the assembly and reinstall the panel. Tighten the retaining hardware according to the vehicle or replacement-part specification. Refit the panel clips, install the Torx screws, and confirm that the trim isn't pressing on the linkage.
The documented second-generation sequence is simple, but the rod release is where many jobs go sideways. A practical Tundra handle replacement demonstration shows why releasing the rods correctly matters before the handle is pulled away.
Handling Camera Wiring and Lock Cylinder Transfer
A camera-equipped handle adds another failure path. Some Tundra applications separate inventory into camera and no-camera versions, and later or mid-generation trucks can integrate the camera into the tailgate handle. Check the opening and wiring before ordering, as documented in the Tundra tailgate handle camera fitment listings.
Disconnect the camera without damaging it
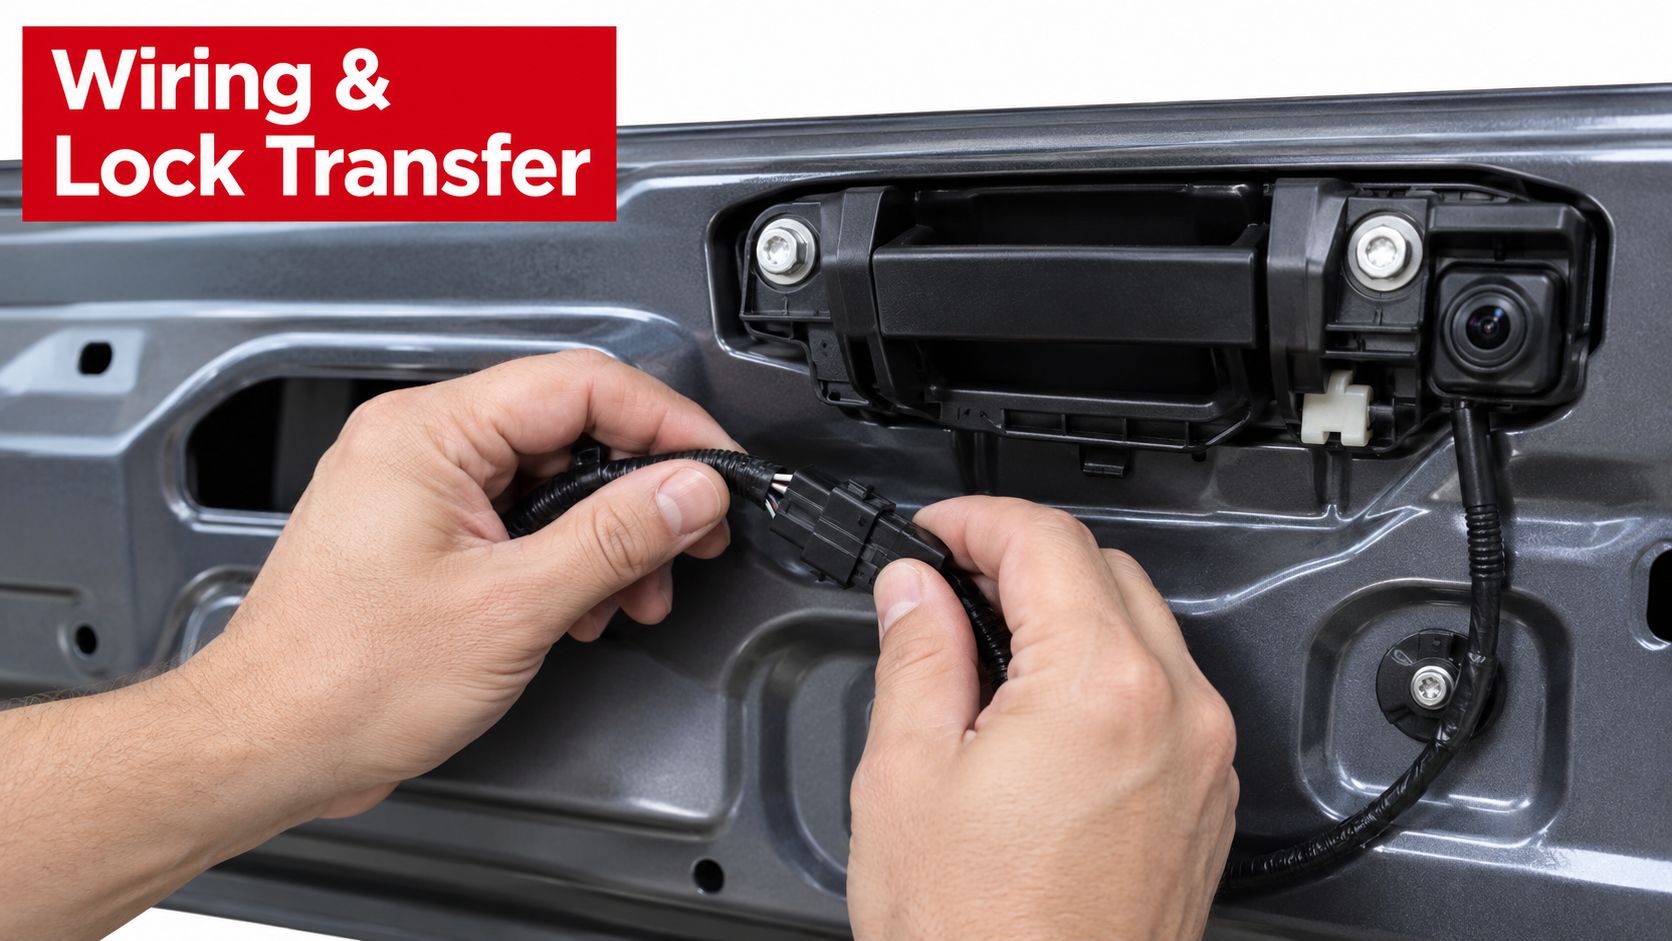
Find the body-side harness connector and press its release tab. Pull the connector straight apart. Don't pull the wires, twist the camera module, or pry against the connector housing. Inspect the grommet and harness channel while the handle is removed, because a poor seal or chafed wire can create a blank image after an otherwise successful mechanical repair.
Use the existing route when reinstalling the wiring. Keep it away from the latch rods, sharp sheet-metal edges, and areas where the tailgate skin can pinch it. Apply dielectric grease only as appropriate for the connector and keep the contacts clean.
The backup camera wiring reference is useful when connector orientation or routing is unclear. Test the image on the dash before reinstalling the inner panel. A camera warning or blank display is easier to diagnose while the wiring is visible.
Move the lock cylinder
If the replacement handle doesn't include a cylinder, compare the retaining tab and opening before transferring the original. Release the cylinder from the old handle without forcing the key or bending the small retainer. Install it into the new handle, then turn the key and confirm that the cylinder engages the mechanism smoothly.
The key should turn without grinding, binding, or requiring the handle to be pulled at the same time. If it doesn't, check cylinder seating and the lock linkage before bolting the handle down.
Preventing Repeat Failures After the Swap
Replacing the visible handle without servicing the latch system is how a routine repair becomes a repeat repair. The inner panel is already off, so inspect every part that transfers your hand force to the latches.
Check the hidden load path
Pull each latch rod gently and look for worn plastic bushings, cracked clips, bent rods, or movement that doesn't reach the latch. A latch that starts moving late or stops short transfers extra effort into the handle. Clean dirt from the latch and apply suitable grease to the moving pivots and rod contact points, following the lubricant manufacturer's guidance.
A stronger handle can expose a weak latch. If the mechanism is stiff, the upgrade has only moved the failure to the next component.
Check the lock cylinder separately. A sticky cylinder encourages owners to twist harder with the key, which can load the handle bracket and lock linkage. Work the key gently and correct the cylinder or linkage problem before relying on the new handle.
Seal and align the replacement
Set the gasket flat against the tailgate skin. A crushed or displaced gasket can allow water into the handle area and leave the assembly sitting unevenly. Confirm that the bracket isn't warped and that the handle sits flush before final tightening.
Keep cargo straps and tie-downs away from the handle. Use the truck's dedicated tie-down points instead. After installation, operate the handle repeatedly, release both latches, close the gate gently, and confirm that it opens again without extra force.
Troubleshooting, Warranty, and Final Checklist
Use the symptom to find the failed node instead of replacing parts blindly.
| Symptom | Likely area | First action |
|---|---|---|
| Handle moves but won't release | Rod, clip, latch, or handle pivot | Inspect linkage movement with the panel removed |
| Handle feels stiff | Corroded or dry latch, binding cable, or misalignment | Clean, lubricate, and check rod travel |
| Key turns without opening | Lock cylinder or lock linkage | Confirm cylinder engagement and rod connection |
| Camera is blank after installation | Connector, harness, camera provision, or display compatibility | Recheck connector seating and test before panel installation |
| Water appears around the handle | Gasket, grommet, or damaged sealing surface | Inspect the gasket and wiring entry point |
| New handle sits proud of the tailgate | Bracket, bezel, or gasket mismatch | Stop tightening and verify part fitment |
Warranty terms vary by manufacturer and seller, so read the written coverage before purchase. Confirm whether the warranty covers the complete assembly, excludes installation labor, requires proof of fitment, or applies differently to plastic and metal construction. A warranty can't compensate for ordering the wrong camera or no-camera version.
Final inspection
- Fasteners: Confirm every retaining fastener is seated and tightened to the applicable vehicle or part specification.
- Rod clips: Verify each clip is fully closed over its rod groove.
- Gasket: Check that the gasket is flat and not folded into the opening.
- Camera connector: Confirm the plug is fully seated and the pins are undamaged.
- Latch action: Operate the handle and verify that both latch sides release.
- Key cylinder: Turn the key smoothly without forcing the handle.
- Paint and metal: Touch up exposed chips and inspect the mounting surface.
- Tailgate alignment: Close the gate gently and check that it meets the body evenly.
- Lighting and accessories: Confirm any tailgate-mounted light or accessory still works.
- Road check: Listen for rattles after driving, then inspect the handle and linkage again.
The repair is complete only when the whole tailgate system works smoothly. A handle that opens the gate today but still requires a hard yank is not a successful fix.
For a durable replacement, T1A Auto offers Tundra tailgate handle assemblies and related components, including camera-compatible options and upgraded metal parts with fitment-focused product information. Visit T1A Auto to match the handle to your truck's year, camera setup, lock cylinder, and latch configuration before ordering.
