


A cable assembly is a ready-to-install unit that combines conductors or mechanical strands with connectors, terminations, and protective sheaths to transmit power, data, or physical force reliably. The global cable assembly market was estimated at USD 178.90 billion in 2024 and projected to reach USD 253.81 billion by 2030, showing that these components are major industrial products, not just loose wires bundled together.
You notice their importance when one fails. Pull a pickup tailgate handle and feel no resistance. Press a window switch and hear a snap behind the door trim. Find a trailer light that works intermittently after rain. The visible symptom may look small, but the failed part is often an engineered cable assembly carrying electrical current, a signal, or mechanical movement through vibration, heat, moisture, and dirt.
For vehicle owners, the practical question isn't only what is a cable assembly, but which construction suits the job and why one replacement will survive longer than another. Electrical harnesses, coaxial data lines, and mechanical Bowden cables all use different materials and terminations. A durable repair starts by identifying the cable's function, its failure point, and the environmental load it must handle.
Table of Contents
- Understanding Automotive Cable Assemblies
- Core Components and Protective Anatomy
- Common Vehicle Cable Types and Applications
- Frequent Failure Modes in High-Wear Auto Parts
- Material Upgrades and Industry Testing Standards
- Choosing and Installing the Right Replacement
- Long-Term Maintenance and Inspection Tips
Understanding Automotive Cable Assemblies
A cable assembly is a finished, ready-to-connect component. It combines one or more conductors with connectors, contacts, terminals, or other terminations, then protects the route with a jacket, sheath, conduit, or related covering. The completed unit is installed as a part, rather than handled as loose wire, as described in this technical definition of cable assemblies.
In a vehicle, the inner element might be copper wire carrying power to a lamp or sensor. It might also be a steel strand inside a flexible housing, pulling a latch when you lift a handle. Both assemblies perform a controlled transfer between two points, but their loads differ. An electrical design must manage current, voltage, insulation, connector contact, and signal interference. A mechanical design must tolerate pulling force, flexing, friction, and imperfect routing.
A wire is not a finished assembly
A plain wire has a conductor and insulation. It becomes useful in a vehicle only after the designer selects its length, terminal style, connector position, protective covering, and routing path. A cable assembly packages those decisions into a component that can be installed consistently.
That packaging matters during repairs. A loose replacement wire may restore continuity but still leave the conductor exposed to a sharp bracket or a wet door cavity. A mechanical cable with the wrong end fitting may connect at the handle but fail to pull the latch far enough. Correct geometry is part of the function.
Practical rule: Diagnose the complete route, not only the broken visible end. A cable can look intact at the handle while its housing, connector, clip, or internal strands have already failed.
Automotive assemblies also sit within a broader electrical and mechanical design process. If you're tracing how a vehicle circuit moves from a switch through protection and control equipment, a practical industrial circuit design workflow can help clarify the relationship between the source, conductors, controls, and load. For a mechanical tailgate, the same systems thinking applies, even though the transferred force comes from your hand rather than a battery.
A cable assembly isn't automatically a complete vehicle wiring harness. A harness may branch to several sensors, modules, and actuators, while a simpler assembly often runs point to point. The terms overlap in everyday parts conversations, but the distinction helps you order the right component and avoid treating a complex routed system like a single wire.
For a mechanical example, the tailgate cable pulley system shows why cable travel, pulleys, attachment points, and handle movement must work together. Replace only the part that appears broken, and the underlying restriction can damage the new assembly.
Core Components and Protective Anatomy
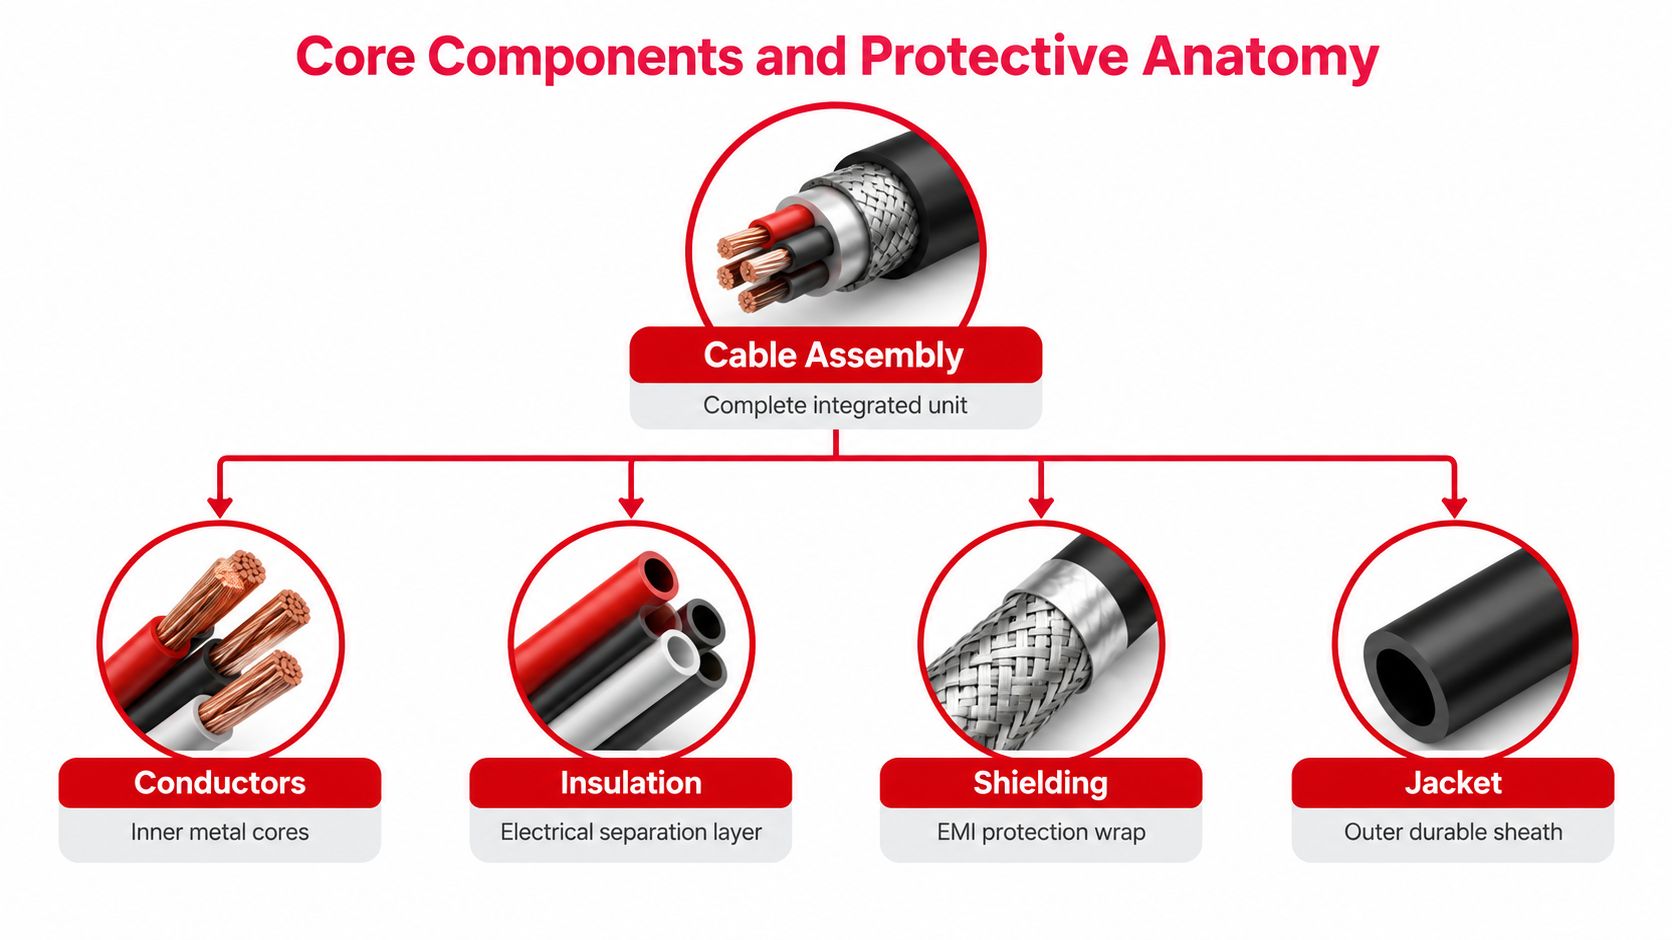
The reliable assembly has several layers, and each layer solves a different problem. At the center are the conductors or mechanical strands. Electrical conductors carry power or signals. Mechanical strands, commonly steel, transmit pulling force through a flexible route.
Around an electrical conductor sits insulation. It prevents neighboring conductors from touching and separates the conductor from the vehicle body. A mechanical cable uses a different arrangement. Its inner strand needs a low-friction path and a housing that holds the outer end of the cable steady while the inner strand moves.
The layers that protect the working core
The basic architecture is organized conductors inside a protective outer jacket or sheath that runs continuously between the terminations, a distinction explained in this overview of cable assembly construction. In automotive service, that outer layer has to cope with abrasion, water, road salt, oil, cleaning chemicals, heat, and movement.
- Conductors: Copper wires carry electrical power or signals. Steel strands carry mechanical force. The material and size must match the intended load.
- Insulation: This layer prevents electrical shorts and helps the wire tolerate temperature and contact with nearby parts.
- Shielding: Foil, braid, or another conductive screen can reduce electromagnetic interference around sensitive signals. It matters near ignition systems, motors, camera wiring, and communication circuits.
- Outer jacket or housing: The outer covering keeps the assembly together and protects it from rubbing, moisture, and impact. A mechanical Bowden housing also provides the reaction surface that lets the inner cable pull.
- Terminations and strain relief: Connectors, crimped terminals, end barrels, clips, and molded boots transfer the load into the assembly without concentrating all movement at one fragile point.
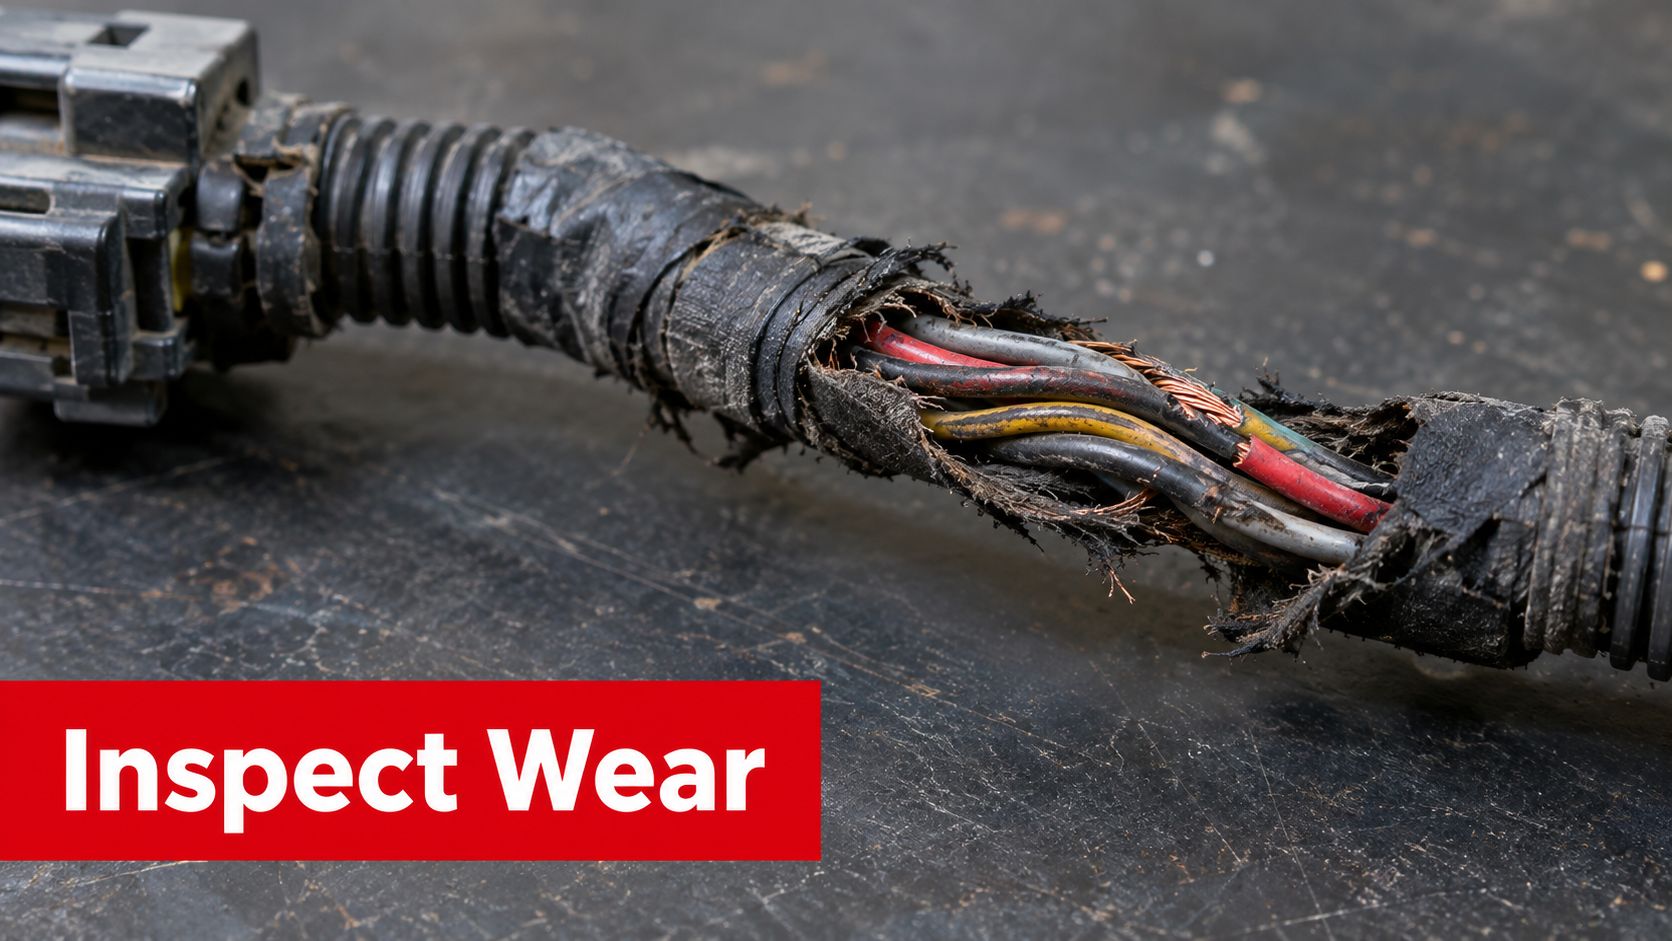
A damaged jacket deserves attention even when the vehicle still works. Water can reach copper, corrosion can increase resistance, and repeated movement can expose more insulation. With a mechanical cable, a split housing can admit grit and moisture, increasing friction until a handle feels heavy or the inner strand breaks.
Material choice is therefore a trade-off. A soft, flexible covering may route easily around a door, while a tougher jacket resists abrasion but can be less forgiving around a tight bend. The best assembly isn't the stiffest one. It's the one whose protection, flexibility, shielding, and termination design fit the vehicle zone.
For replacements exposed to salt and moisture, inspect the inner strand and end fittings as carefully as the jacket. A galvanized steel cable guide explains why corrosion-resistant steel can be a sensible upgrade where bare or poorly protected metal repeatedly deteriorates.
Common Vehicle Cable Types and Applications
Vehicle cable assemblies fall into two broad practical groups. Electrical assemblies move power or information. Mechanical assemblies move a component through a pull, release, or control action. They may occupy the same door, tailgate, or engine compartment, but they don't respond to the same diagnostic tests.
| Cable Type | Primary Function | Common Vehicle Location |
|---|---|---|
| Electrical power harness | Delivers battery or charging power | Engine bay, fuse areas, lighting circuits |
| Sensor and control harness | Carries low-voltage signals between modules and sensors | Engine, transmission, brakes, body panels |
| Coaxial or shielded data assembly | Transfers protected high-frequency or camera signals | Infotainment, antennas, rear cameras |
| Fiber-optic assembly | Carries data through light | Advanced vehicle communication networks |
| Mechanical Bowden cable | Transfers pulling force through a flexible housing | Door handles, tailgate latches, manual windows |
| Window regulator cable assembly | Moves glass through a regulator mechanism | Inside doors |
| Tailgate release cable | Connects a handle or latch control to the release mechanism | Pickup tailgates and rear doors |
Electrical routes
An engine harness must tolerate heat, vibration, fluid exposure, and movement around brackets and connectors. Lighting and body harnesses face water entry, repeated door or hatch flexing, and connector corrosion. A signal cable may need shielding or controlled geometry because interference can produce intermittent faults rather than a complete open circuit.
That difference changes the repair approach. A multimeter can check continuity and resistance, but a passing continuity test doesn't prove that a connector locks correctly, a shield remains effective, or a harness won't short when it moves. Inspect the pins, seals, strain relief, and contact with nearby metal.
Mechanical routes
A Bowden cable has an inner steel strand and an outer flexible housing. When you pull a door handle, the inner strand moves, while the housing stays supported by clips and end stops. If the housing slips out of its bracket, the handle may move without producing enough latch travel.
Tailgate cables work under a different load. They often sit near hinges and latch mechanisms, where misalignment, corrosion, and repeated opening cycles combine. If one side releases before the other or the handle suddenly feels loose, consult a focused guide to tailgate cable replacement before ordering a generic cable.
Don't substitute one cable type for another because the connectors look similar. An electrical line needs the correct conductor, insulation, shielding, and pin arrangement. A mechanical cable needs the correct length, end fittings, housing support, and travel. Appearance is only the starting point.
Frequent Failure Modes in High-Wear Auto Parts
A broken tailgate cable often announces itself with a handle that suddenly feels light. In a door, a window may begin moving slowly, stop partway, or tilt as the regulator struggles. In an electrical circuit, the warning can be less obvious, such as a lamp that flickers after the harness shifts or a sensor fault that appears only over bumps.
Where mechanical assemblies give up
Plastic clips and end retainers are common failure points in high-wear vehicle assemblies. They save weight and can be molded into complex shapes, but heat cycling, cold weather, ultraviolet exposure, vibration, and repeated loading can make them brittle. Once a clip cracks, the housing may move instead of resisting the inner cable, so the driver feels excess handle travel rather than a clean latch release.
Window regulator cables fail in several ways. The inner cable can fray, the drum can wind unevenly, the guide can crack, or the glass can bind in its channel. A motor that continues running against a tight window increases the load on the regulator, while a misaligned glass panel makes the cable work harder each time.
Inspect these symptoms before disassembling the door:
- Loose handle movement: The cable may be detached, stretched, or no longer supported at the housing.
- Rough or heavy operation: Look for a kinked route, dry inner strand, damaged housing, or a binding latch.
- Uneven window travel: Check the regulator tracks, glass alignment, cable drum, and mounting points.
- Intermittent electrical operation: Move the harness gently while testing, then inspect for chafing, pulled terminals, or corrosion.
Electrical damage hides under the covering
A harness can fail without a dramatic break. Repeated contact with a bracket may wear through the jacket and insulation. Water entering a connector can corrode the terminals, creating resistance that changes as the vehicle vibrates. A loose ground can mimic a failed module or sensor.
Start with a visual inspection and a wiring diagram when available. Disconnect the battery before opening circuits that may contain sensitive modules, and never probe an airbag connector casually. For body wiring, look closely at door jambs, hatch hinges, engine-bay brackets, and areas where a loom has been pinched by trim.
A new cable won't correct a latch that binds, a window that sits crooked, or a harness that still rubs on the bracket that damaged it.
The strongest diagnosis explains both the failure and the load that caused it. If the old tailgate cable snapped because the latch was corroded, installing another cable alone may produce a repeat repair. Clean and free the mechanism, verify the housing is clipped firmly, and replace the weak retaining hardware when the design allows it.
Material Upgrades and Industry Testing Standards
The cheapest replacement becomes expensive when it recreates the original weak point. A copied plastic clip, thin retainer, or poorly supported cable may fit during installation, then fail again under the same heat, vibration, and movement.
For exterior and body mechanisms that see repeated use, an upgraded metal end fitting or retainer can be a sensible choice. Metal still has trade-offs. It may add weight, transmit more noise, or corrode if its finish is poor. Choose an upgrade that reinforces the failed area without changing cable travel, alignment, or fit.
Judge the part by more than appearance
Compare the replacement with the old assembly and the vehicle's requirements before ordering:
- Material at the failure point: Look for a stronger retainer, crimp, barrel, or bracket where the original broke.
- Cable construction: Inspect the strand, housing, jacket, seals, and end fittings, not just the connector shape.
- Fitment documentation: The application catalog should identify the vehicle configuration and mounting arrangement.
- Warranty terms: Warranty coverage shows how confidently the supplier supports its materials and workmanship.
- Testing information: Electrical assemblies should have defined continuity, insulation, and connector checks suited to their application.
Electrical cable and harness assemblies are precision electromechanical products under IPC/WHMA-A-620 acceptance requirements. The standard covers materials, assembly methods, tests, and acceptance criteria for crimped, mechanically secured, and soldered interconnections. It gives manufacturers and buyers a common quality reference instead of leaving labels such as “professional grade” undefined.
For automotive replacement parts, construction details matter more than a polished product photo. A metal fitting is useful when it solves the failure, not just because it looks heavier.
Bend radius protects the inside
Routing affects service life as much as material choice. IEC 60966-2-1 specifies a static bend radius of at least five times the cable diameter, a limit that helps reduce conductor fatigue and insulation damage. Use that figure when checking electrical assemblies, and apply the same discipline to Bowden cable housings by avoiding sharp kinks and forced turns.
A cable can pass a bench test and fail after installation if it is bent tightly around a bracket. The jacket may remain intact while the internal strands fatigue. Leave a smooth route, support the housing, and keep the assembly away from moving linkages, exhaust heat, and sharp edges. A durable replacement still needs correct routing to deliver its expected service life.
Choosing and Installing the Right Replacement
Correct fitment starts before the tools come out. Match the vehicle's make, model, year, body style, door or tailgate configuration, and power or manual option. Similar-looking parts may have different connectors, cable lengths, mounting holes, or latch ends.
Verify the replacement
Photograph the old assembly before removing it. If the part is loose, measure its overall route. Compare connector keying, mounting points, terminal shapes, and mechanical end fittings. For an electrical harness, match pin positions rather than wire colors. For a mechanical cable, compare inner travel, housing stops, and end shapes.
A sound selection process follows five checks:
- Confirm exact application: Match the catalog listing to the vehicle and the mechanism being repaired.
- Compare the construction: Inspect the jacket, strand material, connectors, clips, grommets, and strain reliefs. Upgraded metal end fittings can address a common plastic break point, but only when their dimensions and movement match the original.
- Find the cause: Check the latch, window track, hinge, bracket, or linkage that may have overloaded the failed assembly.
- Plan the route: Lay the replacement beside the old part and mark each clip, bend, and pass-through.
- Test before final trim: Operate the mechanism or verify the circuit while the installation remains accessible.
Install for the environment
Keep a mechanical cable's route smooth. Do not twist the housing while tightening a bracket, and do not force a bend that creates a sharp crease. As noted earlier, the five-times-diameter static bend-radius guidance is especially useful for electrical cables. Mechanical housings also need free movement, firm support, and enough slack for the mechanism's full travel.
Use the correct grommets and fasteners at door and tailgate pass-throughs. A missing grommet can admit water and let the jacket rub against bare metal. Secure the loom away from window glass, regulators, hinges, exhaust components, and steering or suspension movement.
Lubricate only where the service instructions allow it. A light lubricant suited to the cable and housing may reduce friction, while petroleum products can soften or swell some plastics and elastomers. Keep sealed connectors dry, and avoid packing grease into a mechanism that will collect abrasive road grit.
After installation, test the complete range of operation. The window should move evenly, the tailgate should release from both sides, and each electrical connector should lock without pulling on its wires. Refit trim only after the assembly passes that test. If the replacement binds, shifts, or needs unusual force, correct the route or investigate the surrounding mechanism before returning the vehicle to service.
Long-Term Maintenance and Inspection Tips
Cable assemblies last longer when the surrounding mechanism doesn't make them carry unnecessary load. A dirty window channel increases resistance. A misaligned tailgate or stiff latch transfers extra force into the release cable. A loose harness clip lets vibration turn a protective loom into an abrasive contact point.
Use a quick inspection routine during normal vehicle service:
- Look at exposed routes: Check door jambs, hatch hinges, engine-bay brackets, and underbody sections for rubbing, splits, or crushed coverings.
- Feel the operation: Notice new handle resistance, delayed release, rough window travel, or movement that isn't even.
- Inspect connectors: Look for loose locks, moisture, green corrosion, pushed-back terminals, and damaged seals.
- Check mechanical supports: Confirm that housing clips, grommets, latch brackets, and hinge hardware remain secure.
- Clean before lubricating: Remove debris from window tracks and latch areas so lubricant doesn't turn grit into grinding paste.
- Test intermittent faults carefully: If a circuit changes while the harness moves, stop flexing it once the fault is identified and repair the damaged route.
Inspection habit: If a handle suddenly feels different, investigate it immediately. Small changes often appear before a strand, clip, connector, or housing fails completely.
Keep replacement information with the vehicle, including the part number, fitment details, and installation notes. For fleet vehicles, record recurring failures by location. A pattern of broken tailgate cables may point to latch alignment or hinge loading, while repeated harness chafing usually indicates poor routing or missing protection.
The durable repair combines the right assembly with a sound installation and a free-moving mechanism. That approach protects the replacement instead of asking a new cable to compensate for the same problem that destroyed the old one.
T1A Auto supplies premium aftermarket automotive parts for high-wear systems, including tailgate cables, handles, latches, window regulators, mirrors, sensors, and related hardware. Its catalog focuses on exact vehicle fitment and upgraded metal components where plastic parts commonly fail, with a lifetime warranty on metal components and a 3-year warranty on standard items. Visit T1A Auto to find a durable replacement for your vehicle and get support when you're ready to install it.
