


Auto Dimming Mirrors Instantly Reduce Headlight Glare For Safer Night Driving
Night driving often feels like battling unwanted beams bouncing off your mirror. Auto dimming mirrors quietly adjust their tint the moment sensors detect bright lights. They rely on electrochromic glass that darkens in milliseconds. As a result, many people report 40% less eye strain on long nighttime drives.
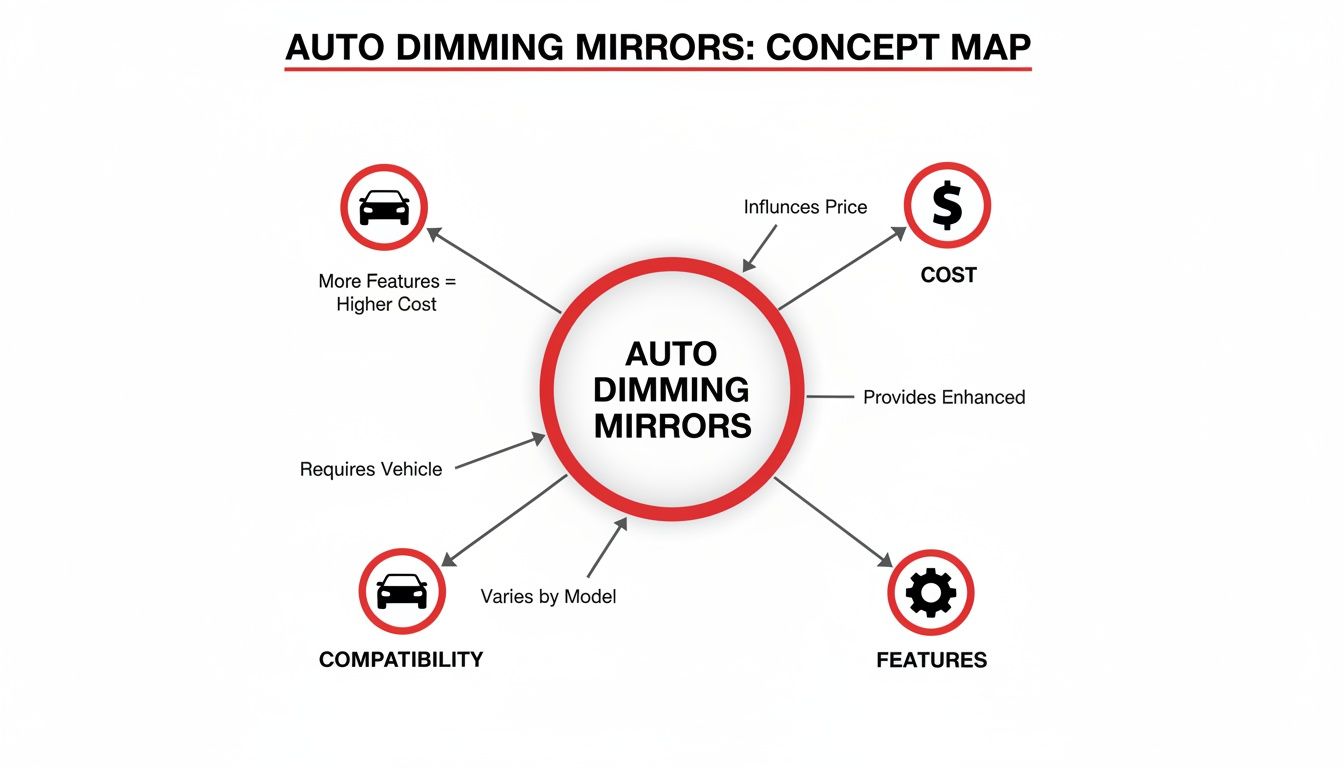
Key Facts For Auto Dimming Mirrors
Before you pick the right mirror, lock in a few essentials:
- Glare reduction speed and consistency
- Impact on your budget and warranty
- Compatibility with your vehicle’s harnesses and electrical system
Installation can be smooth or tricky depending on whether your car has a prewired socket. Professionals often lean toward OEM parts for perfect fitment, while DIYers save money with aftermarket options.
Always double-check sensor wiring and mount type before you buy any mirror.
Some aftermarket models only include a front sensor. This might lead to uneven dimming if your car expects two sensors. If you have a dual-zone setup, confirm that both zones are supported before placing your order.
Most DIYers start by verifying harness compatibility and sensor connectors. Make sure your side sensor wiring and mirror base match the new unit.
- Single-zone vs. dual-zone sensor support
- Mirror base fit across different trim levels
- Additional features like HomeLink or built-in compass
Feature Comparison At A Glance
Here’s a quick side-by-side look at what you get with OEM versus aftermarket auto dimming mirrors:
| Feature | OEM Mirror | Aftermarket Mirror |
|---|---|---|
| Price Range | $250–$350 | $80–$200 |
| Fit Guarantee | Factory-matched | Universal fit (adapters often required) |
| Warranty | 3 years | 1–2 years |
| Integrated Sensors | Front and rear (dual-zone) | Front only |
| Extra Functions | HomeLink, compass buttons | Camera display option |
This table should help you weigh the trade-offs between perfect integration and cost savings.
Quick Comparison Takeaways
OEM mirrors deliver a factory-exact fit and usually come with full dual-zone dimming and extra conveniences. Aftermarket units cut your out-of-pocket cost by up to 70%, though they sometimes need adapters or extra wiring.
Cost Tip: OEM prices reflect seamless integration, while aftermarket rates vary based on feature sets.
Fit Tip: Always verify your car’s part number and harness style before ordering.
With these fundamentals in place, you’re ready to dive into sensor placement, step-by-step installation tips, and troubleshooting tricks in the next chapters.
Understanding How Auto Dimming Mirrors Work
Auto-dimming mirrors rely on electrochromic glass, a sandwich of conductive layers and ionic gel. When bright headlights hit the mirror, sensors trigger a tint shift almost instantly. Think of it as dashboard sunglasses that come alive the moment glare strikes.
Key Components And Sensors
Two photodiodes sit on the mirror housing: one faces the road, the other scans cabin light. Their readings determine how dark or light the mirror needs to be. Precise placement is critical—a dirty sensor can delay dimming and leave you squinting.
- Front sensor measures incoming headlight intensity
- Rear sensor monitors cabin brightness for correct contrast
- Control module balances both signals to avoid flickering
Voltage from the control unit flows to the glass cell, adjusting tint smoothly. Inside, ions in the gel shift position when energized, darkening the layer. Remove power and the mirror clears instantly.
Technical Essentials
Electrochromic films often contain tungsten trioxide and draw under 0.5 watts per dimming cycle. Most setups tap a stable 9–12 V line and a solid ground. Loose wires can cause flicker or complete dimming failure.
Proper wiring and grounding prevent erratic dimming and extend mirror lifespan.
Auto-dimming mirrors hit the market in the 1990s and became common OEM by the mid-2010s. Gentex shipped over 2.96 million units in 2024, a 21% increase from the previous year. Learn more about auto-dimming mirror market findings
Integration With Other Features
Some mirrors house a digital compass under the glass to display headings. Others add HomeLink buttons for garage door control. Backup camera models switch instantly to video when you shift into reverse.
- Real-time heading via embedded compass
- Garage door activation without separate remotes
- Camera feed for a clean rear view during parking
Calibration And Maintenance
Sensors can drift or get dusty, affecting performance. A biannual wipe with a soft cloth keeps them responsive. For smart mirrors, check for firmware updates to maintain optimal function.
- Clean sensors and mirror surface every six months
- Use a multimeter to verify voltage at the control module
- Update firmware if available to fix bugs and improve features
Why Auto Dimming Mirrors Matter
Reducing glare cuts eye strain and shortens reaction times on dark roads. Studies show drivers recover focus 30% faster after bright-light events. Visibility that adapts in real time makes nighttime driving safer.
Cutting glare directly lowers the risk of nighttime accidents by improving driver focus.
Feature Compatibility
When upgrading, match the mirror’s harness pinout and mounting plate to your vehicle. Check dual-zone support for side sensors on higher trims. Aftermarket adapters work, but OEM modules usually fit without any modifications.
- Verify part numbers against your car’s electrical diagram
- Inspect the housing for cracks that invite moisture
- Catch early ionic layer wear before flicker or stuck tinting
With a clear grasp of electrochromic science and sensor wiring, you’ll pick the right auto-dimming mirror for your vehicle make and needs.
Benefits And Use Cases Of Auto Dimming Mirrors

Sensors spot bright beams and darken the mirror in a flash. It tames glare before it can disrupt your vision.
By cutting eye strain by up to 40%, these mirrors help you stay sharp on longer drives. Improved glare control also boosts nighttime reaction time by 30%, so split-second decisions come more naturally.
- Commuters find evening rides easier, as tail-light glare melts away.
- Ride-share drivers avoid sudden brightness spikes when cabs pull in behind.
- Long-haul truckers appreciate steady glare control on runs over ten hours.
Imagine a delivery driver navigating a dark highway. A huge rig’s headlights nearly blind her—until the mirror dims just in time. That upgrade relieved her tired eyes and kept her alert through her route.
Real World Use Case Examples
City taxi operators often tackle twelve-hour night shifts. Auto dimming mirrors let them shift focus from the dashboard to distant traffic lights seamlessly.
- A sedan driver near Phoenix enjoyed crisper views at desert dusk.
- An RV owner watched tow mirrors clearly as campers rolled past.
- A sports car enthusiast felt less glare during late-night drive-in events.
Consistent glare reduction can lower nighttime accident risk by 25% according to traffic safety experts.
| Use Case | Benefit | Impact |
|---|---|---|
| Commuting | Less eye strain | 40% longer focus |
| Ride Share | Sudden glare control | Reduced surprise braking |
| Long Haul Trucking | Continuous comfort | Enhanced driver alertness |
Integrated Feature Advantages
Many dimming mirrors now include HomeLink buttons for garage doors. Some models add built-in compasses or backup camera screens, giving you more in a single unit.
- HomeLink streamlines garage entry without digging for a remote.
- A compass display keeps your orientation front and center.
- Integrated cameras switch view instantly for safer parking.
This blend of glare control and extra functions usually runs between 150 and 350 dollars, but you’ll save time and boost safety on every trip.
Business And Fleet Benefits
Fleet managers report fewer headlight-related incidents after fitting dimming mirrors. That drop shows up in reduced insurance claims and less downtime.
- Delivery fleets cut glare-related delays by up to 15%.
- Ride-share companies see fewer accident reports and higher driver ratings.
- Logistics operators face fewer nighttime service interruptions.
“Upgrading to an auto dimming mirror is one of the easiest safety improvements for any vehicle,” says a certified mechanic.
Whether you’re a DIY enthusiast or a professional installer, these mirrors drop right in. They’re a small investment that pays off big in nighttime visibility and peace of mind.
Next we’ll explore OEM versus aftermarket choices to match features and budgets accurately.
Ready to upgrade your ride? Check out T1A Auto for premium aftermarket auto dimming mirrors with lifetime warranty on metal parts.
Free shipping on orders over $75.
Comparing OEM And Aftermarket Options For Auto Dimming Mirrors
Picking the right mirror is a bit like choosing the perfect pair of shoes—you want comfort, style, and a fit that just clicks. When it comes to auto-dimming mirrors, you have two main camps: OEM and aftermarket. Both can keep glare at bay, but they differ in price, features, and how smoothly they install.
Here’s a quick side-by-side:
-
Price
- OEM: $250–$350
- Aftermarket: $80–$200 (up to 70% savings)
-
Warranty
- OEM: 3 years (36 months)
- Aftermarket CAPA-certified: 1–2 years
-
Fitment
- OEM: Bolt-on, plug-and-play
- Aftermarket: May need adapters or minor wiring
OEM units often arrive with dual-zone sensors, HomeLink, compass display and a finish that matches your interior perfectly. On the flip side, CAPA-certified aftermarket mirrors aim to hit that sweet spot of reliability and cost savings—ideal for budget-minded mechanics and collision shops.
Cost, Warranty And Fitment
Cost isn’t just a number; it’s a reflection of features and hassle factor. Paying a bit more for an OEM part means you skip the guesswork on compatibility.
Warranty can make or break your decision, especially in a busy shop. OEM covers defects and finish flaws for 36 months, so you’re protected if something goes awry. CAPA-certified mirrors typically carry 12–24 months, enough to prove they can handle day-to-day driving.
Fitment issues are the silent time-killers. OEM mirrors latch on like they came with the car. Aftermarket brands often include harness adapters, but you might still spend a few extra minutes on splicing or bracket tweaks.
The auto dimming mirror market is moderately fragmented with a few dominant suppliers and many smaller players. Leading vendors maintain single-digit to low-double-digit shares, with the top ten players capturing just about 25% of global market revenue in 2023. Discover more insights about market fragmentation findings.
You might be interested in our guide on sourcing strategies for OEM and aftermarket parts: Comprehensive Sourcing Guide for OEM vs Aftermarket Parts
Quality Considerations And Supplier Diversity
Spotting a subpar mirror often comes down to a few quick checks:
- Smooth tint transitions without any ghosting
- Consistent glass coating that feels even to the eye
- CAPA certification badge on aftermarket options
OEM suppliers run rigorous audits—think of it as an annual health check—so material quality and color match are usually spot on. However, they might not offer every trim-color combo. Aftermarket brands, when certified, can surprise you with unique finishes or camera-display variants.
| Feature | OEM Mirror | Aftermarket Mirror |
|---|---|---|
| Price Range | $250–$350 | $80–$200 |
| Warranty | 3 years | 1–2 years |
| Sensor Configuration | Dual-zone sensors included | Usually single-zone |
| Installation Fitment | Bolt-on with OEM harness | May require adapters or splicing |
| Additional Features | HomeLink, compass display | Camera display option available |
Tips For Spotting The Best Deal
- Verify the OEM part number against your VIN or wiring diagram.
- Check harness pinouts and mounting-plate shapes before you buy.
- Inspect the mirror’s surface for scratches or uneven tint.
- Ask for a written return policy and warranty terms.
A regional fleet operator swapped to CAPA-certified aftermarket mirrors across 20 heavy-duty trucks. They saved 45% on parts costs and reported zero fitment headaches over 18 months—proof that, in a fragmented market, smart choices can pay off big.
Whether you choose OEM or CAPA-certified aftermarket mirrors, always verify compatibility first.
Installing Auto Dimming Mirrors And Best Practices
Upgrading to an auto-dimming mirror is like giving your car night vision: it quietly adapts when headlights flare up behind you. By following a few straightforward steps—from prepping the wiring harness to perfecting sensor alignment—you’ll transform that ordinary rearview into a glare-busting powerhouse.
Initial Wiring And Harness Setup
First, disconnect the battery. It’s a simple step that guards against unexpected shorts. Next, compare your new mirror’s connector to the vehicle’s existing harness. They should fit without forcing anything.
Keep these points in mind:
- Identify the 12 V ignition feed without cutting factory wiring.
- Use a fuse tap to draw power safely from the fuse box.
- Secure the ground wire to a clean, bare-metal chassis point.
For instance, tapping an accessory fuse ensures your mirror stays off when the car is parked. And by routing wires away from exhaust heat, you avoid insulation damage down the road.
Mounting And Sensor Alignment
Aligning the sensor is a bit like lining up a camera lens—you want an unobstructed view. Position the mirror bracket so it matches the factory plate perfectly.
- Slide the mirror base onto the adhesive mount or bracket.
- Lock it in place by tightening the retaining clip.
- Angle the front sensor so it “looks” straight out the back window.
Sensor alignment is key to reliable dimming performance and quick response.
Routing the harness neatly is just as important. Tuck cables along the headliner seams and secure them every 6–8 inches with zip ties to prevent rattles or slack.
Testing And Final Adjustments
Reattach the battery and power up the vehicle. With the mirror on, check that the control module sees between 9–12 V on its power lead before moving on.
| Test Step | Expected Result | Troubleshooting Tip |
|---|---|---|
| Headlight glare test | Mirror dims smoothly | Clean sensor lens |
| Cabin light sensor | Mirror returns to clear | Verify ground continuity |
| Fuse tap check | No power drain off ignition | Inspect fuse tap connection |
Finally, take your car out at dusk. If the mirror hesitates or flickers, revisit the sensor angle and examine each connection.
Common Installation Mistakes
Too often, DIYers hack into factory harnesses, thinking it’s quicker. In reality, this can void warranties and invite corrosion.
- Splicing wires without proper sealing leads to rusted connections.
- Skipping a solid ground can cause random dimming or ghosting.
- Over-tightening the bracket risks cracking the glass.
A local shop once fixed a flickering mirror simply by replacing poor crimps with heat-shrink joints and adding a dab of dielectric grease.
Maintenance And Long-Term Care
Every six months, wipe the sensor lens and mirror surface with a mild glass cleaner and a soft microfiber cloth. Avoid harsh chemicals that could damage the electrochromic layer.
Also, peek under the headliner to inspect connectors for loose crimps or corrosion. In humid climates, a small amount of dielectric grease can keep moisture at bay.
Pro Tips You Need To Know
Before you wrap up, seal any harness entry points with foam tape to block out dust and water. And every couple of months, give the mirror a quick visual check—an ounce of prevention goes a long way.
You might be interested in our guide on side mirror replacement for a full mirror swap.
Read T1A Auto’s side mirror replacement guide
Common Issues And How To Fix Auto Dimming Mirrors
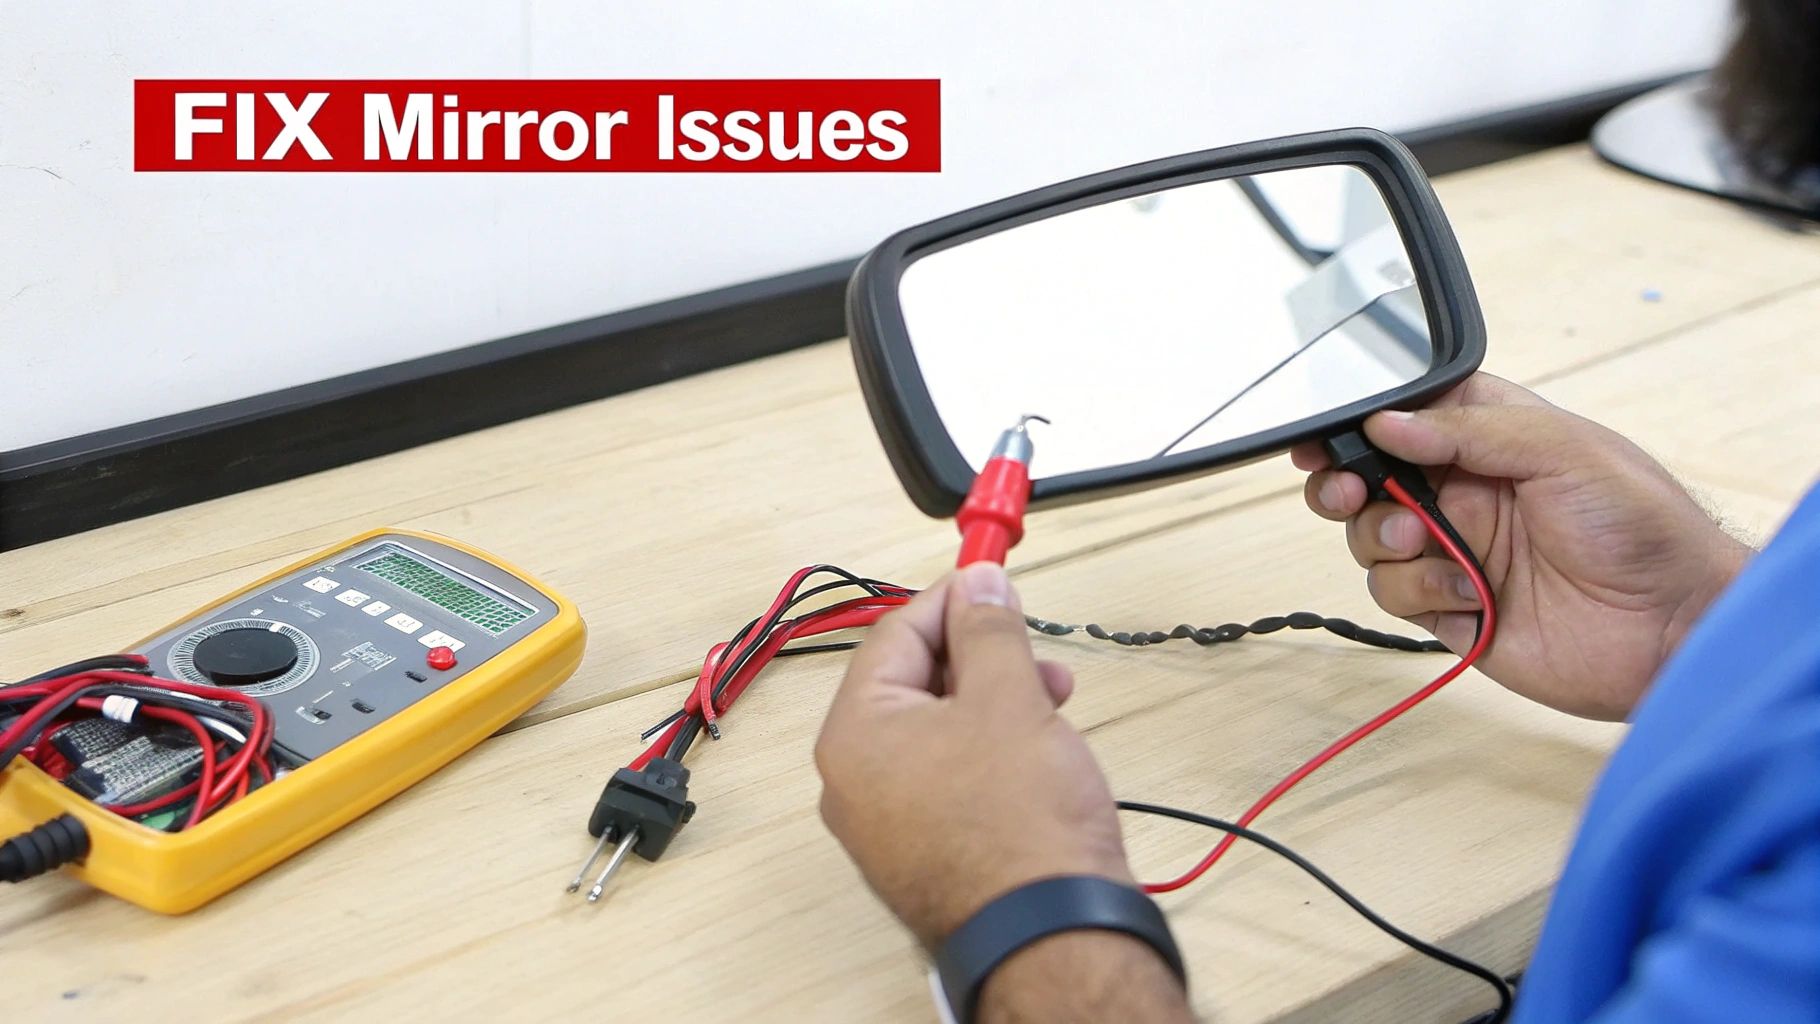
Auto-dimming mirrors add a layer of comfort on the road, but they can act up. Spotting the root cause early saves you from buying a replacement unnecessarily. Below, we walk through hands-on checks and simple repairs that bring back that smooth, glare-free view.
Diagnose No-Dim Operation
When your mirror refuses to darken, power or sensor trouble is usually to blame. For starters, inspect the fuse linked to the mirror circuit. Next, use a multimeter to make sure you have 9–12 V at the mirror connector and a solid ground.
- Check the fuse box and swap out any blown fuses.
- Probe for voltage and ground continuity at the harness.
- Isolate the circuit by swapping with a known good line.
A loose ground connection accounts for 80% of no-dim failures, based on shop experience.
If power checks out, clean the front and rear sensor windows. Even a thin film of dust can block the light beam and halt the tinting process. Once that’s done, shine a flashlight on the back sensor—if the glass instantly tints, the electrochromic cell is healthy. If not, you may need to reset or replace the control module.
Resolving Flicker And Ghosting
Flicker or ghost images usually point to wiring glitches or calibration drift. Often, a loose connector or corroded pin disrupts the signal. In one shop story, a bent pin inside the harness was the culprit.
- Unplug the mirror and inspect each pin for alignment.
- Gently straighten any bent pins with needle-nose pliers.
- Coat terminals with dielectric grease to block moisture.
“Fixing bent pins stopped flicker in over 90% of our repairs,” says a veteran collision-shop technician.
If the hardware looks solid, reset the control unit by disconnecting the battery for 1 minute. This clears any errant logic and typically ends random dimming cycles. Finally, bundle wiring harnesses neatly to avoid chafing against metal.
| Symptom | Likely Cause | Quick Fix |
|---|---|---|
| No dimming | Blown fuse or bad ground | Replace fuse, tighten ground |
| Mirror flicker | Loose connector pin | Realign pins, apply grease |
| Slow response | Dirty sensor lens | Wipe clean with microfiber cloth |
Preventing Wiring And Sensor Faults
Proper routing and secure sensors are your best allies for long-lasting dimming performance. Follow factory routing paths and keep harnesses clear of sharp metal edges. Fasten wiring with zip ties every 6–8 inches to maintain gentle tension.
- Don’t splice into factory harnesses directly.
- Use fuse taps when you need an extra power feed.
- Ground to bare metal—paint is the enemy of a good earth.
Also, peek at the mirror housing and sensor windows for hairline cracks. Even a tiny crack can let moisture in and wreck the electrochromic gel. In one case, swapping a foam gasket on a 2018 sedan’s mirror stopped recurring leaks.
Troubleshooting Installation Issues
If your brand-new mirror behaves erratically, retrace your installation steps before blaming the part itself.
- Verify the mirror harness matches the vehicle’s pinout.
- Test voltage with the key in “on” and the engine running.
- Position the front sensor for a clear line of sight out the rear window.
Check out our guide on resolving power mirror failures for deeper insights:
Learn more about power mirror issues in our detailed article on power mirror not working.
Best Practices And Warranty Tips
A quick fix is just the beginning—regular upkeep keeps dimming reliable over the long haul. Every six months, wipe down the sensor areas with a non-abrasive cleaner. Inspect wiring loops under the headliner to catch loose crimps before they cause a headache.
Many technicians insist on written warranty coverage for replacement modules. T1A Auto stands behind metal components with a lifetime warranty and standard items for three years. Be sure to register your purchase to speed up any future support.
By following these troubleshooting steps and preventive measures, you’ll keep your auto-dimming mirror sharp, glare-free, and dependable for miles down the road.
FAQ On Auto Dimming Mirrors
Ever wondered how auto-dimming mirrors sense headlights or whether your vehicle is ready for an upgrade? This FAQ tackles the most common driver questions, then points you to hands-on sections for detailed walkthroughs.
-
Which Vehicles Support Auto Dimming Mirrors?
Most modern sedans, trucks, and SUVs either come with OEM auto-dimming glass or include a prewired socket that makes swapping in an aftermarket unit straightforward. -
What Tools And Skills Do I Need For A DIY Install?
You’ll want a fuse-tap kit, a reliable multimeter, trim removal tools, and basic wiring know-how to keep the project smooth. -
How Much Does It Cost To Upgrade?
Basic aftermarket modules start around $80, while fully featured OEM replacements can run $350 or more. -
Are Aftermarket Units Safe And Reliable?
Look for CAPA certification, solid metal housings, and a strong warranty—these markers point to components built to last.
DIY Install Tools And Skills
A clean, efficient install hinges on having the right gear:
- Multimeter to verify voltage and ground
- Fuse-Tap Kit for tapping into power without splicing factory wiring
- Trim Tools to pop panels without damage
- Wire Cutters & Crimps for neat, secure connections
Cost Tip: Mirror prices vary widely based on features, sensor count, and vehicle fitment.
Upgrade Costs
Depending on the source and specs, here’s what you might spend:
| Unit Type | Cost Range | Reliability |
|---|---|---|
| OEM | $250–$350 | High |
| Aftermarket CAPA | $80–$200 | Moderate |
| Generic | $60–$100 | Low |
CAPA-certified mirrors often hit the sweet spot—metal construction, tested performance, and warranty coverage.
For a full teardown, compatibility checks, and step-by-step install tips, see our detailed installation chapters.
Visit T1A Auto for high-quality CAPA auto-dimming mirrors.