


You've probably seen both versions of this job. In one, a cracked plastic mount hangs loose above the license plate after a hard winter. In the other, a new camera sits untouched on the workbench because the installer isn't sure which bracket will fit the vehicle, the camera body, and the wiring.
That small piece of hardware has a bigger job than it appears to. A backup camera bracket is the mechanical bridge between the camera, the vehicle body, and the image on the screen. It holds the lens at a repeatable angle, limits movement from road shock, and helps protect the wiring opening from water. If it flexes, shifts, or lets moisture inside, the camera may be perfectly healthy while the image becomes shaky, tilted, or intermittent.
Table of Contents
- Why the Right Backup Camera Bracket Matters
- Main Types of Backup Camera Brackets
- Bracket Materials and Finish Options
- Matching Brackets to Vehicle and Camera
- No-Drill Adhesive Versus Mechanical Mounts
- Installation Tips for a Long-Lasting Mount
- CAPA Certification and Warranty Considerations
- Choosing and Buying the Right Bracket
Why the Right Backup Camera Bracket Matters
A camera can only produce a dependable view if it stays in the position where it was aimed. The bracket controls that position. It also transfers vibration between the camera and the vehicle, so its thickness, stiffness, fasteners, and contact area all affect what the driver sees.
Three mechanical jobs matter most:
- Angle control: The bracket keeps the lens pointed toward the intended rearward coverage. A small change can move the horizon, bumper edge, or parking reference out of place.
- Vibration control: Road impacts, tailgate movement, and trailer-related vibration can shake a loose camera. That movement appears as unstable video or a shifting alignment.
- Water management: The bracket and its hardware surround the wiring route. An unsealed opening can let water and road salt reach the connector, causing corrosion and signal problems.
Shop rule: Treat the bracket as part of the camera's calibration, not as decorative trim.
CAPA's technical standard for exterior rearview and sideview cameras, CAPA 702, focuses on the bracket's ability to preserve the camera's intended orientation, lens opening geometry, and secure retention. That matters because the camera's field of view depends on mechanical alignment. A bracket with poor hole spacing, excess flex, or an over-tightened fastener can tilt the image or move the lens away from the position the vehicle integration expects. CAPA's certification overview provides the relevant standard context.
The failure often starts. The image looks acceptable after installation, then the bracket loosens, the lens angle changes, and the driver compensates for a view that no longer matches the vehicle. Water can create a separate problem, with intermittent power or video loss appearing long after the installation.
A bracket is usually one of the least expensive parts in the system, but it can be the first part to fail. Choosing one should therefore be a durability decision, based on location, climate, camera weight, and vibration, rather than an accessory decision made only by appearance.
Main Types of Backup Camera Brackets
Start by sorting brackets by where they attach and how they support the camera. Once you can identify the mounting family, fitment listings become much easier to understand.
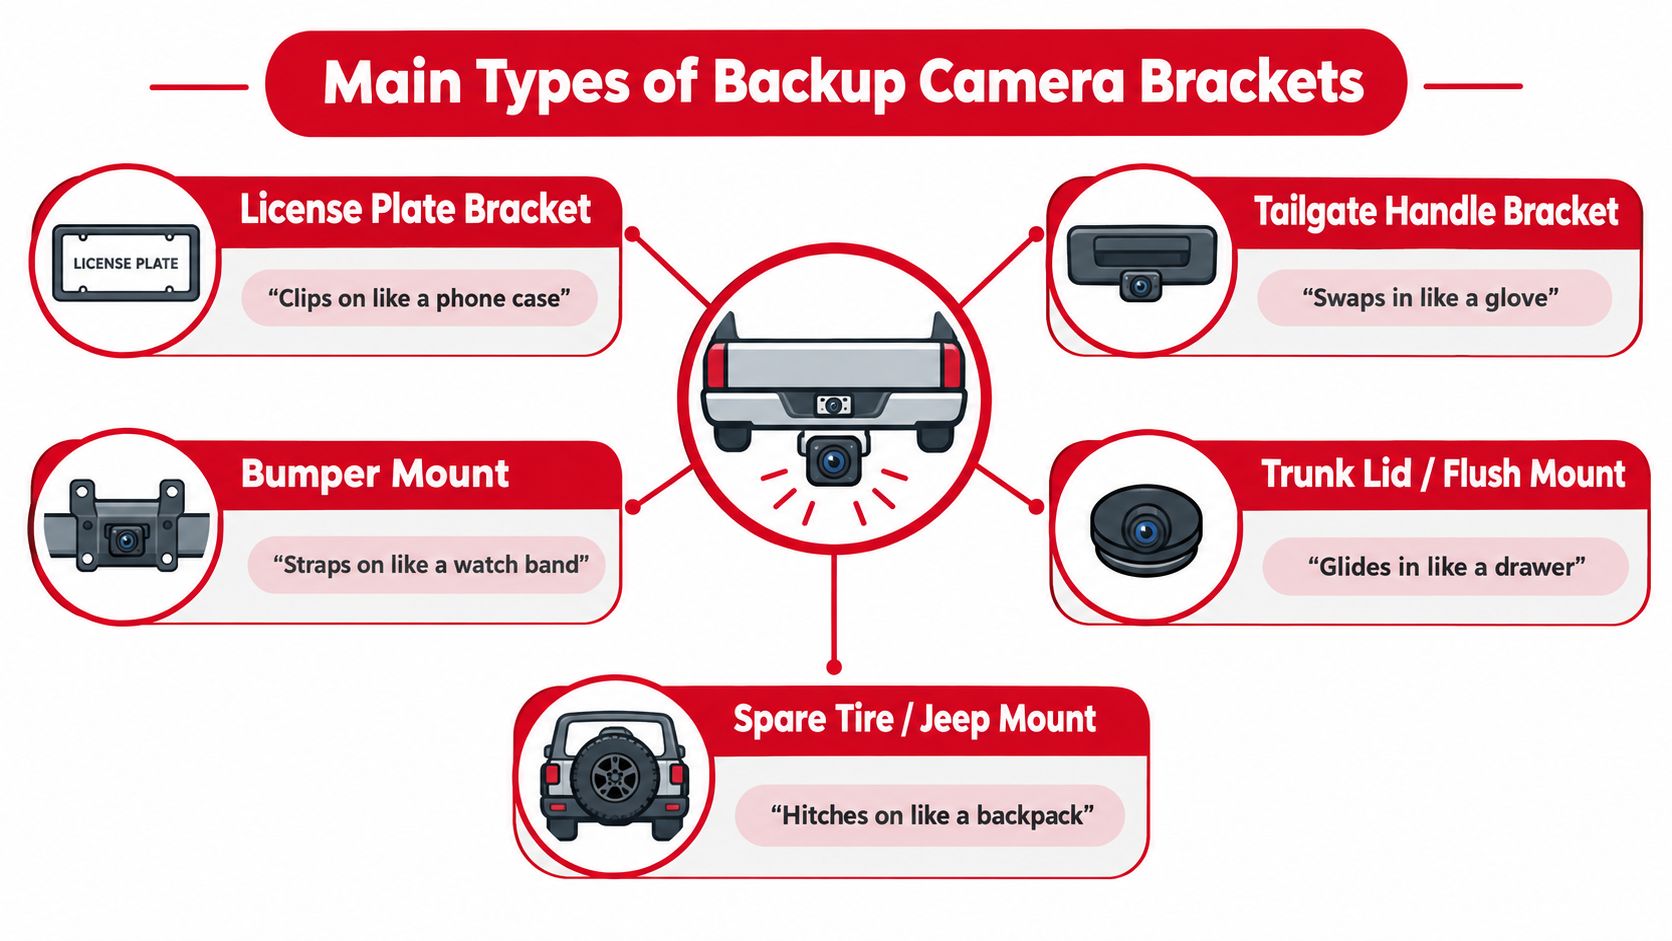
A license-plate bracket is the simplest option for many sedans and small SUVs. It uses the existing plate area, much like a phone case that clips around a device. This is useful for a leased vehicle or a car where you don't want to drill into the bumper, although the camera may sit slightly off center or cover part of the plate area.
A tailgate-handle bracket or bezel replaces, surrounds, or attaches near the factory handle. It suits pickups because the camera can sit high and near the centerline. Think of it as a replacement glove that follows the shape of the original handle area. Vehicle-specific versions usually offer a cleaner result than a universal pod.
A flush-mount insert sits inside a drilled opening in a bumper, hatch, trim panel, or RV body. The camera recesses into the surface like a drawer sliding into its cabinet. This approach offers a tidy appearance, but the installer must measure carefully and protect the cut edge from corrosion or cracking.
A surface-mount pod fastens onto the outside of a bumper, tailgate, van door, or other panel. It resembles a small watch band wrapped around a fixed surface. Universal cameras often ship with this type of pod, which makes it flexible but places more responsibility on the installer to set the angle.
Finally, adjustable arm, swan-neck, spare-tire, and Jeep-style brackets extend the camera away from an unusual mounting point. They attach like a backpack to a rear-mounted spare tire or another exposed feature. These are useful when the normal bumper or plate area is blocked, but the longer arm can increase vibration.
A quick way to sort a listing
Look for the mounting surface first, then the camera pocket. A universal surface bracket may accept a compact cylindrical camera, while a handle bezel may require a specific rectangular housing and screw pattern. Some brackets hold the camera directly, while others only provide the vehicle-side structure and require separate hardware.
If you're also comparing hardware for other vehicle or workshop projects, a wall mounting brackets guide from XTREME EDEALS INC. can help explain how load direction, fastener choice, and mounting surface affect bracket performance. The same basic thinking applies here, even though a vehicle camera faces vibration, weather, and repeated impacts.
Before buying, identify these three points:
- Vehicle attachment: Plate studs, handle opening, bumper panel, trim, or spare-tire carrier.
- Camera attachment: Threaded holes, side screws, a snap-in pocket, or a clamp.
- Harness route: A cable opening that lets the connector pass without bending, pinching, or rubbing.
Bracket Materials and Finish Options
Material choice determines how the bracket behaves after installation, especially when the vehicle sees vibration, temperature changes, moisture, and road salt. Price can help narrow a selection, but it shouldn't replace an assessment of stiffness, corrosion protection, and serviceability.
Stamped steel provides useful rigidity at a modest weight, but thin sections and exposed edges can become weak where coating is damaged. Weld seams and fastener holes deserve special attention in salt-belt vehicles. Cast aluminum resists ordinary rust and can hold a precise shape, though it may cost more and add weight compared with a thin stamped part. Molded ABS or glass-filled nylon can isolate vibration well and avoid some corrosion concerns, but plastic can become brittle with ultraviolet exposure or creep when a constant load stays on the bracket.
Finish matters as much as the base material. Bare paint is easy to damage, while zinc plating and e-coating provide a more deliberate barrier against moisture. Powder coating adds a durable outer layer, but a scratch or exposed edge still needs attention. A corrosion-resistant finish paired with stainless hardware is a stronger combination than a decorative black coating on low-grade steel.
| Material / Finish | Vibration Handling | Corrosion Resistance | Typical Use |
|---|---|---|---|
| Stamped steel with basic paint | Rigid when thick enough, but thin parts can flex | Depends heavily on edge and seam coverage | Simple surface pods and low-exposure mounts |
| Zinc-plated steel | Strong mechanical support with good fastener compatibility | Better protection than bare or lightly painted steel | Daily drivers and replacement brackets |
| E-coated or powder-coated steel | Stable under normal road vibration when properly formed | Strong protection when the coating remains intact | Tailgate, bumper, and fleet installations |
| Cast aluminum | Rigid and dimensionally stable | Naturally resistant to ordinary rust, though fasteners still need protection | Weight-sensitive or exposed mounts |
| ABS or glass-filled nylon | Can damp vibration effectively | Won't rust, but can age, crack, or creep | Light cameras and mild-climate installs |
A bracket's warranty also tells you how seriously the manufacturer treats long-term failure. OEM-style and CAPA-related parts generally provide clearer material and fitment expectations than anonymous plastic pieces with no meaningful coverage. For a closer look at how common metals behave in automotive hardware, see this guide to stainless steel versus zinc.
For vehicles exposed to salt, humidity, or frequent washing, choose a bracket that keeps its shape and clamp load after the coating is scratched. That usually means corrosion-resistant metal, protected penetrations, and hardware selected for the same environment.
Matching Brackets to Vehicle and Camera
Fitment has three ends, and all three must agree: the vehicle surface, the camera body, and the harness exit. A bracket can bolt neatly to the car and still be wrong if the camera sits loosely in the cradle or the connector can't pass through the opening.
A license-plate bracket suits a sedan or small SUV with a flat, centered plate area. It installs without cutting bodywork, but the camera may sit lower than a factory camera or shift the image slightly to one side. Check whether the frame covers plate lettering and whether the camera has enough vertical adjustment to show the desired rear reference.
Pickup trucks usually benefit from a tailgate-handle bracket or vehicle-specific bezel. The higher position can provide a useful view over the bumper, but the bracket must clear the handle mechanism, tailgate trim, spare tire movement, and any tonneau hardware. A camera that fits the pocket but interferes with the handle is not a successful fit.
Flush mounts suit hatchbacks, bumpers, and RV panels where an OEM-style appearance matters. Surface mounts are more forgiving on vans and commercial vehicles because they can attach to an existing flat panel. They also make replacement easier, provided the panel is strong enough and the camera can be aimed without the bracket contacting the body.
| Bracket Style | Best Vehicle Match | Camera Body Fit | Key Caveat |
|---|---|---|---|
| License-plate frame | Sedans and small SUVs | Compact cameras with plate-frame hardware | May sit low, off center, or cover plate details |
| Tailgate-handle bezel | Pickup trucks | Vehicle-specific rectangular or handle-mounted cameras | Must clear handle and tailgate hardware |
| Flush-mount insert | Hatchbacks, bumpers, and RVs | Small cameras with a matching round or shaped housing | Requires accurate cutting and edge protection |
| Surface-mount pod | Vans, trucks, and flat panels | Universal cameras with side screws or a cradle | Angle and sealing depend heavily on installation |
| Adjustable arm or spare-tire mount | Jeeps, vans, RVs, and unusual rear layouts | Cameras compatible with the arm clamp or plate | Extended arms can amplify vibration |
Camera dimensions deserve more attention than the product title. Measure the body width, housing diameter, threaded-hole spacing, lens opening, and gasket depth. Also measure the harness connector, not just the cable. A connector that barely fits can pull against the camera when the tailgate opens, eventually shifting the bracket or damaging the wiring.
Manufacturing methods can produce useful custom shapes when a vehicle has an unusual opening or a replacement camera differs from the original. Background on automotive additive manufacturing is helpful when evaluating custom or low-volume bracket concepts, but a printed part still needs suitable material, wall thickness, weather resistance, and secure fastening for the actual vehicle use.
No-Drill Adhesive Versus Mechanical Mounts
The adhesive-versus-screw decision is really a retention decision. Ask how the bracket will behave through heat, cold, rain, car washes, and repeated vibration, not only how quickly it can be installed.
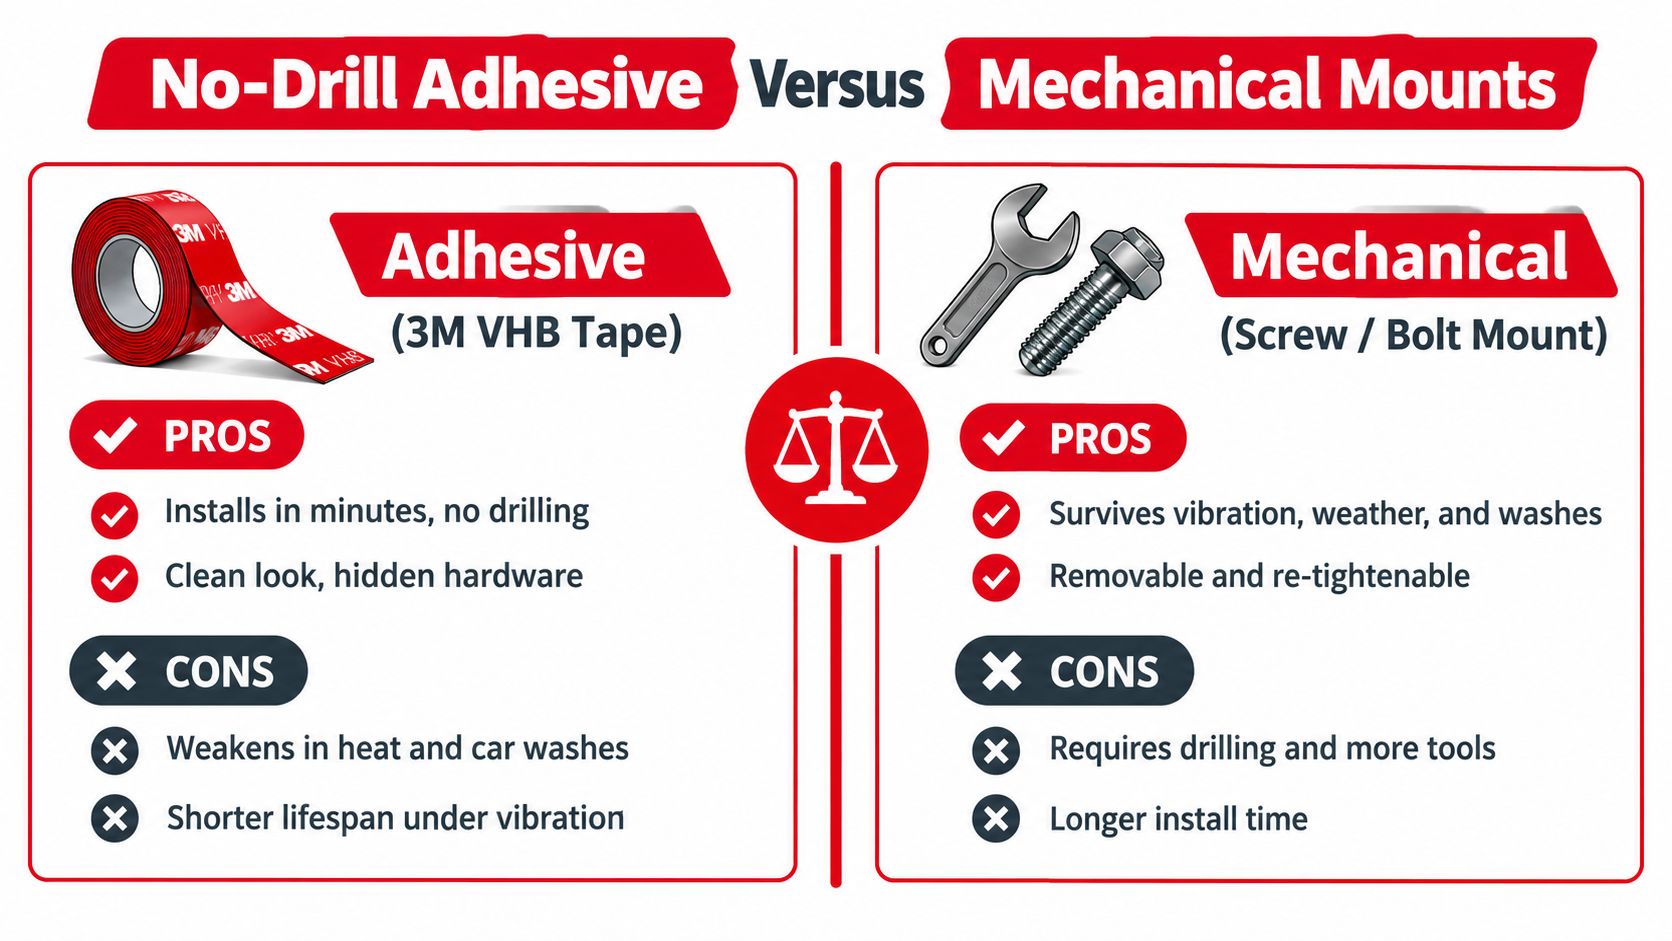
Adhesive mounting makes sense when drilling would damage a leased vehicle, thin trim, or a glass surface. A properly prepared surface and quality automotive tape can hold a light camera without visible hardware. It also removes the need to treat drilled holes, which is useful when a temporary installation must be reversed cleanly.
The weakness is long-term load. A camera bracket creates constant force, and adhesive can soften, creep, or lose grip when the surface is dirty, wet, highly textured, or exposed to repeated temperature changes. The result may be a bracket that looks secure during installation but moves after enough vibration or washing.
Mechanical mounting uses screws, bolts, existing license-plate studs, or a vehicle-specific attachment point. Stainless fasteners and suitable sealing make the connection serviceable and easier to retighten. Drilling adds work and creates a hole that must be protected, but it provides a more dependable load path for heavier cameras, work trucks, tow vehicles, and harsh environments.
A practical decision looks like this:
- Daily-driver sedan: Adhesive can be reasonable for a light camera when the surface is smooth, clean, and well protected. A secondary tether adds insurance.
- Pickup tailgate: Mechanical fastening is usually the safer choice because the tailgate moves, closes with force, and sees more vibration than a sheltered trim panel.
- Commercial fleet: Choose a mount that can be inspected, retightened, and replaced without destroying the mounting surface.
- RV or camper: Consider the body material, panel thickness, and access behind the surface. A mechanical mount needs backing support if the outer panel is thin.
- Salt-belt or off-road vehicle: Use sealed mechanical fasteners and corrosion-resistant hardware. Adhesive alone leaves too much uncertainty around long-term retention.
Neutral repair guidance emphasizes surface preparation, alignment, and sealing, while Garmin's installation material uses screw mounting or license-plate clipping as standard approaches. Garmin's backup camera installation manual is useful for seeing how those mounting choices appear in an actual installation context.
Installation Tips for a Long-Lasting Mount
The order of operations matters. If you drill before checking the camera view, you'll create a cleanly installed bracket in the wrong position.
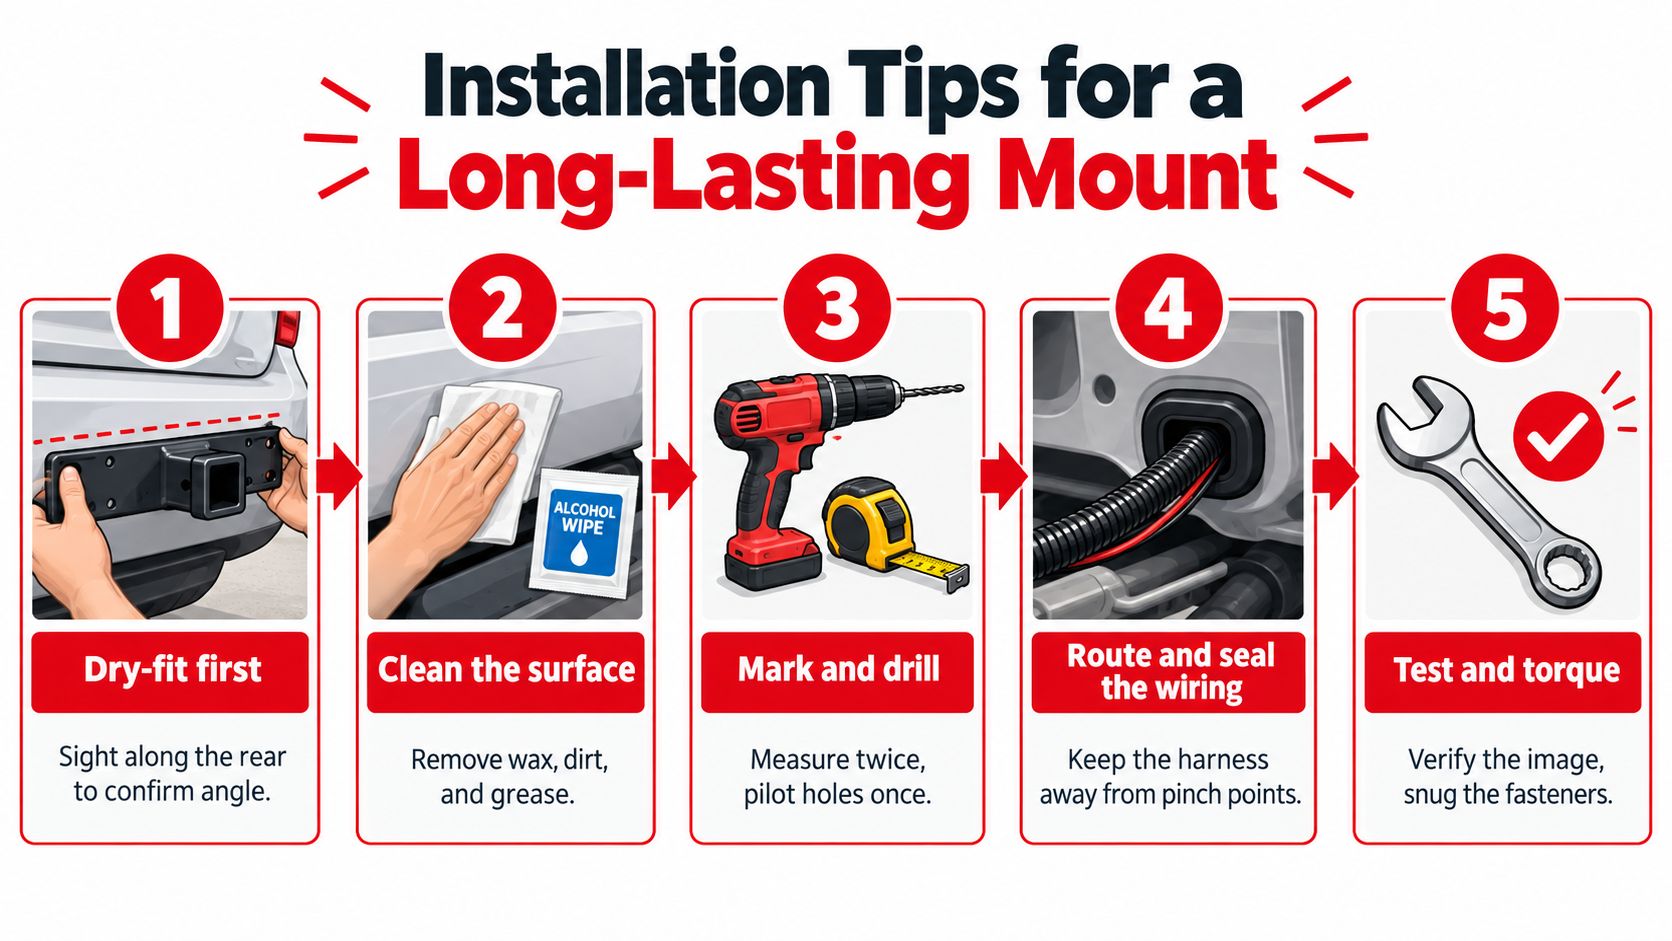
Dry-fit before making permanent changes
Hold the bracket and camera against the vehicle. Sight along the rear surface and check that the lens sees the intended ground reference rather than only a bumper edge or corner. Installation guidance commonly uses the nearest visible ground reference roughly 3–5 feet behind the bumper on passenger vehicles, as described by neutral backup-camera installation guidance.
Confirm the tailgate, hatch, trunk, or doors can open without pulling the harness. Mark the bracket position, screw holes, and cable path only after the camera view looks correct.
Prepare the surface and fasteners
Clean the mating area with isopropyl alcohol. Wax, road film, and fingerprints weaken adhesive contact and can leave a path for moisture under a gasket. For drilled holes, use a step bit and a pilot size that lets the fastener bite without splitting plastic or distorting thin sheet metal.
Use stainless fasteners where exposure is high. Apply medium-strength threadlocker to suitable metal-to-metal threads, then seal penetrations with silicone, automotive seam sealer, or a properly sized rubber grommet. The seal should stop water without trapping a loose cable against a sharp edge.
Set the angle before final tightening
Connect the camera and display before fully locking the bracket. Adjust the image so the view is useful for parking alignment and the horizon isn't noticeably tilted. Hold the bracket in place while checking the image, then tighten the lock nut or screws without forcing the housing into a new angle.
This installation demonstration can help first-time DIYers visualize the sequence:
After the first drive, inspect the bracket, cable, seal, and image. Check again after the vehicle has experienced normal vibration and weather. If the picture has shifted, do not adjust the screen. Find out whether the bracket, fastener, or harness is moving.
For a more complete wiring and camera procedure, use this backup camera installation guide alongside the bracket-specific checks above.
CAPA Certification and Warranty Considerations
A certification mark can't replace a fitment check, but it can improve the information available about the part. CAPA 702 addresses exterior rearview and sideview camera components, including the mechanical requirements that help preserve camera orientation, lens geometry, and retention. That makes the bracket part of the functional system rather than an unimportant accessory.
For a daily driver or work truck, a bracket that holds its position matters because a shifted camera creates repeat labor. A shop may need to remove trim, inspect the wiring, reset the angle, and explain why the original installation no longer matches the vehicle. Better material control and documented fitment can reduce that uncertainty.
Don't assume every part carrying a quality-sounding label is certified. Check the actual CAPA identification, part number, vehicle application, camera compatibility, and included hardware. A certification for one bracket design doesn't automatically make a different universal bracket suitable for your camera.
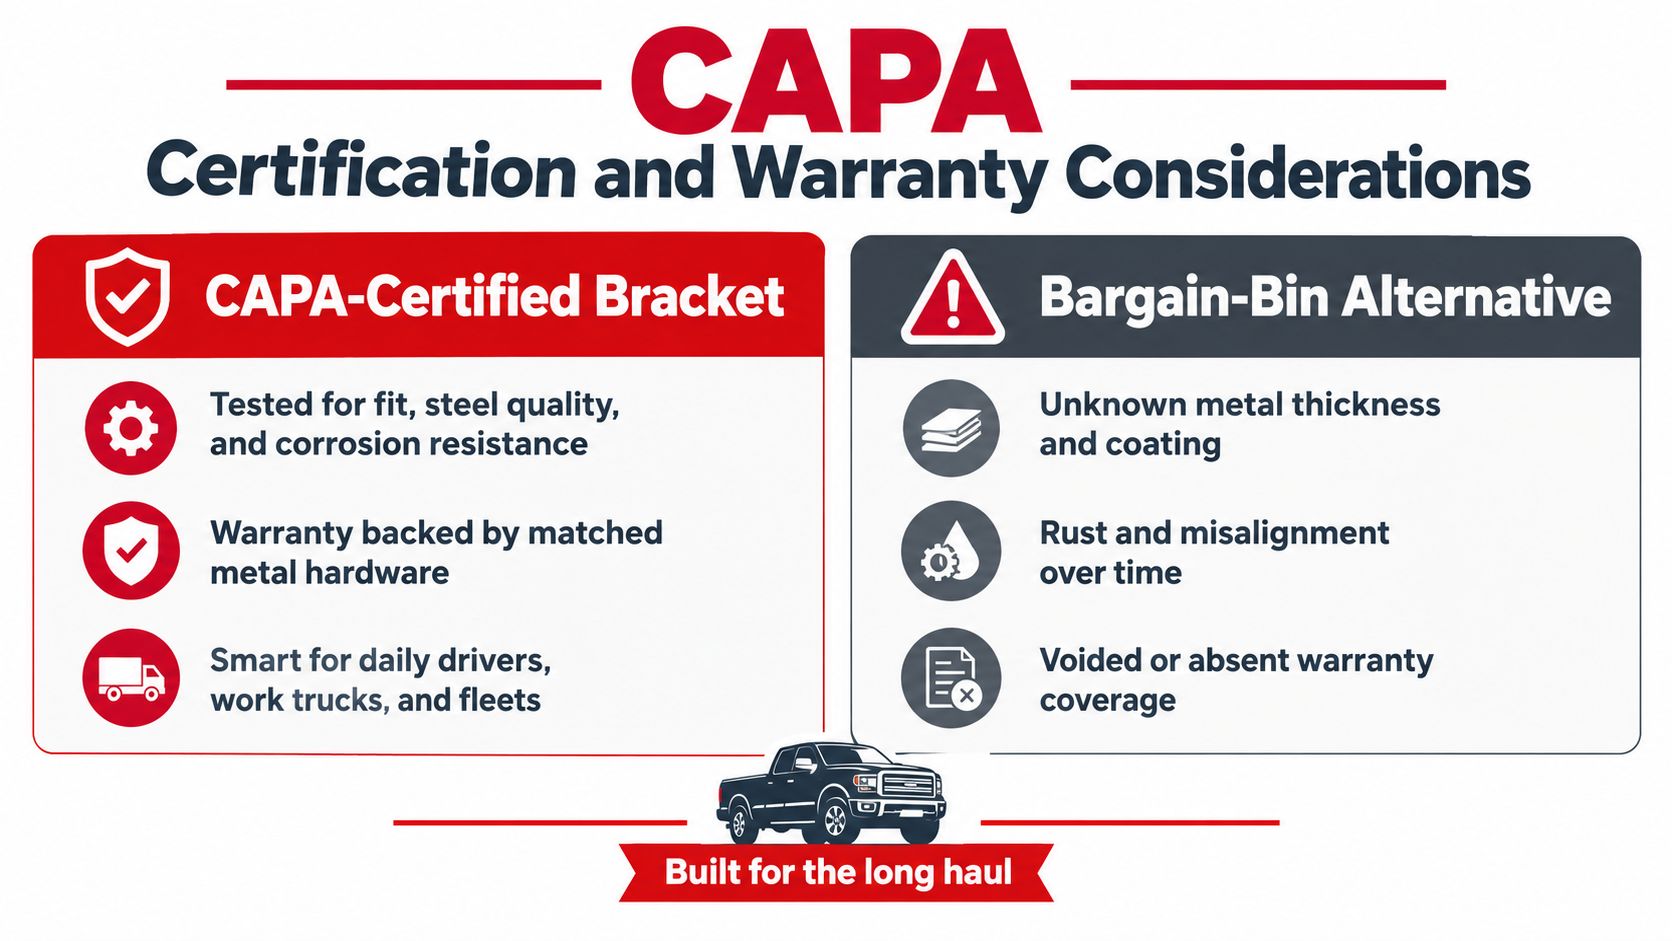
Warranty terms also deserve a close read. Confirm whether coverage applies to corrosion, cracking, loss of retention, or only manufacturing defects. Keep the receipt and installation information, especially if the part is being fitted by a repair shop or fleet team.
A CAPA-certified parts guide can help explain what certification means in the broader replacement-parts context. The useful buying habit is simple: verify the mark, verify the application, and match the hardware to the environment instead of relying on a product photo.
Choosing and Buying the Right Bracket
Run this checklist before you click buy:
- Measure the camera: Record the body shape, housing diameter, screw-hole spacing, thread type, lens opening, and gasket depth.
- Inspect the connector: Make sure the harness and its plugs can pass through the bracket without forcing, kinking, or rubbing.
- Match the vehicle surface: Choose a plate frame for a suitable sedan, a handle bezel for a compatible pickup, a flush insert for a prepared opening, or a surface pod for a strong flat panel.
- Choose for the climate: Salt, humidity, and frequent washing call for protected metal and corrosion-resistant hardware. A reinforced polymer may suit a light camera in a mild environment.
- Choose the retention method: Use adhesive for carefully prepared, light-duty, reversible installations. Favor screws or bolts for high vibration, commercial service, tow vehicles, and exposed locations.
- Verify the documentation: Check CAPA or equivalent certification where applicable, warranty coverage, included hardware, and vehicle-specific fitment.
Common fitment questions
Will one bracket fit multiple cameras?
Sometimes, but only when the camera body, screw pattern, lens opening, and connector clearance all match. A universal bracket can hold several similar cameras, yet “universal” doesn't guarantee the correct angle or gasket compression.
How do I confirm vehicle-specific fitment?
Compare the bracket's listed vehicle application with the actual mounting location. Then compare measurements and photographs against your vehicle, especially around tailgate handles, trim openings, plate studs, and spare tires.
When should I replace a bracket during a camera upgrade?
Replace it when the new camera changes the housing size, screw spacing, cable exit, or weight. Also replace any bracket showing cracks, corrosion at a fastener hole, elongated openings, loose pivots, or an angle that won't stay fixed.
For vehicle-specific backup cameras, mounting hardware, and related replacement parts, T1A Auto offers fitment-focused products for DIY owners and repair professionals, including camera components and replacement parts supported by product documentation. Visit T1A Auto to compare options by vehicle and confirm the bracket and camera combination before installation.
