


Before you even think about touching a single wire, let's talk about the most important step: picking the right backup camera system. This one decision will shape the entire installation process and, more importantly, how well the camera performs day-to-day. Getting this right from the start is half the battle.
Choosing the Right Backup Camera for Your Car

The first and most critical choice you’ll face is whether to go with a wired or a wireless setup. Each has its own set of pros and cons, and the best option really depends on your vehicle and how much work you're willing to put in.
Wired vs. Wireless Systems
I’ve installed dozens of both types, and here's the honest breakdown. A wired camera is the gold standard for reliability. You get a stable, interference-free video feed because there's a physical cable running from the camera to your monitor. This is why car manufacturers use them. The downside? You have to route that cable through your car's trim panels, which can be time-consuming.
On the flip side, wireless cameras are all about convenience. They send the video signal over the air, which means you don't have to tear apart your car's interior to run a long cable. The trade-off is potential signal interference. Other electronics can sometimes cause the picture to flicker or drop out, which can be frustrating when you need it most.
Here’s a quick table to help you decide which path is right for you.
Wired vs Wireless Backup Camera Systems
| Feature | Wired System | Wireless System |
|---|---|---|
| Video Reliability | Excellent, no interference | Prone to occasional interference |
| Image Quality | Generally higher and more stable | Can be compressed, quality may vary |
| Installation Difficulty | More complex, requires routing a cable | Much simpler, minimal wiring |
| Cost | Often slightly less expensive | Can be a bit more expensive |
| Best For | Daily drivers, reliability-focused users | Trucks, RVs, or those wanting an easy install |
Ultimately, if you're comfortable with a bit more work upfront for a flawless picture, go wired. If you want a faster, easier project, wireless is a great choice.
Key Features to Look For
Once you've decided between wired and wireless, don't just grab the first kit you see. There are a few key features that separate a genuinely useful camera from a gimmick.
- Viewing Angle: You absolutely need a wide field of view. Look for a camera with an angle between 120 and 170 degrees. Anything narrower gives you tunnel vision and defeats the purpose of seeing what's in your blind spots.
- Night Vision: This is a must-have, not a nice-to-have. A camera without good low-light performance is useless at night or in a dark parking garage. Look for systems that mention infrared (IR) LEDs for true night vision.
- Parking Grid Lines: Those colorful lines on the screen are incredibly helpful for judging distances. The best cameras have adjustable grid lines you can calibrate to your vehicle's width and length, making them far more accurate.
- Image Quality: Don't settle for a fuzzy picture. A camera with at least 720p resolution will give you a clear enough image to easily spot small obstacles, pets, or children behind your car.
The demand for these safety features has exploded. The global automotive backup camera market is on track to grow from $330.14 million in 2025 to $484.01 million by 2035. Ever since rearview cameras became mandatory on new U.S. vehicles in 2018, the market for adding them to older cars has boomed.
Picking the Right Display
Finally, where are you going to watch the video feed? The display is just as crucial as the camera itself.
You could get a small, standalone monitor that mounts to your dash or windshield. Another popular option is a rearview mirror monitor, which either clips over your existing mirror or replaces it entirely for a clean, factory-installed look.
If your car already has an aftermarket stereo with a video screen, you're in luck! Most of these head units have a dedicated camera input, making for a seamless integration. For those seeking top-notch, factory-fit solutions, browsing a dedicated collection of park assist cameras is a great way to find durable, vehicle-specific options.
Gathering Your Tools for a Clean Installation
Every good project starts with getting your tools in order before you turn the first screw. Trust me, knowing how to install the camera is only half the battle. There’s nothing more frustrating than having to stop mid-job to hunt for a specific tool. Let’s run through a pre-flight checklist to make sure this installation goes smoothly.
You’ve probably got the basics covered. A solid socket and screwdriver set is a must for getting into panels and securing brackets. You’ll also need wire strippers, cutters, and good-quality electrical tape for the wiring. A helpful guide to power tools like drills and hammers can give you some background, though drilling into your car should always be a last resort.
The Tools That Make a Difference
Beyond the essentials, a few specific items will make this job much, much easier. They aren't expensive, but they’re the difference between a clean, professional install and a frustrating mess.
- Plastic Trim Removal Tools: These are non-negotiable. If you try to pry open your interior panels with a metal screwdriver, you will scratch or gouge something. A simple set of plastic pry tools lets you pop clips and remove trim without leaving a mark.
- Fish Tape or a Stiff Wire: You'll thank yourself for having this when it's time to route the camera cable through tight spots, especially that rubber boot between the trunk lid and the car’s body. In a pinch, a straightened metal coat hanger can do the trick.
- Zip Ties: Grab a bunch. You'll use these to neatly secure the new wiring along existing factory looms. This keeps everything tidy, prevents annoying rattles, and ensures the cable doesn't get snagged on anything.
If you're looking to build out your toolkit, you can find a great selection of durable automotive installation tools on t1aauto.com that will serve you well for this project and many more down the road.
Pro Tip: Before you touch a single wire, disconnect the negative terminal on your car battery. This is the most important safety step you can take. It takes less than a minute and eliminates the risk of short-circuiting expensive electronics.
Finally, don't even think about starting the wiring without a simple multimeter or a 12V test light. This is the only way to be 100% sure you've found the correct power and ground wires for your reverse lights. It takes all the guesswork out of the equation and prevents some very costly electrical mistakes.
Getting the Camera Mounted and Running the Cable
Alright, with all your tools laid out, it's time to get your hands dirty and start the physical installation. This is the fun part, where you finally see the project taking shape. Getting the camera securely mounted and aimed just right is the key to getting a useful view when you shift into reverse.
First things first, you need to decide where the camera will live. Most aftermarket kits give you a few options, and each has its pros and cons.
- License Plate Mount: This is easily the most common and beginner-friendly choice. The camera is part of a frame that slips right behind your license plate, using the same screw holes you already have. No drilling needed, and it's always perfectly centered.
- Trunk Lip or Hatch Mount: This is a more discreet option. A small bracket attaches to the underside of the trunk lip or near the tailgate handle. It often requires drilling a tiny hole for the wire, but it can look like it came straight from the factory.
- Bumper Mount: For the cleanest, most integrated look, you can mount a camera directly into the bumper. This method requires carefully drilling a hole, which can be nerve-wracking if you're not comfortable with it.
If this is your first time doing this, I'd strongly suggest going with a license plate mount. It takes a lot of the guesswork out of the equation and still gives you an excellent view. No matter which you choose, the goal is the same: make sure it's on there tight and angled to see straight back.
Finding the Path of Least Resistance
Now for the part that seems to intimidate people the most: running the main video cable from the back of the car all the way to your dashboard. The secret here is to work smarter, not harder. You want to avoid drilling new holes in your car's body at all costs—that's just asking for rust and water leaks later on.
The good news is that your car already has built-in entry points. Pop the trunk or lift the tailgate and pull back some of the carpet or plastic trim. You're looking for a round, black rubber plug called a grommet. Car manufacturers use these to pass wiring through for tail lights and license plate lights. This is your VIP entrance into the vehicle's cabin.
The infographic below gives you a great visual of how to route the cable through one of these factory grommets without causing any damage.
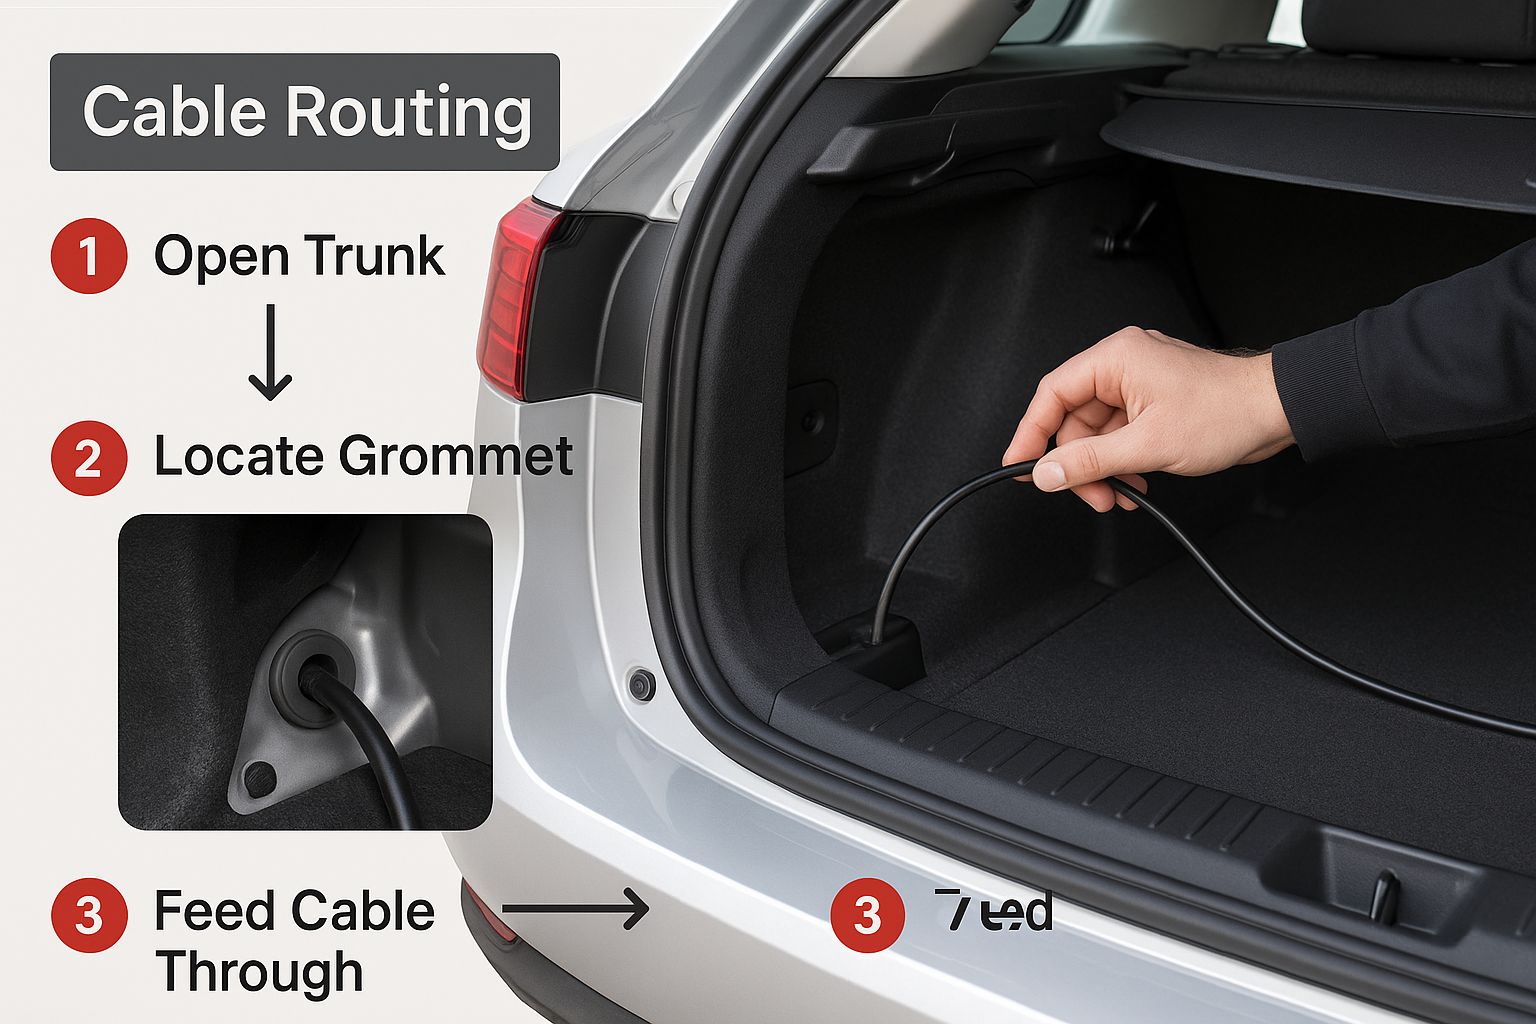
Following this path keeps the cable safe and maintains your car's weatherproof seal. It’s a clean, professional approach that doesn’t require any permanent modifications.
Routing the Cable for a Factory Finish
Once you've got the cable inside the car, the next objective is to make it disappear. A clean installation should look like it was done at the factory—no stray wires in sight. Grab your plastic trim removal tools and gently pry up the plastic door sill plates that run along the floor. Underneath, you'll find a channel where the factory wiring is already neatly tucked away.
Take your time here. Tuck the new video cable neatly alongside the existing wire loom and use zip ties every foot or so to secure it. This prevents the cable from getting pinched or rattling around while you drive.
From the door sills, the path is usually straightforward. You can run the wire up behind the kick panel in the footwell and then feed it up behind the dashboard to where your monitor will be. For more great insights into clean wiring and project planning, check out this DIY guide on installing security cameras. While it's for home systems, the core principles of planning your cable routes are universal and incredibly valuable.
Nailing the Power and Ground Connections
Alright, you've got the camera mounted and the main video cable snaked up to the front. Now comes the part that makes or breaks the entire installation. Getting the power right is the difference between a backup camera that works flawlessly every time and one that’s a constant source of frustration. Don't worry, it's not complicated, but it does demand a bit of care.
The secret to making your camera pop on automatically is tying it into your vehicle's reverse light circuit. When you shift into reverse, the lights come on, and so does your camera. Shift out of reverse, and everything powers down. It’s a slick setup that feels like it came straight from the factory.
Finding Your Power Source
First things first, you need to find the 12V positive (+) wire for your reverse light bulb. This means getting to the wiring harness that plugs into your car's tail light assembly.
To start, put the key in the ignition and turn it to the "on" position, but don't start the engine. With the parking brake firmly engaged, shift the transmission into reverse. This energizes the circuit you need to find.
Now, grab your multimeter or a simple 12V test light. You'll need to carefully probe the wires going into the tail light connector. When you hit the wire that gives you a 12V reading (or lights up your test light), you've found it. To double-check, shift the car back into park. The voltage should disappear, confirming you’ve got the right wire.
Making a Rock-Solid Connection
With the positive wire identified, it's time to tap in and give your camera some juice. You've got a couple of ways to do this, each with its pros and cons.
- T-Taps (Scotchlok Connectors): These are the fastest and easiest option, for sure. You just clamp one over the reverse light wire and plug the camera's power lead into the new port. They're great for a quick install, but I've seen them wiggle loose over time with vehicle vibrations.
- Soldering and Heat Shrink: This is how the pros do it, and it's my personal preference. You carefully strip a tiny bit of insulation, wrap the camera's power wire around the exposed copper, and solder them together. A piece of heat shrink tubing over the top makes it a permanent, weatherproof connection that will never let you down.
Honestly, a quality T-tap will work just fine for most people. Just choose the method you feel most confident executing.
I can't stress this enough: don't rush the connection. A shoddy, loose tap is the number one reason I see for flickering video or cameras that work one day and not the next. Take an extra minute to make sure it's tight and secure.
The Ground Wire: Your Key to a Clear Picture
Power is only half the story. Without a clean, solid ground connection, you'll never get a stable video signal. The camera's black wire needs to be firmly attached to a bare metal spot on the car's chassis.
A bad ground is the source of probably 90% of all video noise issues, like those annoying rolling lines or a screen that constantly flickers. Don't just loop it around the nearest screw you can find.
The best-case scenario is finding a factory grounding point, which usually looks like a bolt with a bunch of other ground wires already attached. If that’s not an option, you can make your own by using a self-tapping screw on a solid piece of the vehicle's frame. Just be absolutely sure to sand off any paint where the connector will touch the metal. A perfect metal-to-metal connection is the secret to getting a crystal-clear image every single time.
Putting the Monitor in Place and Hooking Everything Up
Alright, the hard part is over. You've painstakingly routed that main video cable from the back of the car all the way to the front. Now it's time for the final assembly—getting the monitor mounted and connecting the last few wires to bring the system to life.
Taking your time here is what separates a clean, professional-looking setup from a messy one. A little extra thought now will make sure everything works perfectly and looks like it belongs there.
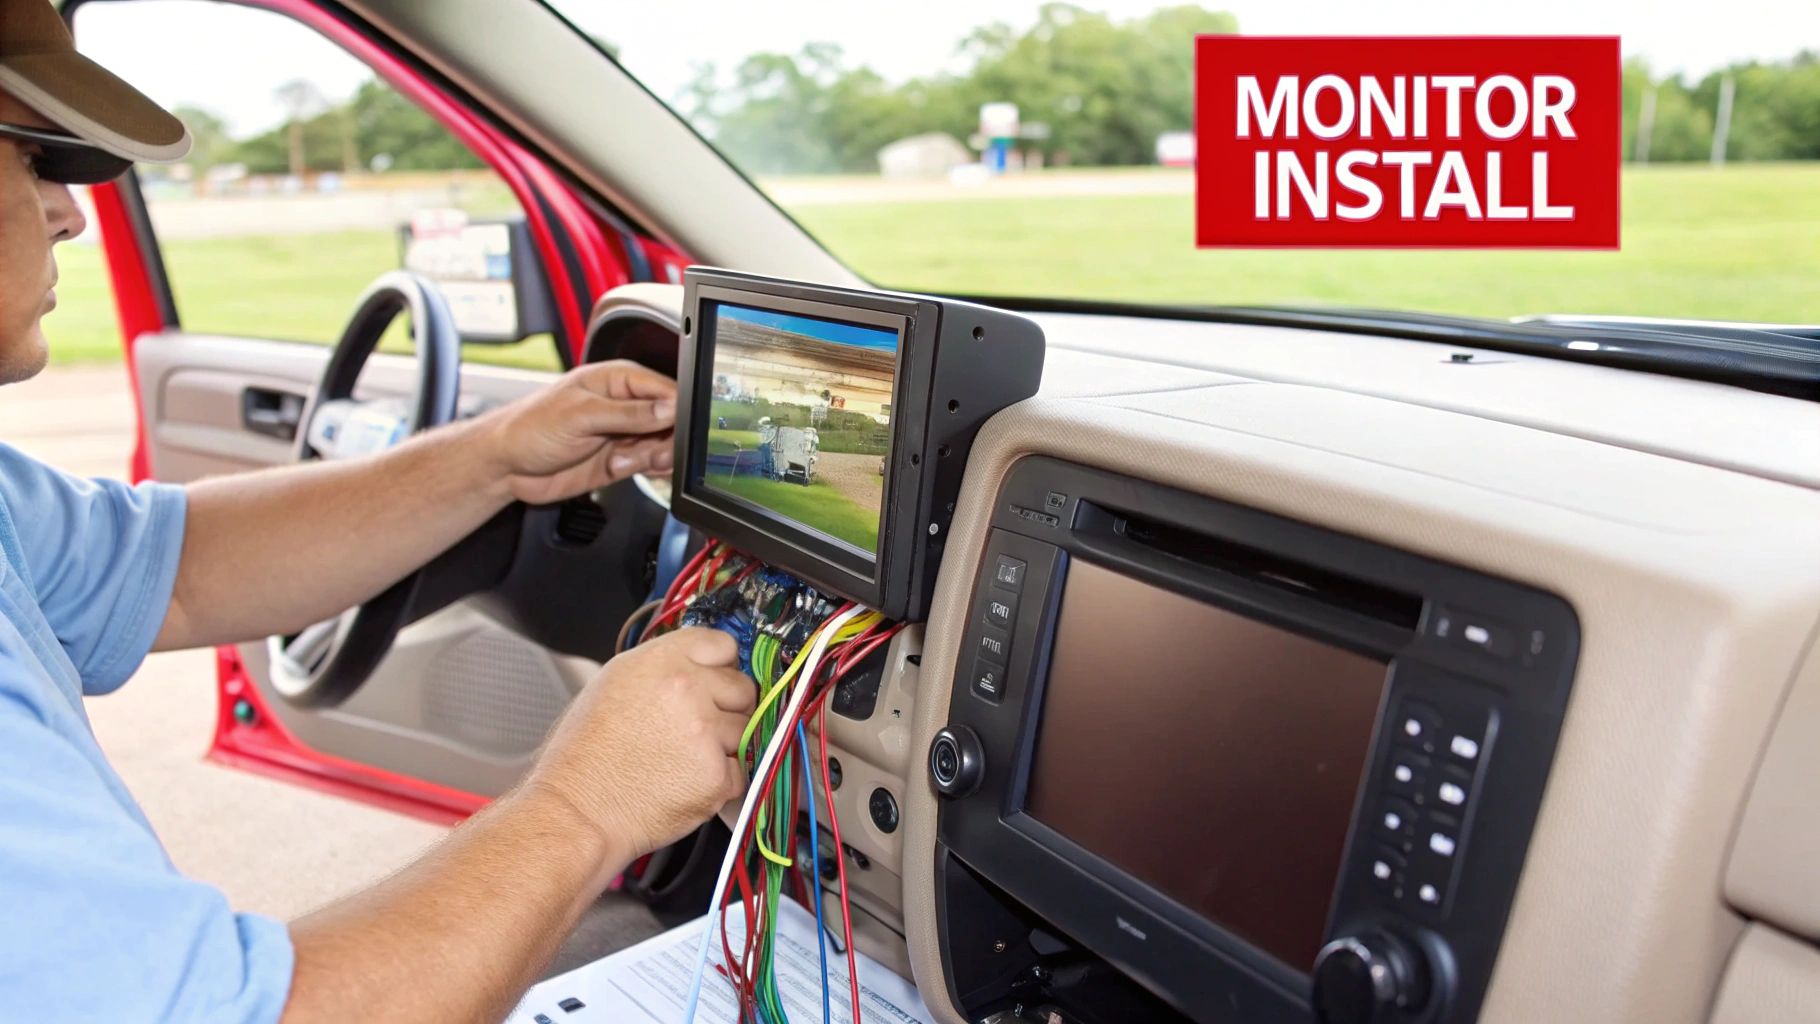
Finding the Perfect Spot for Your Display
Where you decide to put your monitor is a big deal. It needs to be easy to see at a glance without blocking your view of the road. The type of kit you bought will pretty much dictate your options.
- Standalone Dash Monitor: These offer the most flexibility. You can place them on the dash, the center console, or anywhere with a flat surface. Before you peel the backing off that adhesive mount, sit in your normal driving position and hold the monitor in a few different spots. Find the one that feels most natural.
- Rearview Mirror Monitor: If you're going for that clean, factory look, this is the way to do it. The installation here involves carefully running the wires up the A-pillar (the one next to your windshield) and tucking them neatly under the headliner. When you’re done, you won’t see a single wire.
- Aftermarket Stereo Head Unit: This is a common setup if you've already upgraded your stereo. Your main task is simply getting the camera's video plug and the reverse trigger wire to the back of the head unit. You’ll almost certainly have to pull the stereo out of the dash to get access.
No matter which type you have, the goal is to hide the wiring. Grab your plastic trim tools and gently pry open the edges of interior panels to tuck the cables out of sight.
A Quick Word of Caution: When running wires up the A-pillar, you absolutely have to be aware of the side curtain airbags. Always, and I mean always, route your wiring behind the airbag assembly, never in front of it. A few well-placed zip ties holding the new wire to an existing factory harness will keep it secure and out of the way if the airbag ever needs to deploy.
Tapping into a Switched Power Source
This is the last, and arguably most important, electrical connection. You need to power your monitor, but you don't want it on 24/7, draining your battery. The solution is to find a "switched" power source—a circuit that’s only live when the car is on.
The cleanest and safest way to do this is with an add-a-fuse tap. This little gadget lets you piggyback onto an existing circuit in your fuse box without having to cut or splice a single factory wire.
- Find the Fuse Box: Start by locating the interior fuse box. It's usually tucked away under the driver's side dashboard or sometimes behind the glove box.
- Hunt for a Switched Fuse: Grab your test light or multimeter. With the car off, probe fuses until you find one that's dead. Then, turn the key to the "on" or "accessory" position and test again. When you find one that's now live, you've found your switched circuit. Fuses for the radio or cigarette lighter are usually a safe bet.
- Install the Add-a-Fuse: Pop the original fuse out of the panel. Place it into the lower slot on the add-a-fuse tap. Put the new, smaller fuse for your camera system into the top slot. Now, plug the whole assembly back into the fuse box where the original fuse was.
- Connect and Ground: Crimp the monitor's red power wire to the pigtail on the add-a-fuse. For the black ground wire, find a solid metal bolt or screw under the dash. Loosen it, slip the ground wire's terminal underneath, and tighten it back down for a good, solid connection.
With power and ground handled, all that's left is to plug the yellow RCA video cable from the camera into the monitor. Double-check that every connection is snug and secure before you start snapping all your interior panels back into place.
Testing Your Setup and Solving Common Glitches
https://www.youtube.com/embed/xyUv34gxnrw
Alright, with all the trim pieces snapped back into place and every wire tucked away, it's time for the moment of truth. Go ahead and reconnect the negative terminal on your car's battery—make sure that clamp is on there nice and snug.
Now, let's see this thing in action.
Hop in the driver's seat, put the key in the ignition, and turn it to the "ON" position (no need to start the engine just yet). With the parking brake engaged, shift the car into reverse. Your monitor should immediately power up, giving you a crystal-clear view of everything behind you. When it works on the first try, it's a great feeling.
But what if it doesn't? Don't sweat it. Most of the time, the culprit is a simple loose connection or a setting that needs a quick tweak. Let's walk through the common hiccups.
Troubleshooting Common Problems
Is the monitor just a blank, black screen? This is almost always a power problem. Your first move should be to re-check the connection you made at the reverse light. Also, take a close look at your ground wire. It needs to be screwed tight against bare, clean metal, not a painted surface. A bad ground is the cause of 90% of video issues.
If you're seeing a flickering image or rolling lines, that also points to a poor ground connection or some electrical interference. Make sure that ground screw is solid and confirm the video cable isn't running right alongside other high-power wires.
Sometimes the fix is even easier. Is the image just upside down or backward? That's not a wiring problem. Just dive into your monitor's settings menu. You'll find an option to flip or mirror the image—a simple one-click solution.
I can't stress this enough: the most common point of failure is a rushed connection. Taking an extra 60 seconds to double-check that your power tap is secure and your ground is solid will save you from a huge headache later. A little patience right now goes a very long way.
Finally, take a moment to aim the camera properly. A good rule of thumb is to have the very bottom of the screen just showing the edge of your bumper. This gives you a perfect reference point for judging distance while keeping the main focus on the road behind you.
If you’ve run through these steps and are still stuck, there might be another issue at play. Sometimes, other vehicle systems can cause unexpected problems. For instance, it can be helpful to understand how other components work, like what to do when your parking sensor is not working. This kind of knowledge helps you build a more complete picture of your car's safety features.
Common Questions We Hear During Backup Camera Installations
Even with the best guide in hand, you're bound to run into a few head-scratchers during the installation. Let's walk through some of the questions that come up time and time again when people are learning how to install a backup camera.
Can I Hook Up an Aftermarket Camera to My Car's Factory Screen?
This is probably the #1 question we get, and the honest answer is: it depends. Most factory infotainment systems aren't plug-and-play with aftermarket cameras. They're often locked down and need a specific (and sometimes pricey) adapter module to even recognize an outside video feed.
Compatibility is entirely dependent on your vehicle's make, model, and year. For some cars, you might even need a trip to the dealership to have them "unlock" or program the head unit to accept the new camera. The best advice? Before you buy anything, do some digging online for your specific vehicle to see what adapters are available and what the process involves.
My Wireless Camera's Picture is Flickering. What Gives?
If your wireless camera is acting up, signal interference is almost always the culprit. Think of all the other electronics running in your car, not to mention all the metal between the back of your car and the dashboard.
Here are a few things to check right away:
- Make sure the transmitter (near the camera) and the receiver (near your screen) have the clearest possible path to each other.
- Try moving the transmitter a few inches. Sometimes just getting it away from a bundle of other wires is enough.
- Double-check your power and ground connections. A weak or inconsistent power supply can make the signal drop in and out.
A flickering screen is annoying, but it's usually a simple fix. Before you think the camera is a dud, peek in the trunk and make sure the transmitter isn't stuffed behind a metal brace. A quick repositioning can make a world of difference.
Do I Really Have to Drill Holes in My Car?
Nope! For most installations, drilling is completely unnecessary. Modern camera kits are designed to be as non-invasive as possible.
Cameras built into license plate frames are the easiest—they just use the existing holes for your plate. For other styles, take a look around your trunk or tailgate area. You can almost always find a rubber grommet that you can pass the wire through. Drilling should be your absolute last resort, as it can create a perfect spot for rust and water to sneak in.
For reliable, CAPA-certified cameras and all the tools you need for a professional installation, trust the experts at T1A Auto. Shop our collection and get the right parts with a guaranteed fit at https://t1aauto.com.
