


You've just noticed one of your tail lights is out. It’s a common discovery that usually points to one of three culprits: a burnt-out bulb, a cracked lens, or an electrical hiccup somewhere in the system. The good news? This is one of the most straightforward and common repairs a car owner will face. Getting it fixed quickly is key, both for your safety and for staying on the right side of the law.
Why You Can't Afford to Ignore a Broken Tail Light
A dead tail light is more than just a minor annoyance—it's a serious safety hazard and a magnet for traffic stops. Your tail lights are your car's primary way of communicating with drivers behind you, showing them where you are and what you're doing.
When one goes out, your car instantly becomes less visible, a problem that gets much worse at night or in bad weather like heavy rain or fog. This dramatically raises the risk of getting rear-ended because the driver behind you might not see you braking—or see you at all—until it's too late.
Real-World Risks and Legal Headaches
The numbers don't lie. Properly functioning lights are absolutely critical for avoiding accidents. Transportation safety studies consistently show that poor vehicle visibility is a direct cause of crashes. In fact, between 2021 and 2022, a drop in roadway fatalities was partly credited to better vehicle safety systems, which underscores just how important something as simple as a working light can be. You can dig into the specifics by checking out the latest transportation safety data.
Here’s the bottom line: A non-functional tail light gives other drivers less time to react. That split-second difference can be the one that prevents—or causes—a serious accident.
On top of the safety risks, you're looking at a moving violation in every single state. A broken tail light is one of the easiest things for police to spot and one of the most common reasons to get pulled over. That stop can easily end with a fine and points on your license.
Know the Rules of the Road
It's smart to know exactly what the law says about your vehicle's lights. For instance, taking a look at Florida state traffic laws reveals specific requirements for the color, brightness, and condition of tail lights. A quick fix is almost always cheaper and less hassle than a traffic ticket.
So, what’s usually behind a tail light failure? It almost always boils down to one of these four issues:
- A Burnt-Out Bulb: By far the most common cause. Bulbs just don't last forever, and this is usually a quick and easy fix.
- A Cracked or Damaged Lens: A crack lets in moisture and dirt. That can cause the bulb to short out and the socket to corrode.
- A Blown Fuse: Fuses are designed to blow during an electrical surge to protect the circuit. If the fuse for your tail lights goes, the lights go with it.
- Faulty Wiring: Over time, wires can corrode, shake loose, or get damaged, cutting off the electrical connection to the light.
How to Diagnose Your Tail Light Problem
Before you start ordering parts or pulling your vehicle apart, you need to play detective. Getting the diagnosis right from the start is the key to saving time, money, and a massive headache. The fix could be as simple as a ten-dollar bulb, or the dead light could be a symptom of a trickier electrical issue.
Let's walk through how to figure it out, starting with the easiest checks and working our way up.
This flowchart gives you a good visual roadmap for tracking down the real cause of the failure, from a quick visual check all the way to testing the wiring.
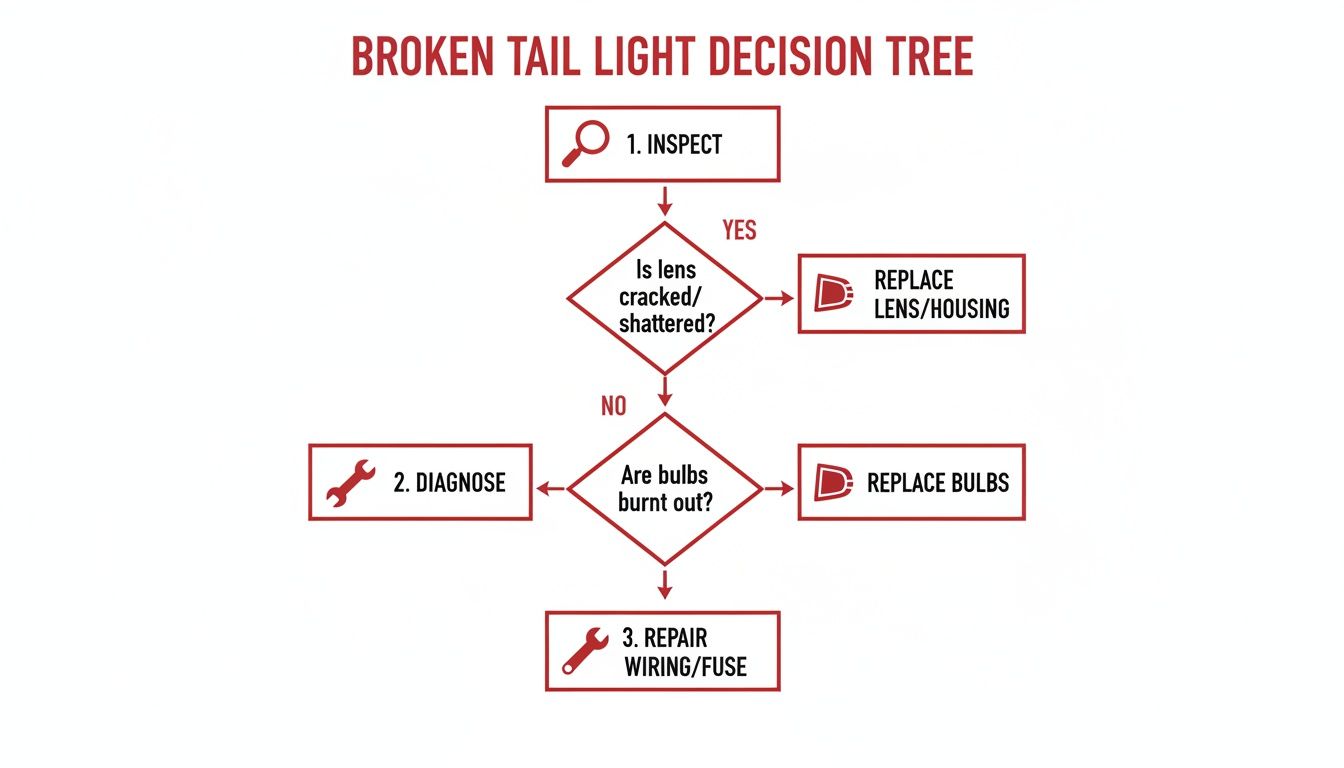
As you can see, it’s a logical process. You always want to rule out the simple stuff first before breaking out the specialty tools.
Start With a Simple Visual Inspection
Your eyes are your best first tool, so let's put them to work. Have a friend or family member help you out. With your parking lights on, ask them to step on the brake pedal and then use the turn signals while you stand behind the car.
Pay close attention. Is the entire tail light assembly dark, or is it just one function? For instance, maybe the brake light is out, but the turn signal still works. If that's the case, you're likely dealing with a dual-filament bulb where one of the filaments has simply burned out—a very common and easy fix.
While you're back there, get a good look at the plastic lens cover. Are there any hairline cracks, chips, or holes? Even a tiny fracture is enough to let moisture seep in, which leads to corrosion and kills bulbs fast.
Checking the Bulb and Socket
If you don't spot any obvious damage on the outside, the next logical step is to get your hands on the bulb itself. You'll typically find an access panel inside the trunk or cargo area. On some trucks and SUVs, you might just need to remove a couple of screws from the outside of the assembly to get to it.
Once you have the socket in hand, a simple twist and pull will free the bulb. Hold it up and look closely at the tiny wire filament inside the glass. A burnt-out bulb is usually pretty obvious—you'll see a broken, dangling filament or a dark, smoky film on the inside of the glass.
But don't be fooled. Sometimes a filament can break in a spot that's hard to see. The most reliable test? Swap it with the working bulb from the other side. If your "bad" bulb lights up in the other socket, then you know the bulb isn't the problem after all.
While the socket is out, give it a quick inspection for:
- Corrosion: Any white or greenish crust on the metal contacts needs to be addressed.
- Melted Plastic: This is a red flag for an electrical short and a more serious problem.
- Bent Contacts: Make sure the metal tabs inside are clean and look like they'd make solid contact with the bulb.
A little bit of corrosion can usually be scraped clean with a small wire brush or a piece of sandpaper to get a good connection again. But if you see significant melting or damage, you're probably looking at a new socket or wiring pigtail.
Move on to the Fuse Box
So, the bulb is good, but the light is still out. What's next? It's time to check the fuses. Your owner's manual is your best friend here; it'll have a diagram showing you exactly which fuse protects the tail light circuit. Most cars have two fuse boxes—one under the hood and another inside the car, often tucked away under the dashboard.
Using a fuse puller (or a pair of needle-nose pliers in a pinch), pull the fuse in question. Hold it up to a light and look at the thin metal strip inside. If that strip is broken or looks torched, the fuse is blown.
Grab a new fuse with the exact same amperage rating and pop it in. Sometimes, that's all it takes. But be aware, a blown fuse is often just a symptom. If the new fuse blows right away, it’s a clear sign of a short circuit somewhere in the wiring that needs to be tracked down. If you're running into issues like that, it's worth taking a moment to learn more about how to diagnose car electrical problems.
To help you quickly connect symptoms to causes, this table breaks down the most common tail light problems.
Troubleshooting Common Tail Light Issues
| Symptom | Likely Cause | First Diagnostic Step | Typical Solution |
|---|---|---|---|
| One function is out (e.g., brake light) | Burnt-out dual-filament bulb | Swap bulb with a known good one | Replace bulb |
| Entire tail light is out | Burnt-out bulb or blown fuse | Check bulb, then check fuse | Replace bulb or fuse |
| Light is dim or flickering | Corrosion or loose connection | Inspect bulb socket | Clean contacts or replace socket/pigtail |
| New fuse blows immediately | Short circuit in wiring | Inspect wiring for damage | Trace and repair the damaged section of wire |
| No visible issue with bulb or fuse | No power to the socket | Test socket with a multimeter | Trace wiring for breaks or consult a professional |
This table serves as a quick-reference guide, but for a definitive answer on electrical issues, you'll need the right tool.
Using a Multimeter for a Definitive Answer
When the bulb and fuse both check out, you're left with one big question: is power even getting to the socket? This is where a multimeter proves its worth. It’s the only way to know for sure.
Set your multimeter to the DC voltage setting (look for the V⎓ or DCV symbol). With the car's lights on, carefully touch the meter's red probe to the metal contact at the very bottom of the bulb socket. Then, touch the black probe to the metal contact on the side of the socket.
You should see a reading of around 12 volts. If you do, it confirms power is reaching the socket and, despite looking okay, your original bulb was the culprit. But if you get a reading of zero (or close to it), it confirms there's a break in the connection somewhere between the fuse box and the socket. That means it’s time to start tracing wires to find the fault.
Gathering the Right Tools and Replacement Parts
Fixing a broken tail light is one of the most satisfying jobs you can do yourself. It's a quick win that makes a real difference. But the key to turning a potentially frustrating hour into a 15-minute success story is having everything you need before you start.
Let's walk through getting your tools and parts lined up so you can knock this out smoothly.
Before you touch a single bolt, a little prep goes a long way. Most tail light jobs don't call for a mechanic's entire toolbox, but a few specific items are absolutely essential for getting it done right without causing any damage.
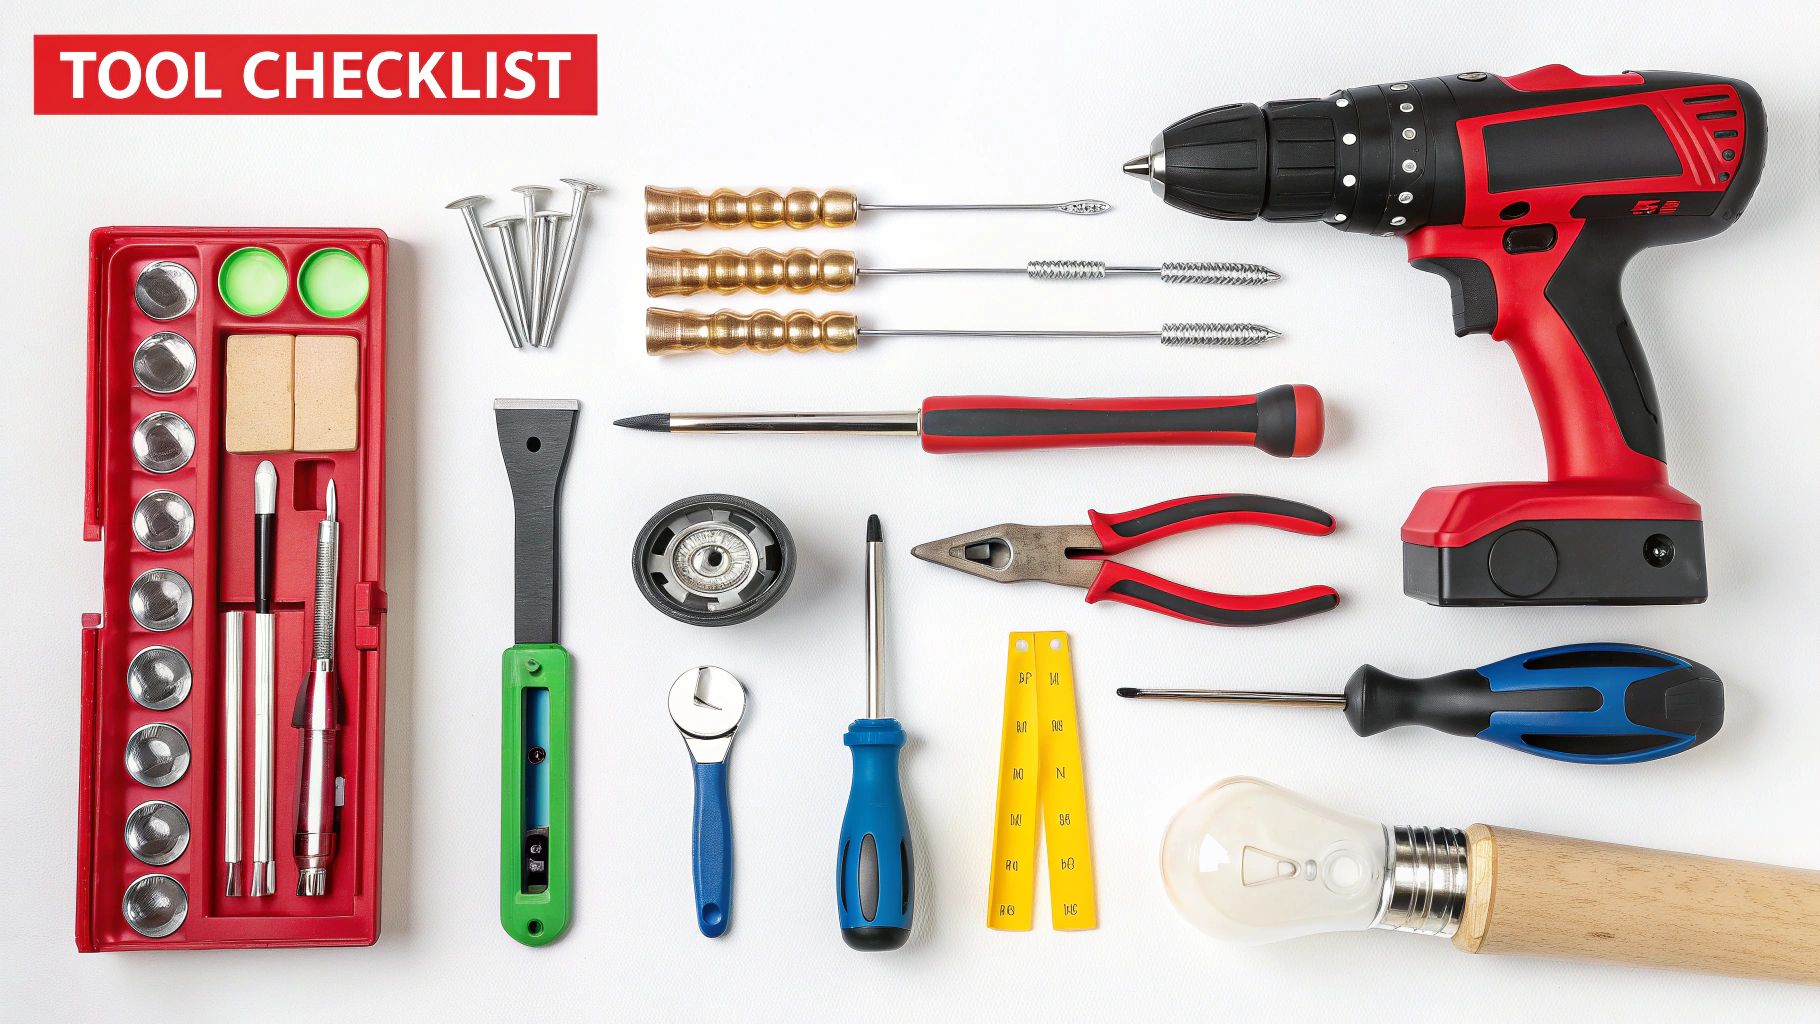
Your Essential Tool Checklist
You'll save yourself a ton of headaches (and trips to the hardware store) by grabbing these items first. For most cars, this is all you'll need:
- Socket Set & Ratchet: This will be your go-to for removing the nuts or bolts holding the assembly. A basic kit with metric sockets is perfect—8mm, 10mm, and 12mm are the most common sizes you'll run into.
- Screwdrivers: Keep a Phillips head and a flathead handy. You'll often need them for smaller screws on the lens itself or to access interior trim panels.
- Plastic Trim Removal Tools: Don't try to use a screwdriver for this! These cheap plastic pry tools are a game-changer. They let you pop off trunk liners and plastic panels without scratching your paint or snapping the clips.
- Needle-Nose Pliers: Invaluable for grabbing a tiny nut you dropped, pulling a stubborn bulb out of its socket, or yanking a blown fuse from the fuse box.
Pro Tip: Grab a magnetic tray or even just an old yogurt cup. Those little nuts and bolts have a magical ability to vanish into the darkest corners of your trunk or roll under the car, never to be seen again.
Choosing the Right Replacement Parts
Okay, tools are set. Now for the parts. What you need depends entirely on your diagnosis. Is it just a dead bulb, or is the whole housing cracked and foggy?
If your lens is cracked, it’s not just a cosmetic issue. Modern tail lights are designed as sealed units. The moment that seal is compromised, moisture gets in and starts corroding bulbs, sockets, and wiring. In that situation, replacing the entire tail light assembly is the only real, long-term solution.
This brings you to a classic decision: OEM or aftermarket?
- OEM (Original Equipment Manufacturer) parts are what your car was built with. You know they'll fit perfectly, but you’ll definitely pay a premium for that factory logo.
- High-Quality Aftermarket parts are made by third-party companies to match or even beat the original specs. Trusted brands like T1A Auto deliver a perfect fit and great durability at a much more wallet-friendly price.
If you're weighing the pros and cons, our guide on OEM vs. aftermarket parts breaks it all down to help you decide.
The market for these parts is huge for a reason. Valued at roughly $5.2 billion in 2023, the global automotive tail light market is expected to hit $8.1 billion by 2032. That's a lot of cars needing safe, reliable lights. This growth just underscores how critical quality components are for everyone from DIYers to pro shops.
When you're ready to buy, just make sure you have your vehicle’s year, make, and model handy. Any good online retailer will have a vehicle filter to ensure the part you're ordering is a guaranteed match, taking all the guesswork out of the process.
Getting Your Hands Dirty: A Practical Guide to Tail Light Replacement
Alright, you've got your tools and the right parts. Now for the satisfying part—actually fixing the problem. We’ll go through the two most common situations you'll run into: a quick bulb swap and a full tail light assembly replacement.
I'll use a pickup truck as our main example here, but don't worry, the basic idea is the same for most cars and SUVs. The exact screw locations might be different, but the core process of unplugging, unbolting, and reinstalling is pretty universal.
Scenario One: The Simple Bulb Swap
This is the fix everyone hopes for. A burnt-out bulb is the number one cause of a broken tail light, and you can usually knock this out in less than 15 minutes. It's a great first project for anyone wanting to get into DIY car repair.
First, you need to get to the back of the tail light assembly. On most vehicles, your access point is from inside the trunk or cargo area.
- For Sedans and Coupes: Pop the trunk and look for a carpeted liner right behind the bad light. You'll usually find a small plastic access door or a few clips to pull it back.
- For SUVs and Hatchbacks: The access panel is probably on the side wall of the cargo space. A plastic trim tool is your best friend here, letting you pop it open without scratching anything.
- For Pickup Trucks: Access is almost always from the outside. This usually means you have to remove the whole assembly to get to the bulbs, which we'll cover in the next section.
Once you can see the back of the assembly, you'll spot the bulb sockets connected to the wiring. To get one out, just grab the plastic base, give it a firm quarter-turn counter-clockwise, and pull it straight back.
With the socket and old bulb free, gently pull the bulb straight out. It shouldn't take much force; sometimes a little wiggle is all it needs. Before you pop the new one in, throw on a pair of clean gloves. The oil from your skin can create hot spots on a halogen bulb and cause it to burn out way too soon.
Slide the new bulb into the socket until you feel it seat firmly. Now, stop. Before you put everything back together, there's one critical step.
Crucial Tip: Always test the new bulb before you reinstall the socket and button everything up. Get a friend to hit the brakes and flip on the turn signal. This simple check can save you the massive headache of having to tear it all apart again.
If the bulb lights up, you're good to go. Re-insert the socket, give it a quarter-turn clockwise to lock it in, and put the trim panel or liner back. Job done.
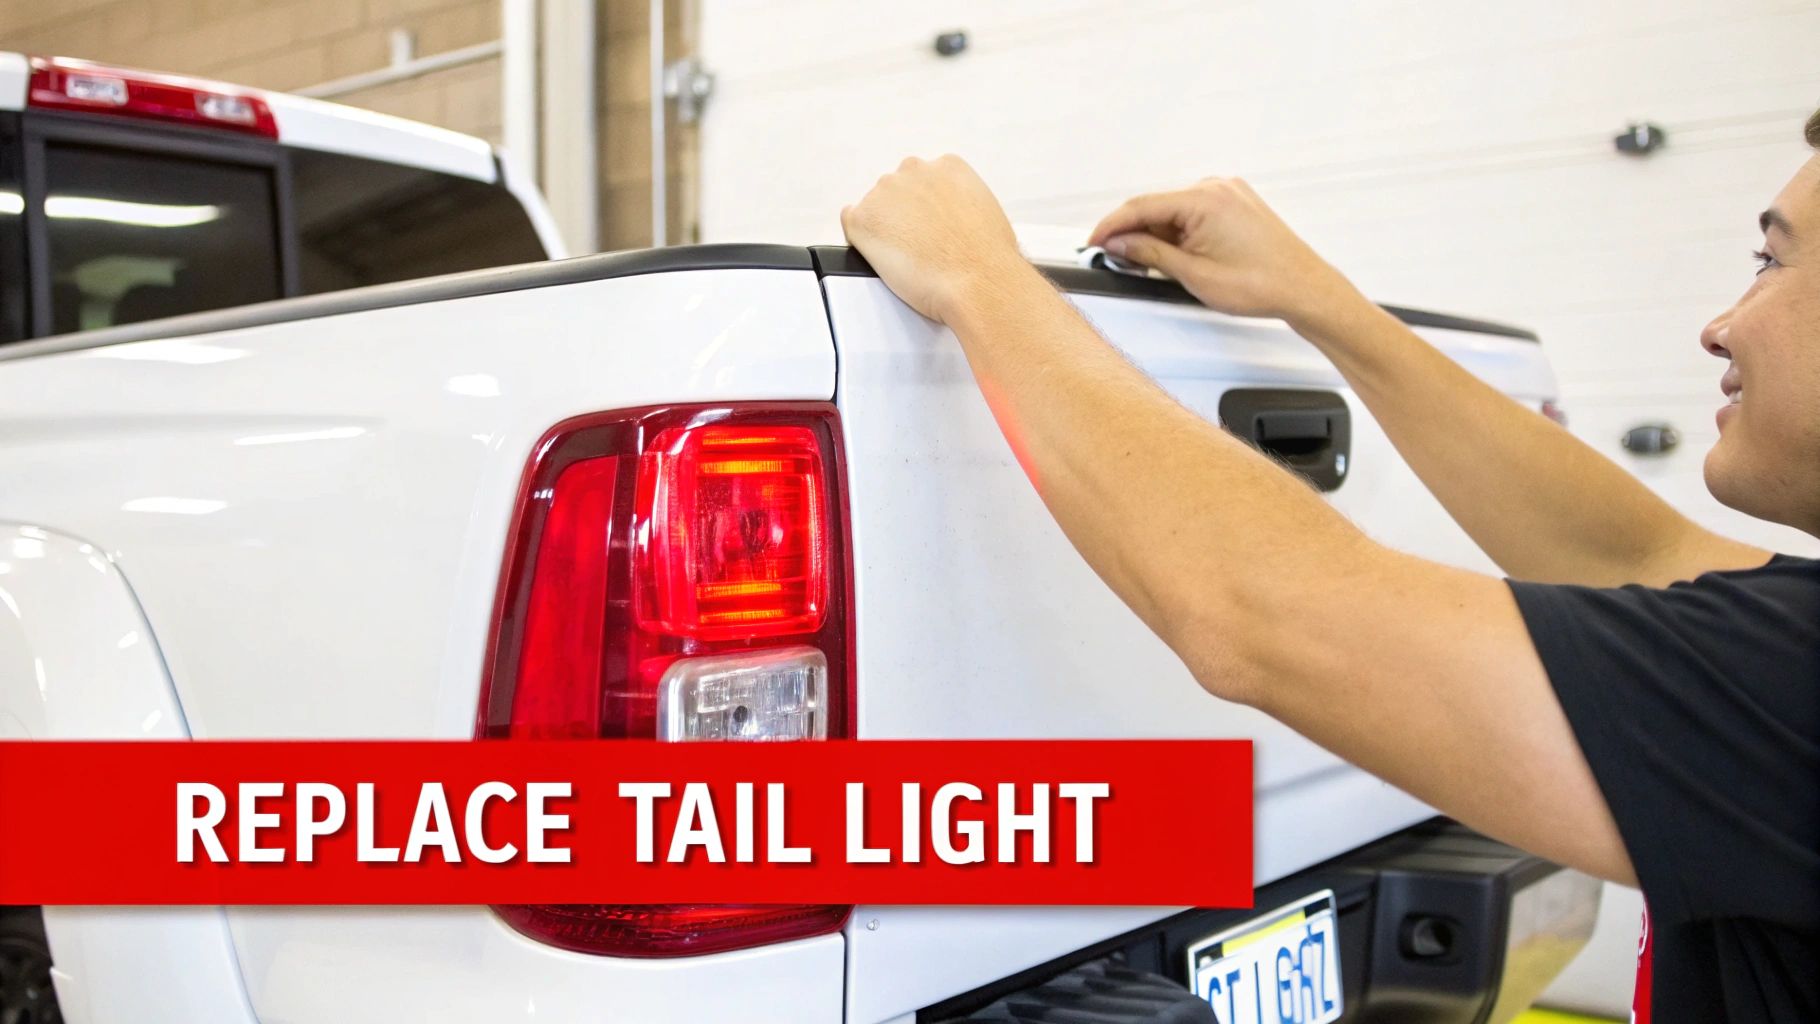
Scenario Two: Replacing the Entire Assembly
If you’re dealing with a cracked lens, nasty internal corrosion, or one of those modern, sealed LED units, you'll have to replace the whole assembly. This sounds like a big deal, but it really isn't. With a basic socket set, it’s a job you can tackle in under an hour.
Let's use a Ford F-150 as our example, where the process is dead simple. First, lower the tailgate so you have a clear shot at the side of the truck bed. You'll see two bolts (usually 8mm or 10mm) on the inside edge of the tail light. That’s all that’s holding it on.
Grab your socket wrench and take those two bolts all the way out. Do yourself a favor and toss them in a magnetic tray so they don't roll away and disappear.
With the bolts out, the assembly is just held in by a couple of plastic guide pins that snap into the truck's body. Grab the assembly and pull it straight back, directly away from the truck. You might need a firm, steady wiggle to pop the pins free. Whatever you do, don't pull it sideways—you'll snap those pins right off.
Once it's loose, you'll see the wiring harness. Now you can easily twist out each socket just like you would for a bulb change. Transfer the old bulbs and sockets to your new T1A Auto tail light assembly, making sure each one clicks in securely.
If your new assembly came with its own wiring, just disconnect the main electrical plug. There's typically a little plastic tab you press to release it. Click the new harness in, listening for that reassuring snap that tells you it's a solid connection.
Now, line up the guide pins on the new assembly with the holes on the truck body and give it a firm press until it pops into place. Reinstall the two bolts and tighten them until they're snug. Don't go crazy here; over-tightening can easily crack the new plastic housing.
And just like with the bulb swap, test everything—running lights, brakes, turn signals, and reverse lights—before you pack up your tools. This final check is your guarantee that the job was a success and your truck is safe to hit the road.
Knowing the Costs and When to Call a Pro
Every DIY project boils down to a classic trade-off: time, money, and your own confidence level. Fixing a tail light is usually a fantastic wallet-friendly job, but you’ve got to be honest about the real-world costs and your own limits. The last thing you want is a simple fix spiraling into a weekend-long headache.
Let's get right into the numbers. The most common culprit, a burnt-out bulb, is one of the cheapest and most satisfying repairs you can do. The bulb itself is usually less than $10, and you can knock out the whole job in your driveway in about 15 minutes. It’s a huge win.
Comparing DIY Part Costs
When the problem is bigger than a bulb, like a cracked lens or a dead assembly, the DIY savings really start to stack up. A high-quality, brand-new aftermarket tail light assembly might run you anywhere from $75 to over $200, depending heavily on your car's make and model. If you were to take that same job to a shop, you can bet they’ll add a hefty labor charge, often doubling the total bill.
The need for good replacement parts isn't going away, either. It’s pretty clear from industry data that exterior lighting is one of the most frequently replaced components on a vehicle. With cars staying on the road longer and more accidents happening, the demand for quality aftermarket parts is sky-high. This just means that having affordable, reliable options is more critical than ever for home mechanics.
Here’s a rough idea of what you can expect to spend in time and money:
-
Simple Bulb Swap:
- Cost: $5 - $15
- Time: 10 - 20 minutes
-
Full Assembly Replacement:
- Cost: $75 - $250+ (for the part)
- Time: 45 - 90 minutes
Getting a handle on what different repairs might cost is just part of smart car ownership. For a broader perspective on what you might pay for various jobs, guides on understanding overall car repair costs can be really insightful.
When to Put the Tools Down
Look, there's absolutely no shame in calling in a professional. In fact, one of the smartest things any DIYer can do is know when to step back. If you run into any of these situations, it’s probably time to pick up the phone and call a mechanic.
Your time and sanity are worth something. If a job starts feeling like it’s over your head, letting a pro take over is often the best call. It prevents you from causing more damage and ensures the repair is done right the first time.
It’s time to call for backup if:
- You're chasing complex wiring problems. So you’ve changed the bulb and checked the fuse, but your multimeter still shows zero power at the socket. You could be dealing with a short or a broken wire somewhere deep in the harness. Hunting down those electrical gremlins without experience is a recipe for frustration.
- You’re up against a modern, sealed LED unit. Many newer cars have tail lights that are basically sealed shut—they aren't designed to be serviced. When the LEDs fail, the entire assembly has to be replaced, and that can sometimes involve special tools or even computer programming to sync with the vehicle.
- You just don't feel comfortable. If the project feels overwhelming or you're picturing yourself cracking a body panel or scratching the paint, trust your gut. It's much better to hand it off to an expert.
Making the right call between DIY and the shop is a skill in itself. For more help finding great components for your next project, check out our guide on finding the best online auto parts retailer.
Got Questions? We’ve Got Answers on Tail Light Repairs
Even a job that seems as simple as changing a tail light can throw a few curveballs your way. It's totally normal to run into a little snag once you get started. We've been there. This section tackles those real-world questions that always seem to pop up, giving you the straight-up answers you need to get back on track.
Can I Just Replace the Plastic Cover on My Tail Light?
This is easily the most common question we hear, and the short answer is almost always no. On pretty much any car made in the last couple of decades, the outer lens is fused directly to the housing, creating one sealed unit. This is done on purpose to keep moisture out—water is the enemy of electrical sockets and bulbs.
You might be tempted to patch up a crack with some sort of glue or sealant, but trust me, that's a temporary fix at best. It's bound to fail, and when it does, water will seep in and cause much bigger, more expensive headaches. The only real, lasting solution for a cracked or busted lens is to replace the entire tail light assembly. It's the only way to guarantee a perfect seal and keep everything working like it should.
So, Why Won't My New Tail Light Bulb Work?
There's nothing more frustrating than putting in a brand-new bulb and getting... nothing. Before you start thinking the worst, take a breath. The fix is usually pretty simple.
- Did you grab the right bulb? Double-check the bulb number against what your owner's manual calls for. Two bulbs can look almost identical but have different bases or filaments. It happens to the best of us.
- Take a peek at the socket. Look inside for any crusty green or white corrosion on the metal contacts. If you spot some, a little scrub with a small wire brush or a folded piece of sandpaper can clean it right up. Also, make sure none of the contacts look bent or pushed in.
- Doing an LED upgrade? Here's a pro tip: many LED bulbs are polarity-sensitive. That just means electricity only flows one way through them. If it doesn’t light up, pull it out, spin it 180 degrees, and pop it back in. That usually does the trick.
If you’ve tried all that and still have no light, it's time to break out the multimeter and see if you’re getting power to the socket at all. If not, the problem lies elsewhere—most likely a blown fuse or a wiring issue.
Is It Really Illegal to Drive with a Broken Tail Light?
Yep. Driving with a busted tail light is illegal in every single state. It's a primary offense, meaning an officer can pull you over specifically for that and nothing else.
But a ticket is the least of your worries. It’s a huge safety risk. Your tail lights are how you tell drivers behind you that you're there, that you're braking, or that you're turning. A non-working light, especially at night or in a storm, dramatically increases your chances of getting rear-ended. In some serious accidents, pieces of a broken tail light have even become key evidence at the scene.
The Bottom Line: Fix a broken tail light immediately. It’s not just about avoiding a fine; it’s about protecting yourself and everyone else on the road.
What’s the Difference Between OEM and Aftermarket Tail Lights?
When you start shopping, you’ll see two labels: OEM and aftermarket. Knowing what they mean will help you make a smart choice.
- OEM (Original Equipment Manufacturer) parts are what the factory installed. They're made by (or for) your car’s manufacturer, guaranteeing a perfect fit. That guarantee, however, comes with the highest price tag.
- Aftermarket parts are made by other companies to fit and work just like the originals, but they usually cost a whole lot less.
Don't let the lower price fool you. High-quality aftermarket suppliers design their parts to meet or even beat the original specs. The key is to choose a brand with a solid warranty and good customer reviews. That's how you know you're getting a reliable part that’s built to last.
When you’re looking for that perfect blend of quality, fit, and value, T1A Auto is your answer. Our premium aftermarket tail light assemblies are engineered for a perfect fit and long-term durability, making your repair a guaranteed success. Check out our selection of dependable parts, all backed by an industry-leading warranty.