


Replacing a bumper cover yourself can be a really satisfying project, especially when you see how much money you can save on labor. But before you jump in, it's smart to figure out if this is a job you should tackle in your garage or leave to the pros. It really comes down to what kind of car you have and what’s hiding behind that plastic.
Should You Replace Your Bumper Cover Yourself?
So, can you really do this on your own? The answer depends on a few key things: your car’s age, the tech packed into it, what tools you’ve got, and how comfortable you are getting your hands dirty. Swapping a simple cracked cover on an older sedan without any fancy gadgets? That’s a perfect Saturday project. But if you’re dealing with a new SUV that has cameras, parking sensors, and collision-avoidance radar built-in, you’re looking at a much bigger—and trickier—job.
Getting this decision right from the start is crucial. It's the difference between the pride of a job well done and the headache of creating a bigger, more expensive problem. Nothing’s worse than finishing a repair only to find your dashboard lit up with warning lights.
Assessing Your Project's Complexity
First, take a hard look at the bumper itself. Is it just a slab of plastic, or is it a hub for your car's advanced safety features?
- Basic Covers: Older cars and base models usually have simple covers held on by a handful of clips and screws. These are absolutely prime candidates for a first-time DIY job.
- Sensor-Equipped Covers: Most modern cars have those little circular cutouts for ultrasonic parking sensors. You’ll have to carefully transfer them to the new cover, but it's a manageable task if you’re patient.
- ADAS-Equipped Covers: This is where things get complicated. If your bumper houses radar for adaptive cruise control or cameras for a 360-degree view, the difficulty skyrockets. These systems are incredibly sensitive and almost always need professional recalibration to work safely after the bumper is reinstalled.
A misaligned radar sensor can seriously mess with your car's safety systems. When high-tech ADAS components are involved, letting a professional handle the job is by far the safest bet.
Evaluating Your Skills and Tools
Now, be honest with yourself. Have you done other car repairs before? If you’ve changed your own oil or replaced brake pads, you probably have the patience and mechanical know-how for this. The trickiest parts are usually dealing with fragile plastic clips that love to break and getting the panel alignment just right.
You don't need a full mechanic's bay, but a solid set of basic tools is a must. We’re talking a good socket set, a few screwdrivers, and—this is important—a set of plastic trim removal tools. Using a screwdriver to pry off clips is a great way to scratch your paint. Having the right gear prevents a lot of frustration and ensures everything fits back together snugly. The market for these parts is huge; the global automotive bumper cover market is expected to hit $47.5 billion by 2030. You can find more details on this market growth from recent industry analysis if you're curious.
DIY vs Professional Bumper Replacement Decision Matrix
Sometimes a quick checklist is the best way to make a decision. Here’s a simple breakdown to help you figure out the best path forward for your specific situation.
| Scenario | Recommended DIY Approach | When to Call a Professional |
|---|---|---|
| Simple cosmetic damage (scuffs, small cracks) on an older vehicle | Great DIY project. The process is straightforward with basic tools. | If you lack tools, space, or confidence, a pro can do it quickly. |
| Bumper has ultrasonic parking sensors | Manageable for an intermediate DIYer. Take photos and be careful when transferring sensors. | If you're not comfortable handling delicate electronic connectors or clips. |
| Damage to the underlying reinforcement bar or frame | Stop and assess. Minor bends might be fixable, but this is a structural component. | Immediately. Frame and structural damage require specialized equipment to repair safely. |
| Bumper integrates ADAS (radar, cameras, etc.) | Not recommended. Removal and installation are just the first steps. | Always. These systems require precise recalibration with specialized tools to function correctly. |
| You need a perfect, factory-quality paint match | You can order pre-painted parts, but getting a perfect match on an older car can be tricky. | For a guaranteed seamless blend, especially on metallic or pearlescent paints. |
Ultimately, whether you DIY or hire a pro, the goal is the same: to get your car looking great and functioning safely. Using this matrix can help you avoid getting in over your head and ensure you get the best result.
Sourcing the Right Parts and Tools for the Job
Nothing tanks a bumper replacement faster than realizing you're missing the right part or tool halfway through the job. It’s the classic DIY trap: what should be a straightforward afternoon project turns into a weekend-long ordeal with multiple trips to the auto parts store.
Getting everything lined up before you pop the first clip is the secret to a smooth, professional-looking repair. Trust me, spending an hour on prep now will save you three hours of pure frustration later.
Your Essential Toolkit Checklist
You don't need a professional-grade garage, but a few key tools are non-negotiable. Trying to make do with a butter knife to pop a trim clip is a surefire way to scratch your paint and break the plastic.
Here’s a practical list of what you should have within arm's reach:
- Socket Set: A good metric socket set with a ratchet and a few extensions is your workhorse. It’ll handle the bolts in the wheel wells and under the splash shield.
- Screwdrivers: You’ll want a couple of Phillips head and flathead screwdrivers on hand for various fasteners and for gently nudging things into place.
- Trim Removal Tools: This is the one tool I insist on. These plastic pry bars are cheap and specifically designed to pop clips without marring your paint or the surrounding trim. An absolute must-have.
- Needle-Nose Pliers: Invaluable for wrangling stubborn electrical connectors or grabbing a dropped fastener in a tight spot.
- Work Light or Headlamp: You'll be working in shadowy areas like wheel wells and under the car. Being able to actually see what you're doing makes all the difference.
And before you get started, don't forget the basics. Grab some gloves to save your knuckles and a pair of safety glasses—it's always smart to have the right essential personal protective equipment ready.
Decoding Bumper Cover Part Types
When you start shopping for the new bumper cover, you'll run into a few different options. Knowing the lingo is crucial for getting a part that actually fits and looks right. This choice really does dictate the final quality of your repair.
OEM (Original Equipment Manufacturer): This is the exact part your car was built with at the factory. The fit is guaranteed to be perfect, but it's also the most expensive option by a long shot.
Aftermarket: Made by companies other than the original manufacturer. The quality here can be all over the map, from surprisingly good to downright awful. The main appeal is the lower price, but fitment can be a gamble.
CAPA-Certified Aftermarket: For my money, this is the sweet spot. CAPA (Certified Automotive Parts Association) is an independent group that tests aftermarket parts to make sure they fit, function, and last just like the original OEM ones. For a major cosmetic piece like a bumper, that CAPA-certified sticker is your best bet for getting quality without the OEM price tag.
Choosing a CAPA-certified bumper cover ensures you're getting a product that has passed rigorous third-party testing for fit, finish, and durability. It’s the most reliable way to get OEM-level quality without the OEM price.
If you really want to get into the weeds on this, we've got a deeper dive in our article comparing the pros and cons of https://www.t1aauto.com/blogs/t1-auto-blogs/oem-vs-aftermarket-parts.
Don't Forget the Integrated Tech
Here's a critical final check: what technology is built into your bumper? Modern cars pack all sorts of sensors, cameras, and lights into their bumper covers, and it's a huge pain if you order a replacement that's missing the right cutouts.
Before you click "buy," take a close look at your existing bumper for:
- Parking Sensor Holes: Are there little, circular dimples for the parking sensors? Your new cover needs pre-drilled holes in the exact same spots.
- Camera Mounts: Many vehicles have front or side-view cameras. The replacement part must have the correct mounting brackets.
- Fog Light Cutouts: Double-check that the shape and size of the cutouts match your car’s fog lights perfectly.
Ordering a "blank" cover when you need one with sensor holes is one of the most common and expensive mistakes I see. Double-check your car's specific features to make sure you get a part that accommodates all its factory equipment for a seamless bumper cover replacement.
How to Remove the Old Bumper Cover
Alright, with your new bumper, tools, and a bit of time, you're ready to dive in. Getting the old bumper cover off isn't a race; it's a methodical process. The real key here is patience, especially when you're hunting for hidden clips or wrestling with bolts that have been collecting road grime for years. A little prep work now will save you a massive headache later.
First things first, set up your space. A flat, well-lit area like your garage or a level driveway is perfect. You'll want plenty of room to move around the car without tripping over things. Here’s a pro tip: lay down an old blanket or a big piece of cardboard. It’ll give you a clean, soft spot to set the old bumper cover down, protecting both the part and your floor from scratches.
This flowchart maps out the journey from realizing you need a new part to having everything ready for the swap.
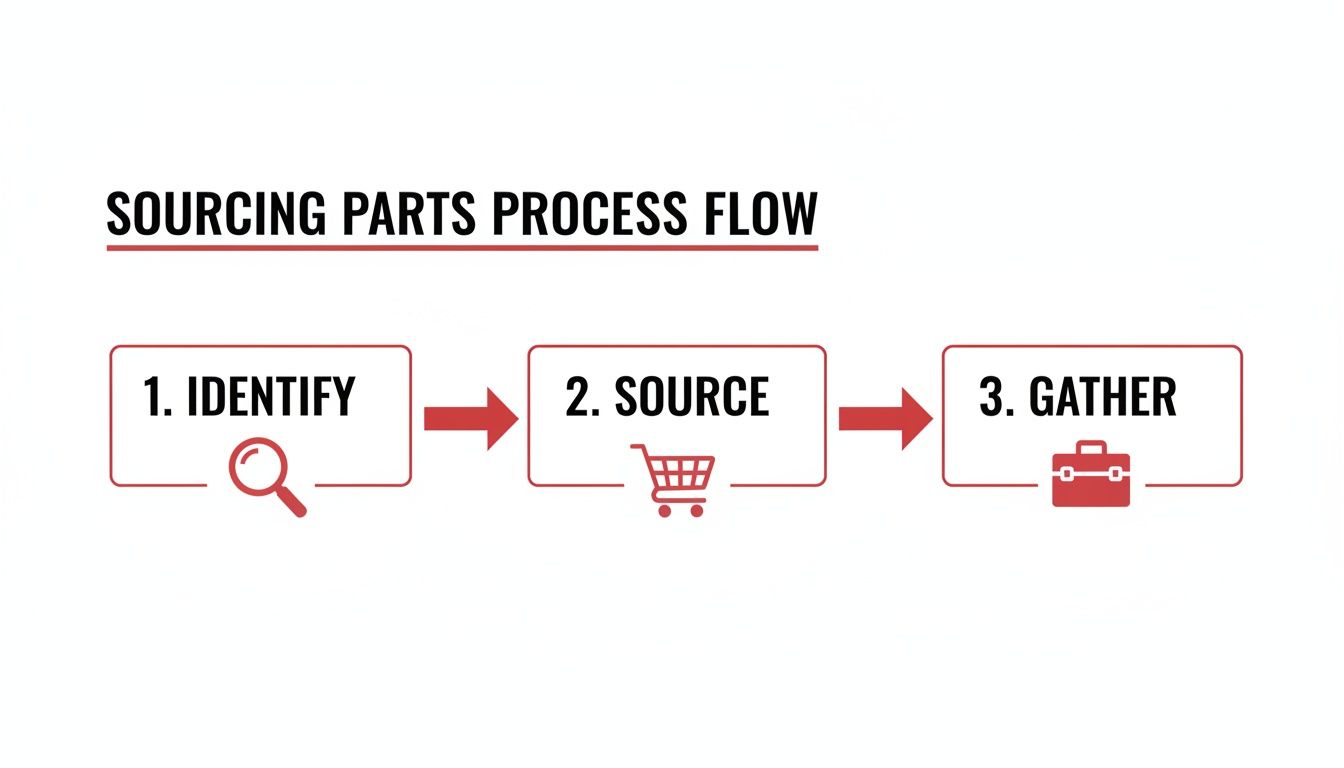
As you can see, a successful job starts long before you pick up a wrench. Sourcing the right components ahead of time is half the battle.
Safety First: Disconnect the Battery
Before you even think about touching a bolt, disconnect the battery. Modern cars are packed with electronics, and the bumper area often houses wiring for lights, parking sensors, and sometimes even airbag triggers. Popping the negative terminal off is a quick, simple precaution against accidental electrical shorts or, worse, deploying an airbag.
Just grab a socket wrench, loosen the nut on the negative terminal, and wiggle the cable free. Make sure you tuck it somewhere it can't accidentally make contact with the terminal again. This is a non-negotiable five-minute step that ensures your safety.
Locating the Hidden Fasteners
Now the real fun begins: the fastener hunt. Car manufacturers have a knack for hiding the screws, clips, and bolts that hold bumper covers on. The best way to tackle this is systematically. Pick a spot to start and work your way around the vehicle, keeping all your hardware organized as you go.
Most cars follow a pretty standard pattern for where these fasteners live:
- Top Edge: Pop the hood (for a front bumper) or the trunk/hatch (for a rear one). You'll almost always find a row of plastic push-pins or small bolts along the top lip of the cover.
- Wheel Wells: This is a classic hiding spot. You might need to turn the front wheels to one side to get better access. Look for screws that fasten the bumper cover's edge to the fender liner inside the wheel well.
- Underside: Get down and look underneath the car. The bottom of the bumper cover is typically secured to the engine's splash shield or an undertray with another set of bolts and push-pins.
A quick tip from experience: Keep a magnetic tray or a few labeled sandwich bags handy. Trust me, there’s nothing more frustrating than finishing a job and finding mystery hardware left over—or realizing you’re missing a critical bolt.
Dealing with Wheel Well and Splash Shield Hardware
The fasteners in the wheel wells and under the car are usually the toughest to remove. They've been exposed to everything the road can throw at them—water, salt, dirt—so they’re often rusted solid. A good shot of a penetrating oil like PB B'laster can be a lifesaver here. Let it soak for a good 10-15 minutes before you try to break them loose.
For those plastic push-pins, a proper trim removal tool is your best friend. It’s designed to slide under the head of the pin and pop the center out without breaking it. If you try to pry them out with a flathead screwdriver, you’re almost guaranteed to snap the brittle plastic heads, meaning an extra trip to the auto parts store.
It's this constant exposure to impacts and wear that keeps the auto parts market buzzing. Bumpers have a much shorter replacement cycle than many other vehicle parts, which drives a steady demand for quality components. If you're curious, you can discover more insights about the automotive bumper market and what fuels its growth.
Disconnecting Lights and Sensors
Once all the main fasteners are out, the bumper cover will start to feel loose. Hold on—don't just yank it off yet! It's almost certainly still tethered to the car by wiring for fog lights, parking sensors, or cameras.
Gently pull one corner of the cover away from the body just enough to peek behind it. You'll spot the wiring harnesses leading to these components. Each plug has a small release tab you need to press to disconnect it. It's crucial that you never pull on the wires themselves, as you can easily damage the connection. If a plug is being stubborn, you can use a small flathead screwdriver to gently depress the tab while you pull it apart. This is probably the most delicate part of the whole removal, so go slow and be careful not to break any of the plastic clips.
With all the electronics safely unplugged, the bumper cover should now be completely free to remove.
Getting Your New Bumper Cover Ready for Prime Time
Alright, the old bumper cover is off and out of the way. Now for the fun part: getting the new one prepped and mounted. This is where your project goes from just "done" to "done right." If you rush this part, you'll end up with a bumper that just looks… off. Think weird gaps, a wonky fit, and a paint job that doesn't quite match.
Seriously, taking your time here is the best thing you can do for the final look. A little patience now means the cover will line up perfectly and look like it belongs on the car, not like a cheap afterthought.
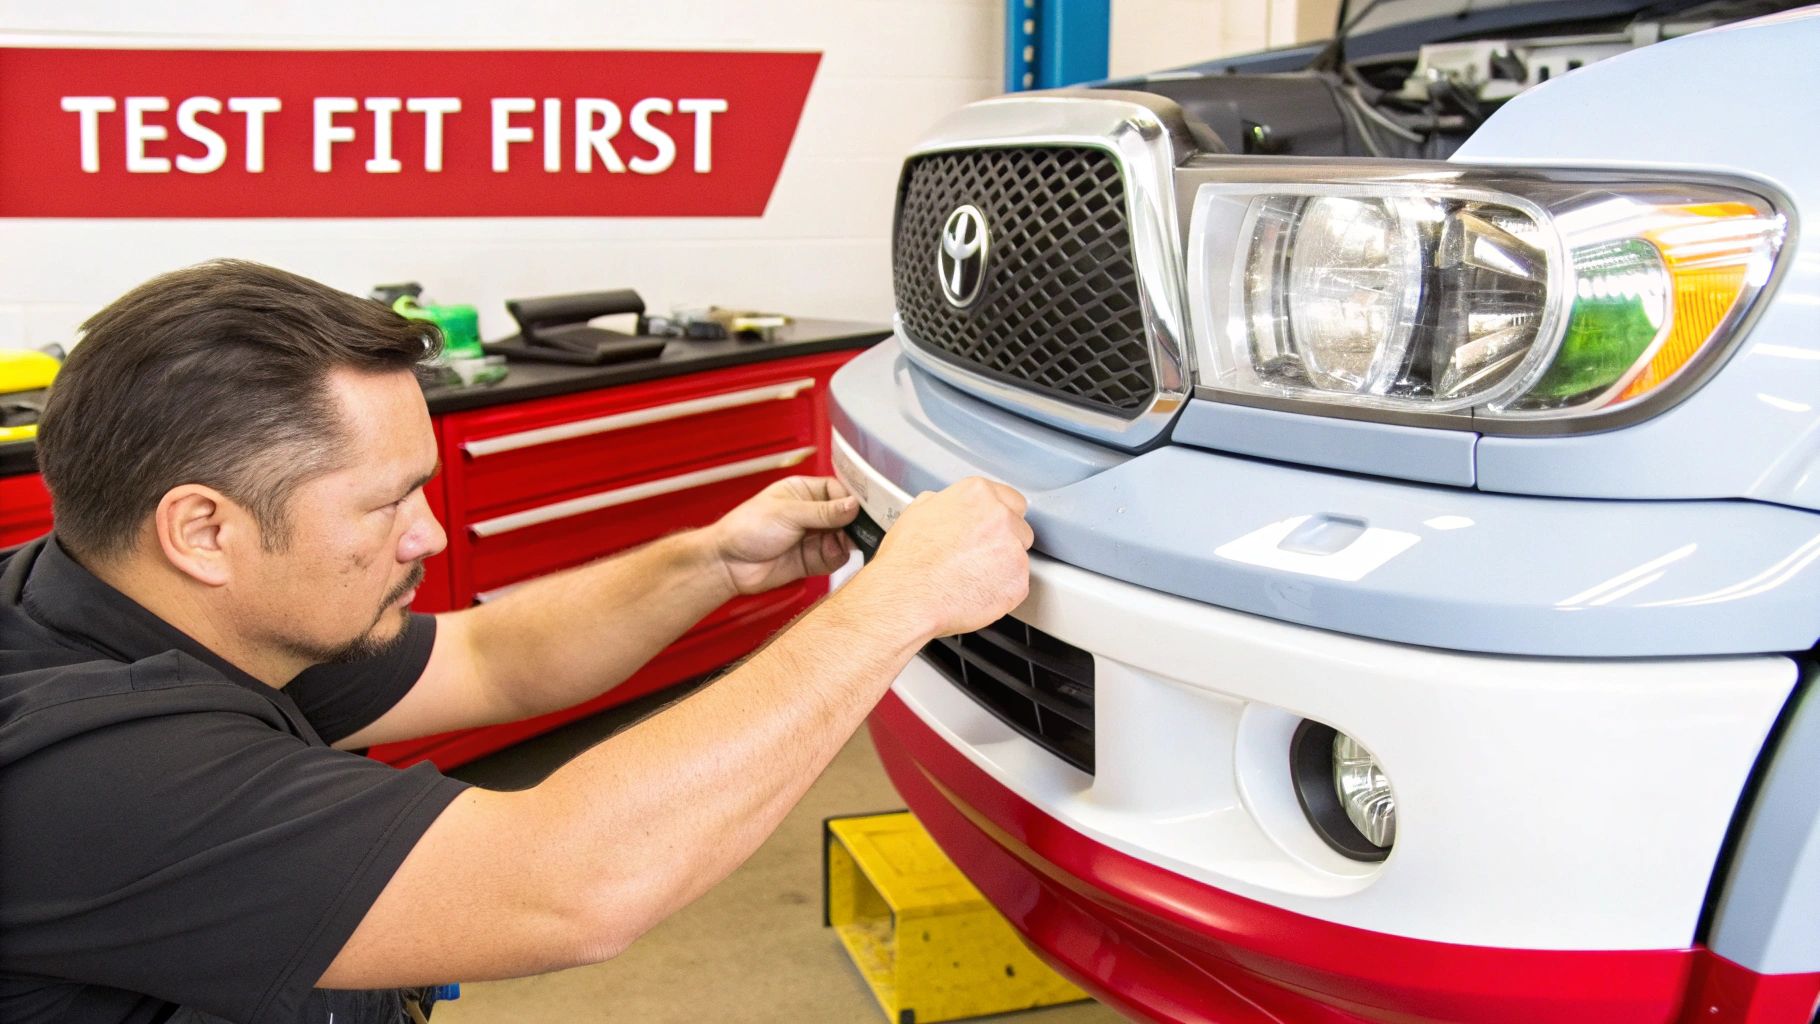
The Most Important Step: Test-Fit Before You Paint
Before a single drop of paint touches that new plastic, you have to test-fit it. I can't stress this enough. This is the one step people always want to skip, and it's the one that can cause the biggest headaches. Even the best aftermarket parts, including CAPA-certified ones, can have tiny imperfections from the molding process or from being stacked in a warehouse.
Go ahead and hang the new, unpainted cover on the car. Use just a few of the main bolts or clips to hold it in place—don't crank anything down yet. You just want it sitting where it's supposed to go. Now, stand back and really look at it from all sides.
- Check the Panel Gaps: Look at the space where the bumper meets the fenders. Is it a nice, consistent line on both the left and right sides?
- Look at the Headlights: How does the cover line up with the bottom edge of your headlights? It should trace the curve perfectly.
- Inspect the Grille: Does the opening on the new cover match up cleanly with your car's grille?
If something isn't lining up perfectly, now is the time to fix it. Sometimes, all it takes is using a small round file to slightly enlarge a mounting hole, giving you that extra millimeter of adjustment you need. Discovering a fitment issue after spending a few hundred bucks on a professional paint job is a truly gut-wrenching experience.
Getting the Paint and Finish Just Right
Once you're 100% sure the new cover fits like a glove, you can move on to paint. You might see pre-painted covers for sale online, but getting an exact match for a car that’s been out in the sun for years is a long shot. And while a rattle can might be okay for a tiny chip, it's just not going to give you a durable, even finish on a panel this large.
For a finish that looks like it rolled off the assembly line, your best bet is to have a professional auto body shop paint the cover. They have the right equipment and expertise to perfectly match your vehicle's specific paint code and apply a tough clear coat that will protect it for years.
You can expect a professional paint job to run somewhere between $300 and $700. It's a worthwhile investment for a car you plan on keeping. Just make sure to bring them your car's paint code, which you can usually find on a sticker inside the driver’s side door jamb.
The Final Mount and Alignment
With your freshly painted bumper cover in hand, it's time for the final installation. First, you'll need to transfer over any hardware from the old cover. This can include:
- The main grille or smaller inserts
- Fog lights and their housings
- Brand emblems or badges
- License plate brackets
Lay the new cover on a soft blanket or a large piece of cardboard to avoid scratching that beautiful new paint while you work.
Next, get a friend to help you carefully lift the new cover into place. Trying to wrestle it on by yourself is a recipe for scuffs and frustration. Start all the bolts, screws, and push-pins by hand, focusing on the primary mounting points at the top and along the sides first.
Before you tighten everything down, take a moment to make any final micro-adjustments. Nudge the cover gently until all the panel gaps are perfectly even and symmetrical. This is your last chance to get it looking flawless. Once you're happy with the alignment, go ahead and tighten all the fasteners—snug is good, but don't overtighten and risk cracking the plastic.
For those small but essential plastic clips that always seem to break, having a fastener kit on hand is a lifesaver. It beats making a frantic trip to the auto parts store mid-job. You can find vehicle-specific kits like this Ford F-150 body fastener kit that have everything you'll need.
Now, step back and take a look. There's nothing quite like the satisfaction of a perfectly installed, freshly painted bumper cover to make a car look brand new again.
Reconnecting Electronics and Final System Checks
Alright, your new bumper cover is on and looking sharp. It's perfectly lined up, all the bolts are tight, but you're not done just yet. Now comes the part that separates a good job from a great one: getting all the electronics hooked back up. Modern cars pack a ton of tech into their bumpers, and if you rush this, you're guaranteed to see a dashboard light up like a Christmas tree.
This is where you switch gears from wrestling with plastic and clips to carefully handling delicate connectors and wires. Every sensor, camera, and light you unplugged has to go back exactly where it came from. The goal is simple: make the car think nothing ever happened.
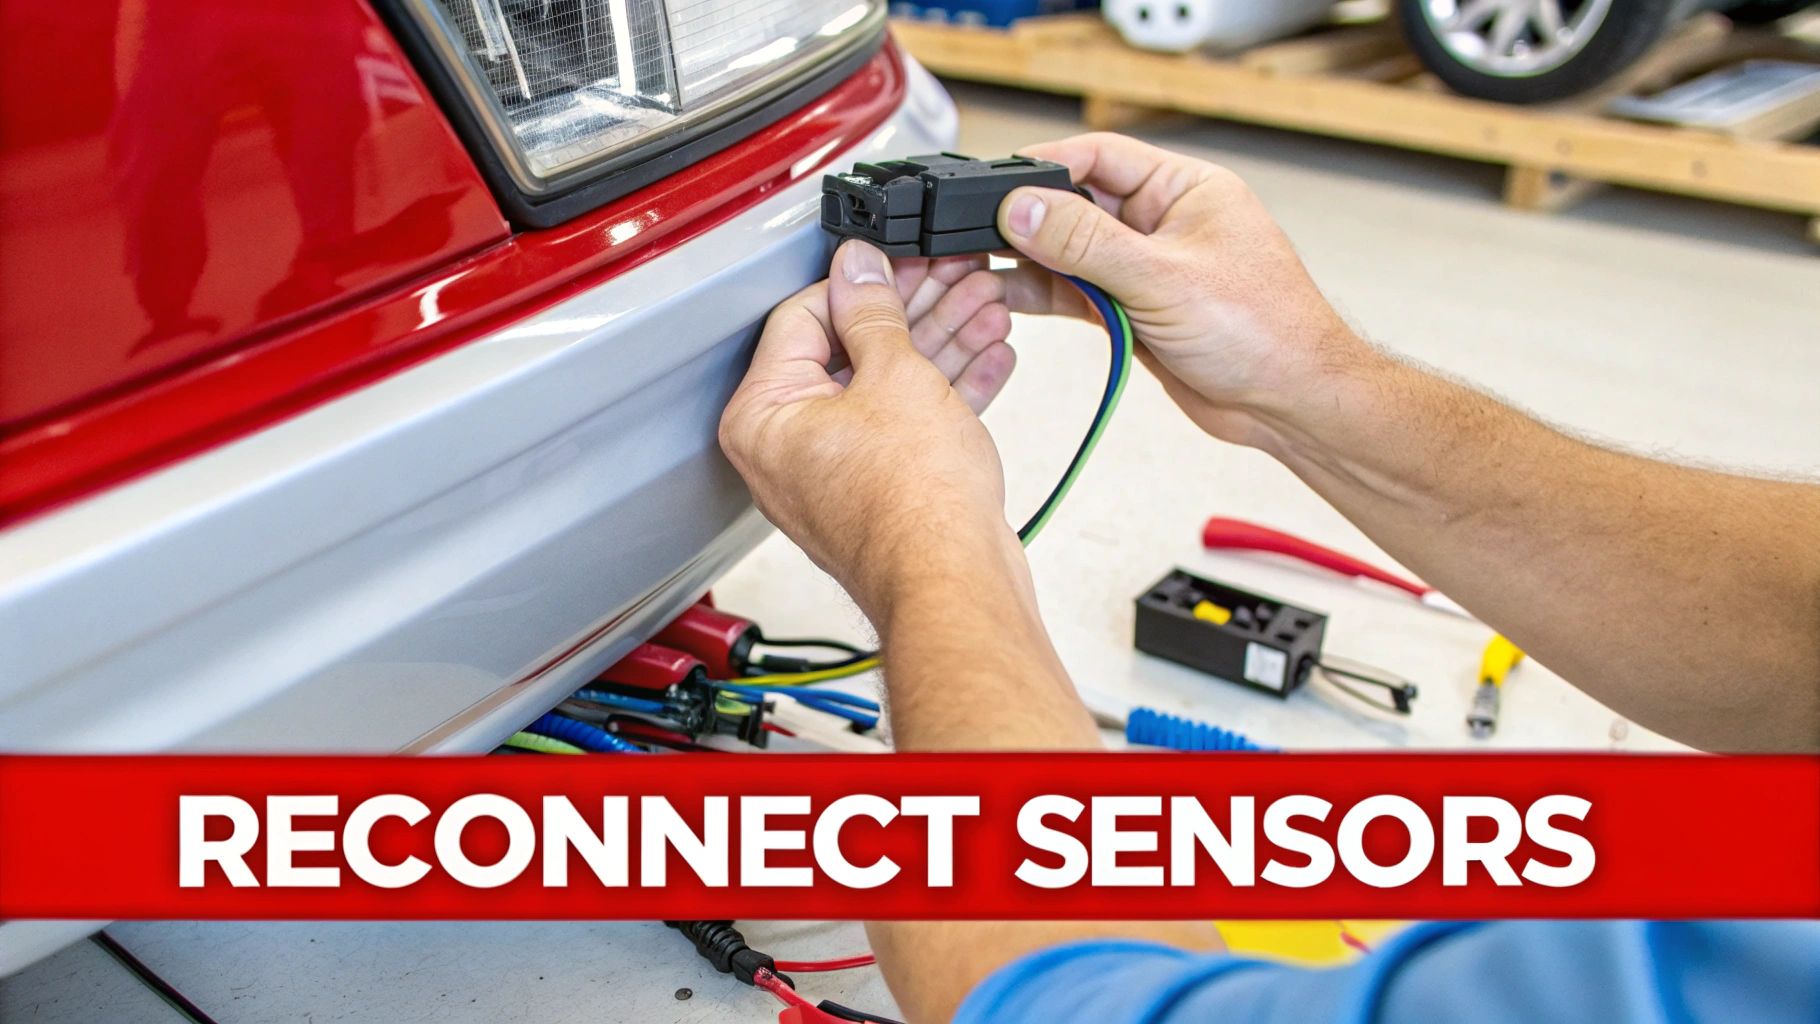
Wiring Harness and Sensor Reinstallation
Time to get all those components plugged back in. Take your time here—a gentle touch is key to avoiding bent pins or cracked plastic connectors.
Start with the main wiring harness. Carefully route it along the path it originally followed, using the factory clips and mounting points on the bumper's reinforcement bar or the car's frame. You absolutely want this secured properly. A dangling harness is just asking to get snagged on something or rub through on a sharp edge, which can cause all sorts of electrical gremlins later on.
With the harness in place, start connecting the individual components.
- Parking Sensors: You'll likely have several of these. Listen for a solid "click" when you plug each one in. A weak connection is the number one cause of a "Park Assist Fault" message. If you need a more in-depth look, our guide on how to install parking sensors covers all the details.
- Cameras: These connectors are usually pretty robust. Just make sure they're fully seated to get your backup or 360-degree view working again.
- Fog Lights and Marker Lights: These are easy to connect but also easy to forget. Give them a quick double-check before you call it a day.
Pro Tip: After you plug in a connector, give the wire a very light tug. If it stays put, the locking tab is engaged. It’s a simple, two-second check that can save you from having to pull the bumper off again to fix a loose connection.
The All-Important Final Systems Check
Once every plug is clicked into place and every wire is secured, you can go ahead and reconnect the negative terminal on your battery. Now, before you fire up the engine, it's time for the moment of truth.
Turn the key to the "on" position (or start the car) and run through a full function test. It’s a lot easier if you have a friend who can stand outside and confirm everything is working.
- Switch on the headlights, then pop on the fog lights.
- Check your turn signals and the hazard lights.
- Put the car in reverse. Does the backup camera turn on? Do the parking sensors start beeping?
- If your car has them, test features like blind-spot monitoring or cross-traffic alerts.
When everything works and your dash is free of warning lights, you can finally step back and admire a job well done.
When ADAS Calibration Is Required
There's one final, crucial point to cover: Advanced Driver-Assistance Systems (ADAS). If your car has features like adaptive cruise control, lane-keep assist, or automatic emergency braking, you need to pay close attention. The radar units and sensors for these systems are incredibly sensitive to their positioning.
Even a flawless bumper cover replacement can throw their alignment off by a minuscule amount. A sensor that's aimed just one degree off can misjudge distances and fail to see an obstacle, which is a massive safety risk. For these vehicles, a professional ADAS calibration is not optional—it's a mandatory final step. This process requires specialized shop equipment to aim the sensors with pinpoint accuracy, ensuring your car's safety features are restored to factory spec and can be trusted to do their job.
Got Questions About Replacing a Bumper Cover?
Even with a solid plan, a job like this can leave you with some nagging questions. It's totally normal. Getting these common uncertainties sorted out beforehand can save you a ton of headaches and keep you from getting stuck halfway through. We've gathered some of the most frequent questions we hear from DIYers to give you quick, no-nonsense answers.
Think of this as your quick-reference troubleshooting guide. Whether you're trying to nail down a budget or just wondering if you missed something, you’ll find the clarity you need right here.
How Much Is This Really Going to Cost Me?
The final bill for a DIY bumper replacement can swing quite a bit, but you'll almost always save a bundle compared to a body shop. Your two biggest costs are the new bumper cover itself and getting it painted.
For a common car like a Honda or Toyota, an aftermarket cover might only set you back $150. If you're driving a luxury SUV or a truck, expect that number to be closer to $500 or more.
The other big-ticket item is paint. A professional paint job to match your car's color will typically run between $300 and $700. All in, most DIY projects land somewhere in the $450 to $1,200 ballpark—a serious saving on labor costs.
How Hard Is It to Get a Perfect Paint Match?
Honestly, getting a flawless paint match is tricky. It's more art than science, especially if your car has a few years on it and the sun has started to fade the original finish. You can order pre-painted bumper covers, but remember, they're matched to the original factory paint code, not the slightly weathered shade your car is today.
For a truly invisible repair, especially with tricky metallic or pearlescent paints, your best bet is to have a professional body shop spray the cover. They have the tools to custom-tint the paint to match your car's current condition perfectly.
What's the Difference Between the Bumper and the Bumper Cover?
This is a classic point of confusion, and people mix these terms up all the time. They are two completely different parts doing very different jobs.
- Bumper Cover: This is the painted plastic piece you see on the outside. Its main purpose is for looks and aerodynamics. It provides very little real protection in a crash.
- Bumper Assembly (or Reinforcement Bar): Hiding behind that plastic cover is a heavy-duty bar made of steel or composite material. It's bolted directly to the car's frame and is the part that actually absorbs the impact in a collision.
If you're just swapping the outer cosmetic piece, you're doing a bumper cover replacement. If that metal bar underneath is bent or damaged, you've got a much bigger structural repair on your hands.
Will My Parking Sensors Still Work with an Aftermarket Cover?
They absolutely should, provided you buy the right part. Reputable aftermarket manufacturers make bumper covers with the sensor holes already drilled in the precise factory locations.
When you're shopping for the part, you have to be diligent. Read the product description carefully and confirm it explicitly says it's compatible with your car's parking sensor system. A cover without those pre-drilled holes just won't work—trying to drill them yourself is a recipe for misaligned sensors that will either not work or give you constant false warnings.
Can I Just Reuse My Old Clips and Fasteners?
You can, but I wouldn't recommend it. Those little plastic clips and push-pins get brittle over the years from constant exposure to engine heat and the elements. It’s incredibly common for them to snap when you try to pry them out, no matter how gentle you are.
A new set of fasteners is cheap, and it’s a smart investment. It guarantees a secure, rattle-free fit and keeps your new bumper cover perfectly aligned for years to come. There’s nothing more frustrating than getting 99% done with a job only to be stopped by one tiny broken clip.
At T1A Auto, we understand that getting the right fit is everything. That’s why we offer premium, CAPA-certified bumper covers and all the necessary fasteners to complete your project with confidence. Find guaranteed-to-fit parts for your vehicle at https://t1aauto.com.
