


You're at the fuel pump, tugging on the driver's door because it won't latch cleanly. Maybe the door sits low, catches the striker with a harsh scrape, or clicks several times without closing. In another situation, the problem may be more serious: after a collision, the outside handle works but the inside handle won't open the door.
Those symptoms can come from different parts. Hinges carry and guide the door, while latches, strikers, cables, handles, and electrical actuators control closure and release. Treating every problem as “just a hinge” or “just a latch” leads to wasted money and can leave a safety-critical defect unresolved.
Table of Contents
- Why Door Hinges and Latches Deserve More Attention
- The Main Types of Door Hinges and Latches
- Metal vs Plastic and Why Upgraded Parts Matter
- How Door Hinges and Latches Actually Fail
- Matching Hinges and Latches to Your Vehicle and Use Case
- Diagnosing a Door Problem Before You Buy a Part
- Installation, Maintenance, and Quality Standards
- A Practical Checklist Before You Replace Anything
Why Door Hinges and Latches Deserve More Attention
A vehicle door performs two jobs at once. It must swing smoothly through a controlled arc, then close firmly enough to stay sealed and restrained during normal driving and a crash. The hinge carries the door's weight and keeps its position relative to the body. The striker provides the fixed target, and the latch grabs it with a positive mechanical engagement.
That relationship explains why diagnosis can be confusing. A worn hinge may let the door sag, shifting the latch away from the striker. The latch then appears faulty because it hits the striker at an angle. Conversely, a striker that has moved after an impact can force a healthy latch to drag, bind, or wear prematurely.
Practical rule: Never order a latch until you've checked whether the door is still sitting in its correct position.
Door hardware has a long history because the basic engineering problem is difficult to eliminate. A documented history of hinges traces an early written reference to door-fastening mechanisms to about 1520 BCE, while the pre-industrial iron butt hinge later became the dominant hinge design worldwide. That source also identifies the butt hinge as the leading hinge type by revenue today, within a global door-hinges market valued at more than $9.5 billion. The history of hinges and the modern hinge market show how a simple joint became a specialized hardware industry.
Automotive doors add crash loads, weather exposure, power releases, child-safety features, and electronic monitoring. In the United States, FMVSS 206 was introduced in 1968, and it roughly doubled the loads that door latches, hinges, and locks had to withstand. A historical review also notes that, before 1956, at least one door opened in nearly half of injury-causing accidents, which is why retention hardware belongs in the safety conversation rather than the trim category. The automotive door-latch safety history connects latch performance with occupant protection.
The Main Types of Door Hinges and Latches
Start by identifying the hardware before comparing replacement parts. Open the door and look at the body-side mounting points, the visible hinge leaves, and the edge of the door where the latch sits.
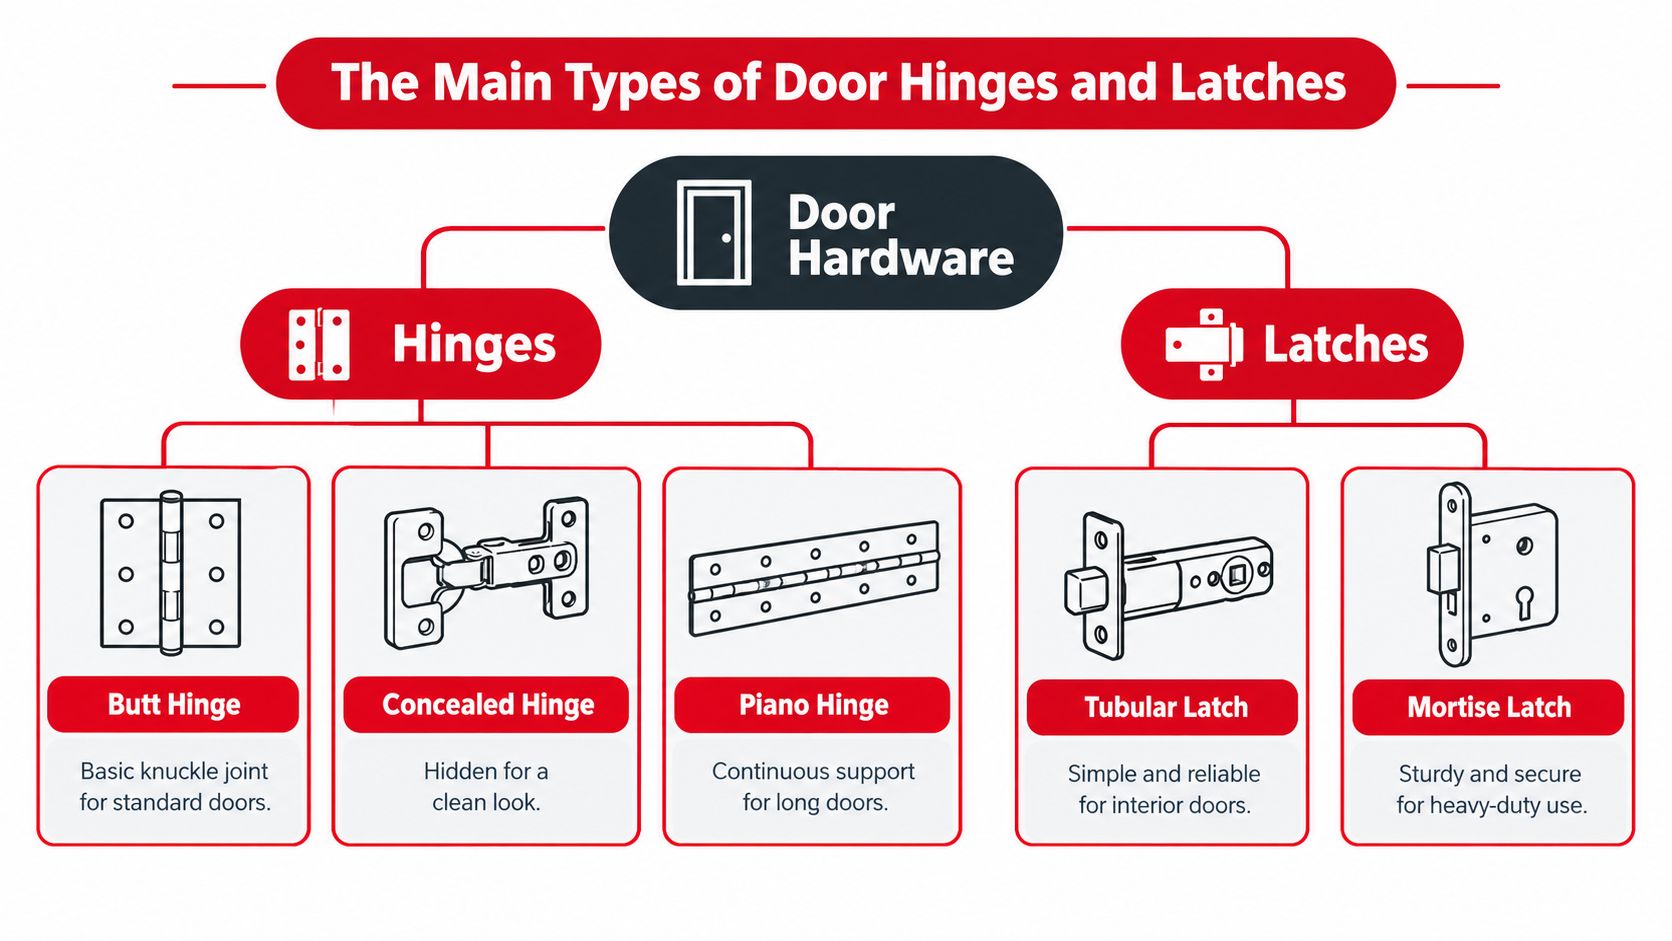
Common hinge designs
- Butt hinge: This is the basic knuckle joint. Two leaves meet around a pin, much like a small mechanical elbow. Traditional doors use it extensively, and many vehicle hinge assemblies use the same fundamental pin-and-knuckle principle even when the surrounding brackets are vehicle-specific.
- Concealed hinge: The mechanism sits inside the door and body structure. Sedans and vehicles with smooth exterior styling often use concealed arrangements because the hinge isn't prominent when the door is closed.
- Pivot hinge: Instead of turning around a side-mounted knuckle, the door rotates around pivot points. Hood, tailgate, and specialty door systems may use pivot geometry when the panel needs a controlled lift, swing, or wide opening.
- Strap-style hinge: A visible arm or strap spreads the load across a broader mounting area. This design is common on trucks, vans, utility bodies, and equipment where serviceability and rugged construction matter more than hidden styling.
The term piano hinge generally describes a continuous hinge running along much of an edge. It can provide even support on a long panel, although it isn't the only hinge arrangement found on vehicle doors.
Common latch designs
A rotary latch uses a rotating claw or jaw to capture a striker pin. Inside, a pawl-and-ratchet mechanism holds that rotating element in the closed position. The first click may represent a partial catch, while the final position creates full engagement. You should never treat a partial catch as an acceptable driving condition.
Many SUVs and power-operated doors use a cinching latch. The latch first captures the striker, then an electric motor pulls the door tightly into its final position. Sliding doors and tailgates may use rotary latch assemblies with electric release, while a conventional side door commonly connects the outside and inside handles through cables or rods.
A striker pin is the fixed component attached to the body. A check strap limits how far the door opens and prevents the hinges from taking the full impact when the door reaches its travel limit. If you're comparing a complete hinge and latch set, check whether the package includes the supporting hardware your vehicle uses.
Metal vs Plastic and Why Upgraded Parts Matter
Material choice changes how a hinge or latch behaves under repeated loading. Stamped steel and stainless steel usually provide a rigid mounting structure, while engineered plastic can reduce weight, cost, and corrosion exposure. Neither material automatically guarantees a good part. The design, reinforcement, fasteners, alignment, and environmental sealing matter just as much.
A plastic component may work well when it sits in a protected location and carries a controlled load. Problems begin when the part flexes, absorbs impact, or supports a heavy panel through constant cycling. Flex can change the relationship between the latch and striker, creating rattling, incomplete engagement, or a door that appears to sag.
| Attribute | Stamped Steel / Stainless | Engineered Plastic |
|---|---|---|
| Rigidity | Resists deflection under door and latch loads | Can flex more, depending on design and reinforcement |
| Weight | Usually heavier | Usually lighter |
| Corrosion | Steel needs protection; stainless resists corrosion better | Doesn't rust, but surrounding inserts and fasteners may corrode |
| Fatigue behavior | Can deform, crack, or corrode after prolonged abuse | Can become brittle from heat, cold, chemicals, or UV exposure |
| Repair strategy | Often supports robust fasteners and replaceable wear components | May require complete assembly replacement when molded sections wear |
| Best fit | Heavy doors, frequent use, harsh service, and repairable designs | Protected locations, weight-sensitive systems, and properly engineered applications |
The classic “door won't stay up” complaint usually points to a support or gas-strut problem rather than a hinge alone, but a flexible or cracked hinge can also change the door's resting position. Inspect the mounting area before assuming the material itself caused the failure.
An upgraded metal replacement can make sense for a high-wear component, especially on a truck, fleet van, or frequently used front door. Still, a heavier part isn't automatically an improvement if it has poor geometry, incorrect mounting holes, inadequate corrosion protection, or the wrong latch interface. Match the replacement to the vehicle, load, and exposure instead of treating “metal” as a complete quality test.
How Door Hinges and Latches Actually Fail
A door that needs a hard slam, sits low at the latch side, or refuses to open may have three different faults. The cause can be mechanical wear, environmental fatigue, or misalignment or electronic control problems. Start with the symptom, then test the mechanism before buying a hinge or latch.
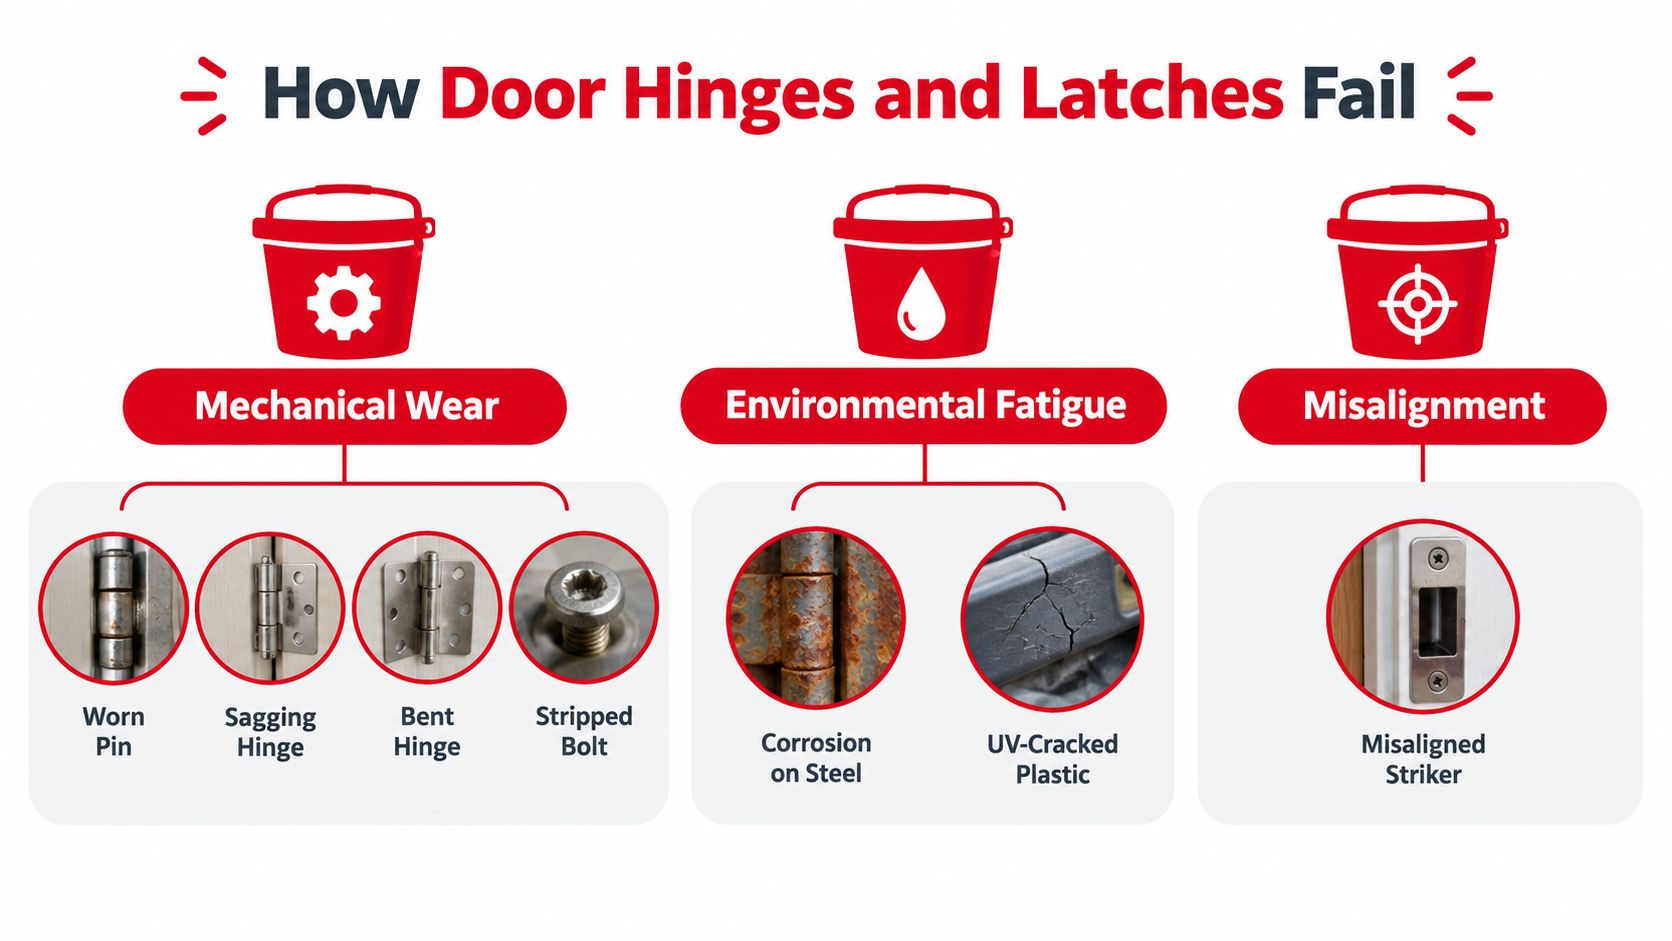
Mechanical wear changes the geometry
A hinge pin can wear inside its knuckle, creating vertical or side-to-side movement. The door drops at the latch-side corner, so the striker approaches the latch above or below its intended centerline. Loose or stripped mounting bolts can produce the same result. An impact can bend the hinge and shift the door even when the pin has little play.
The latch can wear at its claw, pawl, spring, or internal release lever. If the door closes only after a hard slam, inspect the latch for drag, then check whether the striker sits too far inward or outward. Also check whether hinge movement has lowered the entire door.
The door latch assembly diagram separates the visible latch body from the pawl, release mechanism, and actuator inside it. That distinction prevents a common mistake. An exterior handle cannot repair a broken pawl, while a new latch cannot correct a door that hangs low.
Corrosion, fatigue, and contamination attack differently
Corrosion often begins around hinge pins, welds, and mounting surfaces. It may make the hinge stiff before looseness becomes visible. Plastic components can crack or turn brittle after long exposure to heat, cold, chemicals, or ultraviolet light. Hardened grease can also stop a latch from returning smoothly.
A contaminated latch may make a sharp click without reaching full engagement. A frozen or sticky cable can make the handle feel loose, heavy, or inconsistent. Inspect the latch and the cable or linkage leading to it, because either side can create the same complaint.
Electrical faults now belong in the diagnosis
Modern latches also depend on motors, microswitches, wiring, connectors, battery voltage, and control logic. A failed motor, moisture-sensitive microswitch, low battery voltage, water intrusion, or control fault can keep a door locked, prevent complete latching, or disable an interior release.
A 2025 Ford Mustang Mach-E recall affected 197,432 vehicles because door latches could remain locked after exit when battery charge was low, creating an entrapment risk. A 2026 Mercedes-Benz recall covered 310,667 vehicles after a door-lock microswitch failure associated with moisture exposure. A 2025 NHTSA report also described incorrect greasing that could prevent full latching and allow a door to open while the vehicle was moving. The recall coverage on electrical and mechanical latch failures shows why a power-door complaint should be tested electrically and mechanically, rather than dismissed as a hinge-lubrication issue.
Matching Hinges and Latches to Your Vehicle and Use Case
A commuter sedan, a work truck, and a fleet van don't place the same demands on door hardware. Door weight, opening frequency, road salt, dust, water, and collision exposure all influence the right replacement.
A concealed hinge may suit a sedan where clean exterior styling and an OEM appearance matter. A truck or fleet van benefits more from a strong hinge with a durable pin and mounting structure, especially when the door sees frequent opening or carries additional accessories. An SUV used on rough roads needs hardware that tolerates body movement without allowing the latch and striker to drift apart.
| Vehicle / Use Case | Recommended Hinge | Recommended Latch | Key Consideration |
|---|---|---|---|
| Passenger sedan | OEM-style concealed or compact hinge | Standard rotary latch | Preserve panel gaps, sealing, and factory appearance |
| Pickup truck | Reinforced stamped or cast hinge with serviceable pin design | Robust rotary latch with protected release linkage | Account for heavy doors, repeated use, and vibration |
| Fleet van | Heavy-duty hinge matched to door mass | Durable latch with accessible cable or actuator | Favor serviceability and consistent adjustment |
| SUV with light off-road use | Reinforced hinge with controlled flexibility and corrosion protection | Rotary or cinching latch suited to the factory system | Check body movement, dust exposure, and striker alignment |
| Sliding door or tailgate | Vehicle-specific pivot or roller-supported hinge system | Rotary latch with manual or electronic release | Verify release backup and cable routing |
For collision repair, OEM-style fitment can simplify panel-gap and weather-seal work. A reinforced aftermarket component may be more appropriate when the original design has a known weak wear point, but it still needs correct hole placement, latch geometry, and fastener strength.
Safety requirements also put clear boundaries around design. Automotive hinge systems are commonly validated against retention loads of 11,000 N longitudinally and 9,000 N transversely, and the system must not separate under those loads under FMVSS 206. The SAE J839 hinge requirements show why a hinge isn't merely a panel-positioning bracket.
Latch systems face their own demands. SAE J839 specifies an ultimate longitudinal load of 11,000 N, a transverse load of 8,900 N, and a fully latched inertia-load requirement of 30 g in any direction. The SAE and regulatory retention document ties striker engagement and internal latch design directly to crash retention.
Diagnosing a Door Problem Before You Buy a Part
Start with the door closed only when it can latch safely. If it won't engage securely, don't drive the vehicle until the problem is repaired or professionally assessed.
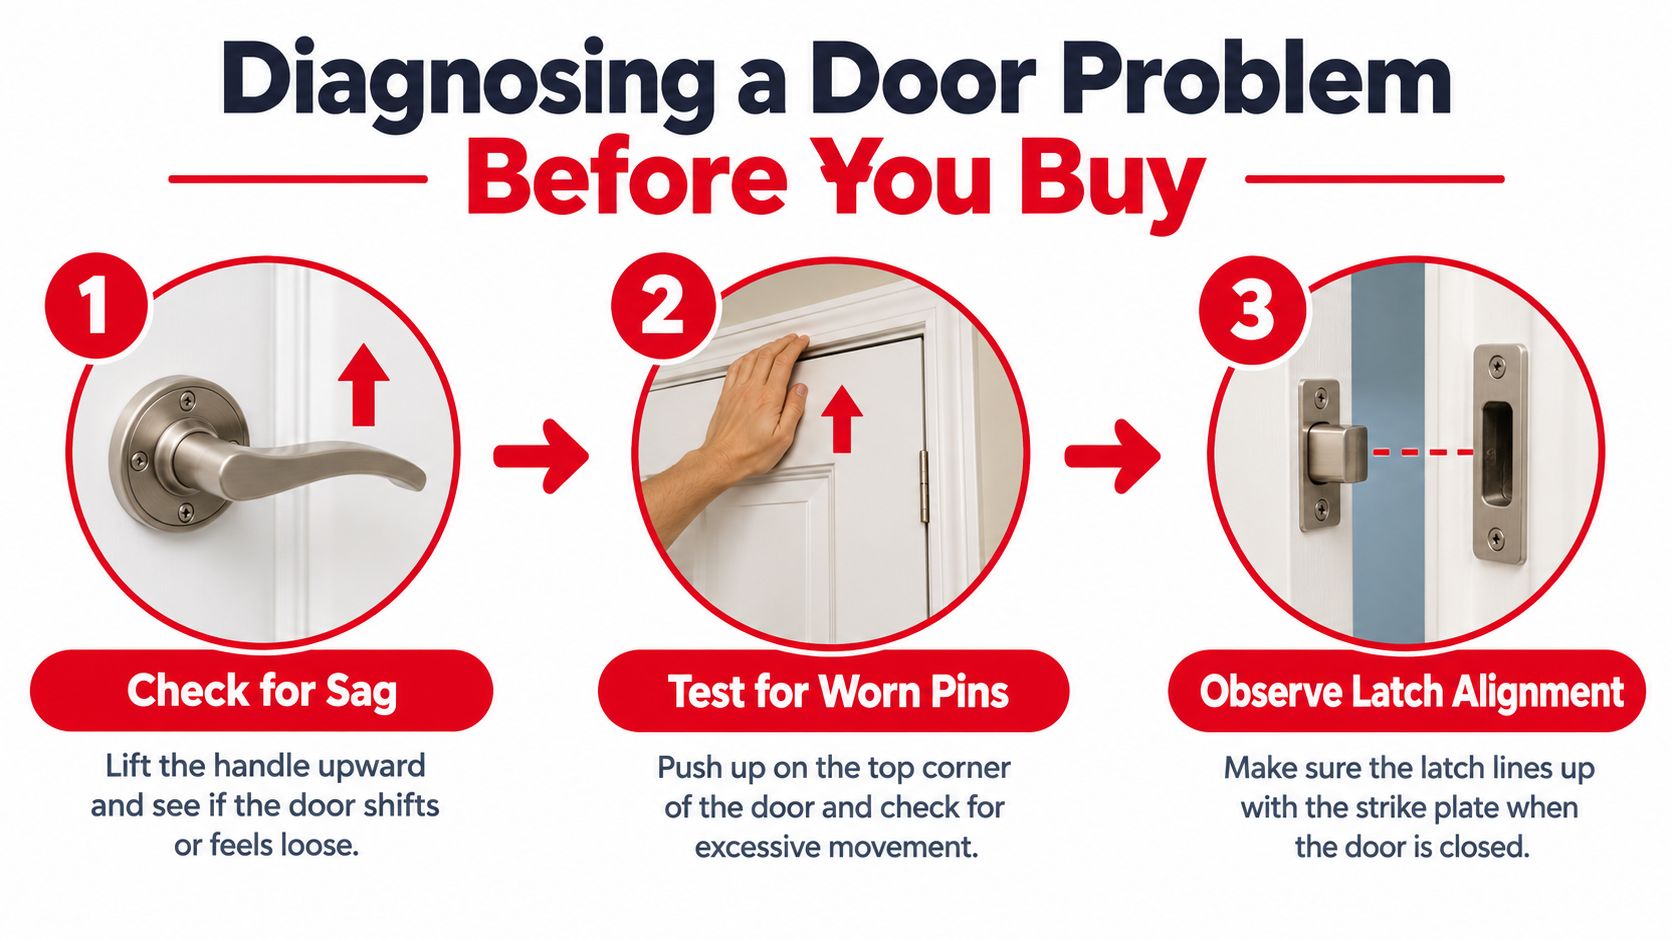
Check the door's position
Open the door partway and lift gently at the handle-side edge. Excessive movement suggests hinge-pin wear, loose fasteners, or body-side damage. Compare the gaps around the door with the adjacent door. A gap that narrows at the top and widens at the bottom often points to sag, while a consistent gap with a latch that won't release points elsewhere.
Push upward at the latch-side corner while watching the hinge area. If the door moves independently of the hinge brackets, the hinge or pin is suspect. If the entire body structure flexes, stop and inspect for collision damage rather than tightening random bolts.
Observe the striker and latch
Use a flashlight to see whether the striker enters the middle of the latch opening. Paint rub marks, fresh metal, or a deep groove on one side indicate contact rather than clean engagement.
Listen to the closing sound. A single firm capture followed by a solid final click suggests normal engagement. Repeated ratcheting, a metallic scrape, or a latch that bounces back points toward misalignment, contamination, internal wear, or an actuator problem.
Separate mechanical and electrical symptoms
Try the inside and outside handles with the vehicle safely stationary. If both handles feel normal but the power lock won't release, investigate voltage, fuses, wiring, actuator operation, and latch switches. If one handle feels loose, inspect its cable, rod, or attachment before replacing the latch assembly.
A temperature-dependent failure can reveal grease or material behavior. A problem that appears only in cold weather may involve stiff lubricant or a frozen cable. A problem after rain may indicate moisture intrusion at the latch, connector, or microswitch.
Use this order:
- Door sag or lift play: Inspect hinge pins, hinge bolts, and body mounting points.
- Correct door position but poor capture: Inspect striker adjustment and latch cleanliness.
- One handle fails: Check the cable, rod, handle, or release lever.
- Power release fails: Check electrical supply, connector condition, actuator, and switch signals.
- Latch or striker damage: Replace the failed assembly and verify alignment before regular driving.
For a visual walkthrough of the first checks, use this door alignment and hinge diagnosis guide.
Installation, Maintenance, and Quality Standards
A door that drops when its hinge bolts loosen can damage wiring, seals, fenders, or the paint edge. Before removing anything, inspect for vertical play at the hinge pin, cracked paint around mounting points, elongated bolt holes, bent brackets, and witness marks showing that the striker has contacted the latch incorrectly.
Support the door with a floor jack and broad wood block. Protect the paint with a folded towel, mark the original hinge position with a paint pen, and have another person stabilize the panel. The support carries the panel's weight while the second person controls its movement, reducing the chance of a sudden shift.
Lubricate the right component
Choose lubricant by mechanism:
- White lithium grease: Use on exposed metal hinge pins and load-bearing hinge contact points when the manufacturer permits grease.
- Silicone spray: Use on weather seals and some low-load pivot points where rubber compatibility matters.
- Dry PTFE: Use where a clean, low-residue film is preferred and dust buildup would create problems.
Keep lubricant away from electrical latch connectors and sealed actuators. Wipe off excess, cycle the door, and confirm that the latch returns fully. A sticky residue can collect grit and turn a smooth pivot into a source of binding. This car door hinge lubrication guide provides a maintenance reference for the procedure.
Replace and align carefully
Transfer any check strap, wiring bracket, or spacer fitted to the original hinge. Use the marked position as a starting point, then adjust panel gaps and striker engagement gradually. Follow the vehicle's factory torque specifications. Apply thread locker only where the service instructions require it.
Quality marks describe different things. CAPA certification covers specified replacement-part standards and inspection requirements. OEM-stamped parts follow the vehicle manufacturer's design and production channel. ISO or IATF-related certification generally describes a manufacturer's quality-management system, not proof that every individual hinge or latch fits a particular vehicle.
Ask what the mark covers, who issued it, and whether it applies to the exact part number. Confirm the vehicle, body style, door position, connector, mounting pattern, and release configuration before installation. A correctly certified part can still be the wrong fit, while a properly aligned replacement is what allows the latch to hold the door securely during normal driving.
A Practical Checklist Before You Replace Anything
Before spending money, identify the failed link in the system. A latch won't correct a door that hangs low, and a hinge won't restore an actuator that has lost power.
- Confirm the symptom: Decide whether the door sags, scrapes, fails to capture, won't release, or has an electrical-only fault.
- Check the hardware visually: Photograph the hinge, striker, latch, cable ends, connector, and mounting area before disassembly.
- Test alignment first: Verify that the striker meets the latch cleanly without forcing the door upward, inward, or sideways.
- Look for vehicle-specific information: Search the manufacturer's recall database and technical service information using the exact vehicle identification details.
- Verify replacement fitment: Match the door position, body style, manual or power release, connector, mounting holes, and included fasteners.
- Evaluate part quality: Consider OEM-grade or CAPA-certified options where applicable, then check corrosion protection, reinforcement, and warranty coverage.
- Record the repair: Fleet operators and shops should keep torque records, part numbers, and alignment notes for future inspections.
- Recheck operation: Test both handles, the lock function, the child-safety feature where fitted, the warning indicator, and full latch engagement.
Recall evidence shows that striker and latch defects can create more than noise or inconvenience. A 2026 Nissan recall involved more than 26,000 vehicles after improperly welded door strikers could crack and separate. A 2026 Volvo New VN recall said an interior door-handle cable that wasn't properly seated in the latch could prevent occupants from opening the door from inside. The Nissan door-striker recall report reinforces the need to inspect the complete system, not just the part that looks worn.
If the door won't latch securely, the body structure is damaged, or an electronic latch fails in a way that could trap an occupant, use a qualified body shop or mechanic. The safest repair is the one that restores correct geometry, positive engagement, and reliable release together.
T1A Auto offers vehicle-specific replacement hinges, latches, handles, cables, and related hardware for common makes including Toyota, Ford, Chevrolet, and GMC. Browse T1A Auto by vehicle to confirm fitment, compare upgraded metal and OEM-style options, and choose the right part after diagnosing the actual failure.
