


The handle gives way when you're standing beside a loaded bed, and the plastic piece comes off in your hand before the tailgate moves an inch. The truck is still drivable, but the tools, groceries, or equipment behind the gate are suddenly out of reach. The natural reaction is to pull harder. That usually makes the damage worse.
The practical answer to how to open a tailgate with a broken handle is to release the latch manually, then diagnose the complete mechanism. The handle, rods, latch, and hinges work together. A broken handle may be the only failed part, but rust, debris, a disconnected rod, or a seized latch can leave you with the same symptom. The modern pickup tailgate developed from simple hardware into a quick-release system with one-handed operation, so a small plastic failure can disable a system made of several linked components. Ford's tailgate history describes that progression, including the first factory-assembled pickup in 1925 and Ford's one-handed “Instant-Action” latch system introduced in 1961.
Table of Contents
- The Stuck Tailgate Moment Every Truck Owner Dreads
- How a Tailgate Handle Actually Works
- Getting the Tailgate Open Without the Handle
- Replacing the Broken Tailgate Handle Step by Step
- Why a New Handle Alone May Not Fix the Problem
- When to DIY and When to Call a Pro
- Your Stuck Tailgate Checklist and Final Takeaways
The Stuck Tailgate Moment Every Truck Owner Dreads
You've got one hand full, you grab the tailgate handle with the other, and the handle suddenly feels loose. The plastic knob pulls away from the bezel, leaving you holding a piece that should have opened the gate. For half a second, you may expect the tailgate to drop anyway. It doesn't.
I've seen this failure on F-150s, Tacomas, Silverados, and Sierras. Sometimes it's a ten-minute manual release. Other times, someone has already yanked the handle until a rod bends, a retaining clip breaks, or the latch binds harder. The difference is usually not the truck's badge. It's whether the owner treats the handle as the whole repair or checks the connected hardware first.
The handle often contains a brittle plastic cam or pivot. Behind it, rods transfer movement to latch mechanisms at the sides of the gate. Road salt, dust, old grease, and corrosion can make those latches resist movement until the handle takes more force than its plastic parts can tolerate. Industry history shows how tailgates moved from chains and hooks toward support cables, quick-action latches, and locking mechanisms, which is why a modern failure can involve more than the visible handle. This overview of tailgate design changes provides useful context for that linked-component layout.
Practical rule: Get the gate open first, diagnose second, and buy parts last.
Before forcing anything, clear space behind the truck and look at how the handle failed. If it snapped cleanly while the gate still releases smoothly from the inside, the handle may be the culprit. If the gate is crooked, one side is tight, or the handle was getting progressively harder to pull, plan for a latch or alignment problem too. Owners who personalize their trucks can also find useful fitment context through resources such as veteran-friendly custom decals, but decals won't solve a binding latch, so keep the mechanical diagnosis separate from appearance work.
How a Tailgate Handle Actually Works
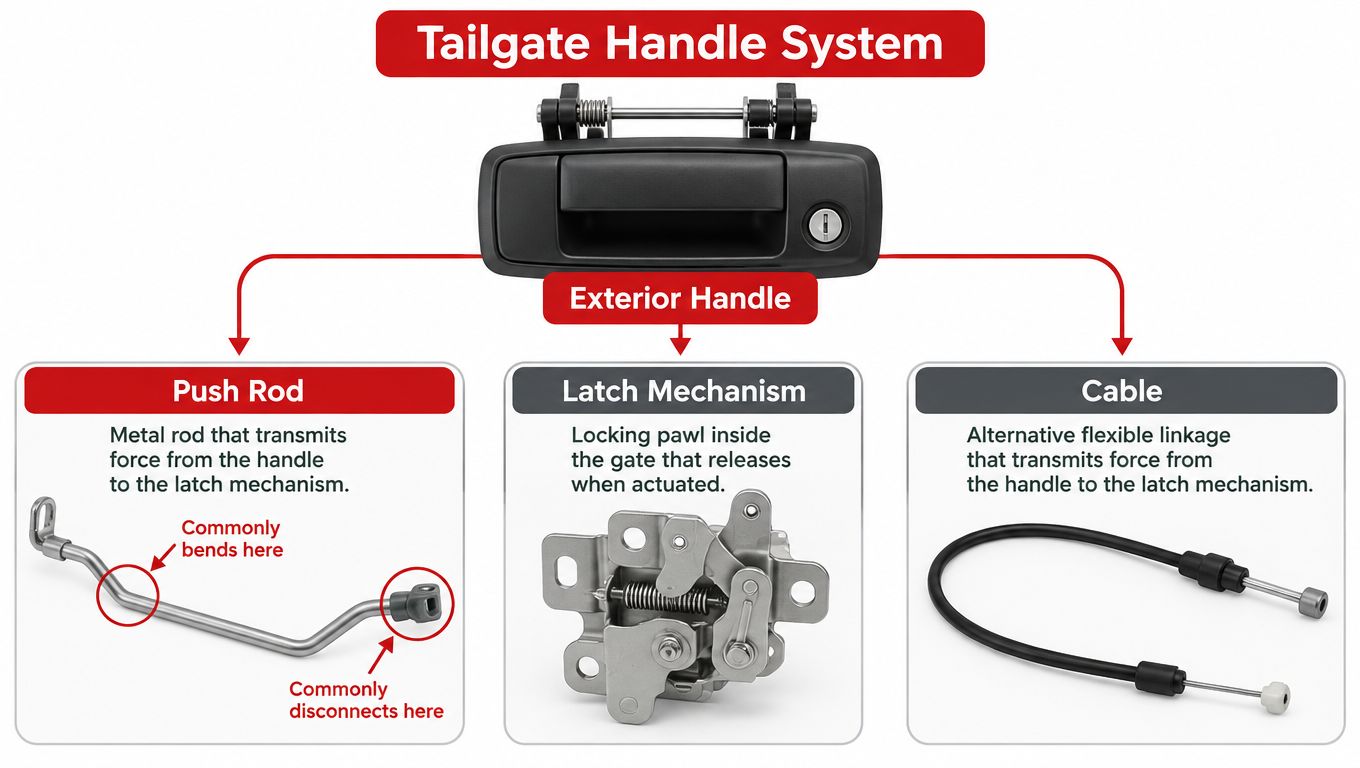
Most pickup tailgates use the same basic logic, even though the access panels, clips, and fasteners differ between Ford, Toyota, Chevrolet, GMC, and Ram trucks. The exterior handle rotates an internal lever or cam. That movement pulls or pushes linkage connected to the latch points on each side of the tailgate.
On a common rod-style design, two thin steel rods run from the handle toward the side latches. Each rod ends near a latch lever, often held in place by a small plastic retainer. When the handle moves correctly, both latch mechanisms release their grip on the body-mounted strikers, allowing the gate to swing down.
A cable-style design uses flexible cables instead of rigid rods, but the diagnostic principle remains the same. The handle is only the input. The latch is the component that releases the gate. This cable and pulley system guide is useful when the tailgate uses flexible linkage rather than two straight rods.
Where the movement gets lost
The handle can crack around its pivot, or its internal cam can break while the outer piece still looks normal. A rod can disconnect from its clip, bend, stretch, or break at a crimp. The latch itself can freeze from corrosion, packed debris, or dried lubricant. A shifted striker can also hold tension against the latch and make a good handle feel broken.
Watch what the linkage does when someone moves the handle. If the rods don't move, the handle or its connection has failed. If the rods move but one latch stays locked, the problem is farther down the system. If both latches move but the gate remains tight, the gate may be loaded against the strikers or misaligned at the hinges.
The goal isn't to guess which part is bad from the outside. It's to follow the movement from the handle to the latch and find the point where it stops.
Getting the Tailgate Open Without the Handle
Start with the gate closed and the truck parked on level ground. Remove loose cargo that could fall when the latch releases. You'll generally need a plastic trim tool, a flat-blade screwdriver, a Torx driver, long needle-nose pliers, gloves, and a second person if the gate is heavy.
Expose the linkage
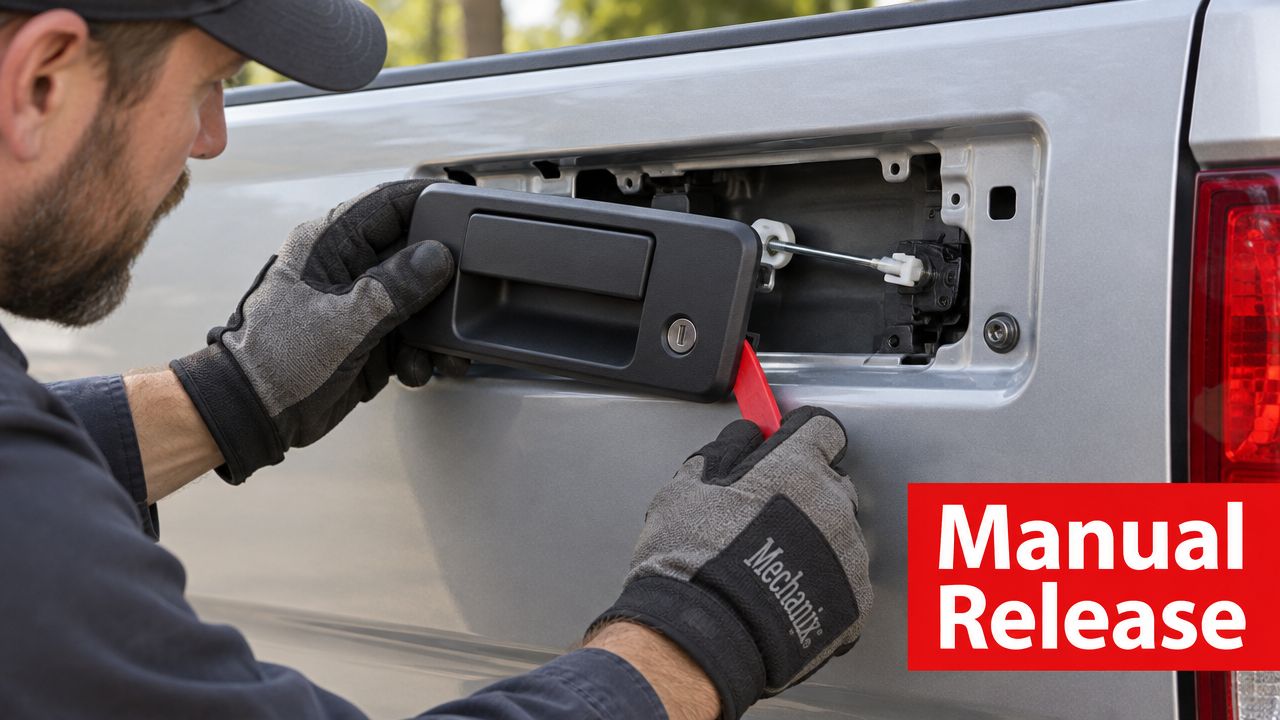
- Create a small working gap. Use a plastic trim tool at the bezel or inside access panel. If you use a flat screwdriver, wrap its tip with tape and work against a protected edge. Don't pry directly against painted sheet metal.
- Remove the bezel or access panel. Fasteners vary, but many pickups use Torx or Phillips screws. Some screws sit beneath small plastic caps. Keep the fasteners together, because losing one inside the tailgate can create a second problem.
- Pull the panel back carefully. The rods may be visible immediately, or you may need to move a liner or inner cover. Avoid bending the panel. On some trucks, the opening is tight enough that a short driver is more useful than a full-size one.
The manual tailgate release procedure follows this same general approach, removing the access piece and releasing the linkage by hand rather than dropping the entire gate.
Release the latch by hand
Look for the two vertical rods or the cable ends behind the tailgate skin. Use long needle-nose pliers or a hook tool to grip the rod close to its upper section. Pull in the direction the handle normally sends the linkage, generally toward the cab on many layouts. Don't twist the rod sideways, because a thin rod can bend or pull out of its retainer.
If one side releases and the other doesn't, keep the gate supported and work at the stubborn latch. A lower access opening may let you reach the latch lever with a screwdriver. Push the lever in the release direction while easing pressure on the gate. A helper can press inward on the tailgate or lift it slightly to remove tension from the striker.
Don't stand directly behind the gate while releasing it. A loaded or heavy tailgate can drop as soon as the latch lets go.
Once the gate moves, have your helper hold it. Check for sharp sheet-metal edges before reaching farther inside. If the rods are seized solid, the latch won't move with reasonable hand pressure, or the gate is visibly sagging, stop forcing it. Penetrating oil and latch-side access may be necessary, and forcing the linkage can turn a handle repair into a bent-latch repair.
For another view of linkage service, see this guide to tailgate cable replacement.
Replacing the Broken Tailgate Handle Step by Step
Once the gate is open, replacement is usually straightforward if the rods and latches move freely. Don't remove the old handle before studying the linkage. Take a photo of the rod routing and note which rod connects to each side.
Prepare the gate
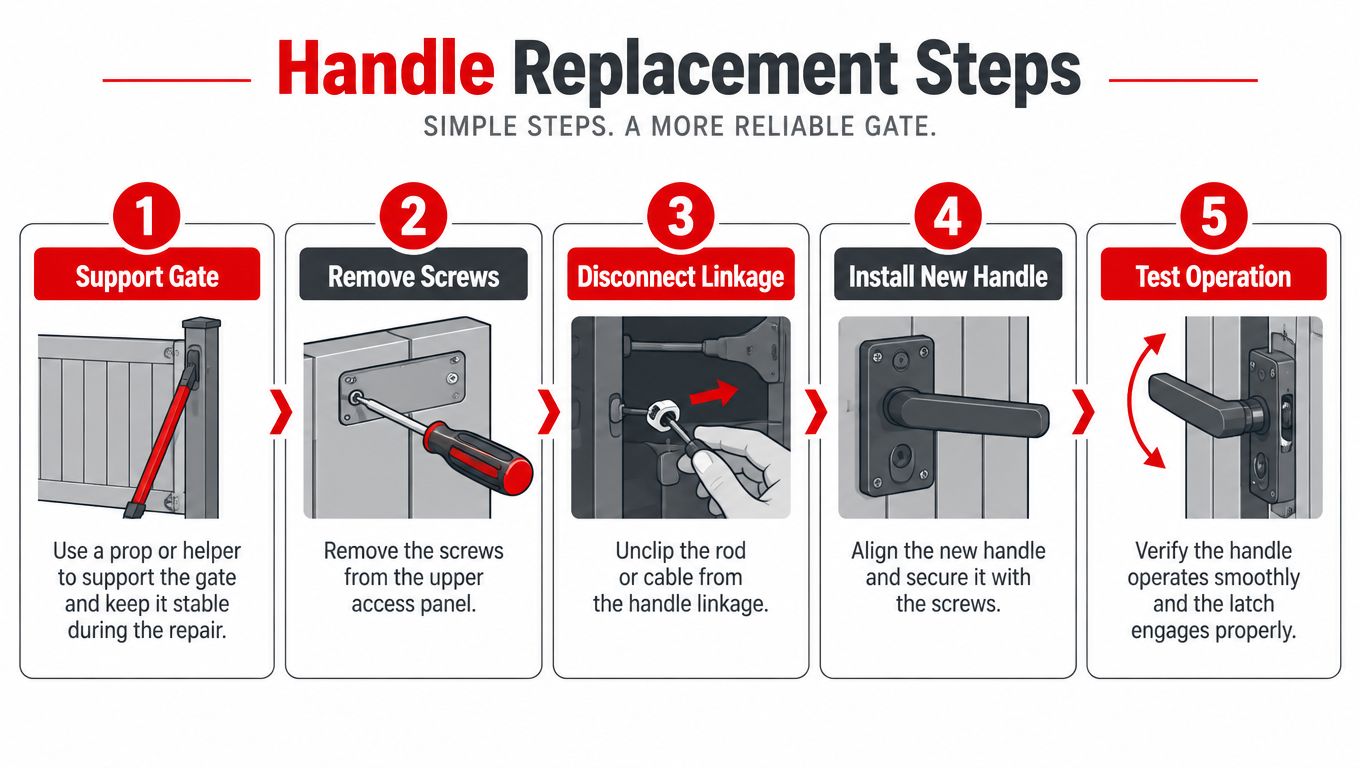
Support the tailgate in a stable horizontal position with a helper or an approved tailgate prop. A gate that hangs from its cables or hinges while you work can shift unexpectedly. Wear gloves, and disconnect electrical connectors carefully if the truck has a camera, power lock, or other wiring in the gate.
Remove the upper access panel screws and pull the panel back. Depending on the truck, you may see a handle assembly secured to the outer skin and two rods retained by plastic clips. A small inspection mirror helps when the clips face away from you.
Remove the failed assembly
- Release the rod retainers. Use needle-nose pliers to squeeze or rotate each plastic retainer, depending on its design. Lift the rod out without snapping the clip. If a retainer is brittle, replace it rather than trying to reuse a damaged piece.
- Separate the rods from the handle. Keep the driver-side and passenger-side rods identified. Their shapes may look similar, but installing one in the wrong position can leave one latch partly engaged.
- Remove the handle fasteners. Many assemblies use two small bolts, often with a 10 mm head, but verify the actual fastener on your vehicle. Support the handle from the outside as you remove the final fastener so it doesn't fall against the painted panel.
- Transfer the seal. Move the gasket or foam pad to the replacement handle if the new assembly doesn't include one. A missing seal can let water enter the tailgate and accelerate corrosion around the mechanism.
Install and test before closing everything
Inspect the rod hooks, bends, crimps, and plastic retainers before installation. A fresh handle won't correct a rod that has pulled out of shape. Install the handle by hand-threading the fasteners first, then reconnect each rod until its retainer locks securely.
Operate the handle while watching both latch levers. They should move together and return fully when you release the handle. Cycle the mechanism several times with the gate still open, then close the gate gently and confirm that both sides latch flush.
Don't guess at fastener torque if the manufacturer specifies it. Use the service information for your model, especially around painted sheet metal and plastic assemblies. Tightening by feel can crack the bezel or distort the handle mounting surface.
Reinstall the access panel only after the mechanism passes its test. If the handle feels stiff, stop and find the resistance. A stiff new handle is a warning that the latch or rod path still needs cleaning, lubrication, or alignment.
Why a New Handle Alone May Not Fix the Problem
A replacement handle restores input to the system. It doesn't free a corroded latch, straighten a bent rod, repair a broken clip, or correct a gate that shifted on its hinges. If the old handle became harder to pull before it failed, assume resistance exists elsewhere until you prove otherwise.
Look closely at the latch area and rod ends. White corrosion halos, thick rust, chewed retainers, and rods that sit unevenly all point to wear in the linkage. A tailgate that sits higher on one side, rubs the bed, or needs to be lifted while closing may have an alignment issue. In that situation, the new handle just transfers force into the next weak component.
The right order is simple. Open the gate manually, move each latch with a screwdriver, and identify whether the latch snaps open and returns smoothly. Only then should you choose between a handle, rod, clip, latch, cable, hinge, or alignment repair. A tailgate latch repair guide can help when the handle moves but the latch doesn't release.
| Symptom | Likely Real Cause | Quick Check |
|---|---|---|
| Handle pulls with no resistance | Broken cam, disconnected rod, or failed retainer | Watch whether either rod moves |
| Handle feels stiff | Corroded latch or contaminated linkage | Move the latch lever by hand |
| One side releases | One rod is bent, disconnected, or stretched | Compare both rod positions |
| Gate stays tight after release | Striker pressure or hinge misalignment | Press inward or lift the gate slightly |
| New handle fails quickly | Binding latch or damaged linkage remains | Lubricate and cycle the latch before final assembly |
A small amount of suitable penetrating oil may help a rusty pivot, but oil isn't a substitute for inspection. If the latch remains gritty or fails to return, replace or rebuild the affected mechanism rather than masking the fault.
When to DIY and When to Call a Pro
A clean, otherwise well-behaved tailgate is a sensible DIY repair. If the handle snapped suddenly, the gate sits square, the rods are visible, and the latches move by hand, the job mainly requires patience, access, and safe support. The repair becomes a poor driveway project when corrosion and alignment are part of the failure.
Consider two practical situations. A newer F-150 with a broken handle and smooth latch action is usually a controlled parts-and-tools job. An older Silverado with a sagging gate, crusted rods, and a latch that clicks without releasing needs a broader diagnosis. In the second case, buying a handle first may waste both time and money.
| Scenario | DIY Time / Cost | Shop Time / Cost |
|---|---|---|
| Broken handle, clean rods, smooth latches | Short repair with basic hand tools and a replacement handle | Handle replacement at a shop |
| Broken retainer or disconnected rod | Access-panel removal, clip or linkage replacement | Linkage inspection and replacement |
| Rusted latch or seized rod | Penetrating oil, cleaning, possible latch or rod replacement | Corrosion repair and mechanism service |
| Sagging or misaligned gate | Not a good first DIY repair without proper support and adjustment tools | Body alignment or rust-related work |
A shop may charge roughly $150 to $350 for a handle swap, while body alignment or rust repair can push the bill to $400 or more, according to the provided repair guidance. Those figures are not a universal quote, so confirm labor and parts pricing before authorizing work.
Hand the job off if a rod snaps during removal, the striker is bent, the gate is sagging on its hinges, or you can't support the gate safely.
T1A Auto offers replacement tailgate handles, latches, hinges, cables, and related hardware, with vehicle-search tools for checking compatibility across common pickup makes. That can be useful after the failed component is confirmed, but part selection should follow diagnosis, not replace it.
Your Stuck Tailgate Checklist and Final Takeaways
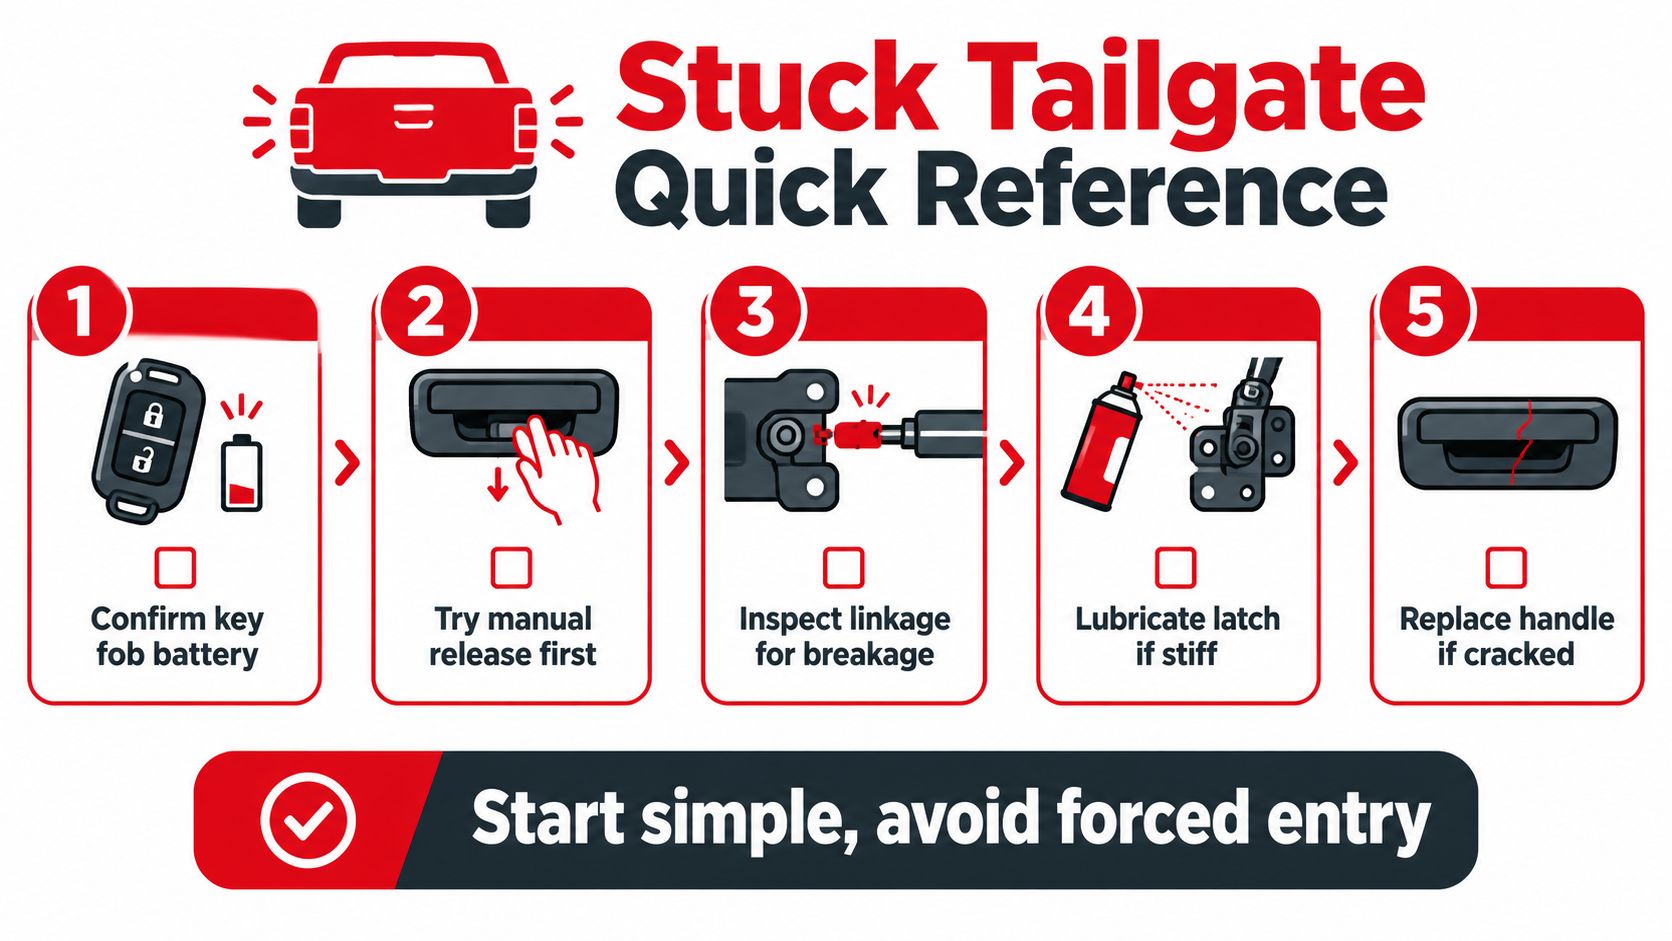
Save this sequence before you start. It keeps the repair focused on the release mechanism instead of the broken plastic handle.
- Confirm the failure. Move the handle gently and notice whether it has resistance. Don't keep yanking if it pulls free or feels unusually stiff.
- Make the area safe. Clear the bed-side landing area, wear gloves, and have a helper hold the gate when the latch releases. If the truck has a backup camera or power-locking tailgate, disconnect the negative battery lead before disturbing wiring.
- Access the linkage. Remove the bezel or inner panel with the correct Torx or Phillips driver and a plastic trim tool. Avoid prying on painted surfaces or textured plastic.
- Release manually. Pull the appropriate rod toward the cab or operate the latch lever through the access opening. Work the latch side if rust or striker pressure prevents release.
- Diagnose before buying. Check rod ends, retainers, latch return action, hinges, and striker alignment. Replace the handle only if the rest of the system moves normally.
Vehicle details still matter. On an F-150, the access panel typically gives you a route to reach down and push the latch lever. On a Toyota Tacoma, remove the bezel screws carefully and protect the plastic rod clips. On a Chevrolet Silverado or GMC Sierra, use a plastic trim tool to reduce the chance of cracking textured trim. On Ram trucks, release the C-clip before pulling the handle straight rearward.
Stop the DIY repair if the cables are broken, the latch strikers are bent, water has entered the camera harness, or the gate sags on its hinges. A stuck handle is manageable. A falling gate or misaligned structure isn't worth risking your hands, paint, or cargo.
For a confirmed handle, latch, hinge, or cable failure, visit T1A Auto to match the replacement to your truck and review the available installation guidance. Diagnose the linkage first, then order the component that failed instead of spending another Saturday swapping the wrong part.
