


You pull the handle on your Chevy tailgate, hear a weak click, and the gate stays shut. Or it opens on one side while the other latch hangs on, leaving the handle loose and the truck unusable for loading. Replacing the outer handle may solve the problem, but modern Chevrolet tailgates can also involve rods, side latches, moisture, freezing temperatures, and a camera harness.
A reliable repair starts with diagnosis, not parts swapping. The classic replacement remains a manageable mechanical job, but camera-equipped and electronically released designs demand more care. The steps below focus on the complete tailgate system, so the new handle works with the latches instead of becoming another temporary fix.
Table of Contents
- What You Need Before You Start
- Why Your Chevy Tailgate Handle Fails
- How to Remove and Install a New Tailgate Handle
- Aftermarket Metal vs OEM Plastic Handles
- Troubleshooting Common Installation Issues
- Getting the Most Out of Your Replacement
What You Need Before You Start
Before removing anything, identify the truck and the handle assembly. Chevrolet hardware varies by model year, body style, trim, and equipment. A replacement for an older Silverado or Sierra may use a different mounting pattern and linkage arrangement than a later truck with an integrated camera. Read the VIN from the vehicle and compare the existing part, connector, mounting points, and camera opening with the replacement listing. The Chevrolet Silverado parts guide can help narrow the correct parts category before you order.
Assemble the tools
Have these items beside the truck:
- Socket set: Keep 10 mm, 12 mm, and 14 mm sockets available, since fastener sizes vary by application.
- Torx drivers: Later-model GM assemblies may use T20 or T40 Torx hardware, depending on the truck and component.
- Trim removal tool: Use a plastic tool for push-pins and interior panels. A screwdriver can mark the liner or crack a retainer.
- Needle-nose pliers: These help release stubborn linkage clips without twisting the rods.
- Small flashlight: You'll need to see rod ends, retainers, and harness connectors inside the tailgate.
- Container for hardware: Put bolts and clips in one place. Tailgate fasteners are easy to lose against a workshop floor.
- Protective gloves and eye protection: Old latches can carry sharp rust, broken plastic, and grime.
Park on level ground and support the tailgate before loosening any component. If the gate is stuck closed, don't force the handle until you understand whether the latch, rod, or handle has failed. For a camera-equipped assembly, switch off the truck and avoid pulling on the harness itself. Release the connector by its locking tab.
Practical rule: Match the new handle to the old one before installation. Compare the bolt spacing, rod attachment points, finish, connector position, and camera opening.
Some trucks require cable or hinge access before the handle can come out. That variation is normal, not a sign that the replacement is wrong. Photograph the linkage before disconnecting it, and keep the old part until the new assembly has passed a complete operation test.
Why Your Chevy Tailgate Handle Fails
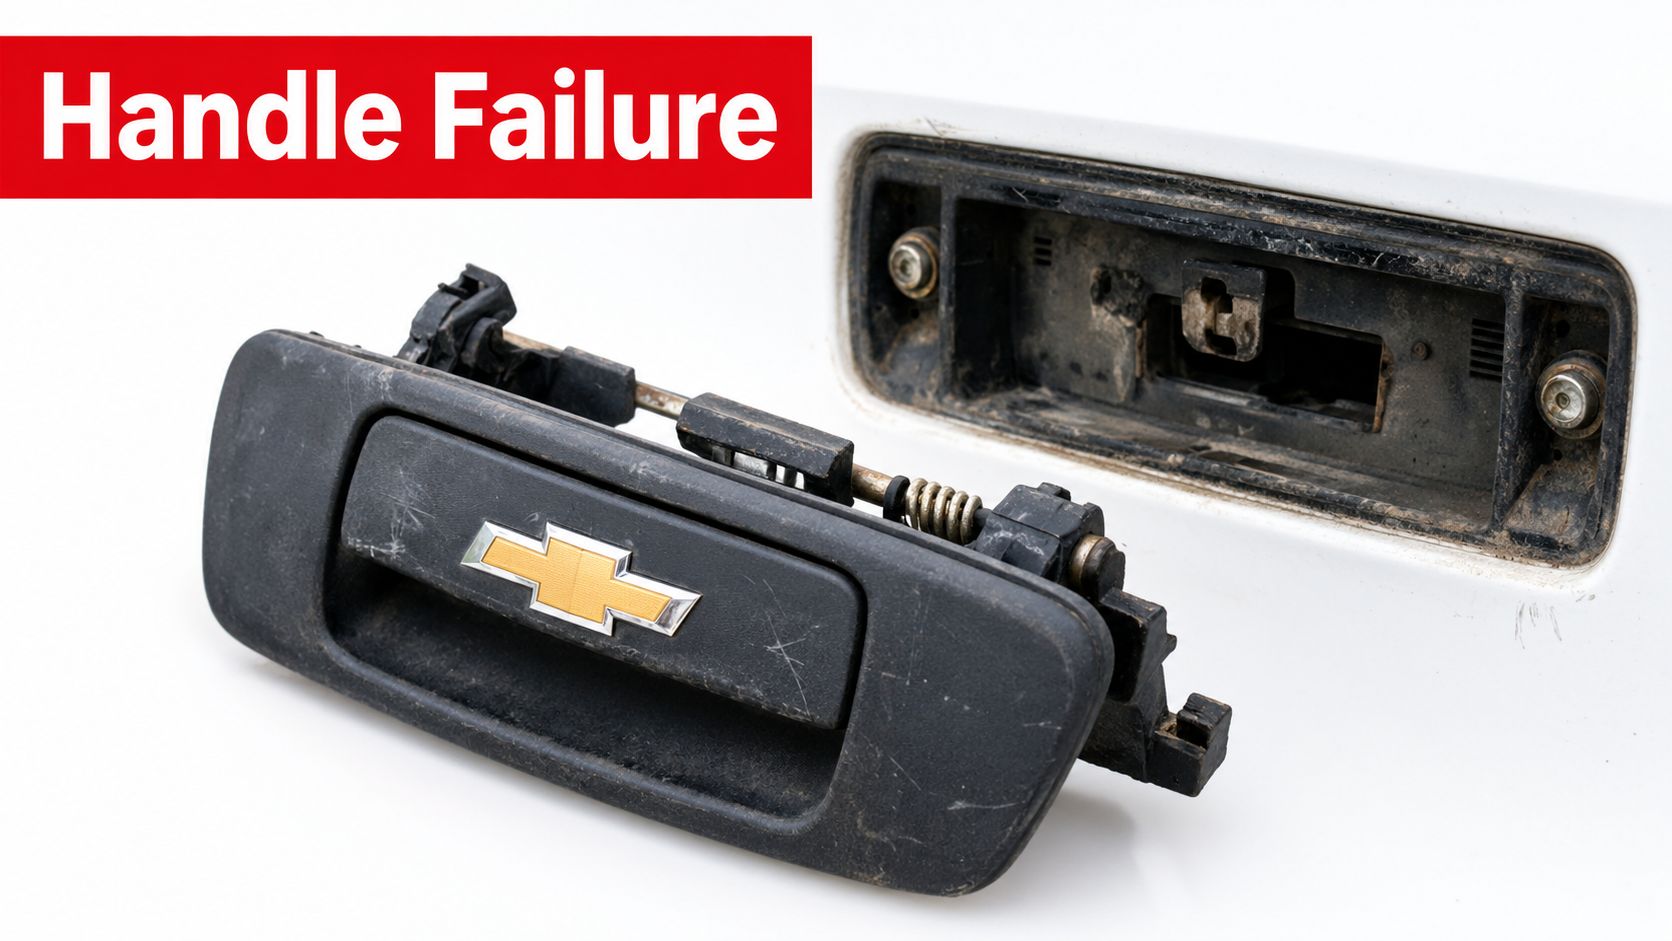
A failed Chevy tailgate handle is often only the visible part of the problem. The handle transfers your pull through rods, clips, bellcranks, and side latches. If one link in that chain breaks, the handle may feel loose, move normally without releasing the gate, or become difficult to operate.
Four failure points to check
Cable or rod separation is a common starting point. A linkage can pop out of its channel when a retainer no longer holds it securely. Pull the handle while watching the mechanism from inside the tailgate. If the lever moves but the rod doesn't follow, the handle isn't the root problem.
Broken clips create a similar symptom. Plastic retainers take repeated load, and a cracked clip lets the rod move sideways instead of transferring force to the latch. Look for a missing retainer, a rod sitting outside its guide, or a clip that turns instead of holding the linkage firmly.
Rust and contamination can make a good handle appear defective. Road salt, mud, and water collect around the side latches and linkage. If the handle has normal resistance but the gate releases unevenly, inspect both latch assemblies rather than replacing only the exterior piece. Clean the mechanism and check whether each latch returns to its resting position.
Water intrusion can affect the internal bellcrank and, on newer trucks, electronic release components. GM's recall of 131,231 model-year 2024 Silverado 2500HD and 3500HD trucks in the United States involved a power-unlatching tailgate that could short circuit after water intrusion and unlatch while parked, according to Kelley Blue Book's Chevrolet recall information. The campaign shows why an electronically controlled tailgate needs a broader inspection than a simple handle-and-latch check.
Camera-equipped handles add another failure point. A connector may be loose, a harness may be strained, or a camera opening may be damaged during removal. Never use the wires to pull the assembly free. Release the connector, inspect the pins, and route the harness through its original path.
Use the following video as a visual reference for the basic disassembly sequence, but verify the hardware against your truck before copying any step.
The design has changed over time. Chevrolet's all-steel Fleetside tailgate appeared on the Cameo pickup line from 1955 to 1958, establishing the horizontal tailgate format that later used a handle to release two latches, as described in this history of Chevrolet tailgate design. Modern camera-equipped assemblies retain that basic user interface while adding electrical hardware, so a handle replacement should always include a linkage and harness inspection.
How to Remove and Install a New Tailgate Handle
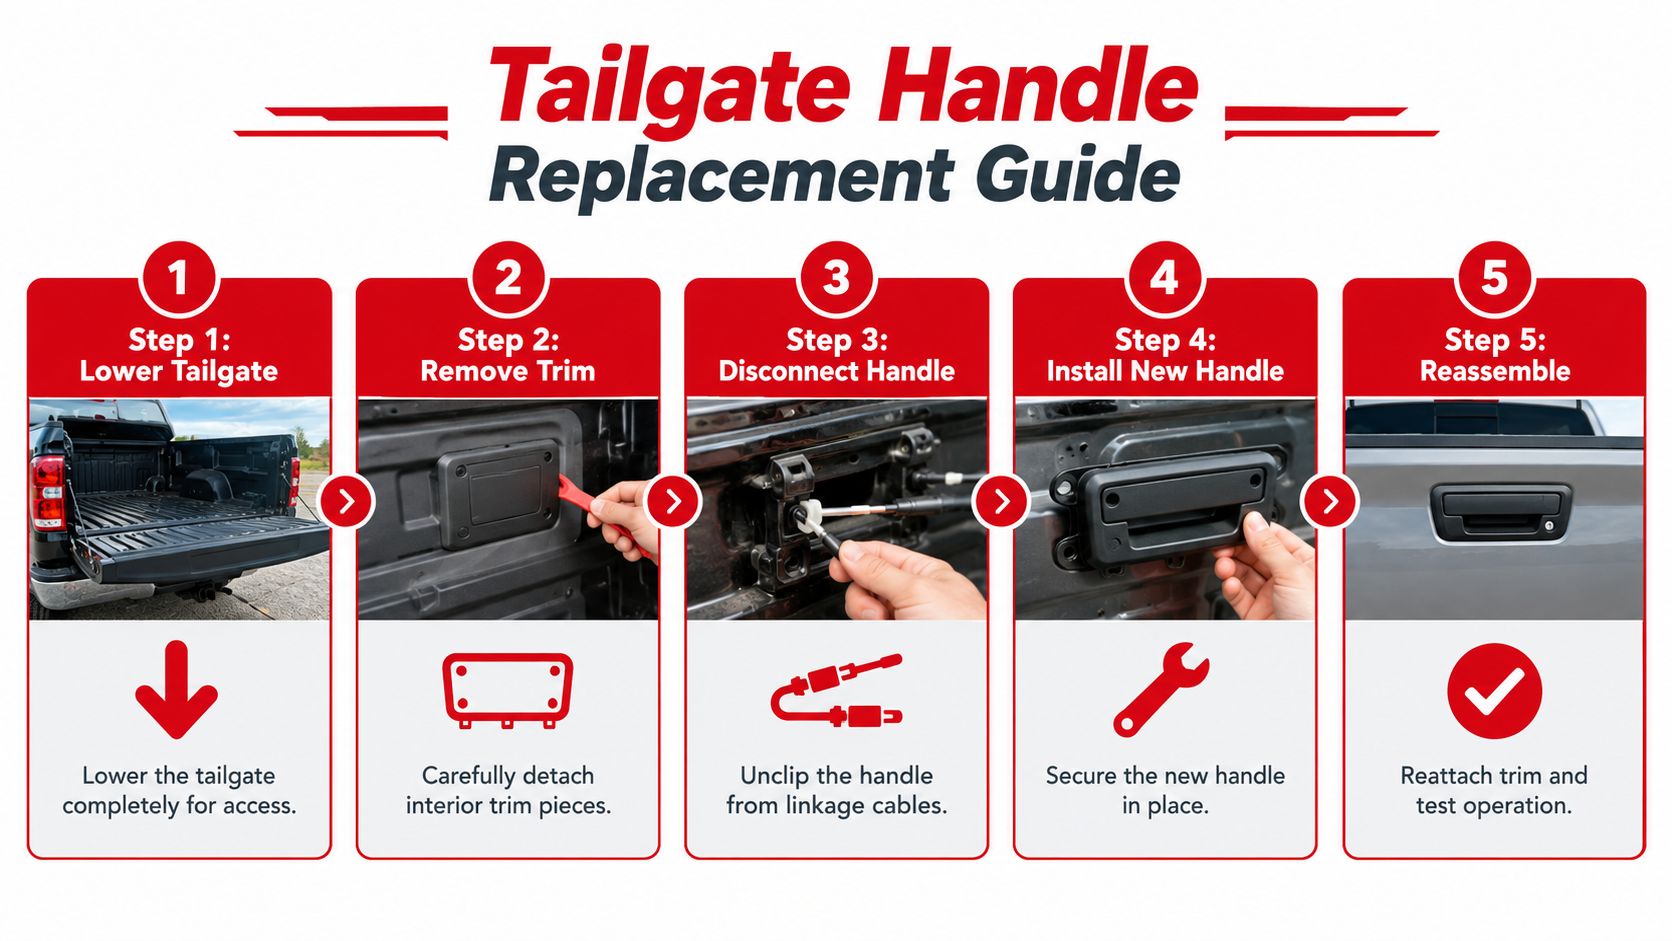
The physical replacement follows a straightforward sequence, but rushing the first step causes most avoidable damage. Lower the tailgate completely if it will open. If it won't, work carefully through the available access points and avoid bending the handle or forcing the latches against load.
Remove the old assembly
- Lower and stabilize the tailgate. Remove cargo from the bed and support the gate so it doesn't shift while you work. Keep fingers clear of the latch edges.
- Remove the inner panel or liner. Use a trim tool to lift push-pins and remove concealed screws. Put each fastener in your container. Don't pry directly against painted or finished surfaces.
- Expose the linkage. Locate the rods or cables connected to the back of the handle. Photograph their orientation before releasing any clips. Some GM trucks require tailgate-cable removal or access near the right hinge before the handle fasteners can be reached.
- Disconnect the rods and harness. Release each retainer with pliers or a small tool, then move the rod out of its channel. On a camera-equipped handle, press the connector lock and pull the plug by its body, not its wires.
- Remove the handle fasteners. GM applications commonly use 10 mm sockets or T20 and T40 Torx hardware, though the exact arrangement depends on model year. A compact 10mm wrench for auto detailing can be useful where the tailgate structure limits access.
- Compare the parts. Place the old and new assemblies together. Check the mounting points, linkage levers, camera aperture, connector, seals, and finish before installing anything.
Install and test
Position the replacement handle in the opening without tightening the fasteners fully. Reconnect each rod or cable in the same orientation as the original, and make sure every retainer is seated in its channel. A rod that looks connected but isn't locked can fall out as soon as you pull the handle.
Reconnect the camera harness before securing the trim. Route it away from latch movement and pinch points. Tighten the handle fasteners evenly, then cycle the mechanism while the tailgate remains open. Both side latches should move together and return freely.
The tailgate handle replacement guide provides another reference for the panel, linkage, and reassembly sequence. Before closing the gate, test the handle several times, inspect the latch engagement, and confirm that the camera displays an image if your truck has that feature. Refit the liner only after the mechanical and electrical checks pass.
Aftermarket Metal vs OEM Plastic Handles
An OEM-style replacement usually offers familiar fitment and factory-like appearance. Its advantage is straightforward installation when the original design remains in good condition. Its limitation is equally important: replacing a cracked plastic component with another part made to the same design may restore operation without addressing the weakness that caused the failure.
An aftermarket metal handle takes a different approach. Metal construction can resist cracking at the grip and lever areas, but it still needs accurate mounting points, smooth linkage movement, proper corrosion protection, and a compatible camera opening where applicable. A strong outer handle won't compensate for a seized side latch or a damaged rod clip.
| Feature | OEM Plastic | Aftermarket Metal |
|---|---|---|
| Fitment | Factory-style replacement when correctly matched | Must be matched carefully to model, trim, and equipment |
| Failure concern | Can retain plastic stress points from the original design | More resistant to cracking, but surrounding clips and latches still need inspection |
| Weight and feel | Typically light and familiar | Often heavier and more substantial |
| Camera compatibility | Depends on the original equipment configuration | Must include the correct camera opening and harness arrangement |
| Climate suitability | Requires regular cleaning and lubrication in harsh conditions | Better resistance to grip cracking, while moisture can still affect the mechanism |
| Best use | Direct restoration with confirmed fitment | Durability-focused upgrade for frequent loading or demanding conditions |
Choose for the whole system
A metal upgrade makes more sense when the truck sees repeated bed access, towing, work-site use, road salt, or cold weather. It isn't a cure for every failure. Before ordering, verify that the latch rods, clips, camera connector, and tailgate shape match the intended assembly.
Cosmetic and body-related parts also deserve fitment and quality checks. For broader truck-accessory considerations, GP Mobile Car Wash & Detail's guide to can provide useful context on selecting exterior equipment that suits how the vehicle is used.
Warranty terms can influence the decision, but they should support, not replace, fitment verification. T1A Auto lists a lifetime warranty on its metal components and a three-year warranty on standard items in its publisher information. Compare those terms with the seller's return policy, customer reviews, and technical support before buying. The OEM versus aftermarket parts guide is useful when you're weighing direct replacement against a durability-oriented upgrade.
Troubleshooting Common Installation Issues
A handle can be installed correctly and still fail to operate if the rest of the tailgate isn't moving freely. Troubleshooting should follow the force path from your hand to the latches. Start at the handle, then inspect the rods or cables, the center mechanism, and both side latches.
When cold weather locks the mechanism
Freezing usually starts with trapped moisture. Don't yank a frozen handle, pour boiling water over painted or plastic components, or use a flame. Warm the area gradually with the vehicle's heat, a gentle warm-air source, or a product designed for vehicle locks and frozen mechanisms. Once the gate opens, dry the accessible areas and use a suitable dry lubricant on the moving linkage rather than leaving a heavy, dirt-catching grease coating.
Recent user discussions describe tailgate cover and handle components becoming difficult to remove in freezing conditions, while newer repair conversations also point to camera-harness disconnection during replacement. Treat those reports as practical warnings, not as a substitute for inspecting your own truck. Moisture control matters as much as the new handle.
When the camera is involved
Disconnect the harness before pulling the handle away from the tailgate. Check the connector lock, bent pins, damaged insulation, and routing. If the replacement handle has no camera opening, the wrong connector, or a different mounting configuration, stop and verify fitment rather than adapting the part with improvised cuts.
Electrical caution: A camera-equipped handle is both a body part and an electrical assembly. Protect the connector first, then work on the fasteners.
When the new handle feels loose
A wobbly handle may indicate loose fasteners, an unseated rod, a cracked retainer, or a latch that isn't aligned. With the tailgate open, operate the handle and watch both side latches. If one side moves late or stays engaged, clean and inspect that latch and the center bellcrank before blaming the handle.
A tailgate that won't close securely also deserves immediate attention. Cargo-bed access and towing hardware work together in daily use, so review practical guidance on hitch class and weight limits when your repair is part of a larger hauling setup. Never drive with a latch that doesn't engage positively.
Getting the Most Out of Your Replacement
A new handle lasts when the surrounding mechanism gets attention. Keep the latch areas clean, inspect the rods and retaining clips during routine service, and apply a suitable lubricant to moving metal contact points. In cold climates, look for water that can remain trapped behind trim or inside the handle opening, then dry the area before freezing conditions return.
The history of Chevrolet tailgates shows how a simple mechanical interface became part of a more complex access system. The familiar handle still has to release both latches, but newer assemblies may also carry a camera or operate with power-release hardware. That makes precise fitment more important than choosing a part that merely looks similar.
When selecting a replacement, compare the VIN, model year, trim, camera configuration, mounting points, warranty, and return terms. A metal handle can improve resistance to grip cracking, but only a complete system check addresses worn clips, seized latches, moisture, and misrouted wiring.
If your Chevrolet tailgate handle is cracked, loose, frozen, or camera-equipped, T1A Auto offers vehicle-specific replacement parts and related tailgate hardware for a proper fitment check. Visit the catalog, compare your truck's configuration with the product details, and choose the replacement that matches the complete mechanism rather than the outer handle alone.
