


A driver's window stops halfway up on a cold morning. You press the switch again and hear a rough grind from inside the door, but the glass barely moves. It's tempting to order a regulator straight away. First, though, work out whether the problem is the lifting mechanism, the motor, the glass channel or the window's electronics. A slow window can be binding on a dirty seal; a window that drops into the door usually points to a more serious mechanical failure.
The regulator isn't a single part working alone. It's a system that lifts and guides the glass, with a motor, gears or cable drum, a cable or lifting arm, and a track or guide. Switches, wiring and calibration can affect its operation too. The right diagnosis saves you from replacing a sound part while leaving the underlying cause in place.
Table of Contents
- Window Regulator Symptoms and What They Usually Mean
- How to Diagnose a Window Regulator Fault in Order
- What Fails Inside the Motor, Gears, Cables and Tracks
- Recall Cases That Show How Regulator Defects Escalate
- When a Temporary Fix Works and When to Replace
- OEM Versus Aftermarket Regulators and Fitment Checks
- How to Replace a Power Window Regulator Safely
- Confirm the Right Part Before You Order
Window Regulator Symptoms and What They Usually Mean
The sound and movement tell you where to start. A grinding noise with slow travel points toward friction or worn regulator parts. A silent motor points toward an electrical fault. A window that drops or tilts needs prompt attention, because the glass may no longer be held correctly.
| Symptom | Most likely cause | First check |
|---|---|---|
| Window drops or slides down on its own | Stretched, frayed or unseated cable, or a slipping regulator | Inspect cable ends and drum teeth |
| Slow, jerky movement with grinding noise | Worn gears or drum, or a dry or dirty glass channel | Listen at the motor, then check the channel for lubrication and debris |
| Motor hums but the glass doesn't move | Stripped gear, broken cable, or glass disconnected from the lift plate | Check the glass attachment bolts and clips |
| Motor is silent, fuse is intact | Failed motor, faulty switch, or open wiring in the door harness | Measure voltage at the motor connector while pressing the switch |
| Window stops early or reverses for no clear reason | Lost anti-pinch calibration or an obstruction in the channel | Clear the channel and run window initialization |
| Glass tilts, rattles or sits crooked in the door | Loose glass bolts, worn guide or bent track | Inspect glass retaining bolts and guide rollers |
| Fuse blows when the window moves | Binding mechanism drawing excess current | Move the glass by hand to find drag |
| Window works from only one switch position | Switch contact wear rather than regulator failure | Test the same window from the other switch position |
Use the table to narrow the search, then confirm the fault on the car before ordering parts. A motor that hums without moving the glass might be turning against a stripped gear, or the glass may have come loose from its carrier. Only opening the door settles which one you have.
Treat uncontrolled glass as a safety issue
A study by NHTSA and the U.S. Consumer Product Safety Commission covering October 1993 through September 1994 estimated that power windows injured 499 people: 437 of them, about 88%, had a hand, wrist or finger caught by a closing window, fingers were the most severely injured body part in 77% of cases, and 64% of those hurt were under 15 years old. A window that closes unexpectedly or refuses to respond to the switch is a real hazard to anyone near it, and children are the group most often hurt.
Before touching the door trim or pressing the switch again, write down what the window did, what you heard and whether the problem changes in hot or cold weather. That record helps separate an intermittent electrical fault from mechanical drag once you start pulling the door apart.
How to Diagnose a Window Regulator Fault in Order
Think of diagnosis like checking a patient's pulse before recommending surgery. The goal is to find where power or movement stops, then inspect the part causing the failure rather than replacing the assembly on a hunch. OEM procedures distinguish electrical faults from mechanical drag and call for checking the glass channel, seals, fasteners, alignment and possible interference before installing a regulator. A manufacturer diagnostic procedure also describes verifying motor operation and moving the glass manually to identify binding.
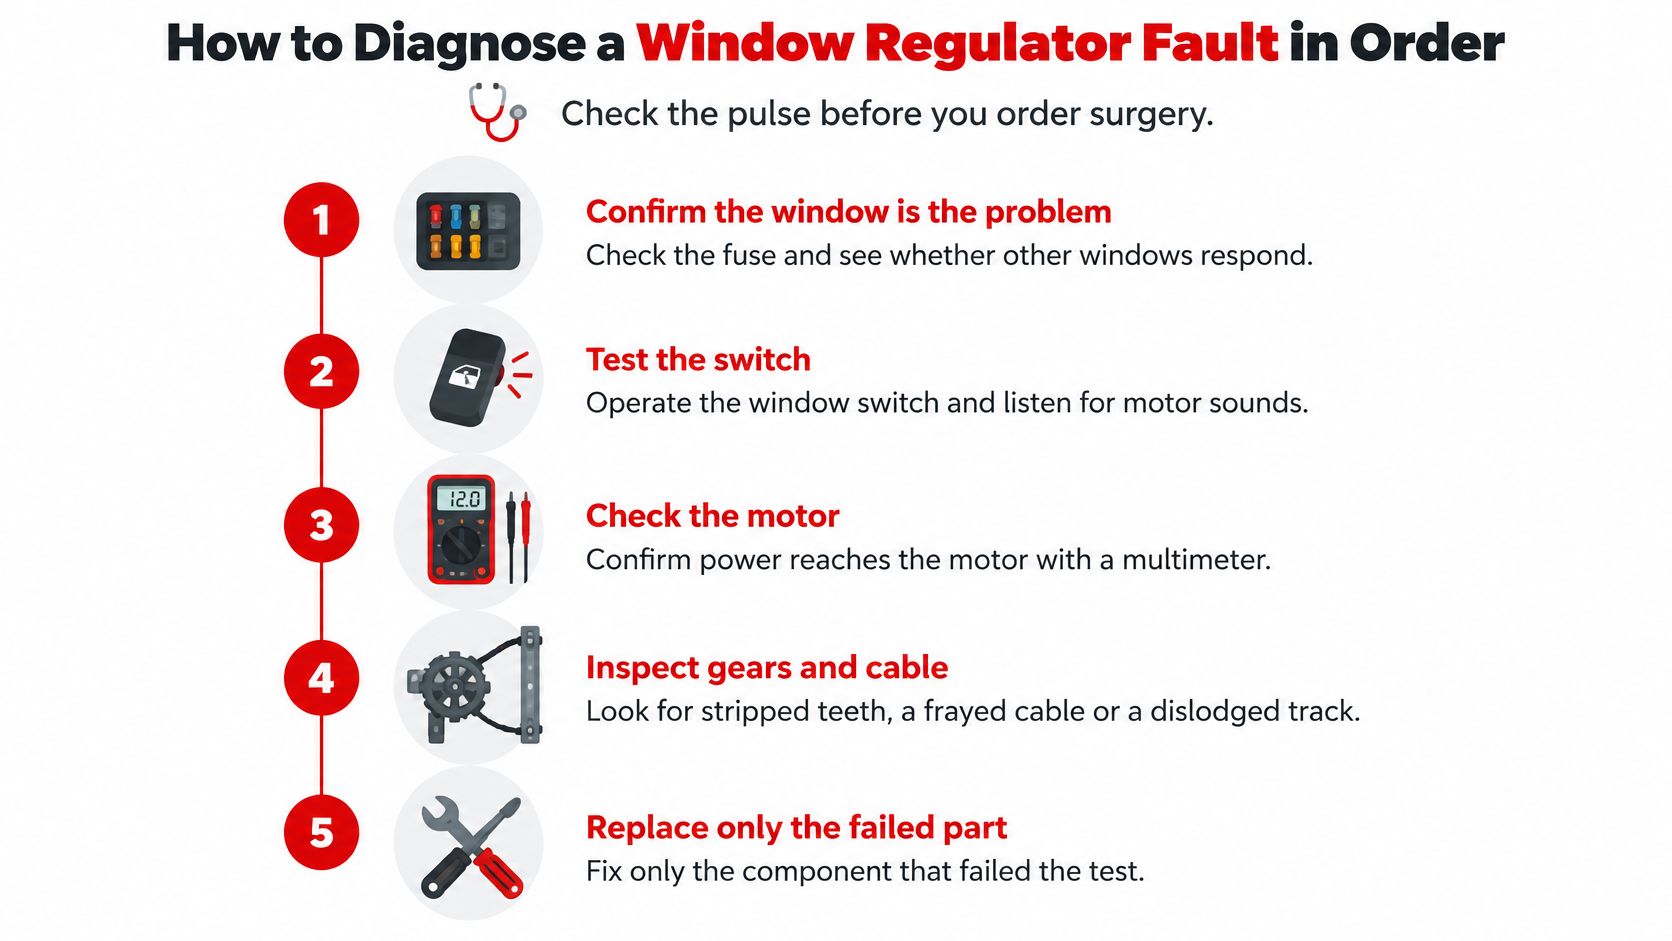
- Confirm the window is the problem. Check the fuse and see whether other windows on the same circuit work. If several windows are out, look for a shared electrical issue before taking apart one door.
- Test the switch from both positions. If the window can be operated from another switch, compare the results. A switch that works in one direction or from only one control may have worn contacts.
- Check for voltage at the motor. With the switch pressed, measure voltage at the motor connector. If power reaches the motor but it doesn't run, the motor is a stronger suspect; if voltage is absent, trace the switch, wiring and connections.
- Test the motor directly when appropriate. On a two-pin motor, a controlled 12-volt supply applied briefly can confirm whether the motor activates. Use the correct service procedure and avoid powering a motor while the glass or regulator is unstable.
- Separate the glass from the lifting mechanism. If the motor runs but the glass binds, disengage the glass from the lift plate and slide it by hand through its channel. Smooth manual travel points away from channel friction; resistance or sticking points toward alignment, seals or an obstruction.
- Inspect the full path. Check for debris, damaged seals, a channel in the wrong position, loose fasteners, misaligned glass, and interference from door wiring or lock components. Don't skip this step: friction can overload a good motor and can cause a replacement regulator to fail again.
- Initialize the window if movement is smooth. Lost calibration can make a window stop early or reverse even when the mechanism isn't broken. Where the vehicle requires initialization, follow its service manual; the procedure typically involves holding the switch beyond a travel stop until the system confirms the reset, then repeating the sequence in the other direction.
- Use scan data when the fault remains unclear. A scan tool can command the window actuator, while voltage and current measurements help distinguish a motor or module problem from a binding mechanism. An unusual rise in current or a persistent stall suggests friction, a seized mechanism or incorrect calibration rather than a simple switch fault.
The branch points are simple: no voltage at the motor means check the switch and wiring; voltage with a silent motor points to the motor; glass that binds by hand points to the channel or alignment. Run initialization only after the channel is clear and the glass is seated. It may be needed after a battery disconnect, regulator replacement or calibration fault, but it can't repair a broken cable or damaged track.
If you're sorting out whether the motor or the lifting mechanism has failed, this guide to window motor versus regulator symptoms can help clarify what each part does.
What Fails Inside the Motor, Gears, Cables and Tracks
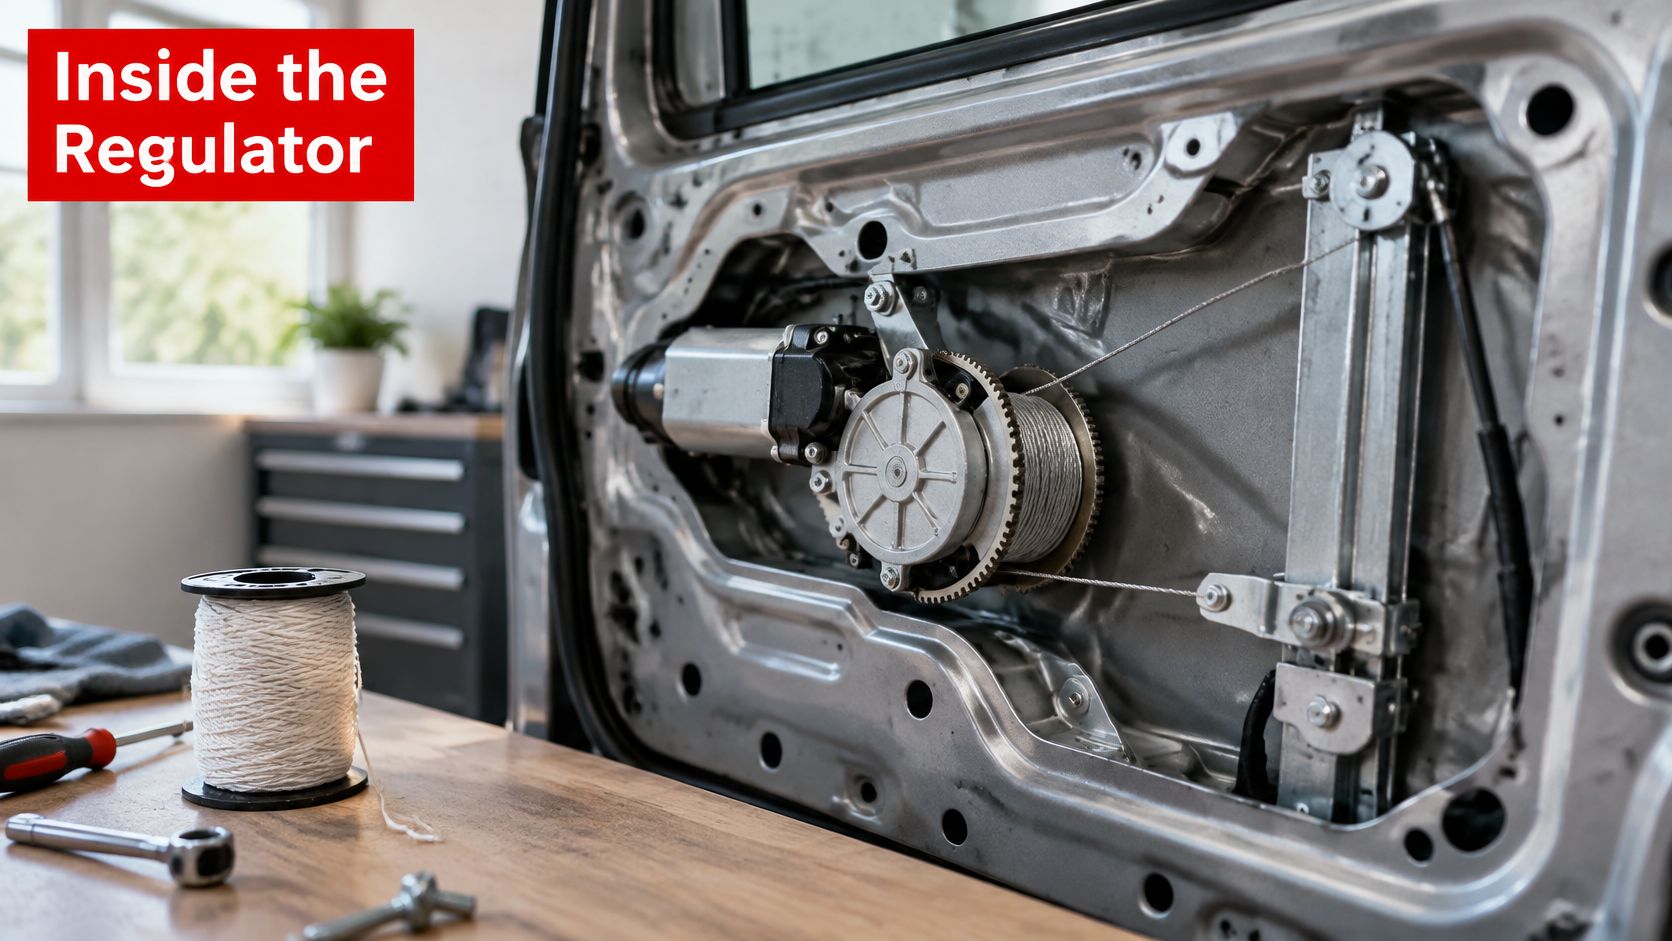
A regulator works a little like a kite string on a spool. The motor turns the spool, the gears or drum convert rotation into lifting force, the cable or arm carries the load, and the track keeps the glass moving straight. If any part binds or lets go, the window can slow down, tilt, rattle or drop.
Start with what you hear
The motor may wear internally as its brushes or bearings deteriorate. A motor that slows under load isn't necessarily dead: it may be struggling against a dry bearing, a binding channel or a damaged regulator. If the motor is silent, test power at its connector before condemning it.
The gears and drum turn the motor's rotation into movement. If gear teeth strip or the drum wears, you may hear clicking or grinding, or the motor may spin while the glass stays still. A motor that sounds active but doesn't lift the window is a reason to inspect the mechanism, not to assume the motor has failed.
Follow the force to the glass
A cable can stretch, fray at its crimped ends or slip off its drum clips. When that happens, the glass may suddenly drop or move with little resistance. A frayed cable isn't a good candidate for a quick patch; inspect the rest of the mechanism and replace the failed regulator assembly when its cable or drum can't reliably carry the glass.
Guide rollers and tracks keep the glass aligned. Worn rollers, a bent guide or grit in the track can increase resistance until a healthy motor seems weak. That's why a slow window deserves a manual check for drag before you fit a new regulator.
The feel at the switch helps you narrow it down. A harsh grind, click or sudden drop calls for an immediate stop and inspection. A steady but laboured movement, particularly with a glass panel that's still level, makes channel friction or misalignment worth checking early. A motor that runs freely without moving the glass suggests that the drive mechanism or glass attachment has lost its connection.
Repeatedly holding the switch won't free a broken cable or stripped gear. It can add load to a motor that's already working too hard. If you want to see how cable and pulley components transfer motion, this overview of a cable-pulley system provides a useful mechanical reference.
A regulator's parts can fail separately, but the glass, guides, fasteners and electronics still affect the system as a whole. That's why replacing the visibly damaged component without checking what caused the damage can lead to a repeat problem.
Recall Cases That Show How Regulator Defects Escalate
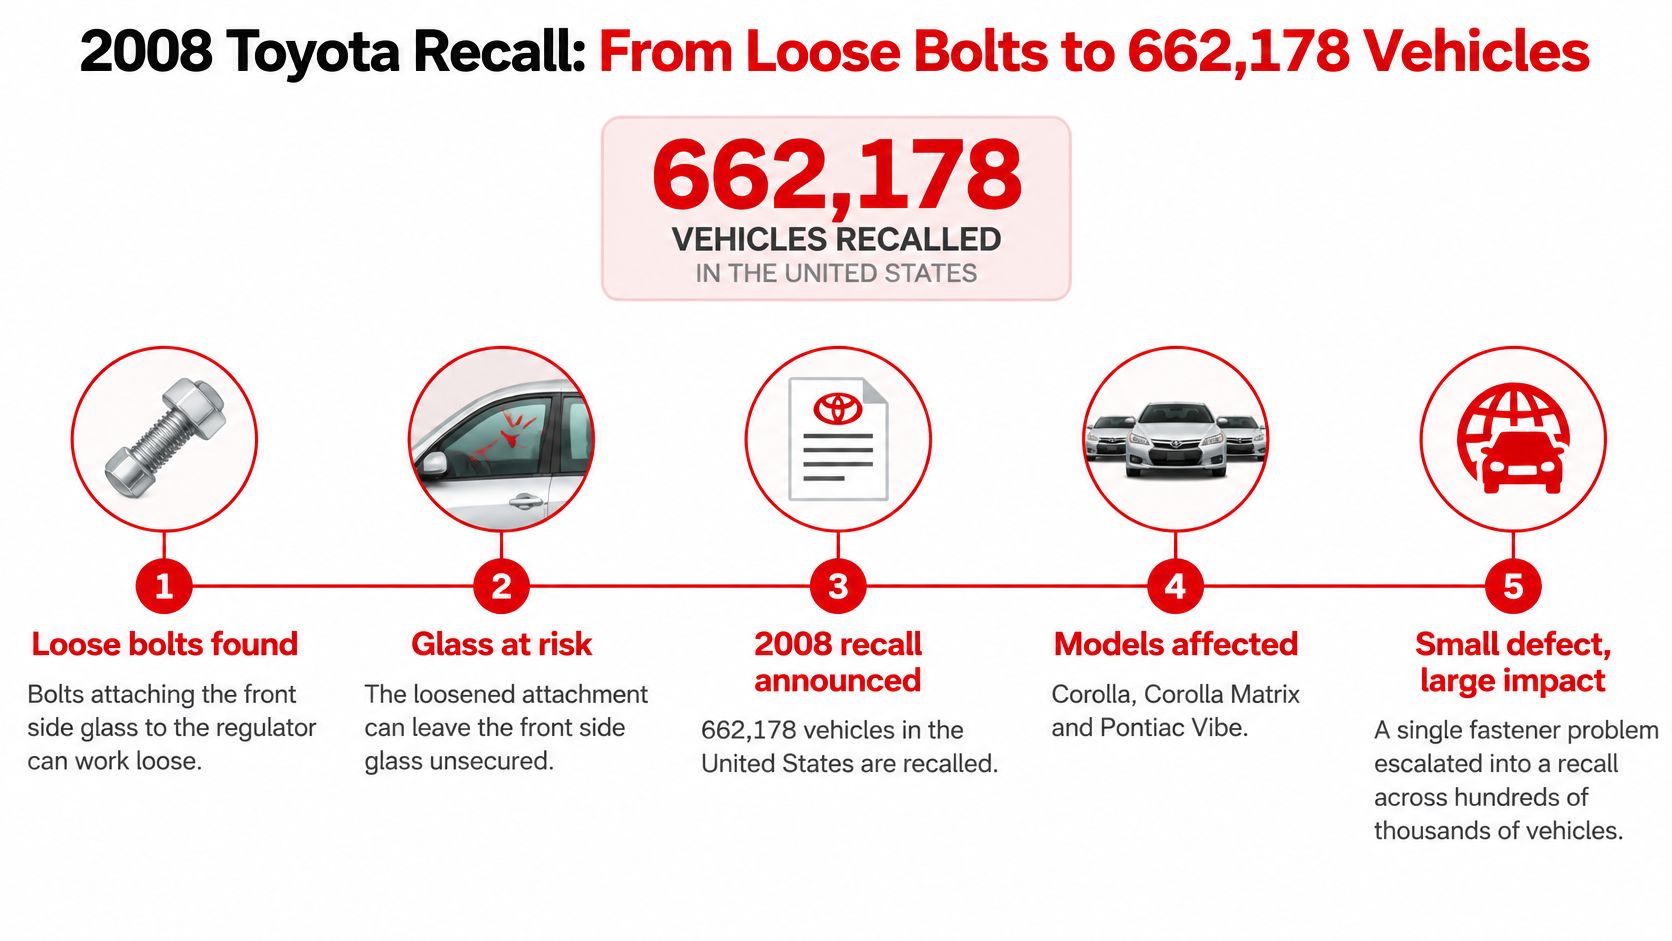
A regulator issue can be more than wear in one door. NHTSA's recall notice documents 662,178 vehicles recalled in the United States in 2008 across Toyota Corolla, Corolla Matrix and Pontiac Vibe models, and the same case history records the move from an NHTSA preliminary evaluation to Engineering Analysis EA08-004 in February 2008 before Toyota announced a voluntary recall. The defect was small on paper: bolts attaching the front side glass to the power-window regulator might not maintain enough retention force.
The risk grew with use. Continued window operation could work a bolt loose, leave the glass misaligned and, in the worst case, allow it to shatter. That is the escalation path technicians look for: a fastener or attachment fault changes how the glass sits, then the guide and drive parts load unevenly, then a normal switch press becomes the event that separates the glass.
Three practical lessons
- Treat new noise or uneven movement as a warning. A change in sound or glass alignment is worth investigating before the window stops moving.
- Check glass fasteners before blaming the motor. A loose attachment can make the glass move abnormally even if the motor still runs.
- Report repeat safety-related faults. If owners of the same model describe similar glass movement or retention problems, they can submit information to NHTSA.
Inspect glass attachments and regulator hardware whenever the glass sits crooked, drops, or changes position unexpectedly. A slow window can still be friction or calibration, but a window that falls, tilts or pops out of its channel needs the attachment points checked first.
When a Temporary Fix Works and When to Replace
Fix friction, debris, fastening or calibration when that's the actual fault. Replace what's broken or worn. Cleaning a channel can restore smooth travel, but it won't repair a damaged drum. A temporary measure only helps when it removes the cause; otherwise, the window is likely to bind or fail again.
| Situation | Temporary fix | Replacement needed? |
|---|---|---|
| Dry, sticky glass run | Clean the channel and apply the lubricant specified by the manufacturer | No |
| Debris in the channel after the window stops | Clean and lubricate, then run window initialization if required | No |
| Loose glass bolt with glass still seated and aligned | Tighten to service-manual torque; use thread locker only if specified | Usually no |
| Glass bracket cracked or bent | No safe temporary repair; don't drive with unsecured glass | Yes |
| Stripped gear or worn drum | No practical temporary fix; the failure will repeat | Yes |
| Frayed or broken cable | No safe temporary repair | Yes |
| Motor silent with voltage confirmed at the connector | No repair; test the motor separately if possible | Yes, the motor or regulator assembly |
| Window slow only after a failed calibration | Run window initialization and retest | Only if initialization fails |
Use only the lubricant specified by the vehicle manufacturer. The wrong grease can attract grit to the channel, turning a repair intended to reduce friction into a new source of drag.
Safety rule: Don't drive with cracked or unsecured glass, and don't treat tape or clamps as a regulator repair. If the glass can fall, shift or obstruct your view, stop operating the window and arrange a safe repair.
After cleaning, tightening or initialization, run the window through several complete up-and-down cycles while watching for grinding, reversal or uneven travel. If the same fault returns, stop testing and inspect the motor and regulator rather than continuing to operate a binding mechanism.
OEM Versus Aftermarket Regulators and Fitment Checks
A regulator listed for your model can still be wrong for its production date, electronics or guide geometry. In one manufacturer bulletin, regulators sourced from different electronic suppliers needed the matching software or calibration files to work correctly. An OEM bulletin on regulator calibration and fitment specifies a 24.5–25.5 mm guide-to-mounting relationship and calls for checking the glass run channel when closing is slow or anti-entrapment operation is erratic.
That is the system view again. Motor, cable, guides and glass all have to match the door's specification before the window behaves.
| Vehicle | Position | OEM number | Aftermarket number |
|---|---|---|---|
| 2002–2007 Jeep Liberty | Front driver side, with motor | 55360031AB | 741-526 |
| 2000–2004 Dodge Dakota or 1998–2003 Dodge Durango | Front passenger side | 5066430AB, 55256418 | 741-648 |
The cross-reference gives you a starting point. Before ordering, confirm the OEM number, side and motor assembly with the seller, then verify the connector pin count and motor polarity against the unit you pulled from the door. For any regulator, compare the mounting points and glass connections with the original, and find out whether the vehicle needs a specific module or initialization procedure.
Choosing between factory and aftermarket
An OEM regulator is built to the vehicle's production specification and keeps the original mounting and calibration arrangement. It can cost more, and for an older vehicle it may be hard to source at all. An aftermarket replacement can be a practical alternative, and some lines use metal parts where the factory design relied on failure-prone plastic. The motor type, connector, electronics and warranty terms still need checking before you commit.
The same identification discipline applies across door parts. A Jeep Wrangler replacement driver-side mirror is matched by side, vehicle compatibility and OEM references, and a regulator gets confirmed the same way: OEM number, position and connector decide fit. A comparison of OEM and aftermarket parts can help you weigh which option suits the repair.
How to Replace a Power Window Regulator Safely
Regulator replacement means working inside a door with heavy, fragile glass and moving parts. Read the vehicle service procedure first, and don't continue if you can't hold the glass securely or identify the correct electrical connectors. Airbags, trim fasteners and access-panel designs vary, so the steps below are a practical outline, not a substitute for vehicle-specific instructions.
- Disconnect the battery. This reduces the risk of accidental window movement while you're working. Follow the vehicle's service procedure for power disconnection, especially if other door electronics need a particular shutdown sequence.
- Remove the door trim and water shield carefully. Keep the screws, clips and electrical connectors organized, and avoid tearing the moisture barrier. A damaged or poorly resealed barrier can let water reach the cabin or door electronics.
- Raise and support the glass. Bring the glass fully up if the mechanism still allows it, then secure it with an appropriate clamp or wedge. This is a critical safety step: unsupported glass can fall when you detach the regulator.
- Disconnect the glass from the lift plate. Remove the attachment bolts or clips according to the service procedure. Keep a firm hand on the glass while releasing its support.
- Remove the regulator. Unbolt it and work it through the door's access opening, taking care not to snag the wiring. Note how the cable is routed and where the assembly sits before pulling it free.
- Compare the old and new parts. Check the mounting points, guides, connector and motor arrangement side by side. Transfer only the brackets, guides or connectors the new assembly requires, and don't assume visually similar components are interchangeable.
- Install the regulator loosely at first. Set the assembly into its mounting points without fully tightening the bolts. That gives you room to align it with the glass rather than forcing the window against a misplaced guide.
- Attach and align the glass. Seat the glass correctly in the channel, connect it to the lift plate and tighten the fasteners to the service-manual torque. Alignment matters: a crooked glass panel can bind, overload the motor and create a repeat failure.
- Lubricate only where specified. Apply the manufacturer-approved lubricant to the glass guide or channel where the service procedure calls for it. Keep it off surfaces where the vehicle maker doesn't specify lubrication.
- Reconnect and initialize. Reconnect the battery, reinstall the trim and run the required window initialization sequence. Test full up-and-down travel, and check anti-pinch operation if the vehicle has that feature.
Before reinstalling the trim, confirm that the glass moves smoothly and stays level. If it stalls, reverses or grinds, stop and recheck the channel, fasteners and alignment rather than forcing the window through another cycle.
Confirm the Right Part Before You Order
Order a regulator only after three checks: the diagnosis points to the regulator, the fault isn't a switch, wiring or glass problem, and the replacement matches the vehicle. Keep the old unit for a side-by-side comparison of mounting points, connectors and glass attachments. Searching by vehicle helps narrow the options, but always verify the door side and motor arrangement before committing to a part.
T1A Auto lists powered and manual window regulators with vehicle-based fitment search. Its listed terms include a lifetime warranty on metal components, a three-year warranty on standard items, free 90-day returns and free standard shipping on orders over $75. The support team targets resolution within 24 hours, so you can raise a fitment question before starting the installation.
If a correctly matched regulator still doesn't solve the problem, return to the diagnosis and recheck the glass, bolts and calibration before assuming the replacement part is faulty.
Check the diagnosis and fitment details before ordering, then use T1A Auto to search powered and manual window regulators by vehicle. If you're unsure about a connector, side or application, contact the support team with your vehicle details and compare the replacement with the old regulator before installation.
