


You hit the switch, and the glass just sits there. Sometimes it's dead quiet. Sometimes you hear a buzz, a click, or that ugly cable-grinding sound from inside the door. Either way, the result is the same. Your window is stuck open in bad weather, stuck closed at a drive-through, or hanging crooked enough to make you nervous every time you shut the door.
It's common to immediately consider the question: window motor vs regulator. That's a useful starting point, but it's not enough. A failed switch, a blown fuse, damaged door-jamb wiring, or a binding track can fool you into buying the wrong part. I've seen plenty of DIY repairs go sideways because the diagnosis started inside the door instead of at the switch and power supply.
A power window problem gets easier once you treat it like a system instead of a single bad part. Listen first. Test the simple stuff first. Open the door panel only after the basic checks point you there. That approach saves time, avoids broken trim clips, and keeps you from replacing a good motor when the actual fault is upstream.
That Familiar Silence When Your Car Window Is Stuck
It usually happens at the worst time. You pull into a parking garage, tap the switch for a ticket, and nothing happens. Or the window goes halfway down, shudders, and stops. Maybe it drops into the door with a thunk that tells you something mechanical has let go.
When a power window fails, the two main suspects are the window motor and the window regulator. But the symptom that matters most at the start isn't the part name. It's what the window does, what it sounds like, and whether the problem shows up from one switch or both.
Here's the first practical split:
| Component | What it does | Typical failure clue | What DIYers often get wrong |
|---|---|---|---|
| Window motor | Provides electric drive to move the mechanism | No sound, weak operation, or intermittent response | Replacing it before checking power and switch input |
| Window regulator | Mechanically lifts, lowers, and supports the glass | Grinding, crooked travel, binding, or dropped glass | Assuming noise always means the motor is bad |
| Switch, fuse, or wiring | Delivers command and power to the system | Works from one switch but not another, or no response at all | Ignoring these checks and buying door parts first |
A stuck window is annoying, but it usually leaves clues. A silent door points you one direction. A running motor with no glass movement points another. A window that works from the driver switch but not the door switch tells a different story entirely.
Practical rule: Don't order parts until you know whether the problem is electrical command, electrical drive, or mechanical movement.
That's the difference between a one-evening repair and a weekend of taking the same door apart twice.
Anatomy of Your Power Window System
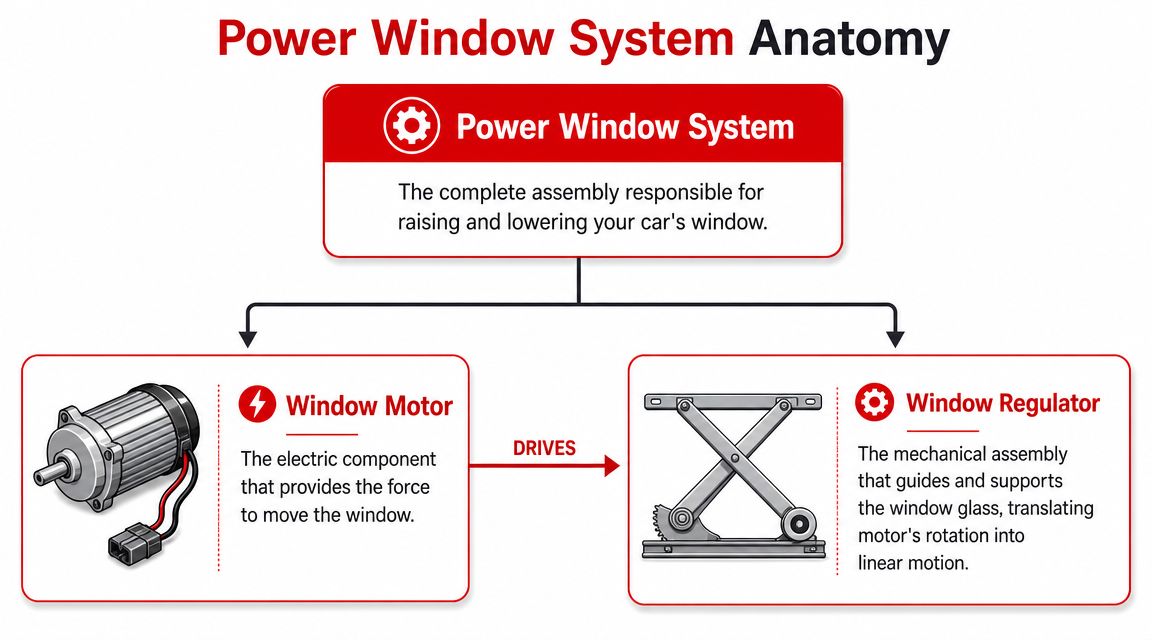
A power window is a small system, not just two parts in a door. The motor and regulator do the visible work, but the switch, fuse, wiring, and glass channels decide whether that work can happen at all.
What the motor does
The window motor is the electric drive unit. Press the switch one way, and the circuit sends power so the motor turns in the direction that raises the glass. Press it the other way, and the circuit reverses direction so the motor lowers it.
Its job is simple. It provides rotational force.
That matters during diagnosis because a dead window motor and a motor with no power can look identical from the seat. If the fuse is open, the switch contacts are worn, or a wire has broken in the door jamb, the motor never gets the command. Replacing the motor in that case fixes nothing.
What the regulator does
The window regulator is the mechanical assembly that turns the motor's rotation into controlled glass movement. Depending on the vehicle, it may use a cable-and-drum setup, a scissor-style arm, guide tracks, sliders, or a combination of those parts. The regulator supports the glass, keeps it aligned, and carries the load as the window moves.
For a quick visual reference, this guide to car window parts and how they fit together helps before you remove a door panel.
In the shop, regulators usually fail from wear in the cable, pulleys, sliders, pivot points, or glass mounts. Dirty channels and a glass run that grabs the window can overload the mechanism too. That extra drag can make a good motor look weak.
What completes the system
The parts inside the door get most of the attention, but the rest of the circuit matters just as much.
A typical power window system also includes:
- Fuse or circuit breaker to protect the circuit
- Window switch to command up or down movement
- Door wiring and connectors to carry power and ground
- Glass run channels and guides to keep the window tracking straight
This is why I tell DIYers to diagnose the whole path first. Command, power, ground, movement. If one part of that chain is missing, the glass stops, and the motor or regulator can take the blame unfairly.
Why the two get confused
From outside the door, several failures feel the same. The switch gets pressed, and the glass does not move. Inside the door, the failure pattern is usually more specific.
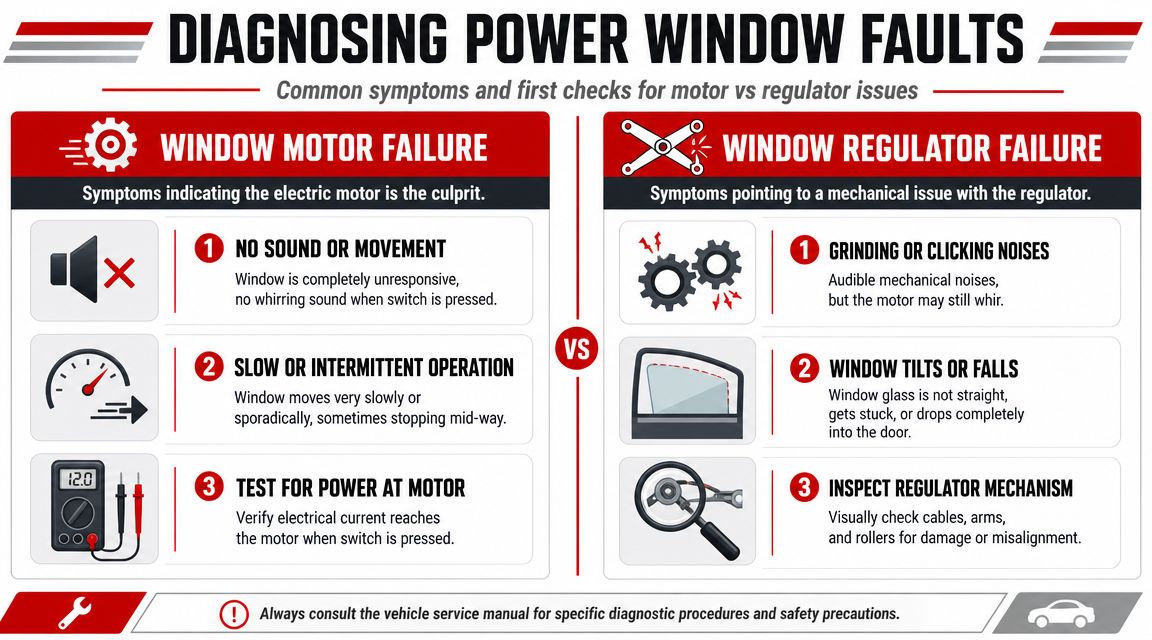
- A motor problem often shows up as no operation, weak operation, or intermittent response
- A regulator problem usually shows up as binding, crooked travel, cable noise, or glass that drops into the door
- An electrical supply problem can mimic a bad motor with complete silence
- A channel or guide problem can mimic a bad regulator by making the window stall or strain
Some vehicles also use a combined motor-and-regulator assembly. On those, the repair decision is less about which single piece failed and more about what is sold, what matches the door design, and whether replacing the full unit saves time and repeat labor.
That is the practical takeaway. Before buying parts, identify which part of the system has failed.
Common Failure Symptoms and What They Mean
A stuck window usually gives a clue before you pull the door panel. The trick is reading the clue correctly so you do not buy a motor for a switch problem, or a regulator for a glass-track bind.
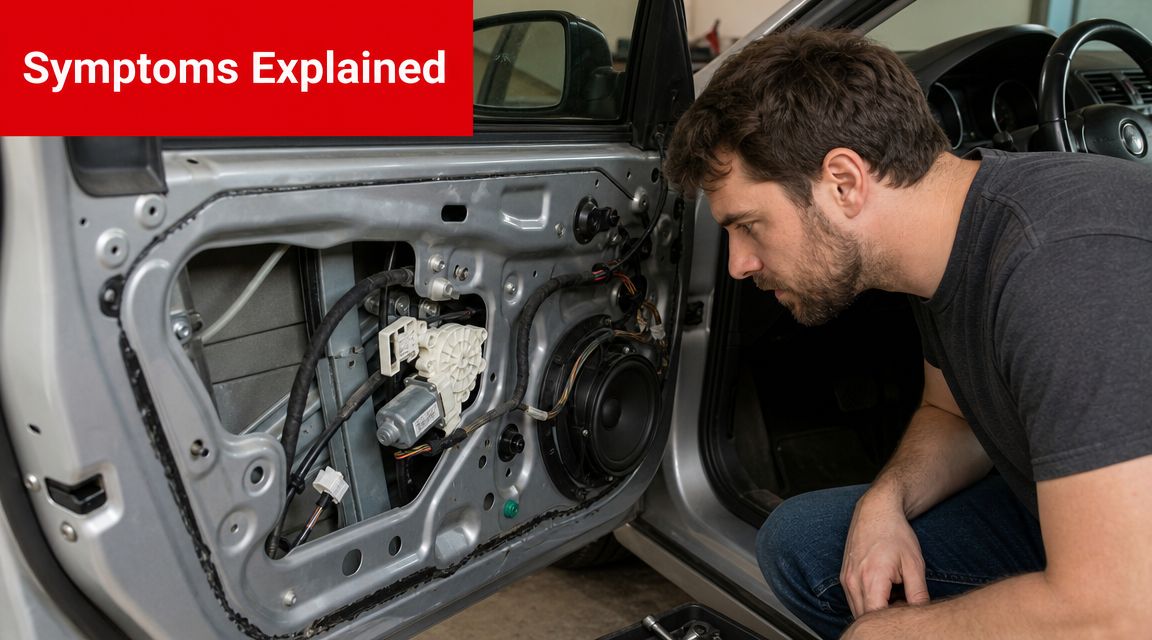
Silence, weak response, and intermittent operation
Complete silence sends many DIYers straight to "bad motor." That guess is expensive when the actual fault is a blown fuse, a failing switch, or broken wiring in the door jamb.
If you press the switch and hear nothing, start by treating it as a command or power problem until proven otherwise. If the window works once, then quits, or creeps up slowly and stalls, the motor may be worn, but low voltage, high resistance in the circuit, or a binding glass channel can create the same symptom. A-Premium's breakdown of window motors and regulators makes that distinction well. A dead motor does not act the same way as a motor that runs while the mechanism fails to carry the glass.
One quick rule helps here. Silence is a starting point, not a verdict.
If you want to confirm whether the motor is getting power before ordering parts, follow a step-by-step window motor test and verify power and ground at the connector.
Noise, crooked travel, and dropped glass
Mechanical faults usually announce themselves.
A regulator with a frayed cable, broken slider, loose mounting point, or worn pivot often causes these complaints:
- Grinding, popping, or snapping sounds
- Glass that tilts forward or backward
- Window that stops partway or binds near the top
- Glass that falls into the door
- One side of the glass rising before the other
Those symptoms point toward the regulator or the glass guidance path because the drive side may still be working. In the bay, one of the most common telltales is hearing the motor run while the glass barely moves or shifts crookedly. At that point, stop hitting the switch. Repeated cycling can bird-nest a cable regulator, crack a plastic slider, or put side load into the glass.
What different symptom patterns usually mean
Regulator design changes the failure pattern, but the basics stay the same. Cable regulators often fail with grinding, slack cable noise, or sudden glass drop. Scissor and track-style setups tend to show wear through uneven travel, binding, or play in the mechanism.
Use the symptom to choose your first check:
| Symptom | Strong first suspicion | Why |
|---|---|---|
| Completely silent from both switches | Fuse, power feed, switch circuit, wiring, or motor | No confirmed motor activity yet |
| Motor noise but no glass movement | Regulator | The motor is turning, but the mechanism is not carrying the glass |
| Glass drops into door | Regulator or glass attachment point | The support side has failed |
| Slow movement with strain | Weak motor, low voltage, binding regulator, or tight run channel | Electrical and mechanical drag can feel the same |
| Crooked or uneven travel | Regulator, guide, or glass channel issue | The glass is not being supported evenly |
That table is how I sort these jobs in practice. First identify whether the problem is command, power, drive, or glass movement. Then test the part that matches the symptom instead of guessing from the outside of the door.
How to Diagnose the Faulty Component Step-by-Step
The fastest diagnosis starts outside the door. Most wrong part purchases happen because people skip the easy checks and go straight to panel removal.
Start with the command side
A key gap in many guides is system-level diagnosis. The actual decision often depends on switch input, fuse power, and door-jamb wiring, and a good first check is to test the window from both the driver master switch and the individual door switch, as recommended in Haynes' diagnosis guide.
That one test tells you a lot:
- Works from one switch but not the other. Suspect the bad switch or its local circuit first.
- Works intermittently when the door moves. Suspect broken wiring in the door-jamb boot.
- Dead from both switches. Move to fuse and power checks next.
If your vehicle uses auto-up, anti-pinch, or more advanced door electronics, don't ignore those features. Some odd behavior that looks like a bad part is really a control issue or a learned-position problem.
Listen, feel, and try one old-school test
Press the switch while your hand rests flat against the inner trim panel.
- No sound and no vibration suggests no motor activity.
- A hum, click, or vibration suggests the motor is trying to work.
- Mechanical crunching points toward the regulator or glass path.
If the window is dead quiet but you suspect a weak motor, a light thump on the door panel while holding the switch can sometimes jolt a worn motor into moving once more. Don't hit the glass, and don't use this as proof by itself. It's only a clue.
For a more focused electrical check, this walkthrough on how to test a window motor pairs well with a multimeter or test light.
Here's a quick reference to keep the logic straight:
| Symptom | Likely Culprit | Confirm With This Test |
|---|---|---|
| No response from either switch | Fuse, power feed, wiring, or motor | Check fuse, then test for power at motor connector |
| Works from master but not door switch | Door switch or local wiring | Compare switch outputs and harness continuity |
| Motor runs, glass doesn't rise | Regulator | Remove panel and inspect cable, arms, and glass attachment |
| Glass moves crooked or binds | Regulator or track issue | Inspect guides, channels, clips, and regulator alignment |
| Intermittent operation with door movement | Door-jamb wiring | Wiggle-test harness at door boot while operating switch |
Move to direct motor testing
Once the basic checks point inside the door, remove the panel carefully and test at the motor connector. A healthy command circuit should deliver power and reverse direction when you change switch direction. If the connector gets proper power but the motor doesn't run, the motor is the problem.
If the motor runs and the regulator doesn't move the glass correctly, the fault is mechanical.
This video gives a useful visual companion before you start probing wires or drilling out rivets:
Don't condemn a regulator until you know the motor is receiving command and power. Don't condemn a motor until you know the glass path and regulator aren't binding hard enough to stall it.
That order matters. It's what keeps diagnosis honest.
Choosing Your Repair Path: Motor, Regulator, or Assembly
Parts get replaced after diagnosis, not before it. By the time you reach this decision, you should already know the fuse, switch, and power feed are not the reason the glass stopped moving. That matters, because a bad switch can mimic a bad motor, and a binding glass channel can make a good motor look weak.
When motor-only replacement makes sense
Replace only the motor if the electrical side checks out and the regulator itself is still in good shape. In practical terms, that means the motor gets proper power and ground, the regulator is not bent or dragging, and the cables, pivots, or sector gear do not show obvious wear.
This option works best when the motor unbolts cleanly from the regulator and the rest of the mechanism has low miles or little wear. It makes less sense if the regulator already feels stiff by hand or the glass has been moving slower for a while. In that case, keeping the old regulator often turns a cheap repair into a repeat job.
When regulator-only replacement is the right fix
Replace only the regulator when the motor runs but the glass does not follow correctly. The usual signs are a window that drops into the door, rises crooked, clicks, binds near the top, or moves on one side and not the other.
Regulator design matters here. Cable units often fail at the spool, cable, or plastic guides. Scissor regulators usually wear at the pivots, sliders, or gear engagement. Some vehicles let you swap the regulator and reuse the motor without much trouble. Others make that transfer awkward enough that the labor savings disappear.
A quick rule from the shop applies here. If the motor sounds healthy and consistent, but the glass movement is erratic or crooked, spend your attention on the mechanical parts first.
Why full assemblies often win
A complete motor-and-regulator assembly is often the smarter buy on older vehicles, high-mileage doors, or any setup that already has noise, drag, or visible wear in more than one place.
The biggest advantage is labor. You remove one unit and install one unit. There is no fighting a tired motor onto a worn regulator on the bench, and there is less chance of finding a second failed part after the door is back together. That is why full assemblies are common shop choices when the customer wants one repair instead of a staged repair.
Assembly replacement also helps when:
- the original motor and regulator have the same age and wear
- the motor mounting pattern or gear fit makes transfer fussy
- the regulator uses rivets and awkward access points
- the glass has been straining long enough that both parts may have suffered
If both pieces look tired and the door is already apart, the full assembly usually saves more time than it costs.
That does not mean the assembly is always the right call. If the motor is clearly dead but the regulator is tight, straight, and smooth, motor-only can be a sensible repair. If the motor is strong and the regulator has obvious mechanical damage, regulator-only is still the clean fix.
The best choice comes down to three things. Condition of the other part, labor required to get back into that door, and how much risk you are willing to accept for doing the job twice.
Repair Costs, Time, and What to Expect
There isn't one universal price because parts vary by vehicle, and labor depends heavily on door design. What you can predict is the shape of the job.
DIY expectations
For a capable DIYer, window repairs are usually less about advanced theory and more about patience with trim panels, moisture barriers, glass support, and awkward fastener access. The actual swap can be straightforward. The setup and reassembly are where most time gets lost.
DIY makes sense if you already have:
- Trim tools so you don't snap panel clips
- A multimeter or test light for diagnosis
- Tape or wedges to secure the glass
- Basic hand tools including sockets and screwdrivers
- A drill if the factory assembly is riveted in place
If the diagnosis is still fuzzy, don't rush to parts ordering. A contaminated track, twisted cable, broken clip, or poor alignment can destroy a new regulator if the underlying issue stays in the door, which is one reason repair planning should consider the whole mechanism and not only the failed headline part, as discussed in Caliber's regulator repair guidance.
Shop expectations
A professional shop brings speed, trim experience, and usually fewer broken clips. They also know when a glass run channel or guide is creating drag that would make a new part fail early.
You're paying for three things more than anything else:
- Accurate diagnosis before parts replacement
- Safe handling of the glass and door electronics
- A repair that doesn't have to be reopened because of a missed clip, cable issue, or alignment problem
The real cost decision
The money question usually isn't “motor or regulator.” It's this: should you replace the failed piece only, or spend more once and avoid reopening the same door?
That answer depends on labor intensity and remaining wear. If the motor tested bad but the regulator is dry, loose, and clearly aged, the cheaper part may not be the cheaper repair. The same goes the other way. A brand-new regulator won't stay happy if the motor is weak and stalling under load.
So budget for more than the box on your workbench. Budget for clips, time, glass handling, and the possibility that one worn part has been stressing the other.
Practical Installation Tips for Aftermarket Parts
Correct diagnosis gets you the right part. Correct installation is what makes the repair last.
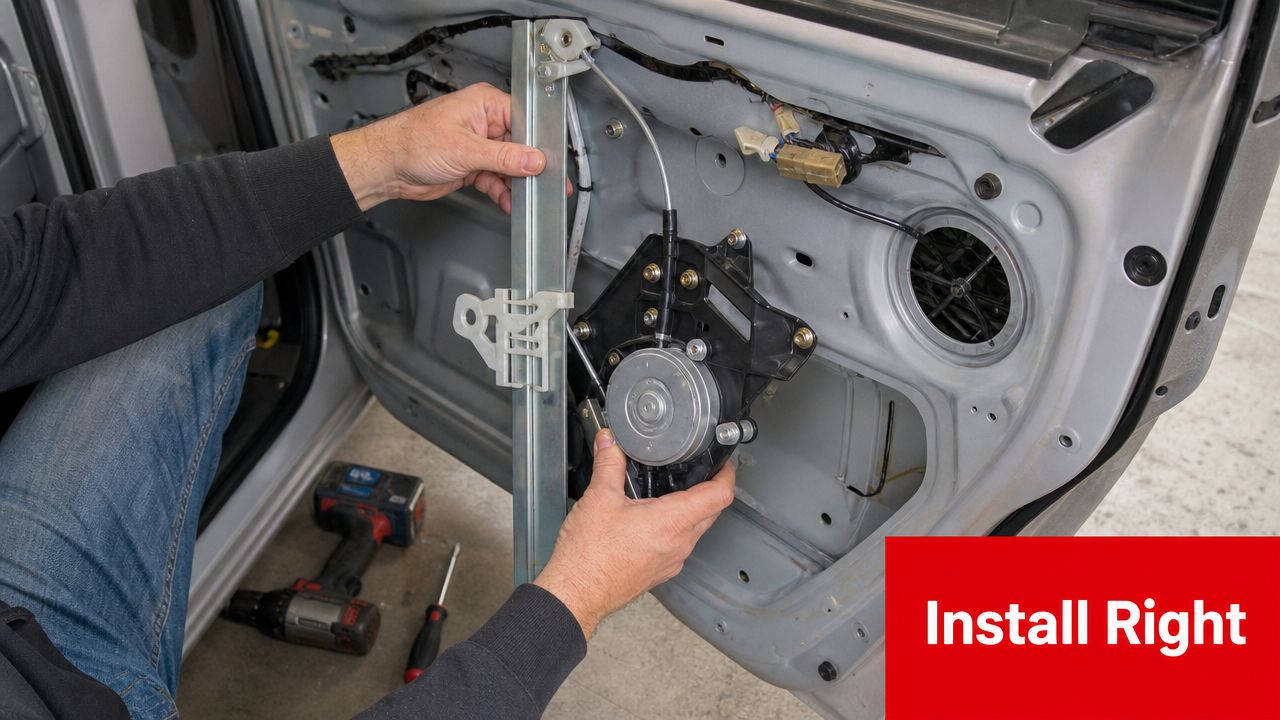
Secure the glass before anything else
Before you loosen the regulator from the window, support the glass. Painter's tape across the top of the frame works on many doors. Suction cups or wedges can help on others. If the glass drops unexpectedly, it can chip, crack, or injure your hands.
This is not the place to improvise carelessly. Window glass can shift fast once the clamps or carrier bolts are released.
Transfer hardware and compare parts on the bench
Lay the old and new parts side by side before installation. Check mounting points, connector shape, glass attachment locations, and any clips or brackets that must transfer over. Aftermarket parts are only easy to install when they match the original design in your door.
If you're sourcing replacements, one option is to use vehicle-specific parts from T1A Auto's installation and fitment resources for window regulators so you can compare what your door uses before you start.
Prevent premature failure during reassembly
A new regulator can fail early if the glass channels are dirty or the alignment is off. Clean the tracks. Inspect for broken plastic guides. Make sure the glass sits square in the carrier before tightening anything fully.
Use this sequence:
- Loosely install first so the assembly can settle into position.
- Cycle the mechanism carefully before final tightening, if it's safe to do so.
- Watch the top edge of the glass as it rises. Any tilt or bind means stop and correct alignment.
- Reconnect the moisture barrier properly because water intrusion ruins door electronics and switch assemblies.
A smooth first test matters more than a fast install. If the glass strains, chatters, or cocks to one side, don't keep running it.
The best-looking installation is the one you don't have to revisit. Most repeat failures come from misalignment, dirty tracks, unsupported glass, or forcing a new part to work with damaged hardware still in the door.
If you've narrowed the problem down and you're ready to replace the failed component, T1A Auto offers vehicle-specific window regulators and related replacement parts for common DIY repairs. Use the vehicle search carefully, compare your existing door setup before ordering, and match the repair path to what your diagnosis confirmed.
