


You grab the driver's handle with groceries in the other hand and it pulls, flops, and does nothing. Or it comes away from the door just enough to tell you something behind the skin has cracked. A Yukon door handle replacement looks simple from the outside, and the swap itself is manageable, but the failures that bring people back into the door a second time are almost always fitment, rod routing, or a missed test before the panel goes back on.
Table of Contents
- Why a Yukon Door Handle Replacement Is Worth Doing Right
- Identifying Your Yukon Body and the Right Handle
- Tools, Parts, and Pre-Job Preparation
- Choosing Between OEM, OE-Equivalent, and Upgraded Aftermarket Handles
- Step-by-Step Removal and Installation
- Troubleshooting When the Door Still Won't Latch Right
- Final Checks, Warranty, and Getting the Right Part Shipped
Why a Yukon Door Handle Replacement Is Worth Doing Right
A loose handle is rarely just loose. The outside pull may flex because its carrier has cracked, the key cylinder may turn without moving the lock rod, or the interior release may feel normal while the latch never trips. Each symptom points to a different part of the same chain, and guessing costs you a second teardown.
That chain matters for safety, not just convenience. On 2007 Chevrolet Tahoe and GMC Yukon models, deteriorating interior handle plating drew federal attention after owners reported cuts from peeling metal. As documented in coverage of the NHTSA interior door handle investigation on 2007 Tahoe and Yukon models, the preliminary evaluation opened in September 2009 and had escalated to an engineering analysis by August 2015, with more than 80 complaints and an estimated 433,000 vehicles potentially involved.
What a Good Repair Has to Prove
A finished job has to do more than fill the opening in the door skin. The handle needs correct mounting geometry, the right engagement with the latch rod, and a finish that won't create a sharp edge as it ages. If any of that is off, you'll feel it as extra pull effort, incomplete release, or a handle that sits proud of the door.
- Exterior pull fails: Check the handle carrier and latch rod connection before assuming the latch is bad.
- Interior release fails: Inspect the cable or rod, the interior handle pivot, and latch movement.
- Both releases fail: Suspect the latch itself or a door that has dropped out of alignment.
- Handle feels sharp or flaky: Replace it. Coating failure doesn't heal, and sanding a plated handle usually makes the edge worse.
Shop rule: Diagnose which release fails, from which side, and whether the lock still works. That three-part answer tells you whether you're buying a handle, a latch, or just fixing linkage.
DIY is realistic for most owners who can remove a door panel without forcing clips. The work doesn't require special programming on the mechanical handle itself, but it does require patience inside a crowded door cavity. If the latch is seized, the rods are bent, or the door has collision damage, the job stops being a simple handle swap.
The decision that protects the whole repair happens before tools come out. Confirm the exact body, door position, and side first. A handle that looks right in a catalog photo can still have the wrong rod lever, lock provision, or mounting spread for your truck.
Identifying Your Yukon Body and the Right Handle
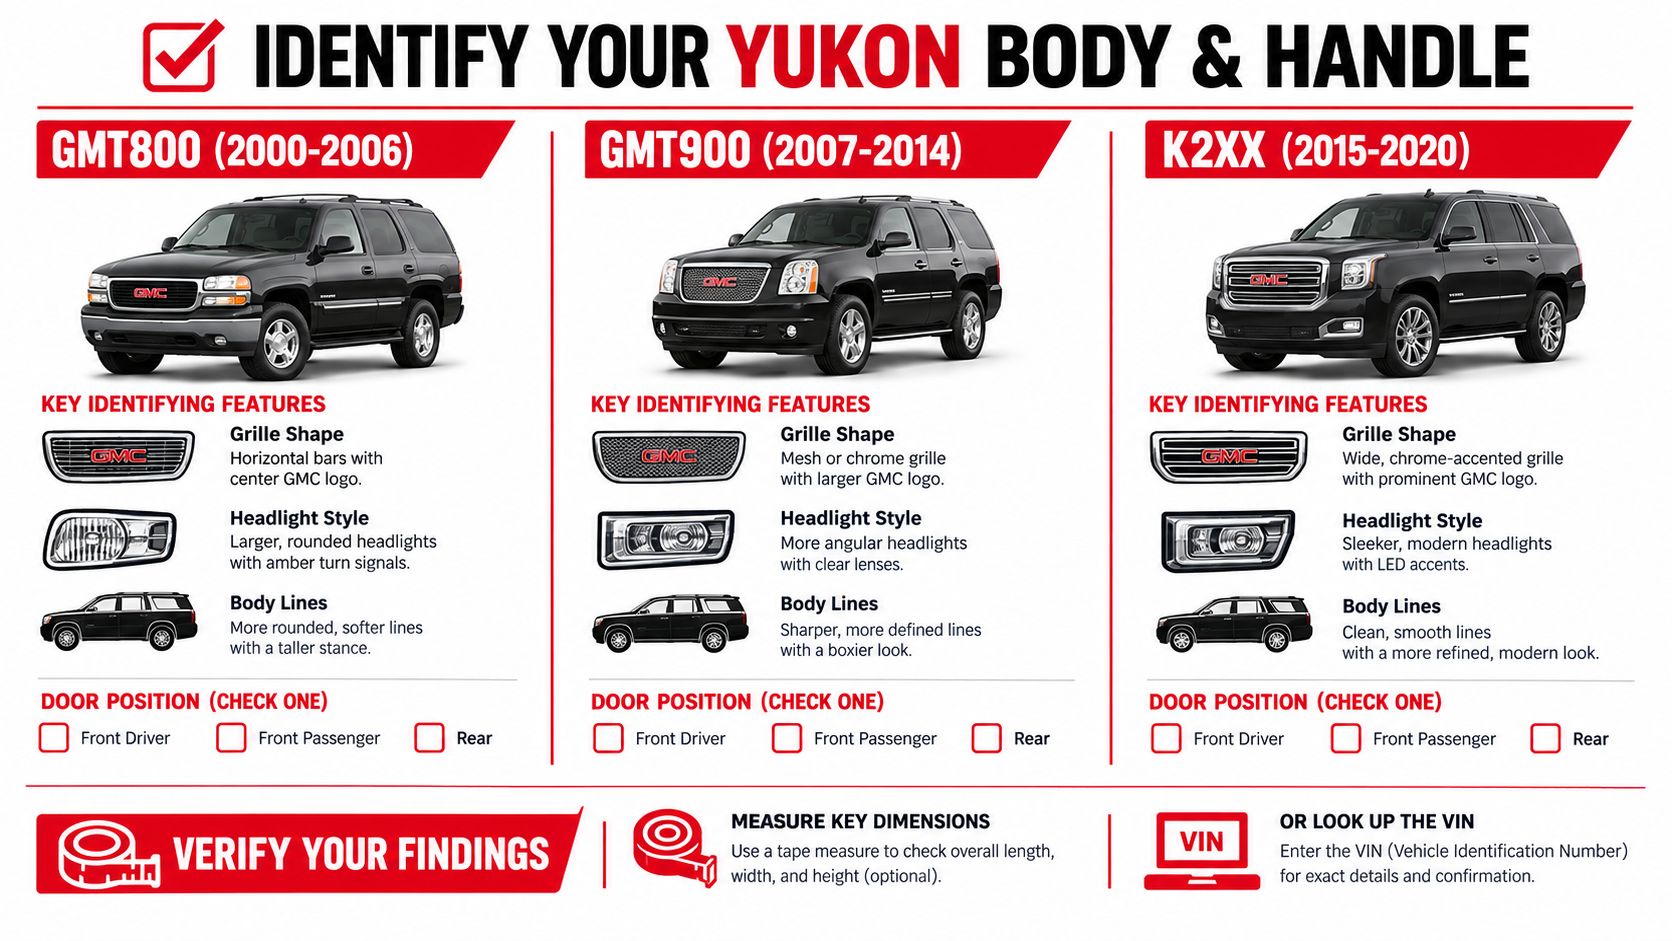
Start with identity, not appearance. Write down the model year, standard Yukon or Yukon XL, front or rear door, left or right side, and whether that door has a key cylinder. Those five details eliminate most wrong parts before price or finish enters the conversation.
Use this visual checklist to separate the major generations before you search a catalog.
Generation and Body Style Come First
Older GM truck platforms create the classic trap. GMT400 and GMT800 exterior handles aren't interchangeable, and overlap years with Classic and newer body styles make model year alone unreliable. Look at the body lines, grille, and headlights together, then confirm with the VIN rather than trusting a previous owner's description.
The same discipline applies to later trucks. Federal records summarized in an NHTSA recall report covering Yukon and Yukon XL production populations show a 2021 campaign covering 68,921 Yukons built from November 12, 2019 through October 7, 2021, plus 37,469 Yukon XL units. A separate 2023 to 2024 campaign covered 57,083 Yukons and 44,945 Yukon XL vehicles. Those weren't handle recalls, but the numbers show how broad a generic Yukon label really is.
Build Your Fitment Form
Before ordering, record this information in one place:
- VIN and model year: Use the dash plate or driver door jamb label, not the registration shorthand alone.
- Wheelbase variant: Mark standard Yukon or Yukon XL explicitly.
- Door position and side: Front driver, front passenger, and rear doors use different geometry and linkage.
- Lock provision: Note with or without a keyhole, and whether the lock cylinder transfers over.
- Finish: Decide on chrome, textured black, primer, or paint to match before checkout.
Compare the old handle's backside to catalog photos when possible. Mounting stud locations, lever shape, and rod clip style matter more than the front profile. If the lever points the wrong way or the lock hole is absent, stop. Forcing a close-enough handle into service usually bends a rod and creates the next failure.
Don't order by the shiny side. The back of the handle determines whether the door opens.
Tools, Parts, and Pre-Job Preparation
Lay everything on the bench before the first clip comes loose. Most delays happen because a 10 mm socket is missing, the new handle reuses hardware you just dropped inside the door, or there's nowhere safe to lean the panel while the harness is still connected. A flat parking spot, good light, and room to swing the door fully open make the work noticeably easier.
Typical Tools and Materials for a Yukon Exterior Door Handle Swap
| Item | Purpose |
|---|---|
| 10 mm socket and ratchet | Remove the two exterior handle bolts and common panel fasteners |
| Phillips #2 and T30 Torx | Handle trim and panel screws found across generations |
| Plastic trim pry tools | Release clips and trim without gouging paint or panel vinyl |
| Painter's tape | Protect the door edge and mark rod positions |
| Marker or paint pen | Index rods and clips before disconnecting them |
| Magnetic pickup tool | Recover dropped bolts and clips from the door cavity |
| Replacement clips | Replace brittle panel or rod retainers instead of reusing cracked ones |
| Clean plastic sheet or blanket | Support the removed panel without kinking switch wiring |
Disconnect the negative battery cable before unplugging door switches or modules. That protects the wiring and prevents a window or lock from cycling while your hand is inside the door. Photograph connector locations and rod routing before you touch them. Phone photos beat memory once both rods are hanging loose.
Inspect the new handle beside the truck, not after teardown. Confirm the lever, mounting points, gasket, lock provision, and included hardware. Some handles ship with clips or fasteners, while others expect you to transfer factory pieces. Knowing that upfront tells you which old parts must survive removal.
Open and close the door, then test the window, power lock, interior release, exterior pull, and key cylinder if fitted. Write down what already doesn't work. That baseline keeps you from blaming the new handle for a dead actuator or worn latch that was faulty before you started.
Choosing Between OEM, OE-Equivalent, and Upgraded Aftermarket Handles
Once fitment is pinned down, choose how the replacement is built. Price alone doesn't tell you whether the carrier behind the pull will crack again, whether the finish matches the other doors, or whether usable clips are in the box. This comparison of OEM versus aftermarket parts trade-offs is useful background, but your decision should rest on how this specific Yukon is used.
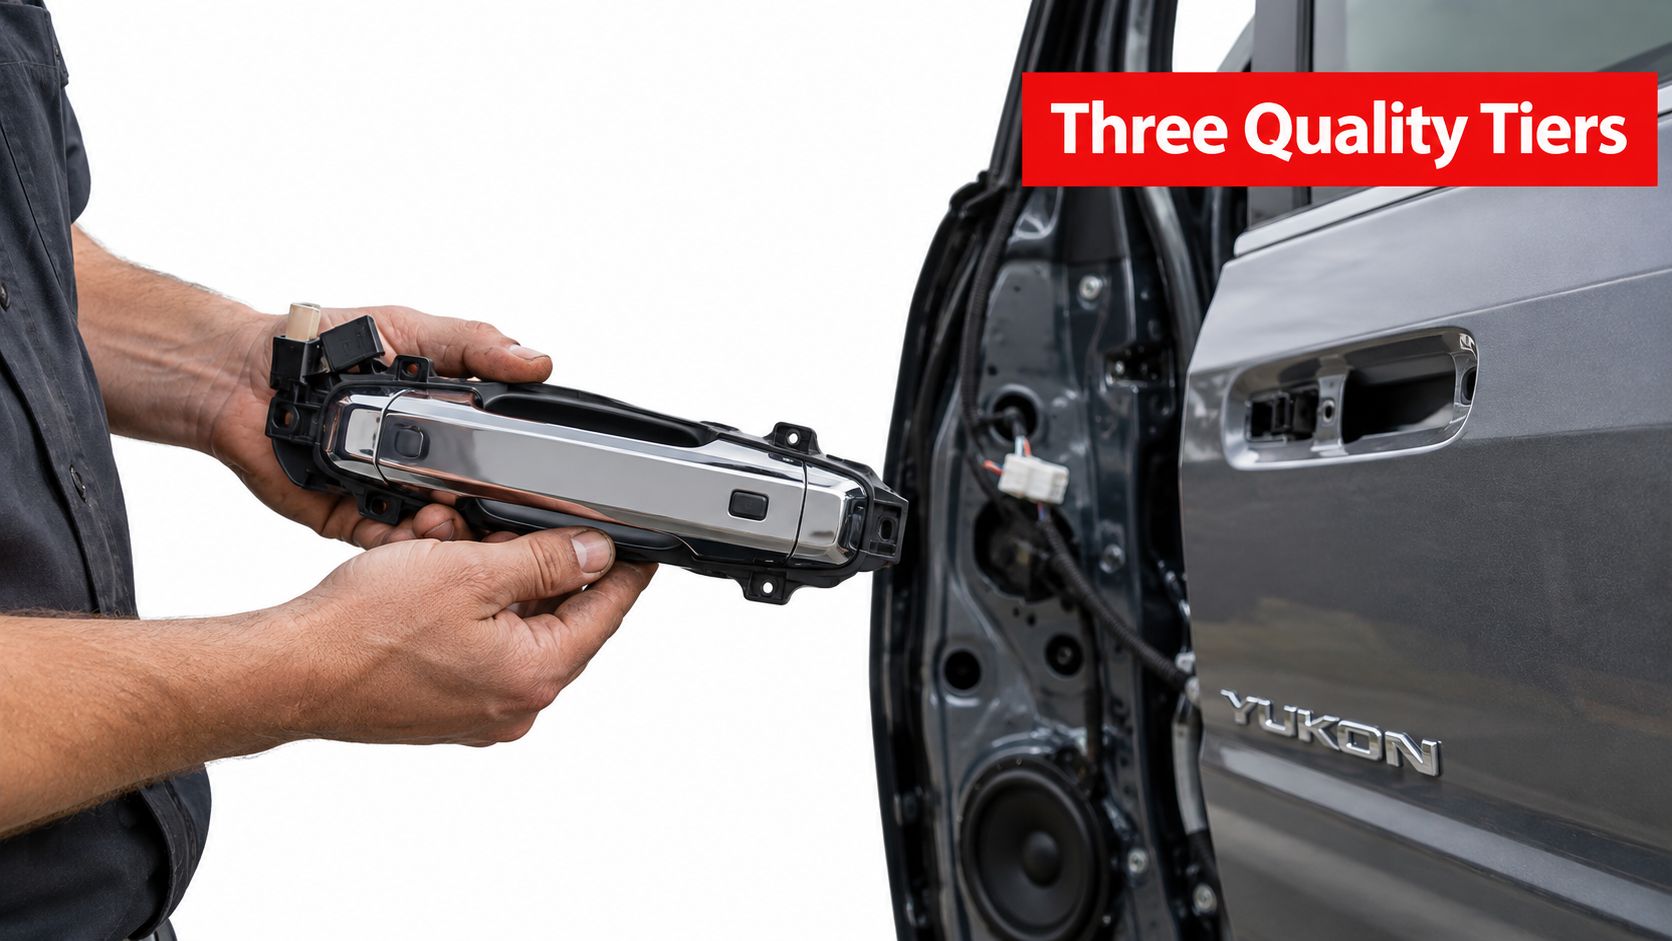
Hold the candidate part up to the door and check finish, gasket, and lever shape before you commit to teardown.
Three Tiers and Their Trade-Offs
GM OEM gives you the closest match to the original mounting geometry and finish. It's the sensible route for a lease return, a low-mile truck where appearance matters, or a paint-to-match job tied to a factory color code. The downside is simple. If the original design used a plastic section that already failed in your service conditions, a new identical part resets the clock rather than changing the failure mode.
OE-equivalent handles aim to copy the factory part at a lower cost. Quality varies more here, so inspect the pivot, spring return, lever thickness, and clip quality closely. A clean casting and firm return action are good signs. A floppy pull, rough pivot, or thin gasket is a reason to send it back before installation.
Upgraded aftermarket handles replace failure-prone plastic internals with metal reinforcement. For a daily driver that has already cracked one carrier, that addresses the known weak point instead of repeating it. T1A Auto is one supplier offering Yukon-compatible replacement handles searchable by vehicle, which fits the fitment-first approach used here. Still verify the exact door position and lock provision yourself, regardless of brand.
A Decision Rule That Works
Choose OEM when exact finish and factory configuration outweigh cost. Choose a well-made OE-equivalent when the truck needs a straightforward repair and the part passes a hands-on inspection. Choose upgraded metal construction when the old plastic carrier failed, the door sees heavy daily use, or you don't want to repeat the job.
Check what's included, what transfers, and what warranty applies to the actual component you are buying. A cheap handle that needs clips, a gasket, and paint may not stay cheap. More importantly, no tier compensates for wrong fitment. The best-built handle for the wrong door is still the wrong part.
Step-by-Step Removal and Installation
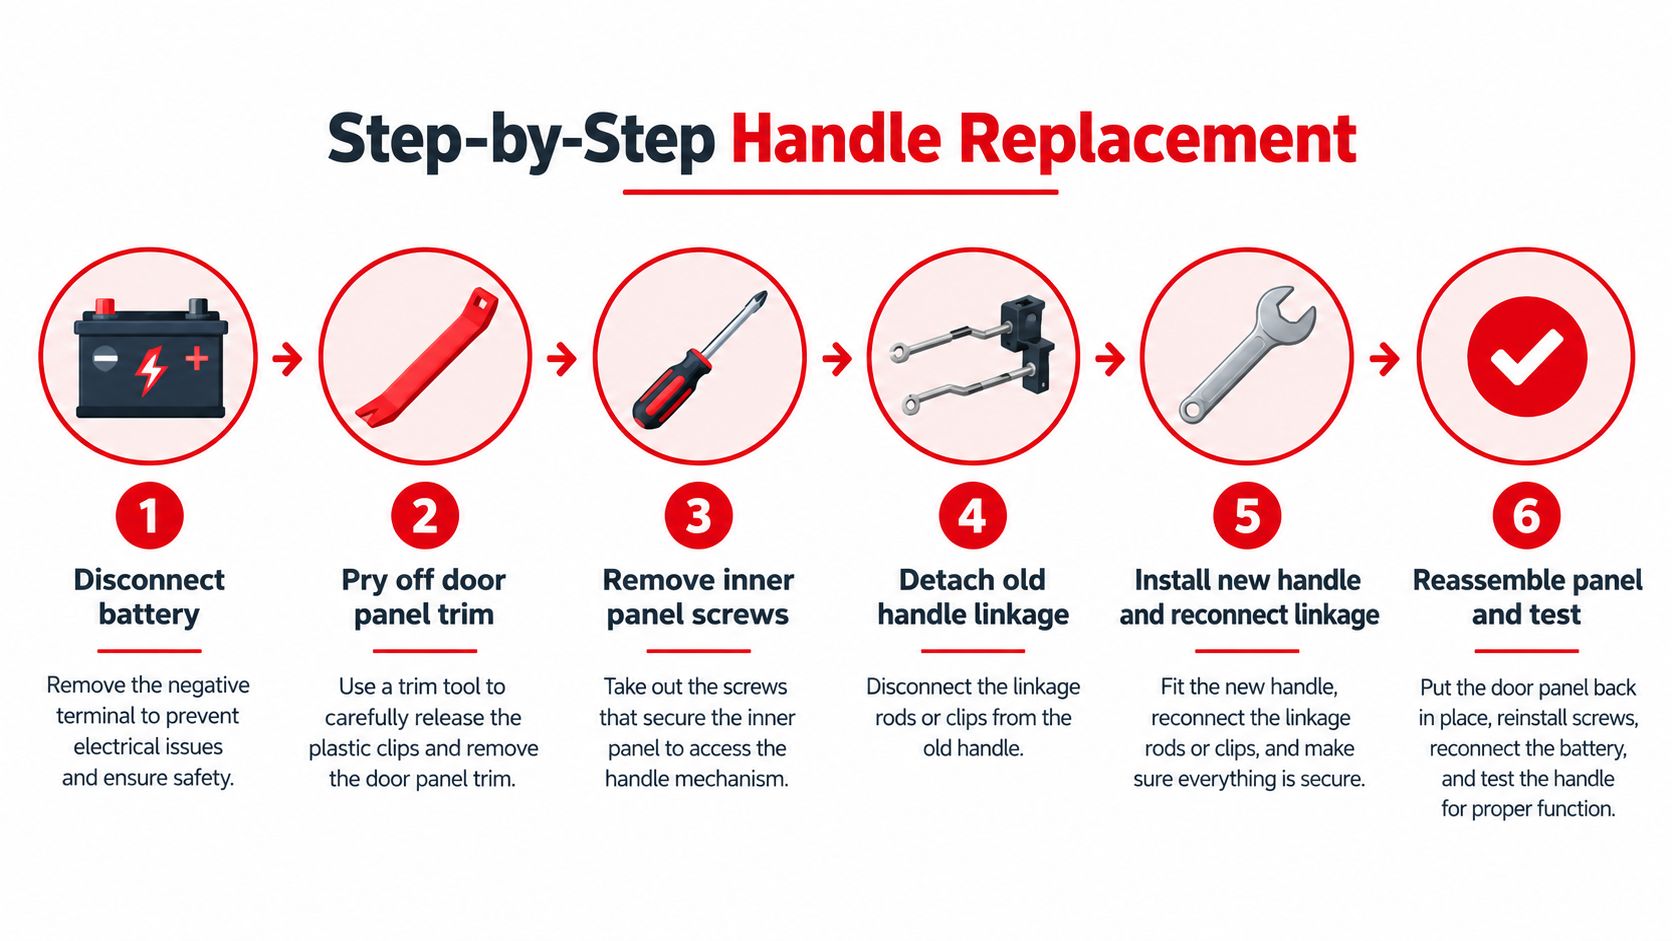
Work in a controlled sequence and keep fasteners grouped by location. For 2007 to 2013 models, the documented GMC Yukon exterior door handle replacement procedure specifies disconnecting the negative battery cable, removing the lock knob, pull handle, interior handle, and mirror trim, removing panel fasteners, lifting the panel upward, disconnecting switch wiring and latch cables, peeling back the water shield, removing two 10 mm exterior handle bolts, transferring the lock cylinder where applicable, and testing function before final reassembly.
This flow shows the order to preserve, even though trim fastener locations vary by year.
Remove the Panel and Old Handle
- Disconnect the battery: Remove the negative cable and keep it isolated from the terminal.
- Strip the trim in order: Remove the lock knob, pull handle trim, interior handle trim, and mirror triangle or sail panel.
- Remove panel fasteners: Check the armrest, handle pocket, and lower panel for hidden screws before prying.
- Release and lift the panel: Use plastic pry tools around the perimeter, then lift upward off the window weatherstrip. Don't yank outward.
- Disconnect wiring and cables: Unplug switch connectors and release latch cables, supporting the panel so the harness isn't strained. If panel removal is new to you, review the technique for removing a car door panel without breaking clips before forcing anything.
- Peel back the water shield: Pull it slowly from the adhesive only far enough to reach the handle. Keep it intact and clean.
- Release the rods: Mark the latch rod and lock cylinder rod, open their retaining clips, and note that driver and passenger routing can differ.
- Unbolt the handle: Remove the two 10 mm bolts, support the handle from outside, and guide it through the door skin opening.
Watch the sequence in motion before your first attempt, paying attention to hand position inside the door and how the rods are released.
Install and Test Before Reassembly
Transfer the lock cylinder and any required linkage pieces to the replacement. Seat the new handle and gasket flat against the door skin, engage it into the opening, and start both bolts by hand. Tighten them snug and even. Cranking one side down hard can distort the carrier or pull the gasket out of line.
Reconnect each rod to its marked lever and close the retainers fully. A rod that looks attached but hasn't snapped into its clip will pop off after the panel is installed. Tug lightly on each connection, then watch the latch levers move as you pull the handle.
Non-negotiable checkpoint: Test exterior pull, interior release, key lock, power lock, and window travel before the water shield and panel go back on.
Cycle everything several times with the door open, using a screwdriver to simulate the striker in the latch if you know how to reset it safely. Confirm full latch and clean release without binding. Only then reseat the water shield, reconnect cables and wiring, hang the panel from the top, reinstall fasteners and trim, and reconnect the battery.
Troubleshooting When the Door Still Won't Latch Right
A new handle that won't open the door doesn't automatically mean the new handle is defective. More often, a rod is on the wrong lever, a retainer hasn't closed, the water shield is trapped in the linkage path, or the latch was the original fault. Work by symptom instead of ordering another part.
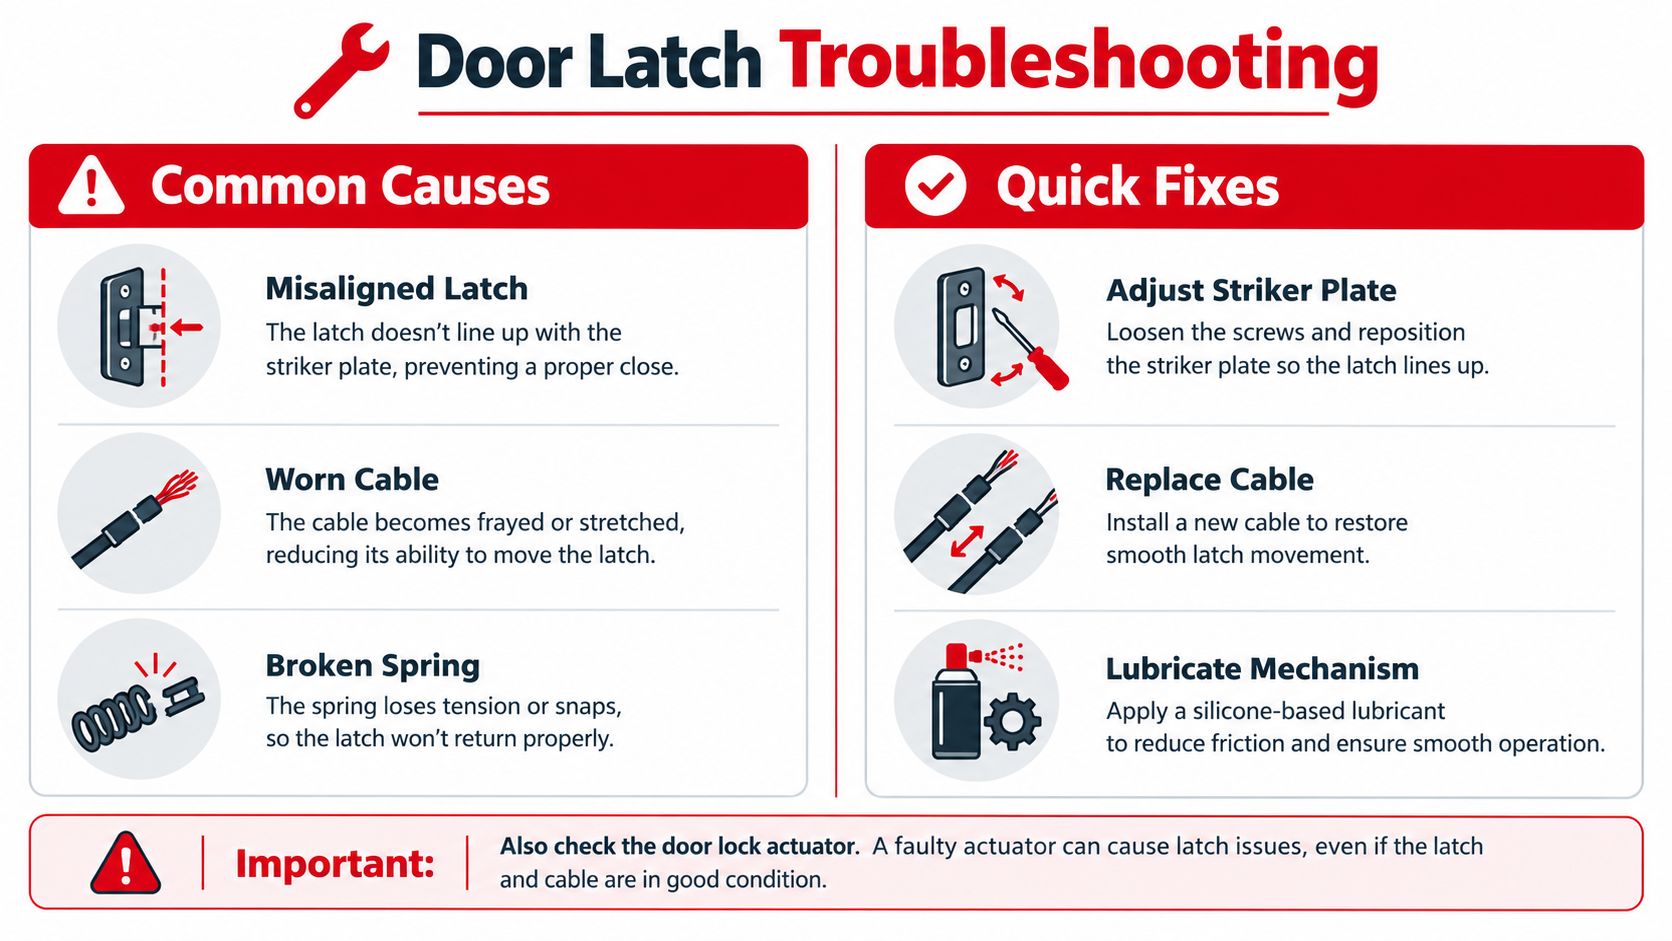
Use this symptom map to separate linkage mistakes from latch and alignment problems.
Match the Symptom to the Cause
- Exterior pull moves but nothing releases: Recheck the latch rod connection and lever choice. Driver and passenger routing differences make this easy to miss.
- Handle feels loose after installation: Inspect both mounting bolts, the carrier seating, and whether a rod clip is partially engaged.
- Interior release works, exterior doesn't: The latch can move, so focus on the exterior handle lever, rod, and retainer.
- Neither release works: Test the latch directly and consider door latch repair diagnosis before replacing the handle again.
- Door must be slammed: Look at striker alignment, hinge sag, weatherstrip interference, and latch wear.
- Power lock cycles but the door won't open by hand: Separate the electrical actuator fault from the mechanical lock rod path.
Guidance for older GM platforms summarized in YourMechanic guidance on GMC Yukon exterior door handle replacement identifies damaged retaining clips, misrouted rods, a torn water shield, and reinstalling the panel before verifying operation as principal pitfalls. It also reinforces that GMT400 and GMT800 handles aren't interchangeable.
Bent rods deserve special attention. If you forced a clip during removal, compare the rod's bends with its original path and your photos. A slightly shortened effective length can leave the latch almost released, which feels like a weak handle. Straightening by guesswork usually makes it worse, so replace a kinked rod or damaged clip.
A healthy result completes multiple lock, engage, open, and close cycles from both release points with no pop-off, abnormal resistance, or latch misalignment. If it fails that test on the bench stage, it won't improve after trim hides the evidence.
Final Checks, Warranty, and Getting the Right Part Shipped
Close the door with normal effort and listen. It should latch cleanly without a bounce, a scrape, or a need to lift the door by the handle. Check panel gaps, handle alignment, trim seating, window travel, speaker operation, lock response, and interior release from the seated position.
Post-Install Checklist
- Latch test: Open and close repeatedly from inside and outside, fastened and unfastened.
- Water shield: Confirm it's sealed flat with no folds touching rods or cables.
- Panel fit: Look for proud clips, rattles, and trim gaps that weren't there before.
- Road check: Listen for wind noise or a loose panel buzz at speed.
- Finish check: Compare handle color and texture with adjacent doors in daylight.
When buying the next part, favor a catalog that filters by year, model, body variant, door position, and side rather than appearance alone. Confirm included hardware, transfer parts, return terms, and whether warranty coverage differs for metal and standard components. Keep the old handle until the new one has passed several days of normal use. It's your reference for rod shape, clips, and lock cylinder details if a question comes up.
The larger lesson from a Yukon door handle replacement is that verification beats speed. Identify the truck precisely, test before reassembly, and diagnose the latch separately from the handle. Do those three things and the repair usually stays a one-time job instead of becoming a recurring door-panel hobby.
Ready to order with fitment confirmed instead of guessed? Search by your Yukon's year, body style, and door position at T1A Auto, choose a handle built for that exact application, and keep your VIN and door details handy at checkout so the part that arrives is the part your door needs.
