


Most window regulator failures are repairable for under $100 in parts and a few hours of work, compared with dealership quotes of $400–$800. T1A Auto's lifetime warranty on metal components reduces the long-term risk of having to do the same job twice.
You press the window switch, hear a click or a grinding sound, and the glass drops into the door. Rain is coming, the door panel is still intact, and the repair estimate makes the problem feel bigger than it is. Car door window regulator repair is often manageable at home, but only if you identify the correct mechanism and treat the glass, wiring, and safety systems with care.
The regulator is the assembly that moves the glass up and down. A failed motor, snapped cable, stripped gear, bent arm, or detached glass clamp can leave the window stuck. The repair itself is usually straightforward. The difficult part is selecting a part that matches the vehicle's exact configuration and reinstalling it without creating a second problem.
Table of Contents
- Understanding Your Window Regulator Type
- Step-by-Step Removal and Installation Process
- Manual vs Power Regulators and Part Selection
- Troubleshooting Common Installation Issues
- Why Quality Replacement Parts Matter
- Time and Cost Estimates for Your Project
Understanding Your Window Regulator Type
A stuck window gives you very little information by itself. The glass may be fully lowered, tilted inside the door, or wedged halfway up. Before ordering anything, determine whether the vehicle uses a scissor-style or cable-style regulator, then confirm whether the system is manual or powered.
A scissor regulator uses hinged metal arms driven by a gear or threaded mechanism. It looks like a broad, folding metal frame. Cable regulators use pulleys, a wound cable, and guide tracks. They're often lighter and more compact, but a broken cable can leave the assembly tangled inside the door. A flashlight aimed through the gap between the glass and weather stripping can reveal the general layout after you lower the glass slightly, if it still moves.
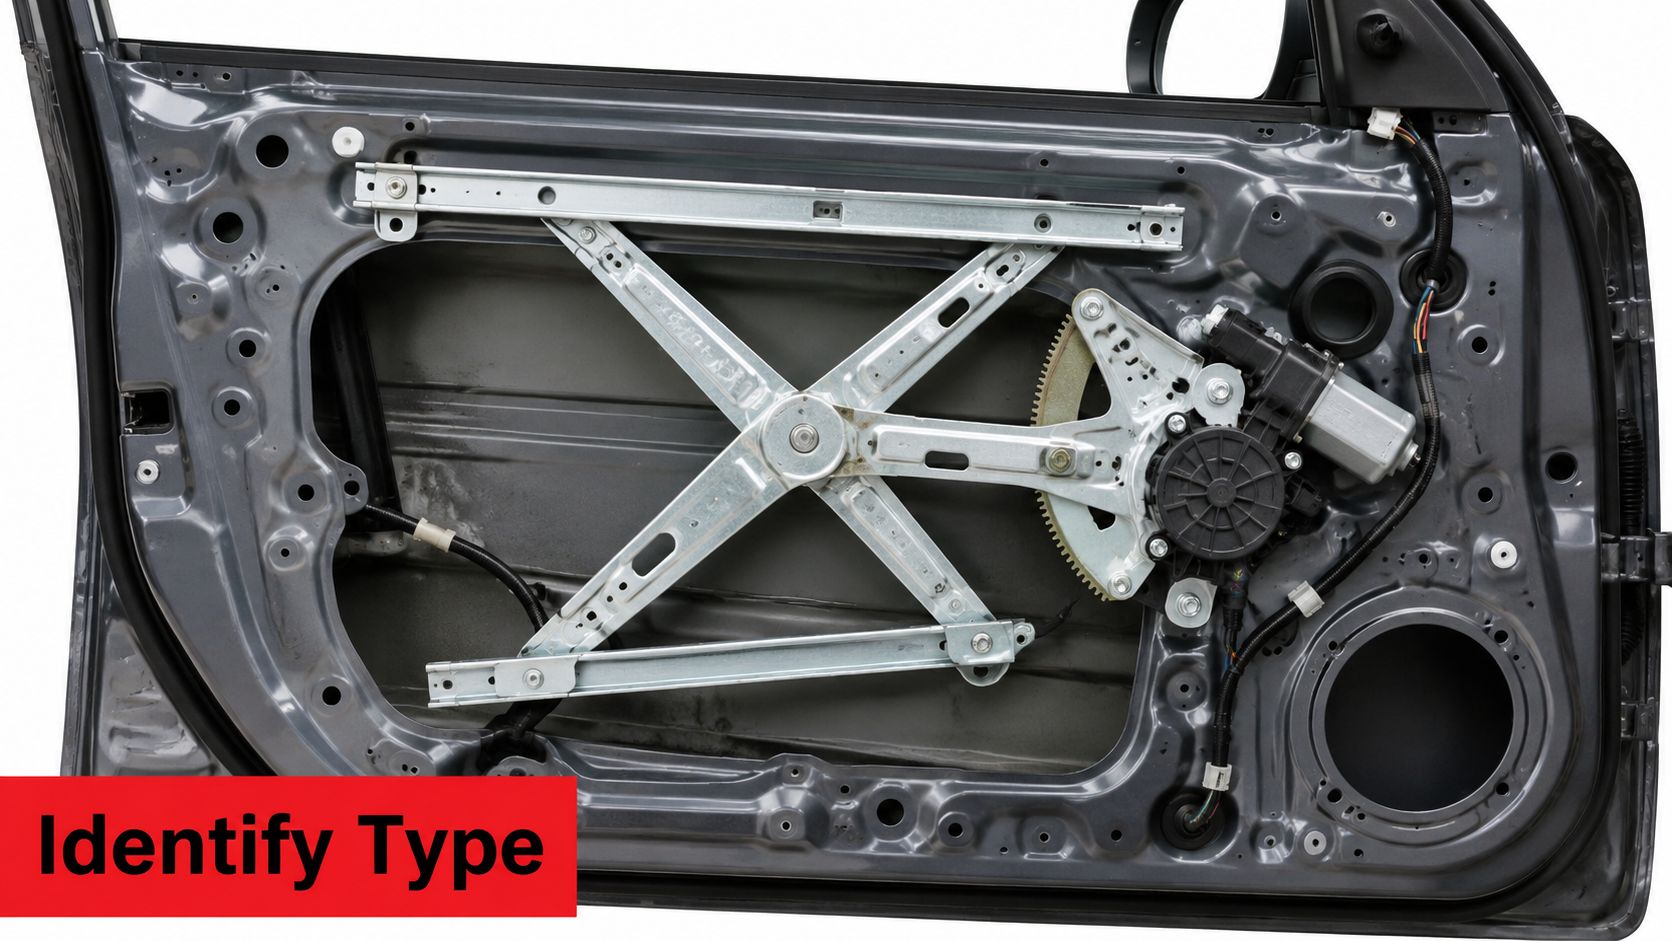
Identify the configuration before buying
The mechanism type is only the beginning. The replacement must match:
- Door position: Driver and passenger doors can use different assemblies. Front and rear doors commonly differ as well.
- Operation: A manual regulator accepts a window crank. A power regulator accepts a motor and electrical connector.
- Vehicle details: Verify year, make, model, body style, and cab or trim configuration where applicable.
- Assembly format: Some replacements include the motor. Others require transferring the original motor to the new regulator.
A part that looks nearly identical can still have the wrong mounting holes, connector, cable routing, or glass attachment points. That's why a vehicle-specific catalog, such as the T1A Auto guide to window regulators, is more useful than matching a product by photograph alone.
Manual and power systems fail differently
Manual systems have fewer electrical parts, but the crank can become stiff when the regulator bends, the cable frays, or the glass runs out of alignment. Power systems add a motor, wiring, switches, control modules, and sometimes position sensors. A motor that hums without moving the glass often points to a mechanical failure, while silence may indicate a fuse, switch, wiring, motor, or control issue.
Practical rule: Don't order by “front window regulator” alone. Order by complete vehicle configuration, door position, and manual or power operation.
Automotive window mechanisms have evolved from early manual lifters to electrohydraulic and electrically operated systems. Historical milestones include Brose's manual window lifter patent in 1926, production installation in 1928, Packard's automatic system in 1940, and the first electrically operated lifting system on the Continental Mark II in 1956, as documented in this automotive window regulator history. That long development explains why similar-looking vehicles can use very different mechanisms.
Step-by-Step Removal and Installation Process
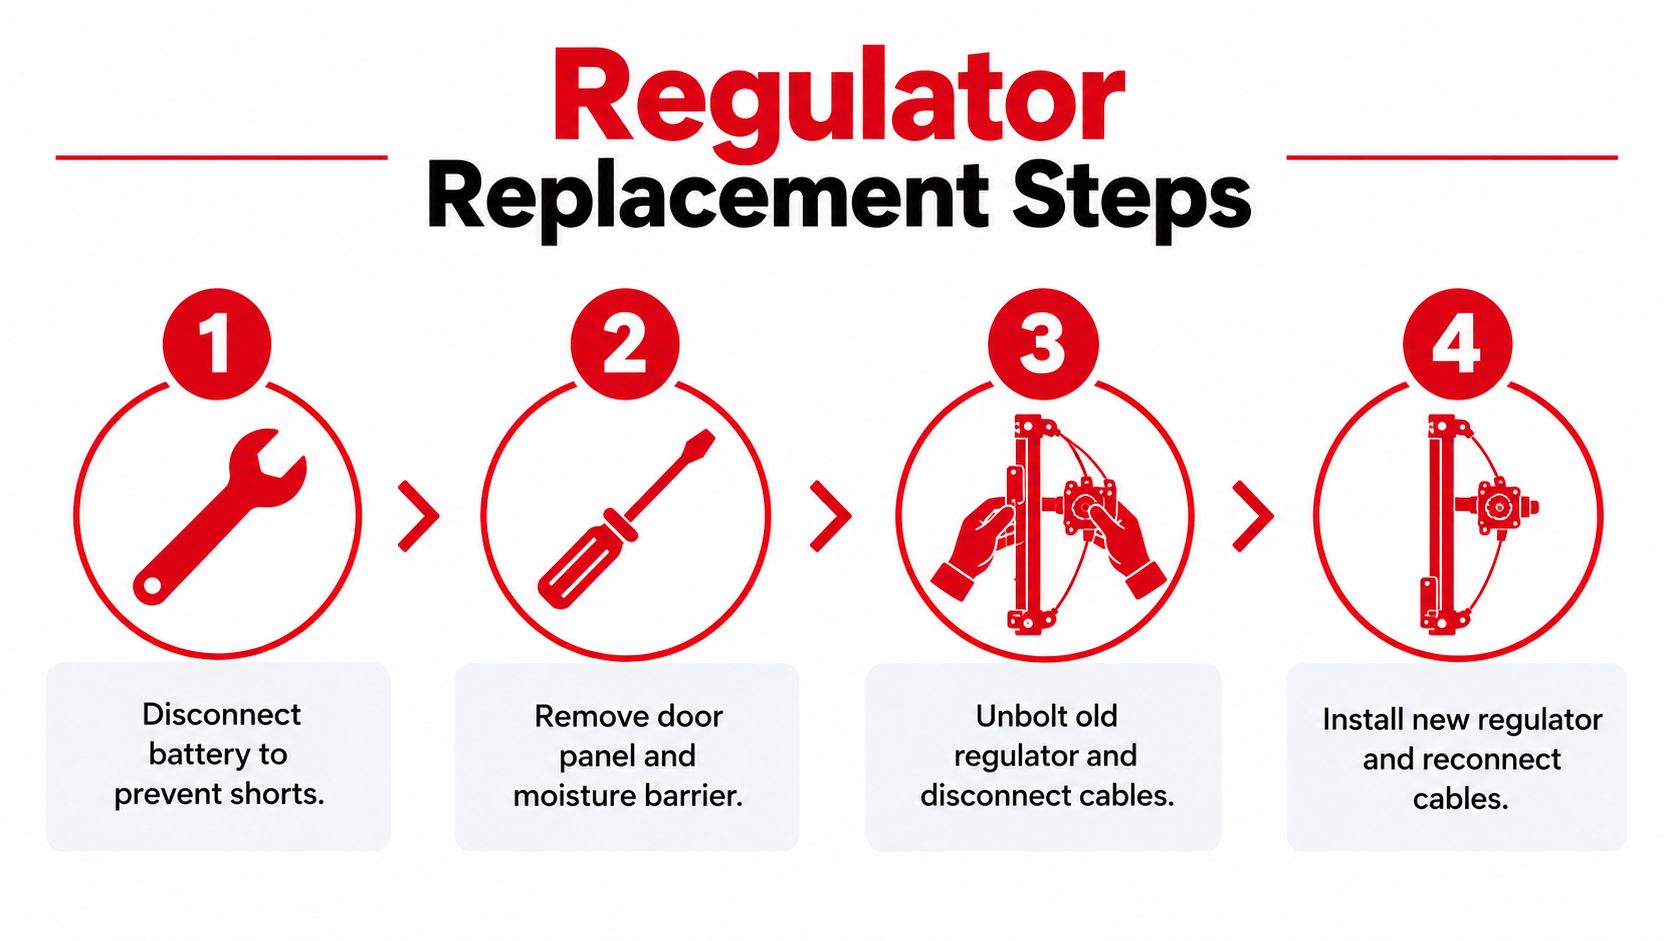
Start with protection, not disassembly. Park on level ground, switch off the ignition, and disconnect the negative battery cable when the vehicle's service procedure allows it. On cars with sensitive electrical systems, follow the manufacturer's instructions for battery disconnection, because power windows may share circuits with airbags, door modules, or memory functions.
Raise the glass fully if it still moves. Secure it from the outside with wide painter's tape or strong glass-holding straps over the top of the door frame. Don't rely on a single narrow strip of tape. A falling pane can shatter, cut your hands, or damage the door.
Expose the regulator carefully
Remove the door handle bezel, armrest fasteners, switch panel, and visible screws. Hidden fasteners often sit behind small trim covers. Use a plastic trim tool rather than a screwdriver against painted surfaces, and keep the clips organized because replacement panels may not sit tightly if several clips break.
The door panel removal guide from T1A Auto provides the general technique, but your vehicle's fastener locations and electrical connectors may differ. Disconnect the window switch, courtesy light, speaker, and lock or handle cables before pulling the panel away. Support the panel rather than allowing it to hang from a wiring harness.
Peel the vapor barrier back slowly. Butyl adhesive can be reused if it stays clean, although torn or contaminated sections should be resealed so water doesn't reach the trim, speaker, or wiring. Locate the regulator mounting bolts, motor connector, and glass clamps through the access openings.
Separate the glass and remove the assembly
With the glass securely supported, move it to the position that exposes the regulator-to-glass clamps. Some vehicles use bolts, while others use clips or plastic retainers. Remove the fasteners and ensure the glass is fully free before touching the regulator.
Disconnect the motor. Remove the regulator bolts and maneuver the assembly through the largest access opening. Cable units can catch on the door shell, so rotate them carefully instead of forcing them. If the motor must be transferred, compare the old and new assemblies on the bench before removing it. Keep your fingers clear of spring-loaded arms and tensioned cables.
Install the new regulator loosely at first. Attach the glass, confirm that it sits evenly in both channels, and tighten the mounting fasteners only after the tracks are aligned. If the manufacturer provides torque specifications, use them. If not, tighten firmly without crushing the door shell or deforming the regulator brackets.
Reconnect the motor and battery temporarily, keeping hands clear of the mechanism. Test the window through its full travel. It should move smoothly, remain level, and stop without binding. Test before reinstalling the vapor barrier and trim, because correcting a misaligned track through a finished door panel wastes time.
A practical repair sequence is:
- Secure the glass: Hold it fully raised before removing the regulator.
- Document connections: Photograph connectors, cable routing, and glass clamp locations.
- Test early: Run the replacement before closing the door.
- Seal the barrier: Restore the moisture barrier and press the adhesive firmly around the perimeter.
Manual vs Power Regulators and Part Selection
Manual and power regulators solve the same problem with different failure patterns. A manual unit is mechanically simpler and usually avoids motor or wiring faults. Its crank also gives you direct feedback. If the handle suddenly turns freely, the internal gear or cable may have failed. If it becomes difficult to turn, the glass may be dragging in the channel or the mechanism may be bent.
A power regulator adds convenience, but it also adds diagnostic work. A nonmoving window doesn't automatically mean the regulator is defective. Check whether the motor receives power, whether the switch functions, and whether the connector is damaged. If the motor runs but the glass doesn't move, the regulator gear, cable, or attachment point is more likely at fault.
Compare the replacement choices
| Choice | Strength | Trade-off |
|---|---|---|
| Manual regulator | Simple mechanism and fewer electrical concerns | Requires physical effort and precise mechanical fit |
| Power regulator only | Useful when the original motor is healthy | Requires correct motor transfer and connector compatibility |
| Power regulator with motor | Convenient matched assembly | Costs more and still needs exact vehicle fitment |
| OEM replacement | Designed around the original vehicle specification | Often carries a higher purchase price |
| Quality aftermarket replacement | Can offer reinforced materials and practical value | Quality and fitment vary by seller and product |
Plastic components can fail after repeated cycling, heat exposure, or cable stress. A metal-reinforced assembly may make more sense for a vehicle you plan to keep, particularly when the original failure involved a cracked gear, broken carrier, or distorted arm. That doesn't mean every metal part is automatically correct. The mounting pattern, glass attachment, motor interface, and door position still control compatibility.
Use the same discipline when comparing OEM and aftermarket parts described in this aftermarket parts versus OEM comparison. Read the product details, inspect connector photos, verify whether the motor is included, and check the return and warranty terms. The cheapest part isn't a bargain if you have to remove the door panel again.
Troubleshooting Common Installation Issues
Most installation problems show up during the first test. A window that tilts, rattles, or stops partway usually has a mechanical alignment issue rather than a mysterious electrical fault. Start by watching the glass through the full travel with the door trim still removed.

Read the symptoms
Glass moves slowly or sticks: Inspect both vertical channels for folded weather stripping, dirt, or a misplaced guide. Loosen the regulator mounting bolts slightly, center the glass, and retighten while holding the glass square. Don't compensate for a bent regulator by forcing the glass sideways.
Glass drops or leans: The glass may not be seated in both channels, or the clamps may not be gripping evenly. Lower it to the access position, support it, and inspect the attachment points. Tighten the clamps evenly rather than overtightening one side.
Motor runs but the glass stays still: The motor gear may be stripped, the regulator cable may have broken, or the motor may not be properly engaged with the replacement assembly. Stop operating the switch. Continued cycling can wind a loose cable into a tighter knot.
Motor is noisy: A grinding sound often indicates damaged gears or a cable problem. A squeak may come from dry guides or glass contact, but lubrication should be applied only where the vehicle service information permits it. Grease on the glass run can attract dirt and worsen sticking.
A smooth window is the result of alignment, not force. If the motor strains, stop and find the bind.
Treat anti-pinch systems as a separate repair
Late-model vehicles may use anti-pinch, one-touch, and position-sensing functions. These systems can interpret resistance as an obstruction. After battery disconnection or regulator replacement, the window may lose its learned upper and lower limits. The motor can then stop early, reverse unexpectedly, or lose one-touch operation.
A common reset procedure is to close the window fully, hold the switch in the closed position briefly, open the window fully, then hold the switch in the open position briefly. Some vehicles require the sequence more than once, a specific ignition state, or a scan-tool procedure. Use the vehicle-specific service instructions rather than assuming one reset works for every model.
Test the anti-pinch function according to the manufacturer's safety procedure. Never place a hand, neck, or another body part in the window opening. If calibration fails, a warning light appears, or the window reverses without an obstruction, inspect the regulator alignment and connector first, then seek model-specific diagnostic help.
A useful window regulator repair video can help you visualize access and installation, but video guidance can't replace the wiring diagram or reset procedure for your exact vehicle.
Why Quality Replacement Parts Matter
A regulator is a high-use component hidden inside a door. Every trip can involve several operating cycles, and the assembly has to lift the glass while resisting vibration, moisture, temperature changes, and misalignment. A replacement that merely fits the bolt holes may not deliver the same durability as one with properly built guides, cables, gears, and mounting brackets.
The failed part often reveals the weak point. A shattered plastic gear, stretched cable, cracked carrier, or bent scissor arm tells you what the original assembly couldn't tolerate. Replacing only the visible broken piece may leave the motor or track overloaded, while installing a complete matched assembly can remove several worn interfaces at once.
Reinforced materials and warranty coverage
Metal components can be useful where the original design relies on failure-prone plastic. They aren't immune to poor alignment or incorrect installation, but a stronger gear or carrier can reduce the chance that the same wear pattern returns. The repair still depends on correct fitment, because a durable regulator with the wrong cable routing is unusable.
T1A Auto offers vehicle-specific manual and powered window regulators and uses a vehicle search tool covering makes such as Toyota, Ford, Chevrolet, and GMC. Its catalog includes a lifetime warranty on metal components and a 3-year warranty on standard items, according to the publisher information provided for this article. Those terms matter because the warranty should match the part's construction and your ownership plans.
Fitment remains the deciding factor
Use the vehicle selector, then confirm the listing manually. Check the door position, body style, power or manual operation, motor inclusion, connector, and mounting arrangement. If the catalog asks for a build detail you don't know, inspect the vehicle or use the VIN rather than guessing.
The automotive door window regulator market was estimated at USD 132.93 billion in 2023, projected at USD 137.96 billion in 2024, and forecast to reach USD 185.7 billion by 2032, with a projected 3.78% CAGR for 2025 to 2032, according to this automotive door window regulator market projection. That scale reflects a durable replacement category, but it doesn't make a generic part suitable for every door.
Time and Cost Estimates for Your Project
Plan the job around access, not just the regulator. A compact car with a clear access opening may be simple, while a truck door with layered brackets, speakers, cables, and modules can slow the work considerably. First-time work also takes longer because identifying hidden fasteners and releasing clips safely matters more than rushing.
Your basic tool list usually includes:
- Trim tools: Plastic pry tools reduce damage to painted edges and panel clips.
- Hand tools: A ratchet, sockets, screwdrivers, and small picks cover most fasteners and connectors.
- Support materials: Wide painter's tape, glass-holding straps, and a work light keep the glass secure.
- Inspection tools: A flashlight and phone camera help document routing and connector positions.
Parts pricing varies by vehicle, whether the motor is included, and the construction of the replacement. A manual regulator can be a different purchase from a powered assembly, and a motor-equipped unit may cost more than a regulator designed for motor transfer. Compare the full assembly, warranty, return terms, and verified fitment instead of choosing by sticker price alone.
Professional repair can be sensible when the glass is damaged, the door shell is bent, the wiring has an unknown fault, or the vehicle requires scan-tool calibration. DIY repair is more realistic when the glass is intact, the door panel comes off cleanly, and you can leave the vehicle parked until the test is complete.
Before ordering, write down the vehicle year, make, model, body style, door position, and operation type. Photograph the old connector and mounting points. During installation, keep the glass supported, test the assembly before trim reinstallation, and complete any required anti-pinch initialization before returning the vehicle to service.
T1A Auto offers vehicle-specific manual and power window regulators, a vehicle compatibility search, metal-component coverage with a lifetime warranty, and standard-item coverage for 3 years. Visit T1A Auto to match the regulator to your car or truck's door position and configuration before starting your repair.
