


You press the window switch, hear an ugly crunch inside the door, and watch the glass sag halfway into the Ford Escape door shell. Or the motor hums while the glass stays put. Either way, ordering the first regulator you find can turn a simple repair into a parts mismatch and another teardown.
A Ford Escape window regulator replacement is manageable for a careful DIYer, but it isn't one identical job across the entire model line. Parts catalogs list regulator applications from 2001 through 2026, covering at least 26 model years and several platform changes (PartsGeek Ford Escape window regulator listings). Door-panel clips, glass attachments, and the relationship between the regulator and motor vary by generation, so diagnosis and fitment matter as much as the installation itself.
Table of Contents
- Is Your Ford Escape Window Regulator Really the Problem
- How to Tell If the Regulator Motor or Glass Clips Failed
- Tools Parts and Prep Before You Remove the Door Panel
- Removing and Installing the Ford Escape Window Regulator
- Alignment Testing and Model Year Caveats to Prevent Comebacks
- Final Checks Pro Tips and When to Upgrade Your Regulator
Is Your Ford Escape Window Regulator Really the Problem
The switch works, the glass drops into the door, and the first instinct is to order a complete regulator and motor. That can waste money. The regulator guides the glass, the motor provides the drive, and clips, clamps, and mounting points transfer that movement to the glass. A failure in any one of them can produce similar symptoms from the driver's seat.
Start by identifying what still operates. A motor that runs while the glass stays still may have a broken cable, stripped gear, or a glass attachment that has pulled loose. A silent window may point to the motor, switch, wiring, or power supply instead. Replacing the whole assembly without checking those basics is how an otherwise sound motor gets discarded.
The job changes with the Escape generation
The basic repair sequence is familiar across 2001–2007, 2008–2012, and 2013–2019 Escapes, but the door fasteners, glass clips, clamps, and regulator design are not interchangeable. 2020–2024 models add another fitment group. Year-specific videos often show one configuration as if it applies to every Escape, so compare the generation before copying a panel-removal step or ordering parts. This generation-specific repair reference helps show why the procedures need to be separated.
Repair time also depends on access and your familiarity with the door. A professional installer may list about 1 hour 48 minutes for a front regulator and motor assembly on the 2013–2019 Escape, while a broader benchmark for similar Ford work is roughly 1.5–3.0 hours per door. Those figures do not predict a first-time DIY job. Allow time to locate concealed fasteners, protect the vapor barrier, support the glass, and correct its position before final tightening.
Practical rule: Support the glass securely before loosening the regulator. If you cannot hold it safely, stop. A falling pane can crack, shatter, or damage the door.
This repair suits someone comfortable with trim tools, electrical connectors, confined fasteners, and careful reassembly. Use a shop if the glass is shattered, the door has collision damage, access panels limit safe work, or you have no stable way to keep the glass raised.
Before buying an Escape, run every window repeatedly. Listen for grinding, hesitation, and glass tilt, then check a used Ford Escape to confirm vehicle details before ordering a year-specific part.
How to Tell If the Regulator Motor or Glass Clips Failed
Start with the switch and the sound coming from the door. Press the window switch briefly in both directions, without holding it long enough to overheat a struggling motor. The result usually places the fault into one of three groups, but you still need a visual inspection before choosing the replacement part.
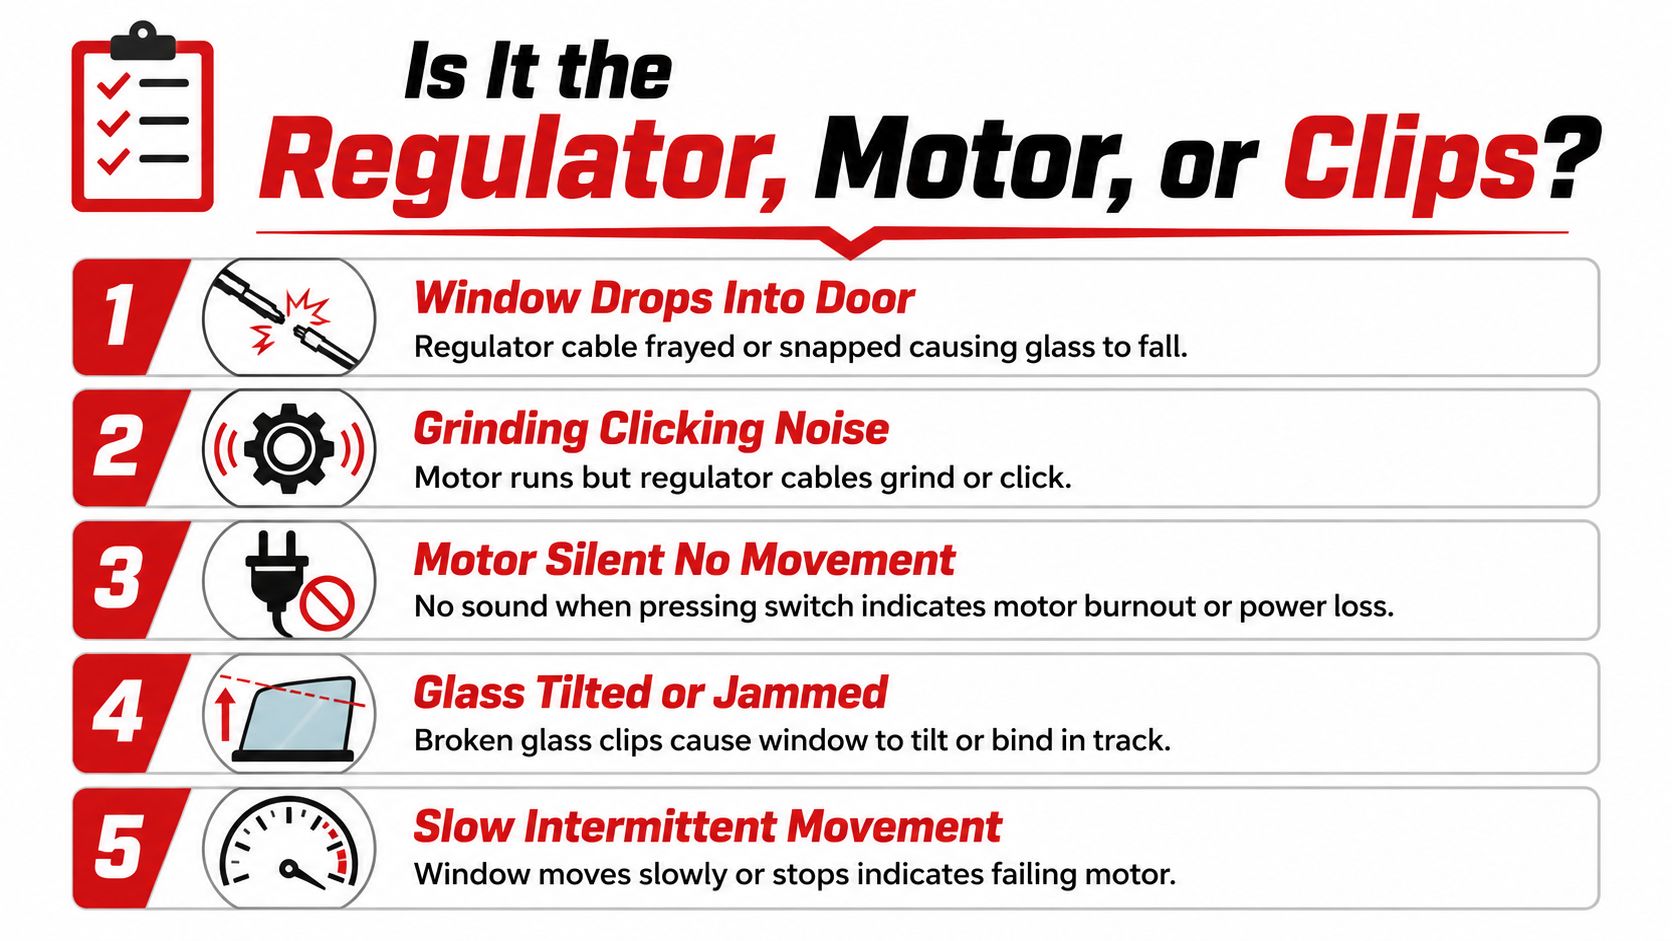
Compare the symptoms before buying
Motor runs, glass doesn't move: You may have a broken cable, a stripped regulator gear, or glass that has separated from its clamp. A humming motor doesn't prove that the regulator is healthy. If the glass has dropped into the door or sits crooked, inspect the regulator and glass attachments first.
Grinding or clicking: A repeating crunch, click, or cable-like scraping usually points toward mechanical failure in the regulator or its drive gear. Continuing to hold the switch can wind the damaged cable further around the spool and make removal harder.
Silence: No sound can mean a failed motor, a disconnected harness, a switch problem, or a power supply fault. Test the connector and power before condemning the motor. The window motor testing guide provides a useful electrical check before you purchase parts.
Glass tilts or binds: A tilted pane often indicates a detached glass attachment, a broken clip, or a glass edge that has left its run channel. The regulator might still be capable of moving, so replacing the entire assembly without looking inside the door can waste a good component.
Slow or intermittent travel: A tired motor can move the glass slowly, stop under load, or work again after cooling. Binding in the run channel can create the same symptom, so check the glass path and weather seals rather than blaming the motor immediately.
Use the door panel as your first test
With the panel still installed, watch whether the glass moves evenly and whether the top edge remains parallel with the beltline. If it falls suddenly, don't cycle the switch again. Support it by hand only if you can do so safely, then tape it in the raised position before opening the door.
Once the panel is off, inspect the motor connector, regulator cable, mounting points, and glass clamps. A broken attachment may be the only failure. If the motor turns and the regulator mechanism travels while the glass remains stationary, focus on the attachment. If the motor doesn't respond and the regulator is otherwise intact, test the motor and circuit before ordering a complete assembly.
Tools Parts and Prep Before You Remove the Door Panel
Preparation prevents the most expensive mistakes in this job. Put the replacement beside the original before installation and compare mounting holes, motor position, connector shape, glass attachment points, and door position. A front-left regulator isn't automatically interchangeable with a front-right unit, and a part that fits one Escape generation may not fit the next.
Build the work area first
Gather:
- Trim tools: Use nylon panel tools to release clips without gouging the door skin or marring painted trim.
- Socket and driver set: Have the common small sockets and extensions used for door hardware available, along with a ratchet and a compact driver for confined fasteners.
- Tape: Wide painter's tape or strong masking tape should support the glass against the upper door frame. Don't rely on one narrow strip.
- Electrical supplies: Keep a test light or multimeter available if the motor is silent, plus a small flashlight for connector locks.
- Replacement clips: Door-panel retainers can stay in the door or break during removal. Spare retainers prevent an unfinished repair.
- Cleaning and lubrication supplies: Use a suitable glass-run lubricant, not a heavy grease that attracts grit or contaminates the window channel.
Disconnect the battery before unplugging door wiring, especially if the door contains powered safety equipment or multiple electrical connectors. Keep the window raised before disconnecting power whenever possible. If the glass is already down, use a safe temporary support while accessing the regulator.
The vapor barrier is not decoration. It controls water that enters through the window opening and helps keep moisture away from the trim panel and interior. Photograph connector routing and clip locations, label fasteners by position, and protect the barrier so it can be resealed. A careful door-panel removal guide is useful for learning the trim-release approach before you start.
Removing and Installing the Ford Escape Window Regulator
A window can drop inside the door the moment the regulator releases. The safe sequence is controlled: expose the mechanism, hold the glass securely, disconnect the glass, remove the old assembly, and test the replacement before closing the door. Never loosen regulator fasteners while the pane is unsupported.
Remove the panel and expose the mechanism
Disconnect the battery, then remove the visible trim covers and door-panel fasteners. Work around the panel with a nylon tool, releasing one retainer at a time rather than pulling from a single corner. Lift the panel clear, unplug the switch and harness connectors, and place the panel where it cannot be damaged or stepped on.
Peel the vapor barrier back only as far as the access opening requires. Keep the adhesive clean, and avoid tearing the sheet around wiring pass-throughs. Any damaged section must be repaired before final assembly, or water can reach the trim and interior.
Secure the glass before touching the regulator
Raise the glass fully if the mechanism still operates. Apply several wide strips of tape over the glass and onto the outer door frame, forming a secure bridge on both sides. Add another layer if the pane is heavy or the tape starts lifting from dusty trim.
The support must remain in place after the glass is disconnected. A motor, cable, or partly engaged clip is not a reliable support, and fingers should stay clear of the regulator tracks and pinch points.
Separate the glass and regulator
Through the access opening, locate the glass attachment bolts or clips. Remove the hardware connecting the pane to the regulator while the glass remains taped up. Keep one hand close to the glass for control, but do not place it between the pane and the mechanism.
Unplug the motor harness before removing the regulator mounting fasteners. Remove the regulator and motor assembly through the door opening, then compare the old and replacement units on the workbench. Check the mounting points, glass attachment style, motor connector, and included hardware before putting the new part in the door.
Generation-specific points
The Escape spans several door designs, so a regulator that looks similar may still be wrong for the vehicle.
- 2001–2007: Expect older trim hardware and a regulator layout that differs from later Escape doors. Photograph the cable route and attachment points before removal.
- 2008–2012: Check the glass clamp position closely. The unit may resemble an earlier regulator while using different mounting or glass-attachment details.
- 2013–2019: Confirm the motor connector and regulator suffix during fitment checks. Ford service documentation identifies a production-date and suffix rule for affected vehicles, so verify those details before installation.
- 2020–2025: Confirm motor integration and clip design rather than assuming they match the previous generation. Check the year, door position, and whether the replacement includes the motor.
Install the replacement in the reverse order. Set the regulator loosely in its mounting points first, connect the motor harness, and check that the assembly sits naturally before tightening the fasteners. Reconnect the glass to the regulator clips or clamps, verify that each attachment is fully seated, and remove the tape only after the mechanism is carrying the pane.
Before reinstalling the vapor barrier and panel, reconnect the battery and operate the window. The hands-on workflow is to remove the trim, disconnect the switch and harness, tape the raised glass, unbolt the glass, unplug the motor, exchange the assembly, and run a full window test before reassembly.
If the glass binds, stop immediately. Inspect the glass alignment, run-channel seating, clip engagement, wiring clearance, and regulator position. Do not force a crooked pane with the switch. That can damage the replacement mechanism before the door panel is installed.
Alignment Testing and Model Year Caveats to Prevent Comebacks
A regulator can be correctly bolted in and still fail the practical test if the glass sits crooked or the run channels create excessive resistance. Cycle the window slowly while watching the top edge, listening for cable noise, and checking whether the glass reaches both stops without hesitation.
The 2013 Escape deserves special attention. Ford Technical Service Bulletin 14-0111 addresses slow operation, stopping midway, and bounce-back. It instructs technicians to identify the build date, and vehicles built on or before 2/4/2013 require diagnosis and, when the regulator suffix isn't AG or higher, regulator replacement (Ford TSB 14-0111). That isn't a universal instruction for every Escape, but it is an important fitment and diagnosis checkpoint for the affected generation.
Test the glass before sealing the door
Run the window through a complete up and down cycle, then repeat the test while observing the regulator through the access opening. Look for:
- Parallel travel: The glass should remain level as it moves.
- Smooth loading: The motor shouldn't labor, grind, or click at one point in the travel.
- Secure attachment: The glass must remain seated in both attachment points.
- Clear wiring: The harness must stay away from the regulator arms, cable, and glass.
- Correct stopping: The pane should reach the normal upper and lower positions without bounce-back.
If the glass reaches the top and reverses, don't assume the new regulator is defective. Excessive friction, misaligned channels, an incorrectly seated glass edge, or a clamp that holds the pane at an angle can trigger the vehicle's protection behavior.
Generation differences at a glance
| Generation | Trim and Clip Notes | Regulator and Motor Setup | Key Caveat |
|---|---|---|---|
| 2001–2007 | Older door trim and attachment details require careful clip inspection | Verify whether the replacement includes the motor | Photograph the original cable and glass path |
| 2008–2012 | Later trim and glass attachment arrangement may not match earlier parts | Confirm mounting points and connector details | Match year and door position, not appearance alone |
| 2013–2019 | Glass clamps and trim details vary within the platform | Check motor integration and suffix information | Apply the Ford service-bulletin build-date rule where relevant |
| 2020–2025 | Newer door construction and clip design require exact application checking | Confirm the complete assembly configuration | Don't substitute a previous-generation regulator without verified fitment |
Once operation is correct, reseat the vapor barrier continuously around its original perimeter. Gaps can allow water into the door panel or create wind noise. Route wires through their original retainers, reinstall the panel by aligning clips before pressing, and test the switch again after the trim is secured.
A loose panel clip or trapped harness can create a rattle that sounds like another regulator failure. Final inspection should include every fastener, every retainer, the inner handle cable, switch operation, and the window seal along the glass.
Final Checks Pro Tips and When to Upgrade Your Regulator
The lasting repair comes from reducing strain on the new mechanism. Keep the run channels clean and use an appropriate light lubricant where the manufacturer permits it. Avoid slamming the door while the glass is partly lowered, and investigate any window that begins moving slowly instead of waiting for the cable to snap.
With the panel removed, inspect related wear points. Check the glass attachment hardware, run-channel condition, wiring clips, vapor-barrier adhesive, door-panel retainers, and the motor connector. Replacing a regulator while leaving a damaged guide or loose glass clamp in place invites the same symptom to return.
Choose the replacement around the failure
A regulator-only replacement can make sense when the original motor operates correctly and the motor is compatible with the new mechanism. A regulator-and-motor assembly is more appropriate when the motor is silent after the circuit has been verified, when the motor has labored for a long time, or when the combined assembly offers confirmed fitment for the vehicle.
Material choice also matters. Standard aftermarket parts can be suitable when fitment, connector design, and warranty coverage are clear. An upgraded metal component may be worth considering when the original design relies on failure-prone plastic in a high-load area. For a broader comparison of replacement-part trade-offs, see OEM versus aftermarket parts.
T1A Auto is one retailer option for Ford window regulators and related door components, with vehicle-based fitment selection, lifetime coverage on its metal components, and a 3-year warranty on standard items, according to the publisher information supplied for this article. Confirm the exact year, door position, motor inclusion, and return terms before ordering.
If the glass is secure, the regulator travels smoothly, the barrier is sealed, and the panel is firmly clipped in place, the repair is ready for daily use. Start by identifying your Escape generation and diagnosing the failure, not by guessing from the part's photograph.
For a Ford Escape window regulator replacement, visit T1A Auto to search by vehicle and compare the correct front or rear assembly for your year and door position. Review whether the part includes the motor, check the warranty terms, and order only after matching the connector and mounting details to your Escape.
