


You press the driver-side switch in your GMC Sierra, hear the glass grind halfway down, and then everything stops. The window is stuck open, the weather is changing, and the door panel is still hiding the part that failed. Before ordering a regulator, you need to determine whether the problem is mechanical, electrical, or a combination of both.
A successful GMC window regulator replacement starts with diagnosis. Then you choose the correct part format for the exact truck, support the glass safely, align the assembly without forcing it, and test the system properly. Newer GMC trucks can add a final step that older trucks don't need, electronic calibration.
Table of Contents
- Why GMC Truck Windows Fail and What a Replacement Really Involves
- Diagnosing a Bad Regulator Versus a Bad Motor
- Choosing the Right Regulator for Your GMC Model and Year
- Removing the Door Panel and Supporting the Glass
- Installing the New Regulator and Motor Assembly
- Calibration and Testing on Newer GMC Trucks
- Tips for Buying Durable Aftermarket Regulators and Final Takeaways
Why GMC Truck Windows Fail and What a Replacement Really Involves
A window regulator is the lifting mechanism inside the door. The motor supplies rotation, while the regulator converts that force into controlled glass movement through cables, arms, guides, or sliders. When the mechanism wears out, the window can tilt, bind, drop, or move unevenly even though the switch and motor still respond.
That distinction matters because a regulator replacement isn't a minor adjustment. You'll remove the interior trim, disconnect wiring, support the glass, release the old mechanism, align the replacement, and verify the window's complete travel. A cable that has frayed or jumped its track won't be corrected by tightening an exterior fastener.
Why the driver window usually gives trouble first
The driver's window gets used far more often than a rear passenger window. One automotive service summary attributes about 45% of power-window complaints to regulator failures, while about 35% of complaints initially blamed on the regulator involve the motor or electrical system. The same summary reports that driver-side regulators account for about 68% of failures, even though they represent only 25% of the regulators in four-door vehicles. Driver windows may see 3,200 to 4,500 cycles per year, compared with 300 to 600 cycles for rear passenger windows. The service summary on window regulator failure patterns provides that useful context.
Higher-use GMC windows often begin showing failures around 60,000 to 80,000 miles, according to the same source. Mileage isn't a diagnosis, but it helps explain why the driver's window may fail while the passenger windows still work normally.
Practical rule: A window that moves crookedly or drops needs mechanical inspection. A window that stays silent needs electrical testing before you buy a regulator.
Inside the door, the likely culprits are the regulator, the motor, or the wiring and controls. The regulator can bind or lose its cable. The motor can wear internally or lose power under load. A broken wire in the door-jamb harness, failed switch, poor connector, fuse, or control issue can imitate either fault.
The repair path is straightforward once you separate those possibilities. Listen to the motor, inspect how the glass sits in the channels, check power at the motor connector, identify the part format for your truck, then remove and install the assembly without allowing the glass to fall.
Diagnosing a Bad Regulator Versus a Bad Motor
Don't order the part based only on the symptom “window doesn't work.” Slow, intermittent, or stuck operation can come from either the motor or the regulator. Diagnosis requires access to the door, a look at the glass and tracks, and a check of whether the motor runs at all. RepairPal's GMC Sierra window regulator guidance also warns that motor-only replacement requires correct alignment between the motor gear and regulator gear.
Start with the switch. Try the affected window from the driver's master switch and, where applicable, the individual door switch. Observe whether the sound changes between controls. A difference can point toward a switch or control-circuit problem rather than a failed lifting mechanism.
Read the sound and movement
Press the switch briefly while listening at the door.
- Motor runs, glass doesn't move: Suspect a stripped regulator gear, broken cable, detached glass clamp, or a regulator that has come out of its guide.
- Glass moves crookedly or tilts: Suspect regulator damage, a loose glass attachment, or a window that has shifted in the run channels.
- Glass binds near one position: Inspect the guides and channels for contamination, damaged seals, or regulator misalignment before condemning the motor.
- No sound at all: Check the fuse, switch, connector, door-jamb wiring, and voltage at the motor before buying a mechanical assembly.
- Motor clicks or strains: The motor may be weak, but excessive regulator resistance can produce the same symptom.
A motor that runs under no load can still fail when it has to lift the glass. If you can safely access the connector, check whether power and ground reach the motor while the switch is pressed. A test light or multimeter helps separate a dead motor from an open circuit, but don't pierce wiring insulation unnecessarily. Back-probe the connector where possible and inspect for corrosion or loose terminals.
For a broader hands-on explanation of switch operation and motor checks, use this window motor testing guide.
Inspect before choosing the part
Once the trim is off, look for a loose or tilted glass, a cable wound incorrectly, a bent track, broken plastic guides, or a regulator mounting point that has shifted. If the motor runs and the glass is loose or fails to travel, the regulator is the stronger suspect. If the mechanism looks sound but the motor doesn't respond to confirmed power, a motor-only repair may be appropriate if your truck uses a separate motor.
Motor-only work isn't automatically easier. The replacement motor gear must mesh correctly with the regulator gear, and incorrect engagement can damage the teeth or leave the window misaligned. If the regulator shows wear and the motor has been working against that resistance, replacing the complete regulator-and-motor assembly often reduces the risk of reopening the door.
Choosing the Right Regulator for Your GMC Model and Year
The cheapest listing isn't always the cheapest repair. GMC trucks use different door designs, mounting patterns, electrical arrangements, and part formats across generations. Labor, whether the motor is included, and whether the system requires calibration can change the economics substantially.
Check the exact year, model, body style, door position, and front or rear location before ordering. A Sierra 1500 front-left regulator isn't interchangeable just because another GMC truck uses a similar-looking cable arrangement. Confirm whether the listing says “regulator only” or “regulator with motor,” and compare the connector, mounting tabs, glass clamps, and motor orientation with the original part.
GM truck platforms have supported replacement demand across long model-year spans. One parts catalog lists Sierra 1500 regulator/motor coverage from 1999 through 2011, while another lists Sierra 2500 HD coverage from 2001 through 2022. Those ranges come from the market and parts-coverage reference, but they aren't a substitute for vehicle-specific fitment verification.
The cost difference is usually explainable
A standard Sierra 1500 replacement is commonly estimated at $404 to $531 total, while a 2015 Sierra 1500 estimate in one guide is around $711 to $865. Another source cites about $205 for a Sierra 1500 window motor and regulator assembly. These figures aren't contradictory by themselves. They reflect differences in labor, parts design, supplier, whether the motor is included, and how the estimate defines the repair.
| Vehicle Context | Typical Cost / Coverage | What It Means for Buyers |
|---|---|---|
| GMC Sierra 1500 general replacement | $404 to $531 total | Expect labor to make up a meaningful portion of the repair. |
| Sierra 1500 coverage listed from 1999 through 2011 | Broad model-year range | Verify the exact year and door position instead of relying on a broad catalog match. |
| GMC Sierra 2500 HD coverage listed from 2001 through 2022 | Long-running truck-platform coverage | Compare the connector and mounting design for the specific generation. |
| 2015 Sierra 1500 estimate | About $711 to $865 in one guide | A higher estimate may reflect labor and the assembly design, not simply a more expensive cable. |
| Sierra 1500 motor and regulator assembly estimate | About $205 in another source | Confirm whether the amount covers the complete installed job or only the part format. |
Regulator only or complete assembly
Buy a regulator-only part when the motor has tested correctly, the motor gear is serviceable, and the replacement design allows accurate gear alignment. Choose a complete assembly when the regulator is damaged and the motor is questionable, or when the truck's design and supplier call for both components.
Manual and powered assemblies are not interchangeable by assumption. A powered GMC door needs the correct motor mounting and electrical connector, while a manual regulator has a different operating arrangement. Save the original part until the new one is installed and tested, especially if you may need to compare a bracket or return an incorrect shipment.
Removing the Door Panel and Supporting the Glass
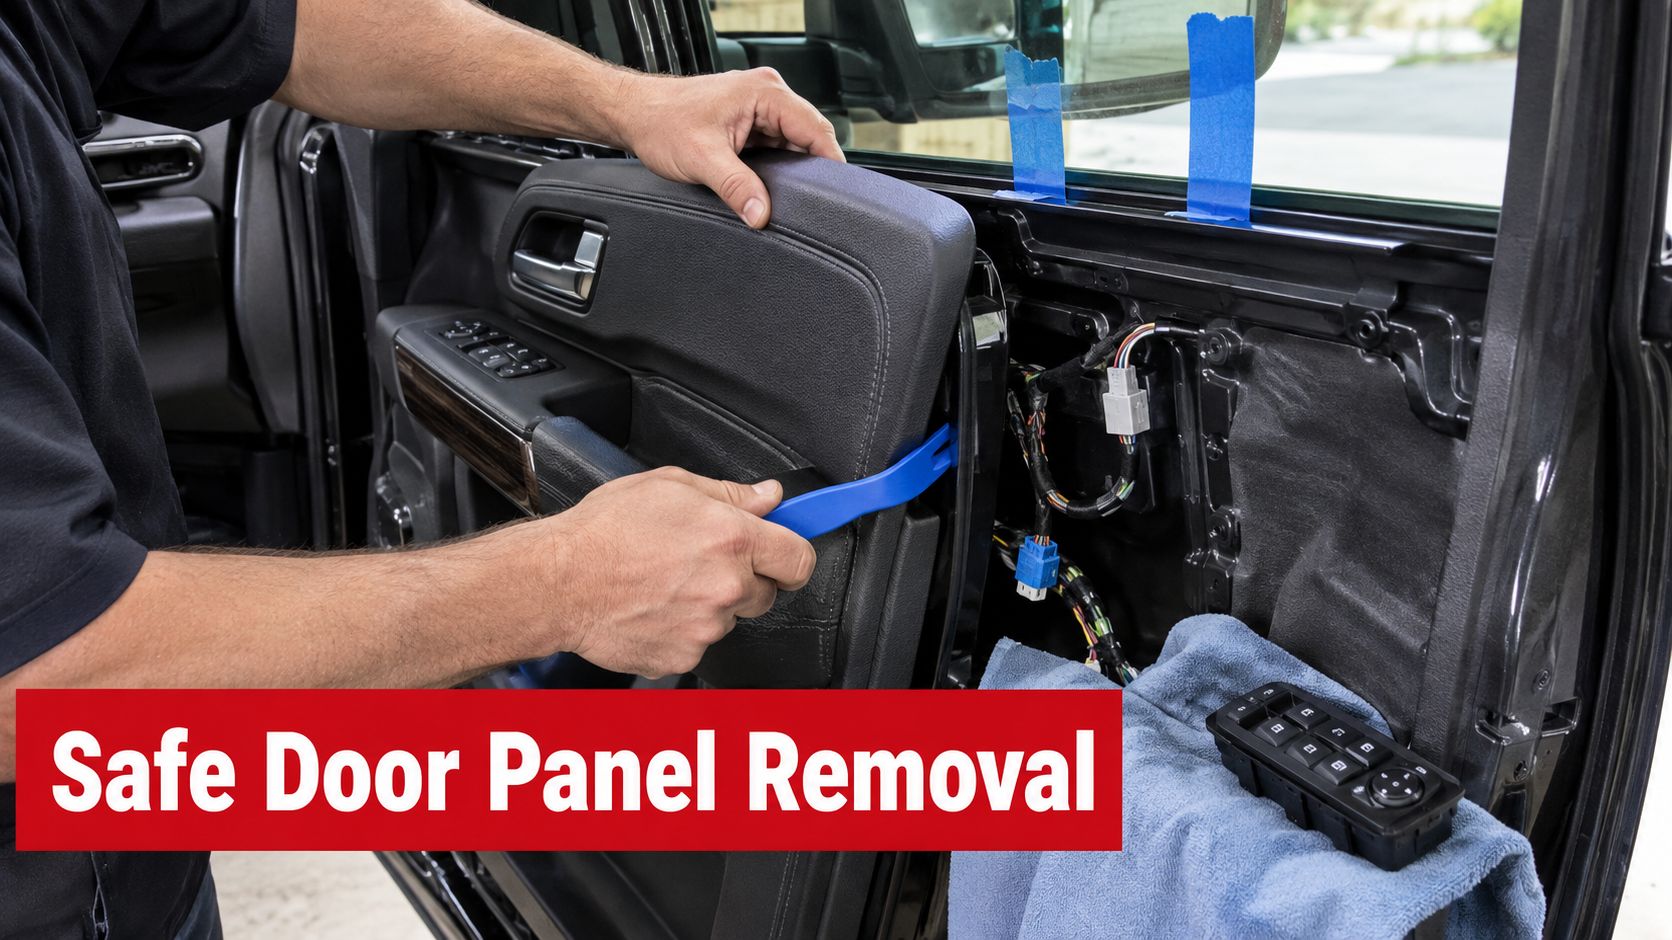
Park the truck on level ground, switch off the ignition, and organize a trim tool set, small socket set, pick, screwdriver, painter's tape, gloves, and a container for fasteners. Plastic clips and stamped door metal don't tolerate rushed prying. If you're unfamiliar with the trim layout, follow this GMC door panel removal guide for the specific panel style before applying force.
Strip the panel without damaging the clips
Remove the visible screws first. They may sit behind a switch bezel, pull handle trim, or small access cover. Use a plastic pry tool rather than a screwdriver against painted trim, and release clips close to their attachment points instead of pulling the panel from one corner.
Once the perimeter clips release, lift the panel vertically as required by the upper window ledge. Don't let it hang by the wiring. Disconnect the window switch, courtesy light, speaker, and any other connectors by releasing their locking tabs. Photograph connector positions if the door has several similar plugs.
Pull the moisture barrier away carefully. Don't shred it or discard the adhesive. You'll need to reseal the barrier so water running down the glass doesn't reach the trim panel, speakers, or electrical connectors.
Secure the glass before releasing the regulator
Move the glass to a position that exposes the regulator-to-glass clamps or bolts. If the motor won't move it, support the glass with your hand while another person operates the switch, or work the glass into a safe supported position without forcing the mechanism.
Tape the glass to the upper door frame with several wide strips of painter's tape, or use a properly positioned wedge. The support must hold the glass independently of the regulator. If you release the regulator first, the glass can drop into the door and chip its edge or injure your hand.
The OEM-style sequence for 2000 to 2005 GMC Sierra, Yukon, and Silverado platform repairs calls for removing the trim panel, cleaning and lubricating the window run channels, securing the glass, and loosening the regulator mounting bolts before final alignment. The replacement installation instructions reinforce why glass support and alignment belong in the same repair sequence.
Disconnect the motor connector, loosen the glass clamp fasteners, and then remove the regulator mounting bolts. Keep one fastener partially engaged until the assembly is controlled, then guide the regulator through the access opening. Watch for sharp edges and don't pull the assembly against the harness.
Installing the New Regulator and Motor Assembly
Compare the old and new assemblies on the workbench before inserting the replacement. Check the mounting tabs, glass clamps, cable routing, motor connector, and overall orientation. If the part doesn't line up naturally with the door openings, stop and verify fitment. Forcing a mismatched regulator can distort the door or damage the new cable.
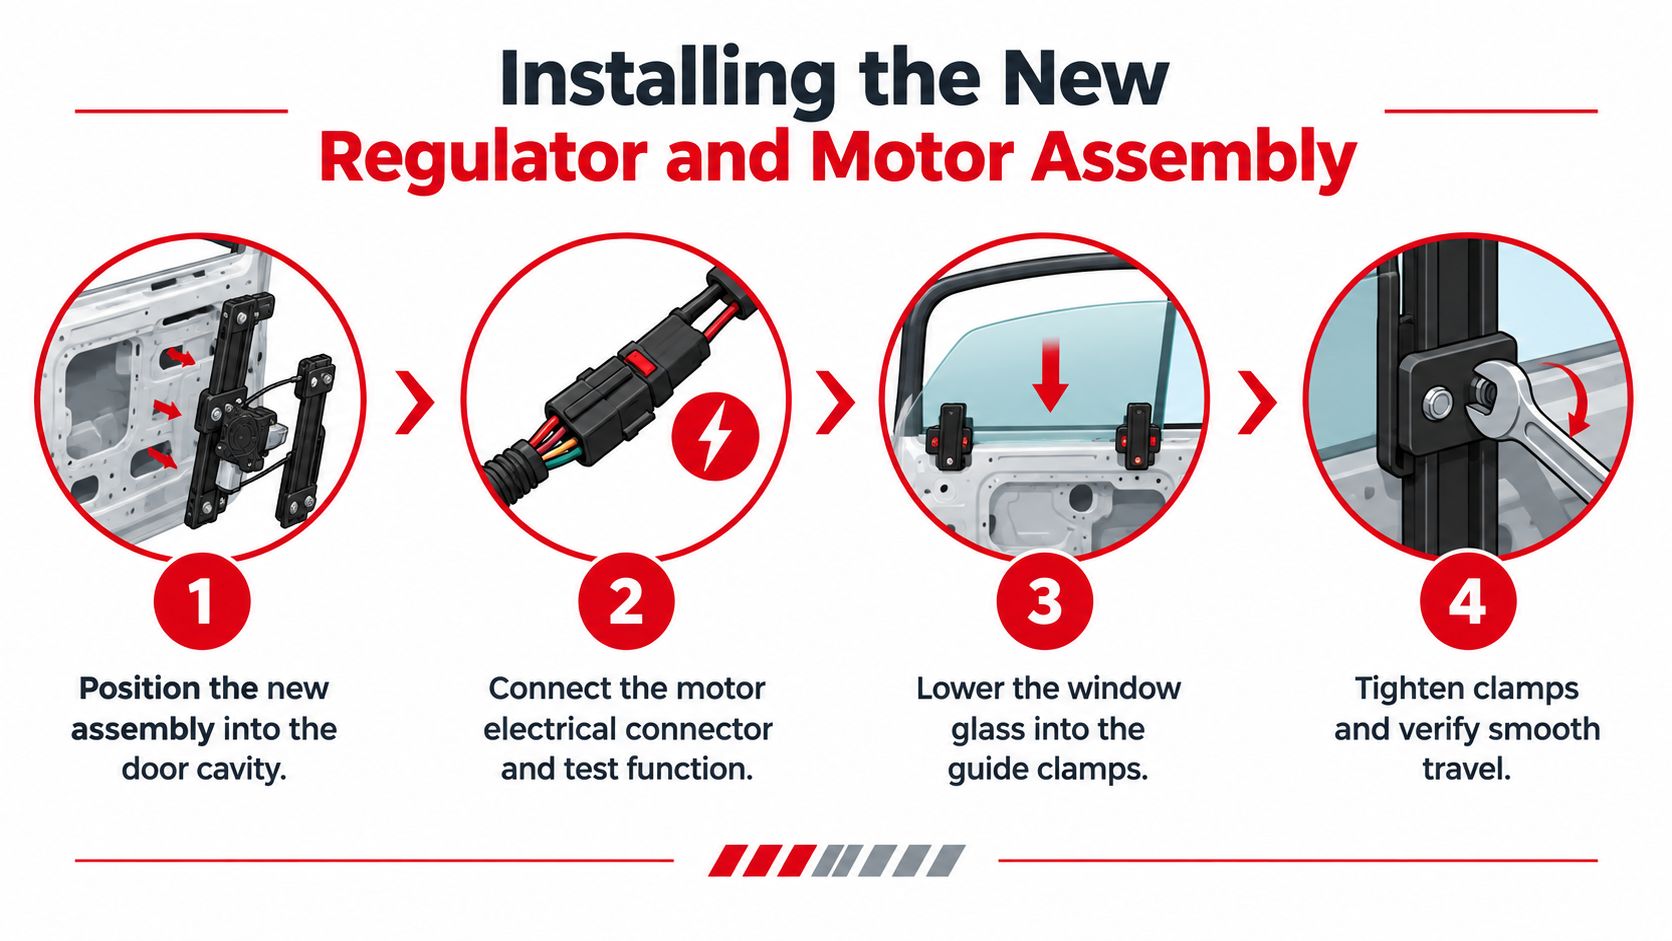
Feed the new assembly through the access opening and loosely install the mounting bolts. Don't tighten everything immediately. The regulator needs a small amount of movement while the glass settles into its guides and clamps.
Alignment rule: Let the regulator float during setup. Tighten it only after the glass is fully seated and the window moves through its path without binding.
Reconnect the motor and lower the glass carefully into the guide clamps. Make sure both sides of the glass sit correctly in the channels and that the glass is fully seated before tightening the clamp fasteners. A glass edge that looks engaged but isn't properly captured can tilt as soon as the window moves.
Lubricate the areas that actually slide
Clean dirt from the window run channels before applying lubricant. Use white lithium grease on the regulator slide area when the original grease has dried or disappeared, applying enough to coat the contact surfaces without filling the door with excess material. Don't substitute a thick household grease that can harden or attract abrasive grit.
Cycle the window while the door remains open and your hands stay clear. Watch the glass from both sides, listen for cable chatter, and stop immediately if one edge rises faster than the other. Loosen the mounting bolts slightly if alignment needs correction, reposition the assembly, and retest before final tightening.
Motor-only installation requires extra care. Align the motor gear with the regulator gear exactly as the parts manufacturer specifies, then confirm the gear teeth engage fully. A motor that is bolted on at the wrong position can make the window bind or strip the replacement gear.
After the glass travels smoothly, tighten the regulator and glass fasteners, reconnect the harness, refit the moisture barrier, and reinstall the trim panel. Test the switch again before pressing every panel clip into place. That gives you access to the mechanism if a connector or alignment issue appears.
Calibration and Testing on Newer GMC Trucks
A mechanically correct installation can still leave a newer GMC window inoperative. GM technical bulletins identify 2021 to 2023 vehicles with certain Continental or Bosch regulator configurations where the repair requires replacing both regulator assemblies and motors, followed by a new calibration file. The applicable GM technical bulletin makes post-install programming or learning part of the repair, not an optional finishing touch.

Older trucks still need a disciplined test
On an older GMC truck, operate the window repeatedly with the door open before reinstalling the trim. Confirm that the glass reaches the top and bottom of its travel, remains parallel with the beltline, and doesn't slow dramatically at one point. Check the driver's master switch and the individual door switch, then inspect the harness while operating the window.
Look for these results:
- Full travel: The glass reaches both stops without a hard impact or hesitation.
- Straight movement: Both front edges rise together, with no tilting or glass drag.
- Quiet operation: A soft motor sound is normal. Grinding, cable snapping, or repeated clicking isn't.
- Secure seating: The glass remains captured in the clamps and channels when the door closes.
- Correct controls: The window responds from every applicable switch.
Don't judge the repair by one successful movement. A poorly aligned regulator may complete one cycle and bind on the next. Run the window through its full path several times, then close the door and repeat the test with the glass seals loaded as they are during normal driving.
Newer trucks may need a scan tool
For the affected newer configurations, follow the service procedure for calibration file installation and window learning. The exact equipment and menu path depend on the truck, supplier, and available diagnostic system. If the assembly and motor requirements match the bulletin but you can't perform the required programming, arrange calibration with a shop before sealing the door permanently.
One-touch operation and anti-pinch behavior deserve particular attention. A window that moves manually but has lost its learned limits may stop early, reverse unexpectedly, or fail to provide normal automatic operation. Don't defeat a safety function by repeatedly forcing the switch. Complete the prescribed learning process, then verify the result with clear hands and objects away from the glass.
Don't skip the software step: On the affected 2021 to 2023 configurations, hardware installation alone doesn't complete the repair.
Tips for Buying Durable Aftermarket Regulators and Final Takeaways
A durable replacement starts with correct fitment, not a bargain price. Search by the exact GMC year, model, body style, door position, and power-window configuration. Compare the connector and mounting points with the old unit, and read whether the listing includes the motor or only the regulator frame.
Metal construction can matter at the high-wear points, especially where a plastic gear, guide, or mounting feature has already failed. That doesn't make every metal replacement automatically correct. A poorly fitted metal assembly still binds, and excessive resistance can shorten motor life.

Use this buying checklist
- Confirm the vehicle: Match the exact year, model, cab or body configuration, door location, and power operation.
- Compare the assembly: Check whether the motor, connector, clamps, and mounting hardware are included.
- Inspect material choices: Look for reinforced guides, sound cable routing, and metal components where the original design is vulnerable.
- Read the warranty: A clear warranty and return policy give you protection if the part arrives with a fitment or manufacturing issue.
- Plan the delivery: Confirm shipping timing and return conditions before disassembling the truck, especially if the window is stuck open.
For a broader comparison of original-equipment and replacement-part decisions, use this guide to OEM and aftermarket parts. The right choice depends on fitment, design, warranty coverage, and whether you can verify the replacement against the original assembly.
The lasting lessons are simple. Diagnose the motor, regulator, and wiring separately. Buy the correct assembly rather than relying on a broad “GMC truck” match. Tape or wedge the glass before releasing the regulator, leave the mounting bolts loose during alignment, lubricate the slide area when needed, and test the complete travel before reinstalling the trim. On affected newer trucks, include calibration and learning in the repair plan.
If you're ready to fix the door, T1A Auto offers GMC window regulators and related replacement parts with vehicle-fitment tools to help match the component to your truck. Visit T1A Auto to compare the correct regulator format, review the warranty and return terms, and order the part before starting your repair.
