


Getting your car door aligned right is a two-part game: first, you figure out exactly what's wrong, and then you make small, careful adjustments. Most of the time, the trouble is either with the door hinges, which handle the door's up-down and forward-back position, or the striker plate, which determines how tightly the door snugs up when it's closed. You have to be a bit of a detective before you even think about picking up a wrench.
How to Diagnose a Misaligned Car Door
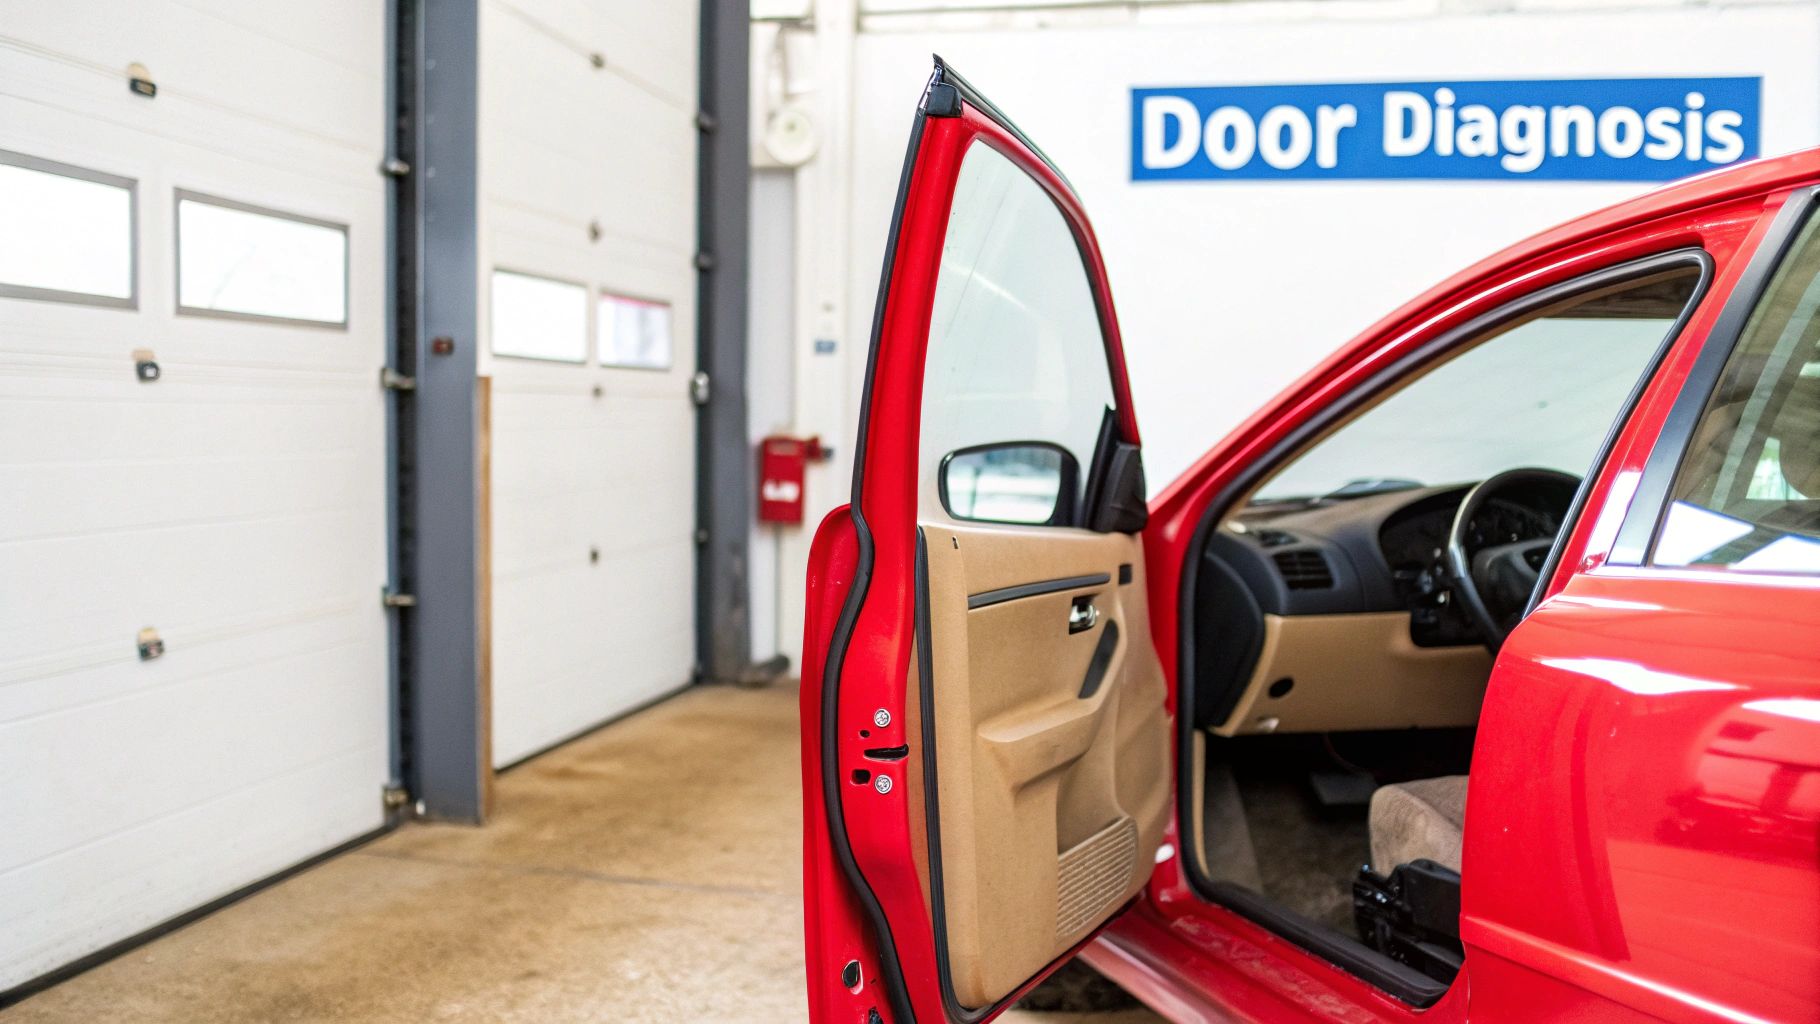
Before you start loosening bolts, slow down. A crooked door is just a symptom, and your first job is to find the cause. If you rush this part, you're just asking for a headache, turning what could be a simple fix into an all-day struggle.
Getting the diagnosis right saves you a ton of time and makes sure you’re fixing the actual problem. Think of it like this: fiddling with the striker when your hinges are shot is like putting a band-aid on a broken arm. It won't solve the real issue.
The Visual Inspection
Just start with a walk-around. Close all the doors and step back a few feet. Look at the car from different angles, paying close attention to the panel gaps—those little seams between your door and the body panels around it (like the fender and quarter panel).
Ideally, these gaps should be perfectly even all the way around. Is the gap wider at the top than the bottom? Does the edge of the door stick out past the fender? Make a mental note of every little inconsistency. Also, trace the main body lines that run down the side of the car. They should flow seamlessly from the front fender, across the door, and onto the rear panel without any weird jumps.
Pro Tip: A classic sign of a sagging door is a panel gap that pinches tight at the top rear corner and opens up at the bottom. This almost always means your hinge pins or bushings are worn out.
The Sag Test
A sagging door is probably the most common alignment issue out there. It's usually the upper door hinge that gives out first. After thousands of opens and closes, the sheer weight of the door wears down the internal hinge pins and bushings.
Here's how to check for it. Open the door about halfway, grab the bottom corner firmly with both hands, and try to lift it straight up. Don't swing it, just give it a firm vertical jiggle. If you feel any noticeable play, hear a clunk, or see the door move at the hinge, you've found your culprit. This tells you that a simple adjustment will only be a temporary fix. You'll probably need new hinge pins or a full hinge replacement from a reliable source like T1A Auto to get it right for the long haul.
Differentiating Hinge vs. Striker Issues
You've got to figure out if you're dealing with a hinge problem or a striker problem. They create different symptoms, and knowing which is which tells you where to focus your efforts.
- Hinge Problems: These almost always mess with the door's height and its forward/backward position. If your door has dropped and you have to lift it to close it, or if it smacks into the striker instead of gliding onto it, that's a hinge issue. Uneven vertical gaps are your biggest clue.
- Striker Problems: These are all about how the door latches and sits flush. If the door closes but needs a good slam, rattles as you drive, or sticks out a bit from the body, your striker is the likely suspect. It handles that final "in and out" positioning.
The Paper Test for Wind Noise and Leaks
A misaligned door isn't just ugly—it can also break the seal with the weatherstripping, letting in annoying wind noise or even water. The "paper test" is a brilliantly simple way to find those leaks.
Take a single piece of paper or a dollar bill and close it in the door. With the door fully latched, try to pull the paper out. You should feel a nice, consistent bit of drag. Now, work your way around the entire door frame, testing every few inches. If you hit a spot where the paper slides out with zero resistance, you've found a gap in your seal. That tells you the door needs to be adjusted inward right at that spot to get a proper, tight seal.
Your Essential Toolkit for Door Alignment
Jumping into a door alignment project without the right gear is a surefire way to turn a quick fix into an all-day headache. We've all been there—a stripped bolt or a misaligned door can make you wish you'd never started. But gathering the right tools first isn't just about avoiding frustration; it's about doing the job safely and getting it right the first time.
Trying to make do with the wrong size socket or just guessing at how tight a bolt should be is a recipe for disaster. Before you even think about loosening a hinge, spend a few minutes getting your tools in order. Trust me, this prep work is the most important step in the entire process.
Here’s a quick rundown of what you’ll need to have on hand. I’ve put together a handy checklist to make it easy.
Car Door Alignment Tool Checklist
This table breaks down the essentials and some helpful extras that can make your car door alignment project go much smoother.
| Tool | Primary Use | Pro Tip |
|---|---|---|
| Socket Set & Ratchet | Loosening/tightening hinge & striker bolts. | Most cars use 12mm, 13mm, or 14mm sockets, but have a Torx set (T40/T45) ready, just in case. |
| Torque Wrench | Tightening bolts to factory specs. | This is a non-negotiable tool. It prevents stripped threads and ensures the door stays put. |
| Floor Jack | Supporting the door's weight. | Always use a block of wood or a rubber pad on the jack to protect your door's paint and finish. |
| Grease Pencil/Marker | Marking the original hinge/striker position. | This simple trick gives you a starting reference point, saving you from guesswork later. |
| Alignment Shims | Making fine-tuned adjustments. | Essential for older vehicles or significant sagging where bolt adjustments aren't enough. |
| Rubber Mallet | Gently tapping parts into place. | Perfect for nudging a stubborn striker plate without chipping your paint. |
Having these tools ready means you can focus on the alignment itself, not on running back and forth to your toolbox.
Core Tools for the Job
You don't need a professional-grade workshop for this. A good quality, basic mechanic's toolset will cover almost everything.
The absolute must-haves are your socket set, a reliable torque wrench, and a floor jack. A car door is surprisingly heavy and awkward to handle. The jack does the heavy lifting, allowing you to make tiny, precise vertical adjustments without straining your back. The torque wrench is your guarantee against over-tightening bolts (which can strip them) or under-tightening them (which lets the door sag again).
A correctly aligned door doesn't just look and sound better when it closes—it dramatically extends the life of your hinges and latch. That’s why using the right tools to hit those precise tolerances is so critical.
Helpful Extras That Make a Real Difference
While you can get by with the basics, a few extra items can make the job feel less like a struggle and more like a professional repair. These are the tools that seasoned mechanics and serious DIYers always have within reach.
A grease pencil or a marker is your best friend here. Before you loosen anything, trace the outline of the hinges and the striker plate. This gives you a visual baseline, so you always know your starting point. For older cars with more significant sag, alignment shims are invaluable. These are just thin metal plates you can slide between the hinge and the car's body to make micro-adjustments. And never underestimate the value of a simple rubber mallet for a gentle, non-damaging tap to nudge a component into its final position.
Proper alignment is a big deal for the longevity of your car's parts. The market for automotive door components is actually projected to grow from USD 43 billion in 2025 to USD 68.1 billion by 2035. Studies show that misalignment is a factor in 12% of all door mechanism failures. When you consider a car door can open and close over 50,000 times in its life, you see how important it is for the pressure to be distributed evenly.
In some cases, you might find that the hinge bolts on the door side are blocked by the interior panel. If that happens, don't try to force a wrench into a tight space. Take a moment and check out our guide on how to remove a car door panel. Taking the panel off first can save you a world of hurt and prevent you from accidentally scratching or cracking the plastic.
Adjusting Door Hinges to Fix Sag and Gaps
Alright, you've pinpointed the problem. Now it's time to get your hands dirty. Adjusting the door hinges is where the real magic happens, especially when you're dealing with a sagging door or ugly, uneven panel gaps. You'll need some patience for this, as even a millimeter of movement can be the difference between a perfect fit and starting all over again.
The name of the game is control. A car door is heavy and awkward, and the second you loosen those hinge bolts, all that weight is free to move. If you don't support it properly, the door can drop hard, damaging your paint, the fender, or the hinge itself. We're going to make small, careful changes.
Setting Up for Success
Before you even think about putting a wrench on a bolt, you need to support the door and mark your starting point. Trust me, skipping this prep work is a classic mistake that turns a simple adjustment into a massive headache.
First, grab a grease pencil or a marker. Carefully trace the outline of the top and bottom hinges right where they bolt onto the car's body (the A-pillar) and the door. This little trick is your safety net. It gives you a clear visual reference of the door's original position, so if you get lost in your adjustments, you can always go back to square one.
Next, get your floor jack and place it under the bottom edge of the door, toward the rear corner. Put a block of wood or a rubber pad on the jack's saddle to avoid scratching the paint. Gently raise the jack until it just kisses the bottom of the door, taking the weight without actually lifting it. The door shouldn't move up at all; the jack is just there to hold it steady once you loosen things up.
Having your tools laid out and ready will make this job go so much smoother. Here’s a quick look at the essentials.
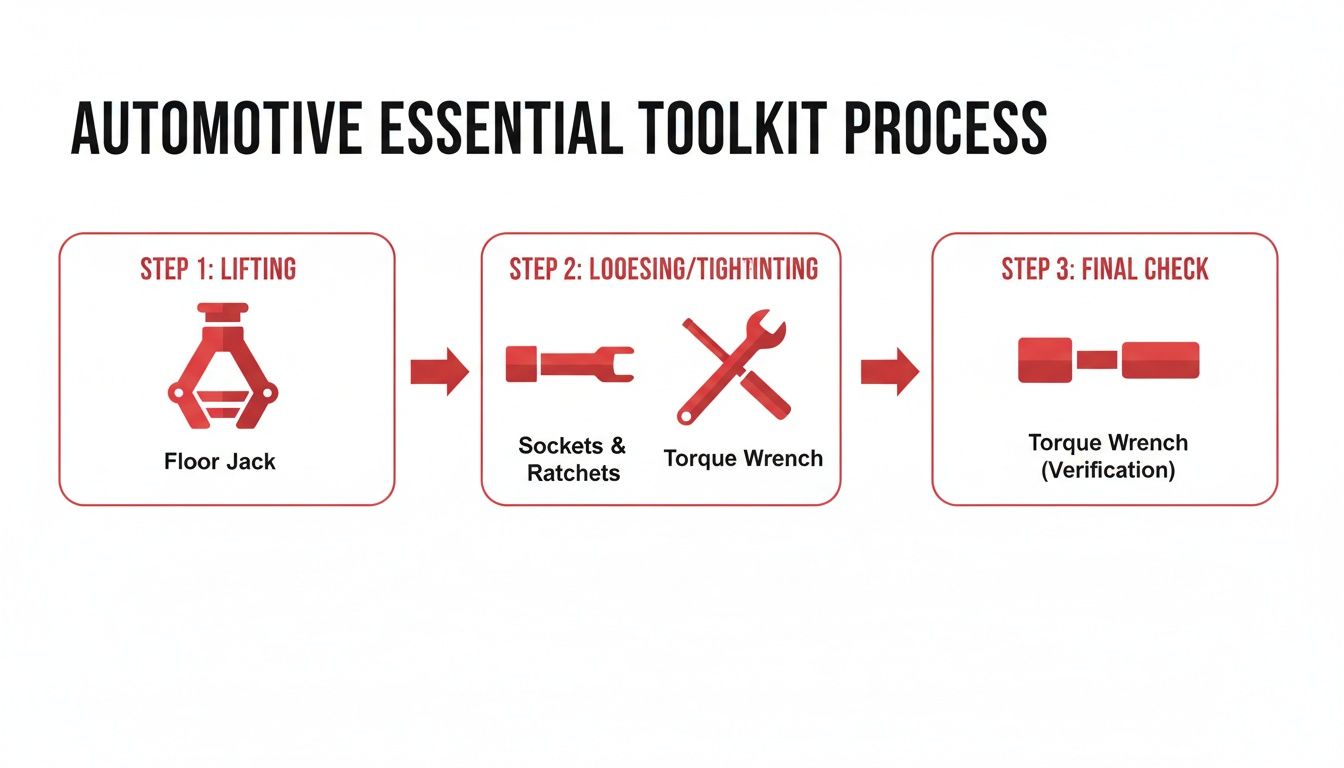
This workflow is key: support the weight, make your adjustments with the right sockets, and then lock it all in with a torque wrench for a precise, safe finish.
Making Vertical and Horizontal Adjustments
Most alignment problems can be fixed by adjusting the hinges where they meet the car’s A-pillar. The bolts connecting the hinge to the body are for your up-down and forward-back movements. The bolts connecting the hinge to the door usually handle the in-out angle.
Let's start with the hinge-to-body bolts. Using the right socket, which is often a 13mm or 14mm, slightly loosen the bolts on both hinges. Don't take them out! Just crack them loose enough that the hinge can be persuaded to move.
- For a sagging door: Use the floor jack to slowly and carefully raise the door. Keep a close eye on the panel gap between the top of the door and the roofline. Your goal is a perfectly even gap from front to back.
- For forward/backward movement: You'll need to gently push or pull the door into position.
This is a game of inches—or rather, millimeters. Make one tiny adjustment, snug up a bolt on each hinge, and gently close the door (don't latch it!) to check your progress against the fender and rear quarter panel. It’s a repetitive cycle: adjust, check, and repeat until it's perfect.
A Quick Word on Shims: On older cars or with really bad sag, you might run out of adjustment in the bolt holes. This is where shims come in. They are just thin metal plates you slide between the hinge and the car's body to physically push the door up or out.
Using Shims and Finalizing the Position
Once you have the door sitting exactly where you want it, it’s time to lock it down. Systematically tighten all the hinge bolts, alternating between them to apply even pressure. This prevents anything from shifting at the last second.
Finally, grab your torque wrench. This isn't a step to skip. Tighten the bolts to the exact specification in your vehicle’s service manual, usually around 20-30 Nm. This ensures the bolts won't vibrate loose over time and undo all your hard work. You're aiming for a uniform fender gap of about 3-5mm.
If you find that your hinge bolts are worn out or stripped, getting a precise adjustment is next to impossible. You might need to look into a quality replacement like the T1A Auto Door Hinge Pin and Bushing Kit. And if the whole hinge assembly is shot, you'll need to replace it. It's a bigger job, but our guide on how to replace a door hinge walks you through the entire process. Sometimes, a full replacement is the only way to get a permanent fix for a badly worn hinge.
Fine-Tuning the Striker Plate for a Perfect Close
So, you've wrestled with the hinges and those panel gaps are looking sharp. You might feel like you're on the home stretch, but if the door still needs a good slam or doesn't close with that satisfying thud, the job isn't done. The last piece of the puzzle in how to adjust car door alignment is the striker plate.
The striker is that simple-looking U-shaped loop on the car's body that the door latch grabs. It’s what dictates how flush the door sits and how securely it stays shut. Even with perfectly set hinges, a poorly adjusted striker can make the whole door feel cheap and clunky.
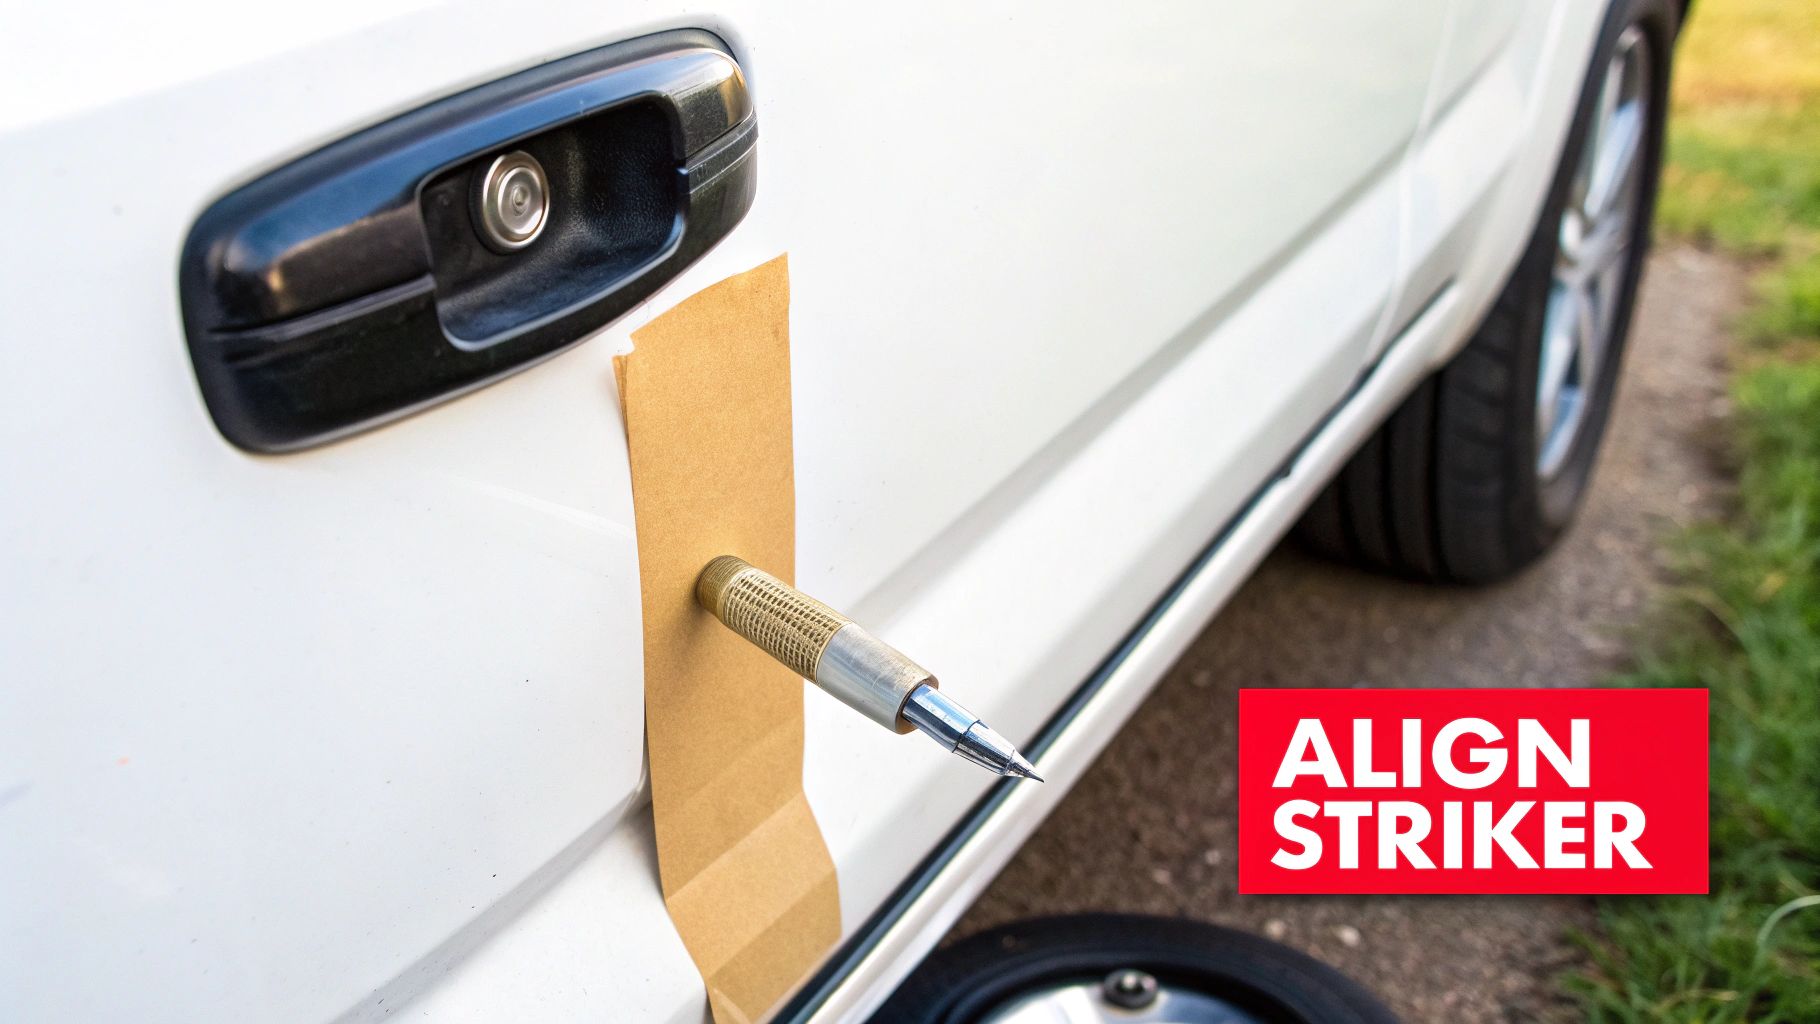
Read the Witness Marks
Before you grab a wrench, you need to play detective. The subtle scuffs on the striker plate, what we call "witness marks," are your roadmap. They tell you exactly where the latch is making contact. Don't guess here; you'll just end up chasing your tail.
A great little trick is to make your own. Just wrap a small piece of masking tape around the striker. Now, gently close the door until it latches. When you open it back up, the tape will have a clear impression showing you precisely where the latch hit.
This simple test tells you everything you need to know:
- High or Low? Is the mark centered on the U-bolt, or is it hitting the top or bottom? This tells you which way to move it vertically.
- In or Out? Does the door sit flush when closed, or does it stick out a bit? This guides your horizontal adjustment.
Making Precise Striker Adjustments
With your intel gathered, it's time to make the adjustment. You'll probably need a Torx bit (often a T40 or T45) or a large socket. Just like with the hinges, loosen the bolts just enough for the striker to move with a little force. Don't take them all the way out.
The secret is to move the striker in one direction at a time. If your tape showed the latch hitting low, nudge the striker up slightly. Resist the urge to move it up and in at the same time—that’s a surefire way to overcorrect and get frustrated.
Make a tiny change, maybe just a millimeter or two. Snug the bolts and gently test the door. Does it feel smoother? Is it closer? Repeat this process of tiny, incremental adjustments. You’re coaxing it into the perfect spot, not forcing it.
The goal is a smooth, one-motion close. You shouldn't have to lift, push, or slam the door. When the striker is perfectly aligned, the door will practically pull itself into the final, flush position.
Securing the Final Position
Once you’ve nailed that sweet spot where the door latches effortlessly and sits perfectly flush, lock it in. Tighten the striker bolts down firmly, then grab your torque wrench to finish the job to the manufacturer’s spec. This isn't a step to skip; it ensures the striker won't shift or vibrate loose down the road.
Now for the satisfying part. Open and close the door a dozen times. Listen for that clean, solid sound. Feel how little effort it takes. That's the payoff for your patience.
If you've got the striker perfectly aligned but the latch itself feels sticky or just won't engage right, the mechanism inside the door might be worn out. It's a common failure on older vehicles. If you suspect that's the case, check out our guide on car door latch replacement. A new latch can make an old door feel brand new again.
When Your Alignment Problem Is More Than Just an Adjustment
You’ve tweaked the hinges and fiddled with the striker, but the door still sags the second you let it go. It's a frustrating spot to be in, and it's a clear signal that the problem runs deeper than a simple adjustment. When endless tinkering doesn't get you anywhere, it's time to stop adjusting and start investigating for underlying damage or severely worn parts.
Sometimes, the core components are just too worn out to hold an alignment. No amount of tightening or shifting will fix a problem when the metal itself has failed. Knowing how to spot these issues is just as critical as knowing how to turn a wrench—it'll save you from a cycle of temporary fixes that never last.
Spotting Worn Hinge Pins and Bushings
By far, the most common culprit behind a stubborn door sag is worn-out hinge pins and bushings. These small but mighty parts bear the entire weight of the door every single time you open and close it. After thousands of cycles, that constant friction grinds them down, creating excessive play that no adjustment can ever permanently fix.
There's a simple but effective test you can do right now. Open the door about halfway, grab it by the bottom rear corner, and give it a firm lift straight up and down. If you feel a distinct "clunk" or see the door moving at the hinge independently of the car's body, your pins and bushings are shot.
This vertical play is the tell-tale sign that you’re fighting a losing battle with adjustments. The sag will always return because the hinge itself is loose. The only real solution is to replace the worn components.
These tiny worn parts can lead to some surprisingly big problems. Within the massive USD 20.1 billion automotive door module market, a staggering 22% of all warranty claims are directly linked to the stress caused by poor door alignment. For older vehicles, doors with worn parts that go unaddressed see a 15% higher rate of complete door module replacements after hitting 100,000 miles.
Recognizing Potential Frame Damage
While worn hinges are common, a more serious cause of misalignment is frame damage, often from a past accident. If a collision has bent the A-pillar (where the hinges mount) or the unibody structure even slightly, getting those perfect panel gaps with standard adjustments becomes nearly impossible.
Keep an eye out for these subtle but clear indicators of a structural problem:
- Creased Metal: Carefully check the metal around the hinge mounting points on both the door and the car's body. Any signs of wrinkling, creasing, or cracked paint suggest the area has been bent or stressed.
- Uneven Seams: Look closely at the seams where the A-pillar meets the fender and the roof. If these factory seams appear wavy, uneven, or show signs of being repaired with body filler, it points to previous structural work.
- Persistent Gaps: The most obvious sign is a door gap that just won’t close up, no matter how you adjust the hinges or striker. If you've pushed the hinges to their absolute limit and still have a huge, wedge-shaped gap, the frame is the likely culprit.
If you suspect frame damage, it’s time to step back. This isn't a driveway repair. It requires specialized equipment like frame-pulling machines and laser measurement systems that only a professional body shop will have. Trying to force it yourself can easily make the problem much worse.
If your car door alignment issues are severe and stem from a recent collision, it's important to understand what to do after a car accident to make sure you handle everything correctly, both legally and for the repair itself. Knowing when to put the tools down and call a pro is a skill in its own right.
Common Questions About Car Door Alignment
Even with the best guide in hand, you’re bound to hit a few snags or have questions pop up when you're wrestling with a stubborn door. Let's tackle some of the most common things people ask when they're in the middle of this job. Getting these answers sorted can be the difference between a frustrating afternoon and a job well done.
How Much Does a Professional Car Door Alignment Cost?
The cost to have a pro handle this can really be all over the map, since it depends entirely on what’s actually causing the problem.
For a simple tweak to the hinges or striker plate, a local shop will probably charge you somewhere between $75 and $150. For a seasoned tech, it's usually a quick and easy fix.
But if the issue runs deeper, like worn-out hinge pins that need replacing, the price starts to climb. You could be looking at $200 to $400 per door once you factor in parts and the extra labor. And if the door is crooked because of frame damage from a collision? That's a whole different ballgame. That kind of repair requires specialized frame-pulling equipment and can easily run over $1,000. This is exactly why it pays to try a DIY adjustment first for minor sags.
Remember, these are just ballpark figures. The final invoice will always depend on your vehicle's make and model, the labor rates in your area, and just how bad the problem is.
Can a Misaligned Door Really Cause Water Leaks?
Absolutely. In fact, a misaligned door is one of the most common culprits behind those maddening water leaks that soak your floorboards. When a door doesn’t sit perfectly flush, it can't create a solid, even seal against the rubber weatherstripping.
This leaves small gaps, often invisible to the naked eye, usually along the top or back edge of the door. The next time it rains or you hit the car wash, water has a clear path inside. Before you know it, you're dealing with musty smells, damp carpets, mold, and potentially even serious electrical problems if the water finds a wiring harness.
Getting the alignment right ensures the door presses firmly against the weatherstripping all the way around. It’s the only way to properly seal the cabin and keep your interior bone dry.
How Can I Tell If My Hinges Need Replacement Instead of Adjustment?
This is a big one. Figuring this out can save you from chasing your tail trying to adjust a part that's already shot. The best way to know for sure is with a quick "play test."
Swing the door open about halfway. Grab the bottom, rear corner of the door and give it a firm lift straight up and down. You’re not trying to swing it open or closed, but checking for vertical slop right at the hinges.
If you feel a noticeable 'clunk' or see the entire door shift up and down on its hinge pins, you've found your problem. That slop is a dead giveaway that the pins and bushings inside the hinge are worn out. No amount of adjusting will fix that permanently; the sag will just come right back.
When you've got that much play, the only real fix is to replace the hinge pins and bushings, or sometimes the entire hinge assembly. You just can't adjust your way around a failed part.
If you've discovered your hinges are too worn for a simple adjustment, a solid replacement is key to a permanent fix. At T1A Auto, we focus on engineering durable door hinges and components that provide a guaranteed fit and restore your door’s proper function. Check out our selection of premium aftermarket parts at https://t1aauto.com to find the right parts for your car or truck.
