


Most of the time, the simplest fix is the right one. When a car door starts squeaking, your first move should always be to clean and lubricate the hinges. This is a quick-and-dirty job that solves the majority of friction noises, and you can usually get it done in less than 15 minutes. A little white lithium grease or a silicone spray is often all you need to get things moving silently again.
Your Quick Guide to a Quiet Car Door
That ear-splitting shriek your door makes every time you open it? That's your car telling you something's wrong. Before you start tearing things apart or ordering new parts, let's figure out exactly what's making all that racket.
The noise is almost always coming from one of three culprits: the door hinges are dry and dirty, the door check is worn out, or the latch isn't lining up right. Pinpointing the source is the key to a fast, effective fix. This guide will help you do just that, so you can tell if you're dealing with a simple lubrication issue or a part that's seen better days.
Common Causes of a Squeaky Door
Figuring out where the noise is coming from is half the battle. Each of these parts tends to make a pretty distinct sound when it starts to fail, which makes your job as a detective a lot easier.
- Door Hinges: If you hear a high-pitched squeal or a metallic grinding sound that lasts as the door swings open and closed, your hinges are the prime suspect.
- Door Check: A loud pop, click, or snapping sound that happens at specific points as the door opens is the textbook sign of a bad door check strap.
- Latch and Striker: Hearing a clicking or rattling sound right when the door closes, or maybe while you're driving over bumps? That usually points to a misaligned striker or a worn-out latch mechanism.
Just like with a squeaky door, staying on top of small issues is key for your vehicle's overall health. For instance, knowing how to handle and be aware of preventing various system leaks can save you from much bigger headaches down the road. It’s all about proactive maintenance.
Pro Tip: Don't just blast lubricant everywhere and call it a day. Grab a rag and wipe the hinges down first. Spraying new grease over caked-on dirt and old, hardened gunk just creates a gritty mess that can actually make the squeaking worse. A clean surface lets the new lubricant get right where it needs to be.
To help you diagnose the problem even faster, here's a quick reference table.
Squeaky Door Troubleshooting Quick Guide
Use this table to quickly identify the source of the squeak based on where it's coming from and determine the most likely fix.
| Noise Location | Common Cause | Recommended Fix | Difficulty |
|---|---|---|---|
| Upper/Lower Hinge Area | Dry, dirty, or rusted hinge pins and bushings | Clean and lubricate with white lithium grease | Easy |
| Inside the Door Panel | Worn or broken door check strap mechanism | Replace the door check strap | Moderate |
| Latch Area (Door Edge) | Misaligned striker or worn latch | Adjust the striker or replace the latch assembly | Moderate |
| Entire Door Swing | Severely worn or damaged hinge pins/bushings | Replace hinge pins and bushings, or the entire hinge | Advanced |
By matching the sound you hear to the common causes in this table, you can confidently move on to the right repair without wasting time on the wrong one.
Finding the Source of the Squeak
Before you reach for a can of lubricant, you need to play detective for a minute. A high-pitched squeak from a top hinge, a loud pop from the door check, and a scraping sound from the latch all point to completely different problems. Nailing the diagnosis is the single most important step to fixing that annoying squeak for good.
Start simple. Stand outside the car and slowly open and close the door. Just listen. Is the noise constant through the whole arc of the door's swing, or does it only happen at one specific spot? This one little test will give you your first big clue.
Deciphering the Noises
Think of it like your car is trying to tell you what's wrong—you just need to learn the language of squeaks and groans. Once you can distinguish between them, you'll know exactly where to look.
Here are the most common sounds and what they're telling you:
- A Metallic Grinding or Squeal: This is the classic sound of a thirsty hinge. It’s a high-pitched, metal-on-metal noise that usually persists as long as the door is in motion.
- A Loud Pop or Click: Hear a sharp, single pop as the door passes a certain point? That’s the signature of a worn-out door check strap. This little arm is meant to hold the door open in stages, and when its internal parts fail, it makes that unmistakable sound.
- A Scraping or Rattling Noise: If the noise happens right as the door is about to close and latch, your problem is almost certainly a misaligned striker plate on the door jamb.
Getting this right from the start keeps you from spraying lubricant on a part that isn't even the problem. A misdiagnosis is the number one reason a squeak comes right back after you thought you fixed it.
The Visual and Physical Inspection
Once your ears have pointed you in the right direction, it's time to confirm it with your eyes and hands.
Take a close look at both the upper and lower door hinges. Do you see any obvious rust? How about old, hardened grease caked with dirt and grime? Any visible buildup is a dead giveaway that the hinges need a deep clean before you even think about lubricating them.
Next, with the door open just a foot or so, grab the bottom corner and try to lift it straight up and down. If you feel any noticeable wiggle or vertical play, the hinge pins and bushings are probably shot. This "slop" lets the door sag, causing that metal-on-metal grind that no amount of grease will ever fix.
This flowchart can help you visualize the process, walking you through the steps from listening to the noise to pinpointing the cause.
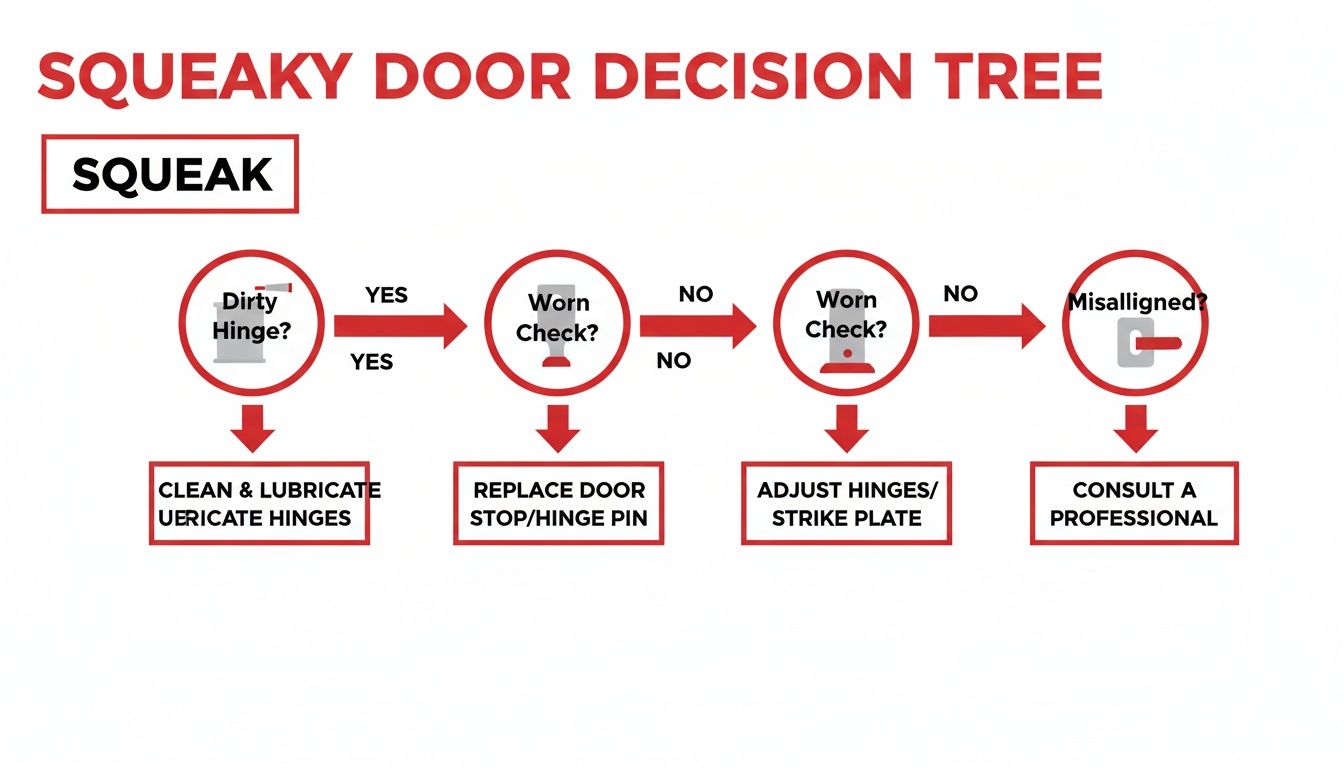
As you can see, a dirty hinge is the most common starting point. If a good cleaning and lubrication doesn't solve it, you move on to checking for worn-out components.
Sometimes, the culprit is hiding inside the door. To properly inspect a door check or latch mechanism, you'll need to get behind the interior panel. It's not as intimidating as it sounds, but you'll want to know how to remove your car door panel without breaking any of the delicate plastic clips or wiring harnesses. By taking this methodical approach, you’ll find the exact source of the noise and make the actual repair a whole lot easier.
The Right Way to Clean and Lubricate Door Hinges
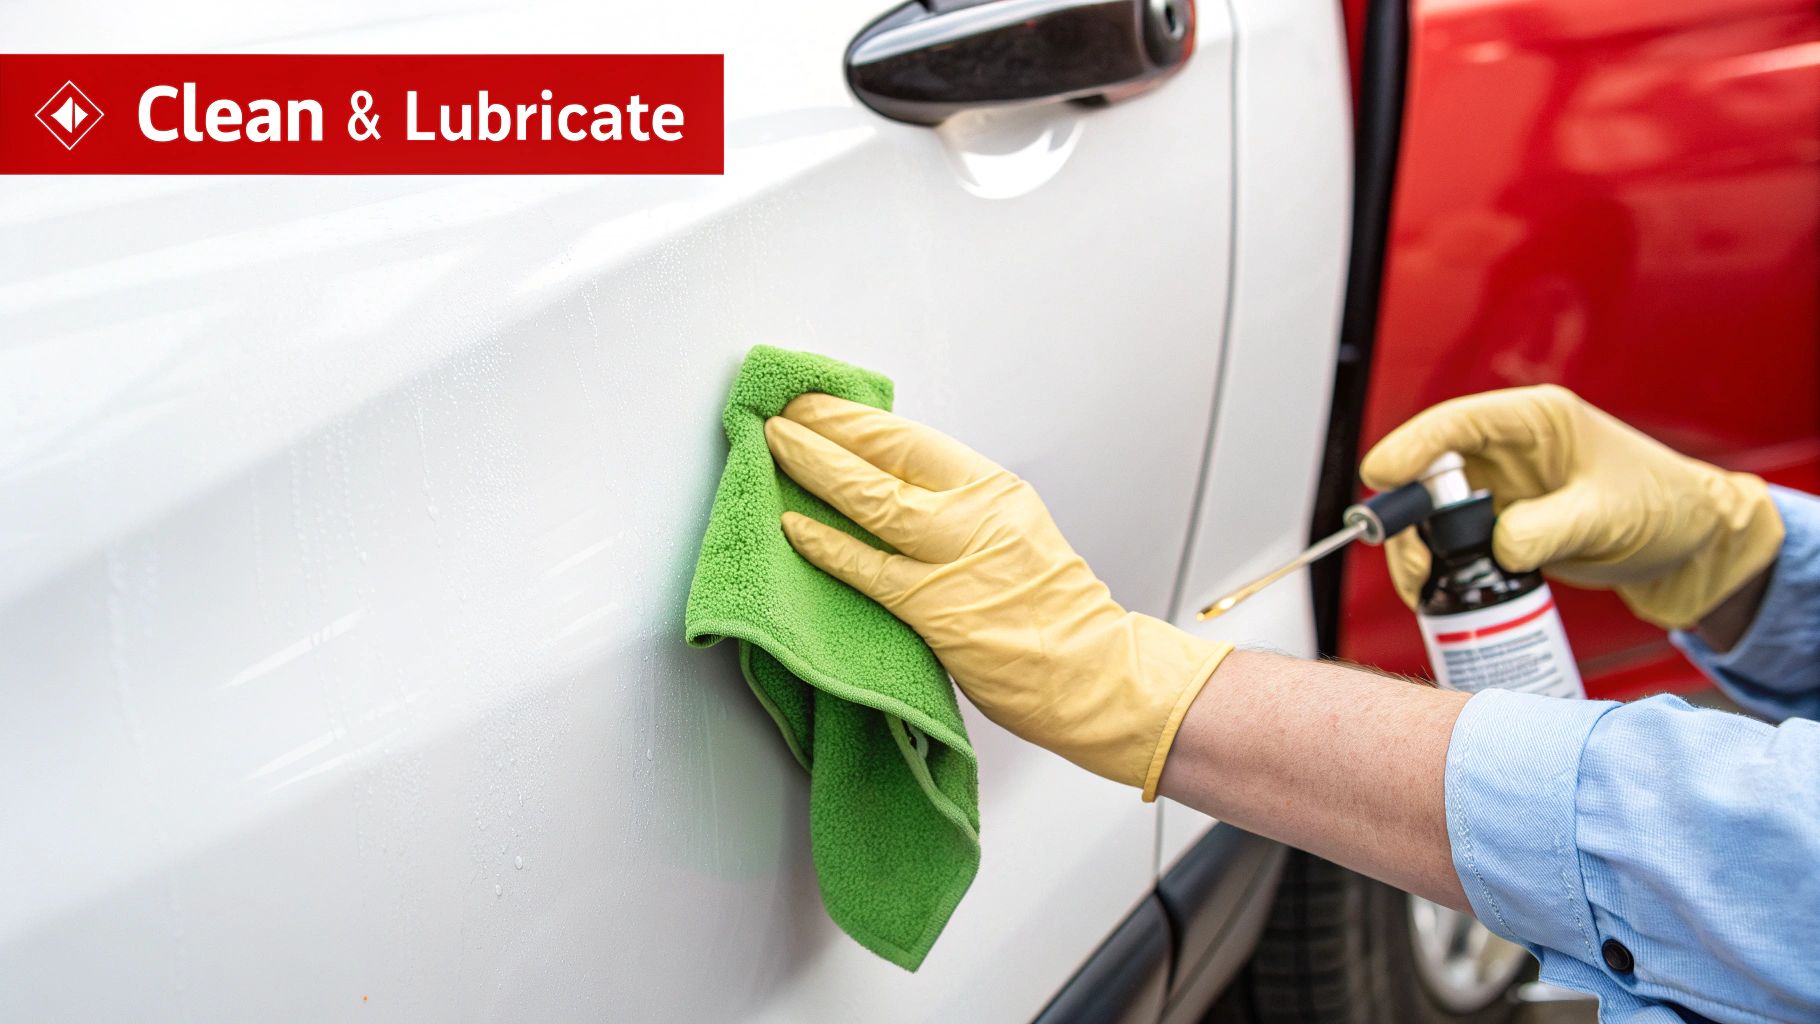
If your inspection points to the door hinges, good news. This is by far the most common cause of a squeaky car door, and it’s a fix you can easily handle right in your driveway. The problem almost always comes down to a buildup of dirt, road grime, and old, crusty grease that’s long past its prime.
The first instinct for many is to grab a can of WD-40 and douse the hinges. Sure, that might stop the noise for a day or two, but it’s a temporary fix at best. WD-40 is a fantastic solvent for cleaning things out, not a true long-term lubricant. It’ll dissolve some of the gunk but then evaporates, leaving the bare metal unprotected and ready to start squeaking all over again.
Prepping the Hinge for Lubrication
The secret to a fix that actually lasts is starting with a squeaky-clean surface. You can't just spray new lubricant over old grime and expect it to work. Think of it like trying to paint over rust—you're just hiding the problem, not solving it.
First, you need to break down and clear out all that old, hardened gunk. A quality penetrating oil is your best friend here. Spray it generously onto the hinge pins, rollers, and any other moving parts. Give it a few minutes to soak in and start dissolving the caked-on mess.
Next, grab some old rags and a stiff-bristled brush—an old toothbrush works perfectly—and get to scrubbing. As you clean, work the door back and forth a few times. This helps dislodge any stubborn grit hiding deep inside the hinge. Keep wiping until your rag comes away clean.
Pro Tip: Before you start spraying anything, stuff a rag behind the hinge to shield your car’s paint from overspray. These products can be messy, and this simple step saves you a much bigger cleanup job later on.
Applying the Right Lubricant Correctly
Now that the hinge is clean and dry, it's time to apply a lubricant that will stick around and do its job. Step away from the WD-40. You need a product designed specifically to provide durable protection against friction.
Here are your best bets for the job:
- White Lithium Grease: This is the go-to for a reason. It usually comes in an aerosol can with a handy straw for precise application. It sprays on thin to creep into the hinge's tight spaces, then thickens into a tough grease that won’t run or drip off.
- Silicone Spray: This is another excellent choice, especially for hinges near rubber or plastic trim, as it’s safe for those materials. It lubricates well and provides great moisture resistance.
Apply your lubricant of choice directly onto the hinge pins and rollers. While you spray, slowly swing the door open and closed several times. This is a crucial step—it works the lubricant deep into all the moving parts, ensuring you get coverage right where metal meets metal.
Finally, take a clean rag and wipe off any excess. A big glob of grease sitting on the outside of the hinge does nothing but attract more dirt, starting the cycle all over again.
When Lubricant Fails: Replacing Worn-Out Hinges
So, you’ve cleaned and greased everything, but that awful grinding noise just won't quit. I’ve been there. This usually means the problem is beyond simple friction—it’s a mechanical failure. On trucks that see a lot of use, like an F-150 or Silverado, the sheer weight of the door swinging open and shut thousands of times takes its toll on the hinge components.
At this point, you're dealing with metal fatigue. The hinge pins and their bushings have simply worn down, creating slop in the mechanism. That little bit of play is enough to make the door sag, and even a slight sag will cause metal to grind on metal. No amount of lubricant is going to fix that.
Gearing Up for the Hinge Swap
Replacing a door hinge is definitely a step up from spraying some lube, but it's a job you can absolutely do yourself. Before you even think about touching a wrench, though, you need to get that door supported. They are much heavier and more awkward than they look, and the last thing you want is a door dropping onto your foot or crunching your fender.
Your best bet is a floor jack. Just put a small block of wood or a thick rag on the jack saddle to protect the paint, slide it under the bottom edge of the door, and gently raise it until it's just taking the weight. The goal isn't to lift the truck, just to hold the door steady once the hinge is unbolted.
You’ll want to have these tools ready to go:
- A good socket set and some wrenches for the hinge bolts.
- An impact driver can be a lifesaver for breaking loose stubborn factory bolts.
- An alignment tool or a simple punch will help you line things up later.
Out With the Old, In With the New
With the door safely supported, it's time for surgery. I find it’s best to work on one hinge at a time, usually starting with the top one, to keep the door from shifting around too much. Go ahead and loosen the bolts holding the hinge to the body (the A-pillar) and to the door itself.
Once the bolts are out, the old hinge should pop right off. Before you rush to install the new one, take a minute to clean up the mounting surfaces on the door and the frame. Getting rid of any gunk or surface rust ensures the new hinge will sit perfectly flat.
Worn hinges are a massive source of persistent door noise. It's a big enough issue that the global market for automotive door hinges is projected to reach US$10.41 billion by 2032, especially with vehicle production topping 93.5 million units in 2023. In my experience with high-mileage trucks, misaligned or worn hinges cause up to 70% of those recurring door groans. You can read more about these automotive hinge market trends.
Pro Tip: When you put the new hinge on, start all the bolts by hand first. This little step prevents cross-threading and gives you the wiggle room you need to line everything up perfectly before you tighten them down.
The Final Alignment: Getting That Perfect "Thunk"
Bolting on the new hinge is only half the battle. The real magic is in the alignment—that’s what gives you a quiet, solid-feeling door. With the new hinge loosely in place, carefully lower the jack just a fraction of an inch so the door’s weight settles onto the new hardware.
Now, check your work. Gently swing the door almost shut and see how it lines up with the striker on the door jamb. Look at the body lines and the gaps all the way around the door. Are they even? If not, you’ll need to adjust. Just loosen the hinge bolts slightly and nudge the door up, down, forward, or back until it looks right. For a much more detailed breakdown of this crucial process, take a look at our guide on how to adjust car door alignment.
Once you're happy with the fit, tighten all the bolts to the manufacturer's torque specs. Open and close the door a few times to make sure it moves smoothly and latches without a fuss. This isn't just a temporary fix for a squeak; you’ve restored the solid, satisfying feel your door had when it rolled off the assembly line.
Tackling Noisy Door Latches and Strikers
Sometimes the noise isn’t a groan from the hinges but a sharp click or a rattle that you only hear as the door is closing. If that’s what you’re hearing, you’ve likely found the source: the door latch mechanism or the striker plate on the door jamb.
These two parts have a critical job—holding your door shut tight. When they get caked with gunk or knocked out of alignment, they’ll complain with all sorts of annoying sounds. Unlike a squeaky hinge, a simple shot of lubricant often won't be enough to silence them.
Checking and Cleaning the Latch Mechanism
The latch is a surprisingly complex little part, with lots of small moving pieces tucked away inside the door. There’s a quick trick to see if it’s working right. Grab a screwdriver and, with the door wide open, gently push the shaft into the U-shaped jaw of the latch. You're basically mimicking what the striker does when you shut the door.
A healthy latch will click smoothly into its closed position. If you feel any grittiness, stiffness, or it seems sluggish, it’s a good bet the mechanism is clogged with a nasty mix of old grease and road grime.
- Flush it out: Grab a can of brake cleaner or a good penetrating solvent and spray it generously right into the latch.
- Work the gunk loose: Use your screwdriver to cycle the latch open and closed a bunch of times. This helps the cleaner get in there and break everything down.
- Re-lube it: Once it's clean and has had a moment to dry, apply a quality lubricant. White lithium grease is perfect for this, ensuring it operates quietly for a long time.
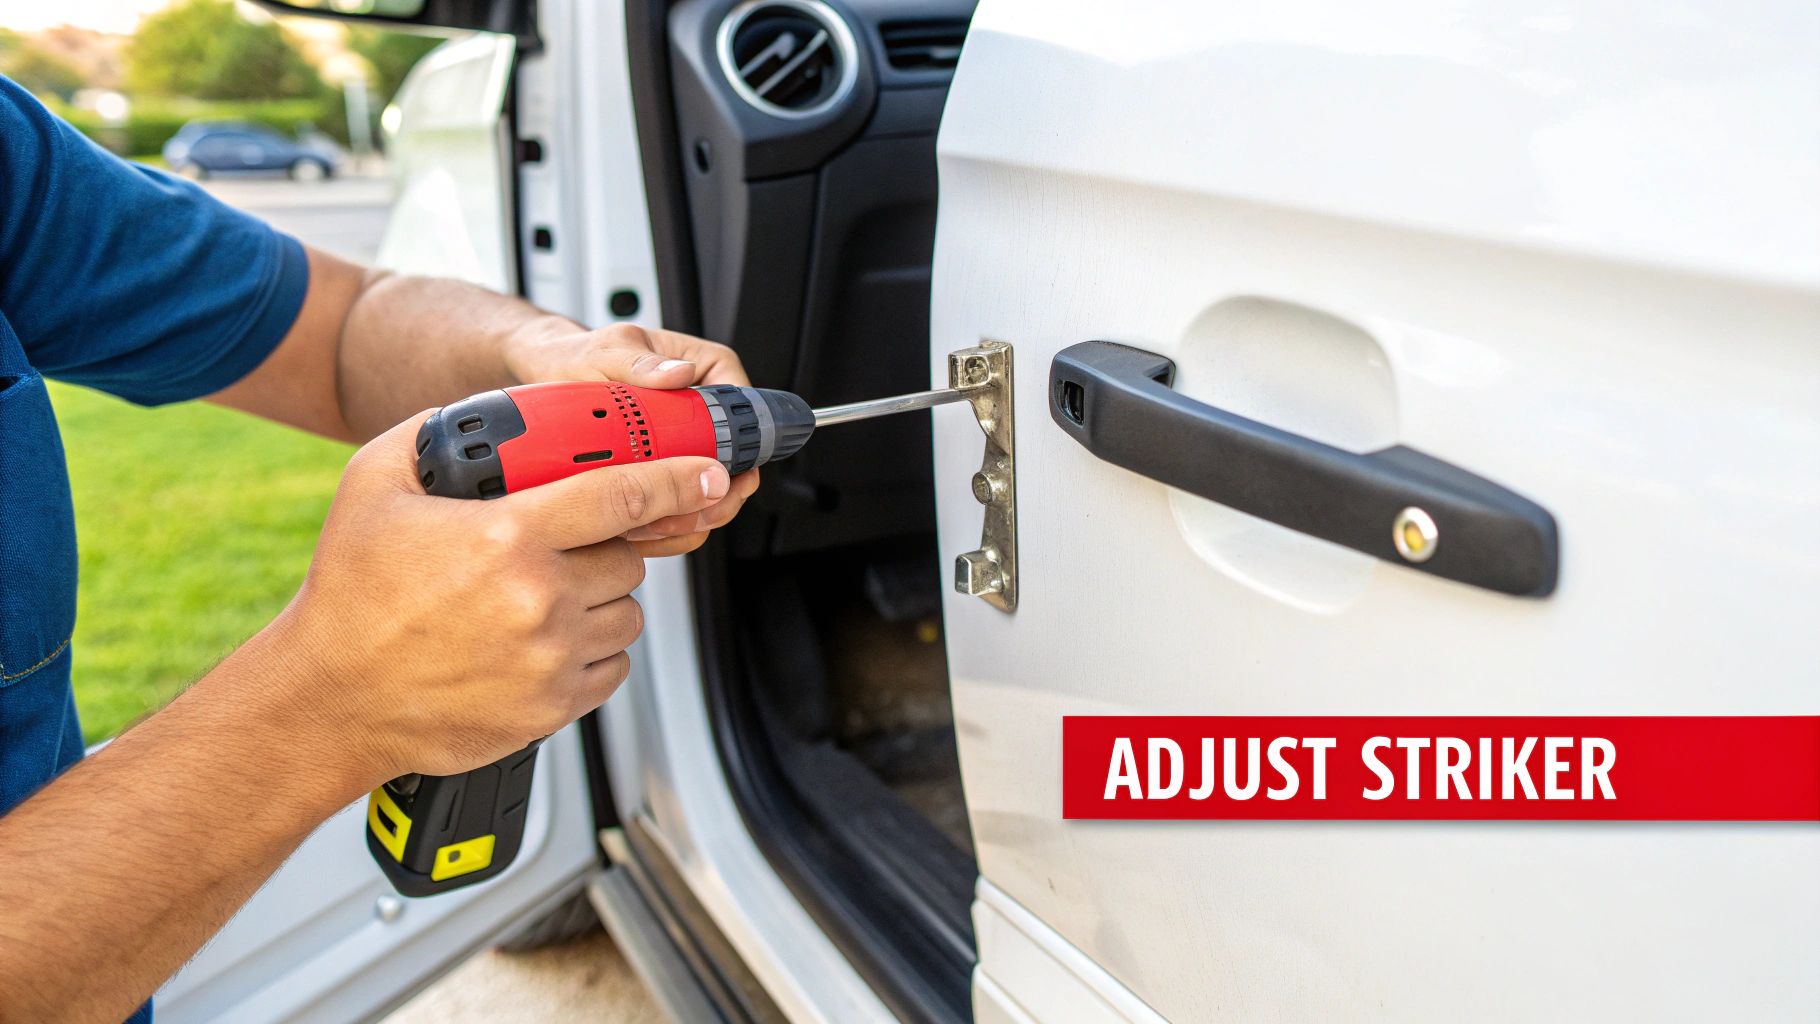
Fine-Tuning the Striker Plate for the Perfect Fit
More often than you'd think, the latch itself is fine, but its partner—the striker plate—is the real problem. This is that beefy metal loop on your car's body that the latch grabs. If it’s even a millimeter off, the door can rattle when you drive or refuse to close with that satisfying thunk.
Adjusting it is one of the easiest and most rewarding fixes you can do. Most strikers are held on with one or two big Torx or Phillips head bolts. All you have to do is loosen them just enough so that you can move the striker, but with a bit of effort.
Now, gently nudge the striker up, down, in, or out. We’re talking tiny movements here. Tighten the bolts down and give the door a test close. You may have to repeat this a few times, but you’ll eventually find that sweet spot where the door shuts perfectly flush.
Key Takeaway: Patience is your best tool for striker adjustment. Tiny movements make a huge difference. You're looking for that perfect alignment where the door closes with a solid, satisfying sound and lines up perfectly with the body panels.
A faulty latch is a common reason for a squeaky car door. It’s a bigger deal than you might think; the global car door latch market was valued at USD 5.07 billion in 2023 and is only expected to grow. In fact, latch failures contribute to 15-20% of all door issues in vehicles that have crossed the 100,000-mile mark, a problem especially common on trucks like the F-Series where heavy doors put more strain on the components. For more on this, you can check out the latest car door latch market research.
When It's Time for a Replacement
If you've cleaned the latch and dialed in the striker but the noise persists, the latch mechanism itself is probably worn out. When that happens, replacement is your only real option.
This job is a bit more involved, as it means taking off the interior door panel to get to the latch assembly. Once you're inside, you’ll need to disconnect the lock rods and any electrical wiring before unbolting the old latch. Installing the new one is just a matter of doing those steps in reverse.
For a detailed walkthrough, take a look at our complete guide on how to fix a car door latch. A brand-new latch not only quiets things down but also restores that secure, factory-fresh feeling every time you close the door.
Got Questions About Fixing That Squeaky Car Door?
You've done the work, but maybe you still have a few nagging questions. It happens. Fixing a squeaky car door seems simple on the surface, but a couple of common issues can leave even seasoned DIYers scratching their heads. Let's clear up some of the most common questions we get.
Can I Just Douse It in WD-40 and Call It a Day?
This is easily the most popular question, and I get why. But the answer is a hard no. Think of WD-40 as a cleaner, not a lubricant. It’s brilliant for breaking up rust and grime, but it’s a solvent at heart.
It’ll stop the squeak for a little while, sure. But once it evaporates (and it will, quickly), you're left with bare metal-on-metal. The squeak will come back, and often, it's even angrier than before. For a lasting fix, you need something that sticks around, like a white lithium grease or a good silicone spray.
My Door Sags a Bit. Is That Connected to the Squeak?
You bet it is. A sagging door is the textbook sign of worn-out hinge pins and bushings. After thousands and thousands of swings, these little parts wear down, and the door droops out of alignment.
That misalignment forces the hinge components to grind together in ways they were never meant to, creating that horrible groan. Spraying lubricant on a sagging hinge is just a temporary patch. To truly fix it, you have to replace the worn-out hinge pins and bushings to get the door hanging straight again.
A Quick Tip from the Garage: Even a tiny bit of sag puts a ton of stress on your hinges, latch, and striker. If you let it go, you'll eventually have trouble closing the door, and you risk wearing out those other parts much faster.
What's That Awful Popping Noise When I Open the Door?
If you're hearing a loud 'pop' or 'click' as the door moves, the culprit is almost always the door check (sometimes called a door stop). That’s the little arm that connects the door to the car's frame, holding it open at different points.
Inside that mechanism, there are rollers and pins that wear out over time. The popping sound is the arm struggling to get past the worn-down stops. A shot of grease might quiet it down for a week or two, but a new door check is the only permanent solution.
Having the right tools ready makes any job easier. For tips on keeping your workspace in top shape for the next project, check out this guide on how to organize your garage tools.
At T1A Auto, we focus on top-tier, direct-fit replacement parts—from door hinges and latches to door checks that are engineered to last. Our parts meet or beat the quality of the original factory components, so you can do the job once and do it right. Find the exact part you need at https://t1aauto.com and get back to enjoying a quiet ride.