

Before you can figure out how to test your parking sensors, you first need to be sure they’re actually the problem. Pinpointing the exact symptoms saves you a ton of time and makes sure you’re not chasing a ghost. It’s not always about that one loud, annoying beep—sometimes, the signs are a lot more subtle.
Spotting the Signs of Failing Parking Sensors

A perfectly working parking assist system is something you can count on. You pop the car into reverse, and it comes to life. As you get closer to your garage wall or another car, the beeps get faster. When things go wrong, that reliability disappears, and you're left with a system you just can't trust.
Learning to read the signs is the first step in any good diagnosis. Your car might be giving you very specific clues that point to a bad sensor, not a deeper electrical headache.
Common Fault Symptoms
So, what should you be looking for? Here are the most common red flags I see that tell me a parking sensor system is on the fritz:
- The Constant Beep: If you get a solid, non-stop tone the second you shift into reverse, it's a classic sign of a system fault. The onboard computer knows something is wrong and is essentially shouting a warning because it can’t get a reliable reading.
- Intermittent Alerts: Do your sensors work on Monday but not on Tuesday? This kind of on-again, off-again behavior often points to a loose wire, moisture inside a sensor, or a sensor that's about to fail completely.
- False Alarms: This is when the system beeps frantically even though there's nothing behind you. Before you panic, check the bumper. Heavy rain, a buildup of ice, or even a thick layer of mud can fool the sensors into "seeing" an obstacle that isn't there.
- Dashboard Error Messages: Most newer cars will spell it out for you with a message like "Park Assist Off" or "Check Parking Sensor System." That’s the car's computer telling you it's found a problem and has shut the system down to be safe.
Normal vs Faulty Parking Sensor Behavior
To help you quickly tell the difference between a minor quirk and a genuine problem, here’s a quick reference table. It breaks down what you should expect from a healthy system versus the signs of a faulty one.
| Symptom | Normal Operation | Potential Fault |
|---|---|---|
| Alert Tone | Beeps get faster as you approach an object. | A solid, continuous beep immediately in reverse. |
| Consistency | Works reliably every time you park. | Works sometimes but fails at other times. |
| False Alerts | Only alerts when obstacles are present. | Beeps randomly with nothing behind the car. |
| System Status | No error messages on the dashboard. | "Park Assist Disabled" or similar warning light. |
Recognizing these patterns is your first major step toward a successful diagnosis. It helps you zero in on the issue before you even pick up a tool.
The biggest tell-tale sign of a problem is inconsistency. A system that works perfectly 99% of the time but fails randomly is just as unreliable as one that’s completely dead.
So, you've noticed the signs of a faulty parking sensor system. The next move is to figure out which specific sensor is on the fritz. Believe it or not, you don't need fancy diagnostic tools for this first step—your ears are often the best tool for the job.
Healthy ultrasonic parking sensors actually make a very faint, high-frequency clicking or buzzing noise as they send out sound waves. A sensor that has gone bad will be dead silent. I've used this simple audio check countless times to get a quick diagnosis right in a customer's driveway.
The Listening Test: Your First Diagnostic Step
To pull this test off, you need to get the sensors to turn on in an environment where you can actually hear them. A quiet garage is perfect for this.
Once you've cleared the area around your bumpers, here’s how to do it:
- Turn the ignition on, but don't start the engine. You just need the car's electronics powered up. The engine noise will completely drown out the sound you're listening for.
- Set the parking brake so the vehicle is secure.
- Shift the transmission into reverse. This is what tells the parking sensor system to wake up.
Now, walk to the bumper and get your ear as close as you can to each sensor, one by one. You're listening for a soft, rhythmic buzzing sound. When you find one that's completely quiet while the others are humming along, you've found your problem.
Pro Tip: A working sensor makes a quiet, pulsing tick or buzz. If you listen to three sensors and they're all buzzing, but the fourth is silent, that's your dead giveaway.
This no-tools trick can save you a ton of diagnostic time right from the start. For more in-depth advice on what comes next when your parking sensor is not working, our full guide covers more advanced troubleshooting.
When the simple listen-and-feel test doesn't give you a clear answer, or if more than one sensor seems to be on the fritz, it's time to break out a more scientific tool. A digital multimeter takes the guesswork out of the equation, letting you know for sure if a sensor has failed or if the problem is somewhere in the wiring.
First things first, you need to get to the sensor's wiring connector. This can be the trickiest part of the job. You might need to gently pry off a piece of the bumper trim or, more likely, get on your back and reach up behind the bumper. Once you locate the connector, unplug it to expose the pins. This is where the real diagnosis begins.
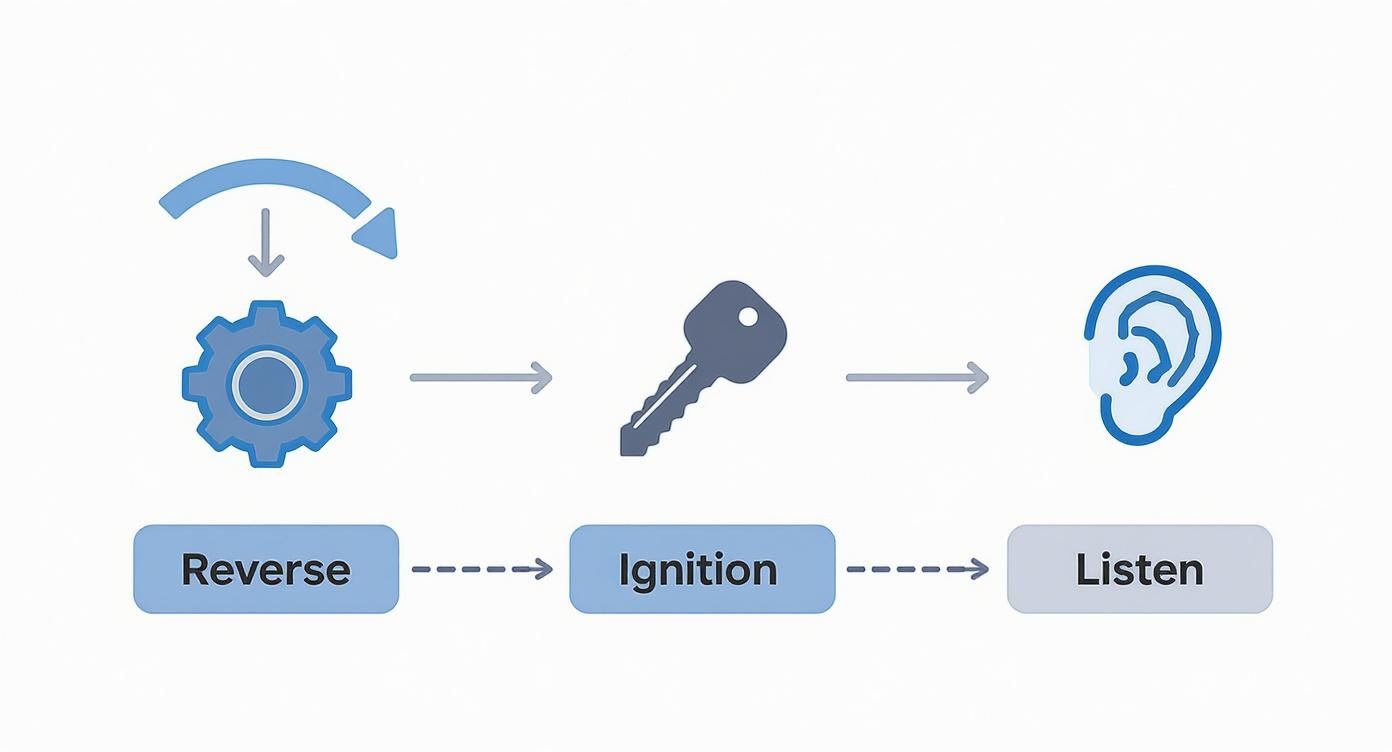
As this graphic shows, activating the system is the essential first step for any test. With power flowing, your multimeter can give you an accurate picture of what's happening electrically.
Getting Your Multimeter Ready
Your first check is for power. Set your multimeter to the 20V DC scale. Now, turn the car's ignition on—but don't start the engine—and put it in reverse to power up the parking sensor system. Take the multimeter's red probe and touch it to the power pin on the wiring connector (the part that comes from the car, not the sensor). Touch the black probe to a solid ground point, like a bare metal bolt on the car's chassis.
You’re looking for a reading that’s close to your car battery's voltage, usually right around 12 volts. If you see that, fantastic! It means the sensor is getting the power it needs. If you get a zero reading, the sensor itself is probably fine; the culprit is likely a broken wire or a bad connection further up the line.
Checking the Ground and Signal Wires
Next, you'll verify the ground connection is solid. Keep the red probe on the power pin, but this time, touch the black probe to the ground pin inside the same connector. The reading should again be about 12 volts, which confirms the ground circuit is intact. If you get a zero reading here, you’ve got a bad ground wire.
The final piece is the signal wire. How this behaves can vary between car models, but generally, a healthy sensor will output a voltage that changes as it detects something. With everything connected and the system on, you might see a specific voltage that fluctuates when you wave your hand in front of the sensor. If the voltage stays at zero or doesn't change at all, it's a strong sign the sensor has failed internally.
Remember, with over 60% of new mid-range cars rolling out with ultrasonic sensors, this is a skill worth having. They're generally reliable, but my experience shows that roughly 5% of them need attention—be it replacement or just recalibration—within the first six months. This makes a simple multimeter one of the most valuable tools in your diagnostic kit. If you're curious, you can explore more about the rise of parking sensor technology and see why these skills are becoming so essential for DIYers and pros alike.
Performing a Thorough Visual Inspection

Before you start pulling out multimeters and scan tools, let’s cover the basics. It’s easy to jump to conclusions and assume you’ve got a complex electrical problem, but more often than not, the issue is staring you right in the face. A good old-fashioned visual check should always be your first step.
Get down on your hands and knees and get a good, close look at each sensor on your bumper. You're hunting for anything that seems off—even a tiny parking lot tap can cause problems you can't see from a distance.
What to Look For
So, what are we actually looking for? Mostly, signs of damage or anything that could be blocking the sensor. A sensor that's been knocked back into the bumper or has a big scuff mark is an obvious red flag.
Pay close attention to these specific areas:
- Physical Damage: Are there any cracks, deep gouges, or signs that something hit the sensor? The plastic casing is all that protects the delicate electronics inside, so any breach is bad news.
- Paint and Finish: Look for paint that's bubbling or peeling off the sensor face. A bad repaint job with thick, heavy paint can easily muffle the ultrasonic waves the sensor uses to see.
- Contamination: This is the most common culprit. A thick cake of mud, road salt, or ice can completely blind a sensor, causing it to either not work or give constant false alerts.
You might be surprised to learn that in lab durability tests, over 60% of early sensor failures are linked directly to physical damage or casing issues that let moisture seep in. You can read more about these sensor durability insights and tests if you're curious.
Sometimes, all you need is a soft cloth and a bit of car-safe cleaner to solve the problem. Wipe each sensor down and see if that clears the fault.
If you find a sensor with a cracked housing or other obvious damage, it's time for a replacement. We've got a great guide on how to install parking sensors that will walk you through the entire process.
Knowing When to Call a Professional Mechanic
https://www.youtube.com/embed/I44yLmz4vYM
While the audio check and a quick multimeter test can get you to the bottom of many sensor issues, some problems just aren't cut out for a driveway repair. Knowing when to put the tools down is just as crucial as knowing how to test the sensors in the first place. You definitely don’t want to turn a straightforward fix into a costly, complex mess.
A big red flag is when you test a sensor and find it has no power at all. This usually means the problem isn't the sensor itself but something deeper in the car's wiring harness. Hunting down a broken wire or diagnosing a bad control module is a tough job that demands specialized tools and vehicle-specific wiring diagrams. At that point, it’s wise to step back.
When Professional Tools Make the Difference
What if multiple sensors stop working at the same time, or the whole system starts acting erratically? This is another classic sign of a bigger issue. It's rarely a coincidence of several sensors failing at once; instead, it often points to a problem with the Parking Aid Module (PAM). This is where a professional mechanic has a huge advantage, thanks to their advanced diagnostic equipment.
A professional OBD2 scan tool can communicate directly with the PAM and pull manufacturer-specific fault codes that your basic consumer-grade scanner won't ever see. This can instantly tell you if the problem is the module, a wiring short, or a communication error, saving you from hours of frustrating guesswork.
If you find yourself stuck, calling in a pro is your best bet. You can learn more about general motor vehicle repair practices to understand what's involved. A good technician can diagnose the root cause efficiently, get the right parts, and handle any programming or calibration that a new module might need.
However, if your own testing has confirmed it's just a bad sensor, you can confidently find high-quality, guaranteed-fitment bumper sensors to finish the job yourself.
Got Questions About Parking Sensors? We've Got Answers
When you’re trying to diagnose a parking sensor problem, a few questions always seem to come up. These are the practical, real-world issues that can trip you up. Let’s tackle some of the most common ones I hear from people working on their own cars.
Do I Need a Special Scan Tool?
This is probably the number one question. People want to know if their trusty, inexpensive OBD2 scanner will do the job. The honest answer? Probably not.
Your basic code reader is designed to talk to the engine control unit (ECU), but it rarely has the software to communicate with more specialized systems like the Parking Aid Module (PAM). To pull the specific trouble codes that will tell you which sensor is acting up, you really need a professional-grade scan tool. Without it, you're just guessing.
Can I Just Replace the One Broken Sensor?
Yes, absolutely! In fact, that's exactly what you should do. The sensors are individual units, so there’s no reason to replace the whole set if only one has gone bad.
The trick is making sure the new sensor is a perfect match for your vehicle. Using the wrong part can throw the entire system out of whack, sometimes causing it to shut down completely.
I’ve seen it happen time and again: someone buys a cheap "universal" sensor online, only to find it doesn't fit the bumper clip or, worse, won't communicate with the control module. Save yourself the headache and double-check the part number.
Why Do My Sensors Go Crazy in the Rain?
This is a classic quirk of ultrasonic sensors. Heavy rain, snow, or even a thick layer of morning frost can coat the sensor's face, creating a surface that the ultrasonic waves bounce right off of.
The system sees this immediate reflection and thinks you're about to hit something. It's almost always a temporary glitch that goes away once the weather clears up and the sensors are clean and dry.
For reliable, OEM-quality replacements that guarantee a perfect fit, explore the wide selection of T1A Auto bumper sensors.
