


Every replacement parking sensor needs an expensive ADAS calibration. That's the advice you'll hear most often, and it's wrong for most ordinary bumper pucks. A conventional ultrasonic sensor usually fails after fitting because it's at the wrong height, tipped into the pavement, buried under paint, or pushed in by a bent retainer. Fix the geometry first, then decide whether that specific vehicle asks for more.
That's the split that matters with parking sensors and fitting. A clean scan doesn't prove the cones are aimed, and a warning tone isn't automatic braking. Get the part type, height, and function test right and most jobs stop coming back.
Table of Contents
- Which Parking Sensor Fits the Vehicle
- Bumper Height Spacing and Sensor Angle
- How to Fit Parking Sensors in Order
- Calibration Decisions and False Alerts After Bumper Work
- Integrating Park Sensors With Reverse Cameras and Park Assist
- CAPA and Quality Checks for Collision Buyers
- Shop Habits and Matching the Right Part
Which Parking Sensor Fits the Vehicle
Start with what the bumper already tells you. If it's got round puck holes and the dash beeps faster as you reverse toward a wall, you're looking at an ultrasonic park aid, not a camera problem and not a radar problem. That's the default choice for a like-for-like swap, and it's the dominant technology in this category. Ultrasonic sensors accounted for 70.42% of the automotive parking-sensor market in 2024, according to Mordor Intelligence.
I would count the holes before I opened a catalog. A typical rear system runs four sensors across the bumper with an audible tone and, on many vehicles, a distance display. One sensor in the center can't cover the corners. If your bumper has four factory apertures, order for that layout, that connector, and that front or rear position. Don't drill a universal kit over factory holes because the price looked better.
Four systems that get confused in the same bumper
Electromagnetic strips hide a tape behind the bumper skin, so there's no drilling. They mainly react to metal, which makes them weak on wooden posts, low curbs, and plastic bollards, and they can chatter in slow traffic. A reverse camera alone shows you a picture. It doesn't measure distance or beep unless sensors are paired with it. Radar blind-spot and rear cross-traffic units also live in rear bumpers on trucks and SUVs, but they watch lanes and cross paths, not the last few feet in a parking bay. They aren't interchangeable with a park-aid puck, and they follow a different service procedure.
| Type | How it warns | Bodywork | Fitment note |
|---|---|---|---|
| Ultrasonic park aid | Beep and distance display at low speed | Drilled or factory holes, usually four rear sensors | Match OEM height, angle, and connector |
| Electromagnetic strip | Continuous tone near metal | Strip behind the bumper skin, often no holes | Poor on non-metal posts and curbs |
| Reverse camera alone | Picture only, no distance beep | Lens in tailgate or bumper | Pair with sensors if distance warnings are required |
| Radar blind spot or cross traffic | Side or rear cross-path alert | Bumper-mounted radar, not a park puck | Often needs a vehicle-specific calibration |
Read the warning the driver gets. A beep that speeds up points to ultrasonic. A side alert in the mirror points to radar. A picture with no tone points to a camera. If you're comparing replacement options, the guide to the best aftermarket parking sensors is a useful checkpoint before you commit to a type.
What to confirm before ordering
- Year, make, and bumper position: Front and rear sensors on the same vehicle can differ in connector, height, and part number.
- Existing hardware: A tow hitch in the center cone will shorten warnings or cause a constant tone, so note it before you blame a new part.
- Connector shape: Match the plug and seal to the failed sensor, not just the round face diameter.
If those three don't match, stop. Ordering the nearest-looking puck is how a one-hour swap turns into a drilled bumper and a comeback.
Bumper Height Spacing and Sensor Angle
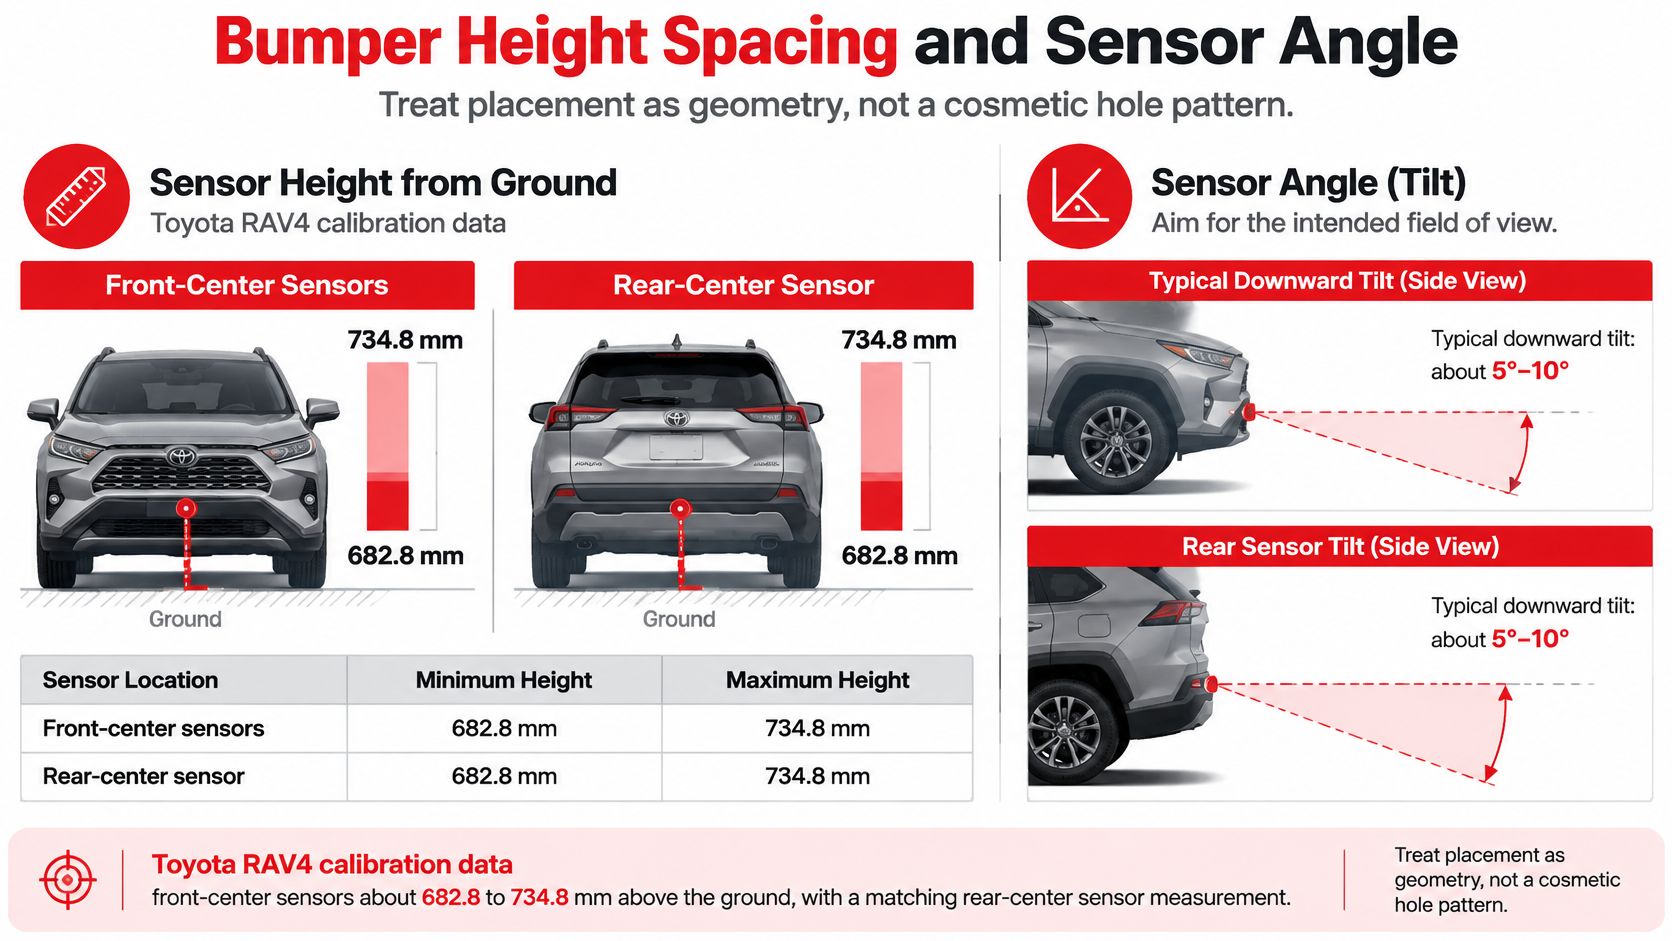
Sensor placement is geometry: height, spacing, and face angle decide what the cone sees before the wiring ever matters. A row of evenly spaced holes can look perfect on a stand and still sense the road once the cover is hung. Front and rear positions on the same vehicle don't share one spec either. On the RAV4 example in the table below, the front-center and rear-center height bands don't even overlap.
The diagram puts those height bands and tilt rules in one view before you pick up a drill or a tape.
Heights that show why looks deceive
Drill a rear bumper to the front-center spec and the sensor lands above the entire rear band on this example. That front-to-rear mix-up is the most common height error on a bumper swap, and it gets built in before wiring starts. Pre-marked holes on a replacement skin can sit outside the band too, especially once the cover is clipped and pulled into its final curve.
Space a four-sensor rear row so the acoustic cones overlap across the bumper. Stack two sensors near the plate and the corners go dead, right where posts and low walls get hit. Push the corner sensors too far out and the bumper edge itself enters the cone. Keep the row clear of hitch receivers, plate brackets, and sharp changes in bumper curvature.
| Location | Benchmark | Orientation | Watch for |
|---|---|---|---|
| Front center | About 682.8–734.8 mm (RAV4 calibration data) | Original angle, face clear of the road | Hole too low after a skin swap |
| Rear center | About 445.4–623.3 mm (RAV4 calibration data) | Lower than front center on this example | Using the front height on the rear bumper |
| Typical rear aid | Four sensors across the bumper | Even spacing, overlapping cones | One center puck leaving corner gaps |
| Fast ultrasonic unit | High enough to clear pavement | About 20–40 degrees from vertical if required | Continuous beep from ground reflection |
| Slower ultrasonic unit | Factory height | Often vertical if response is about 6 ms or longer | Angling it when the manual says flush |
Angle, ground strike, and the constant beep
Keep the sensing face perpendicular to the intended detection zone unless OEM instructions specify otherwise, and mount at factory height and spacing, as set out in Farnell's ultrasonic sensor guidance, which also notes sensors with response times of about 6 ms or longer can generally be mounted vertically while faster sensors may need roughly 20–40 degrees from vertical. That same guidance stresses mounting high enough, or angled slightly upward, so the projection cone never contacts the ground.
Practical rule: If a new sensor beeps in an empty bay, check ground strike and bumper-edge reflection before you condemn the part.
A beep reports distance. It doesn't brake. And when a fresh sensor warns wrong right after a swap, the usual suspects are height, face angle, thick paint, filler skimmed over the aperture, or a bracket clocked a few degrees off. A basic ultrasonic park aid rarely needs calibration equipment to behave. It needs the geometry it was designed around.
Detection also shifts with target shape and surface. A broad, reflective board returns a strong echo. A narrow, angled, or soft target returns a weak one. Water, ice, and dirt on the face change the result again, and a retainer that pushes the puck inward or outward shifts flushness and the echo path even when the hole diameter looks right.
Finish this stage with a tape. Measure height from the ground, lateral spacing, and flushness at each position with the vehicle at normal ride height, and write the numbers down. If a warning is wrong later, those measurements tell you whether you're chasing wiring or geometry.
How to Fit Parking Sensors in Order
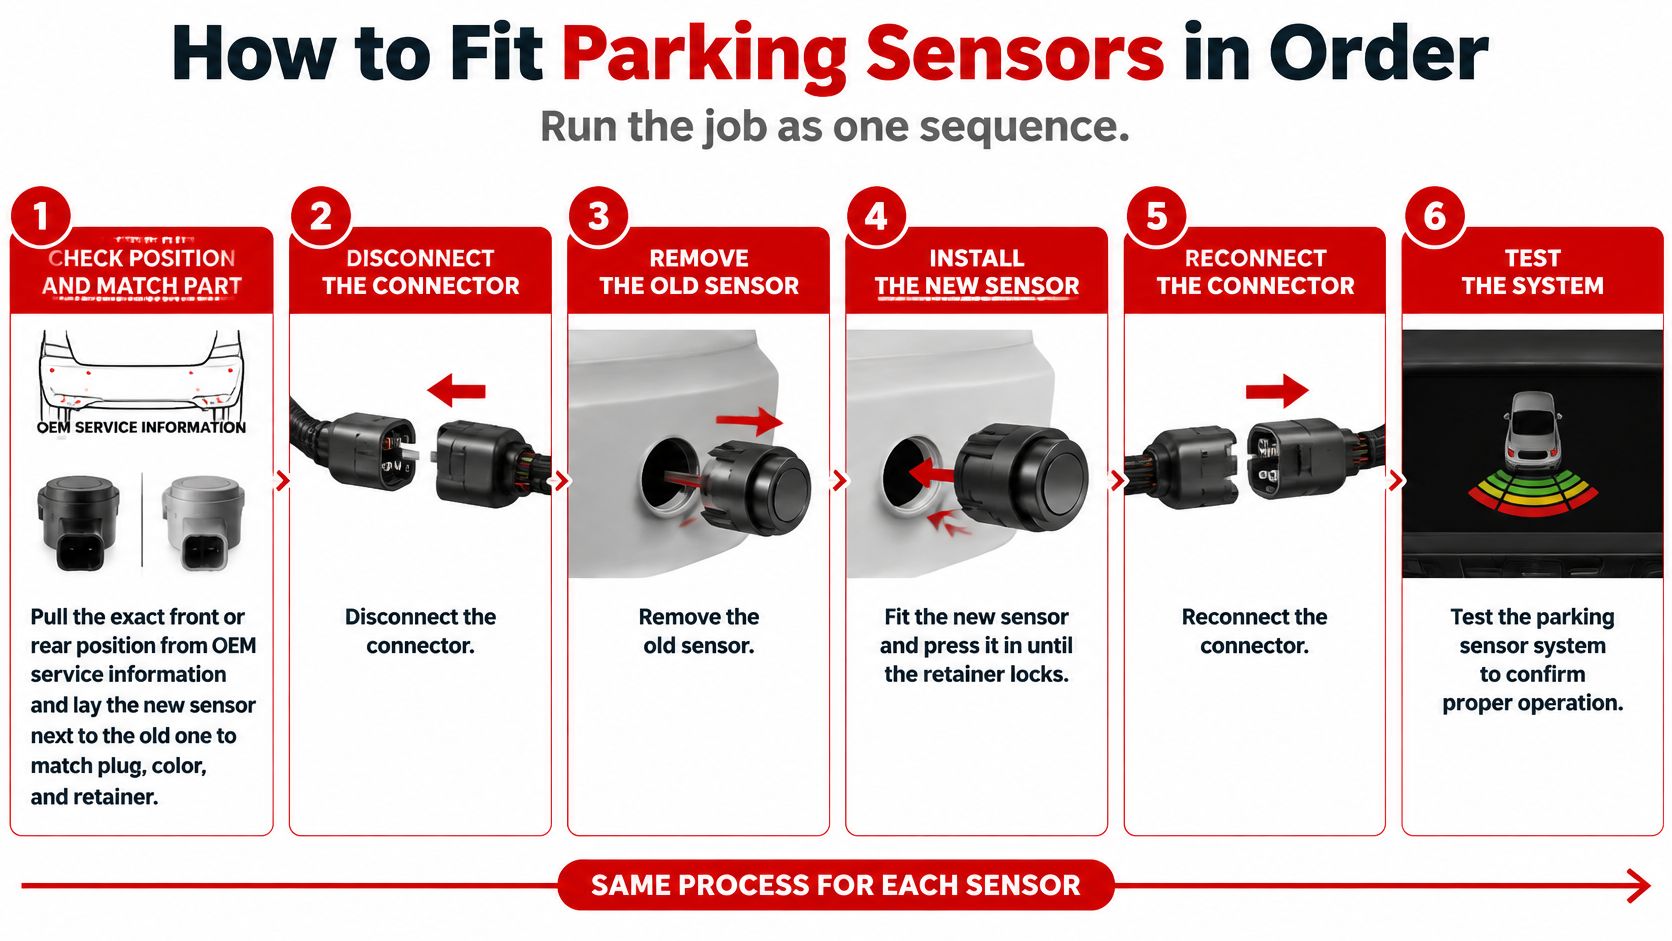
Run the job as one sequence. Skipping ahead to wiring before you've confirmed position is how good parts get blamed for bad holes.
The steps below follow the order shown here, from position check to final walk test.
Steps 1 to 4 Position, inspection, holes, and seating
1. Confirm the exact position. Pull the front or rear location from OEM service information and lay the new sensor next to the old one. Match plug, color, clocking, and retainer style. This prevents the common left and right swap on coded corner sensors.
2. Disconnect the battery and inspect everything the sensor touches. Check the bumper, clips, retainers, wiring, connector seals, and sensor face for cracks, water, contamination, or body filler. A green pin or torn seal will outlast three replacement sensors if you don't fix it now.
3. Reuse factory holes where they exist. On a true retrofit, drill only from the kit template at the heights you've already measured. Don't enlarge a hole to make a wrong retainer fit. Hole diameter controls how the sensor sits, and a loose aperture lets the face tip.
4. Seat each sensor in its original orientation. Confirm height, angle, and flushness, and make sure the bumper skin isn't forcing the sensor inward or outward. The retainer should click fully.
Toyota's RAV4 service data via Mitchell specifies front-center sensors at approximately 682.8–734.8 mm and rear-center sensors at approximately 445.4–623.3 mm, which shows why a visually similar hole isn't necessarily an acceptable fit. That routine also frames the job as geometry plus diagnostics: scan afterward, and initialize or calibrate only when the procedure calls for it.
For a vehicle-specific example, the Car Parking Sensors - Compatible with 2019-2022 Ford Transit - Front or Rear Bumper Parking Aid Sensor, Backup Reverse Parking Assist Kit - OEM JU5Z15K859B is listed as directly compatible with OEM JU5Z15K859B for front or rear bumper use on those Transit years. Check that kind of OEM cross-reference against your failed part before fitting, rather than relying on face diameter alone.
Steps 5 to 8 Wiring, power-up, and the two walk tests
5. Route the harness cleanly. Keep it away from exhaust heat, sharp bracket edges, and moving hitch parts. Push each connector until the seal seats. Don't pierce wires for a power tap, and keep the camera harness separate from park-aid plugs so a lens job doesn't end up feeding the beepers.
6. Reconnect the battery and scan if you have a tool. Clear fitting-related codes, then run initialization only when that vehicle's procedure asks for it. Don't invent a calibration step, and don't skip a listed one.
7. Walk test in the specified operating state. Put the system in the gear or ignition state the manufacturer specifies. Walk a broad board and a narrow post through left, center, and right at several distances. A board alone will flatter a weak corner sensor.
8. Clip the bumper fully and repeat the walk. Curvature changes after the cover is hung, and that change moves sensor angle. This second test is the one that catches a retainer stressed by the skin.
Watch the sequence played out before your first attempt if you've never had a cover off this model.
The RAV4 routine treats the code scan and the detection-area check as two separate inspections. A clean result on the first still leaves the second to run.
If one corner behaves differently after step 8 but passed on the stand, suspect retainer seating or skin pressure first. Pull that corner, reseat it flush, and retest before ordering another sensor.
Calibration Decisions and False Alerts After Bumper Work
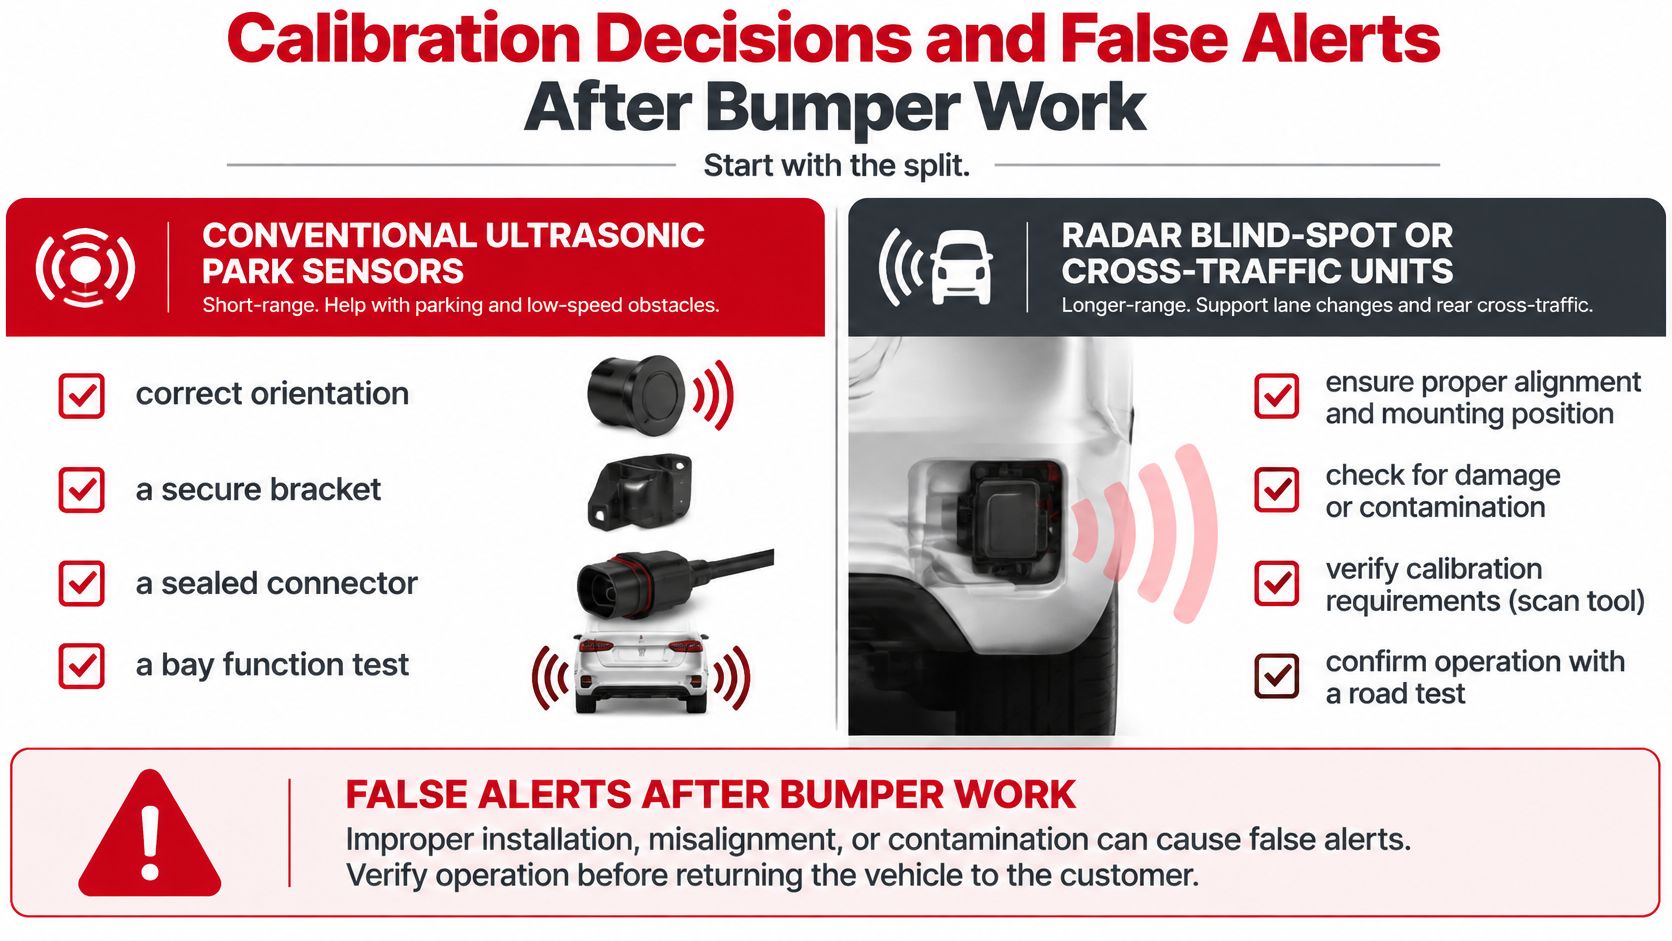
Start with the split, because it saves money in both directions. Conventional ultrasonic park sensors commonly need correct orientation, secure brackets, connector checks, and functional testing. Radar blind-spot or cross-traffic sensors in the same bumper can require vehicle-specific calibration. Mechanic Insights' bumper repair guidance supports that distinction and points to the bracket and bumper aperture as the underlying cause of many recurring false alerts.
Get that split right and a routine puck swap stays out of the calibration bay, while a radar procedure the vehicle requires still gets its bay time.
When a shop visit is justified
Book professional help when the bumper was replaced, a radar module was disturbed, the service information names a calibration or initialization, or warnings stay wrong after you've corrected height, angle, and seating. Also book it when you can't run the manufacturer's specified test state or scan procedure at home. If the module isn't radar and the service info names nothing, the function test is the finish line.
What I wouldn't do is pay for a full ADAS calibration on a routine ultrasonic puck swap where the manual lists no such step and the function test passes at every position. Both extremes cause comebacks. Billing every replacement for expensive calibration wastes the customer's money. Calling every swap plug-and-play leaves inaccurate distance warnings on vehicles that do list a procedure.
What the field tests showed
A sensor's whole job is the warning. Braking stays with the driver. In NHTSA's on-road study of a system pairing rearview video with four ultrasonic rear sensors, the system detected and warned of a rear obstacle in only 5 of 13 staged trials, or about 38%, and only 1 of 13 participants avoided the crash. The same NHTSA report ran a 2009 Ford Flex on its original-equipment ultrasonic rear parking-aid system, where only 1 of 14 drivers avoided the obstacle, about 7%. The report's measurements put rear blind zones between about 100 square feet for small pickups and 1,440 square feet for large SUVs.
Those numbers still leave a tone worth having in ordinary parking. What they show is that detection depends on obstacle characteristics, vehicle position, driver attention, coverage, and installation quality. A driver who treats a tone as a guarantee will still hit things, especially narrow or low objects at the edge of a cone.
After paint or a minor bumper repair
Check the bodywork before you blame the module. Dirt, snow, ice, excess paint, and filler over the face all interfere with ultrasonic performance. A wavy skin tips the sensor. A replacement bracket molded slightly off angle recreates the same false alert on a brand-new part. Photograph bracket clocking before removal so you can prove how it sat.
| Symptom | Likely cause | What to check |
|---|---|---|
| Constant beep in an empty bay | Cone hitting pavement, hitch, or bumper edge | Height and the 20-40 degree rule for fast sensors |
| No warning on a close object | Paint, filler, dirt, ice, or a dead face | Clean and dry the face; compare paint thickness with an untouched sensor |
| Only one corner is silent | Unseated retainer, swapped left/right part, or open seal | Click the connector and match the original position |
| Distance reads wrong, no code stored | Bracket or skin pushed the sensor off angle | Reseat flush and function-test; calibrate only if the manual requires it |
| Works dry, fails in rain or cold | Water, ice, or temperature shift on the face | Retest after drying and after a temperature change |
Pick one likely cause from the table, fix only that, then rerun the board-and-post pass at left, center, and right. Changing three things at once leaves you with no diagnosis if it passes, and no direction if it doesn't. Repeat after rain or a temperature swing if the complaint is intermittent.
Record the outcome on the job card. Note what was inspected, whether calibration was required, and that each sensor passed a function test. That note protects the next tech from repeating your work and protects you when a later bumper tap shifts a bracket.
Integrating Park Sensors With Reverse Cameras and Park Assist
A warning beep and a camera picture are two separate circuits sharing one bumper, and they fail independently of each other. Sort the vehicle into three layers before you buy anything. Park sensors give distance and a tone. The reverse camera gives a picture. Park assist may steer or brake, depending on the vehicle. A camera-only kit gives no distance beep, so confirm which warnings the driver expects when reverse is selected.
Keeping the two harnesses straight
When sensors and a camera share a bumper or tailgate area, keep the camera harness separate from the park-aid plugs. Label each branch before the cover comes off. After reconnecting, confirm the display shows both the sensor distance markers and the camera guideline overlay. If the picture returns but the markers don't, the fault sits in the sensor circuit.
A camera part number confirms the camera only. Match the year and the OEM part number on the product page before ordering, then treat the camera swap and the sensor repair as two jobs with two tests. The steps in this guide on how to install a backup camera cover the camera side of the work. The sensor side still needs its own function test, because a camera that bolts on perfectly says nothing about whether the ultrasonic sensors behind the same cover are seated, aimed, and reporting distance.
Test in reverse with a post at each corner. The tone, the distance markers, and the picture should agree on which side the post is on. If the camera sits crooked after bumper work, the guideline overlay skews even though the image looks sharp, so check that the lens is square in its mount.
When park assist changes the job
If the vehicle steers or brakes during parking, treat a sensor replacement as a system change. Scan for codes, run the manufacturer's initialization or calibration where the procedure lists it, and confirm warning levels match the original behavior. A clean scan still leaves a bad warning if a sensor sits off angle or under heavy paint, so finish with the corner-by-corner post test rather than trusting the code check alone.
On bumpers carrying both park sensors and blind-spot radar, keep plugs matched to their own modules. Swapping connectors to see what happens can set faults that take a scan tool to clear.
CAPA and Quality Checks for Collision Buyers
Collision buyers need paperwork that separates three different parts often lumped together as sensors. CAPA is an independent certification for aftermarket collision parts, and it matters most here when a reverse camera lens is replaced in the same job. We offer CAPA certified rearview cameras, but certification alone doesn't settle whether a park sensor matches a specific vehicle's geometry. The sensor still has to match year, make, bumper position, connector, and OEM part cross-reference.
Ask the estimate to list ultrasonic park sensors, radar units, and the camera as separate lines, with the part type shown for each. If you want background on how those categories are handled in repair estimating, our overview of collision repair parts lays out the distinctions buyers should expect to see.
What a good repair record shows
- Sensor positions noted before removal: Heights and clocking recorded before the old bumper comes off, not guessed afterward.
- Paint thickness on radar bumpers: Recorded before any radar aim, since coating over a radar area isn't the same problem as paint on an ultrasonic face.
- Scan and initialization results: The manufacturer's procedure named, with results recorded rather than summarized as checked.
- Function test per sensor: Left, center, and right results stated individually.
Large vehicles make the same documentation point at a bigger scale. Owners researching how a dedicated Pipe Creek motorhome body shop handles collision work will see the same principle, that the repair plan should name the systems disturbed and how each was verified afterward. If your repairer can't name the procedure source for your car or truck, treat that as a quality gap.
Don't accept a certification claim unless the part paperwork confirms it. A verbal assurance at the counter isn't a certificate, and it won't help you if a warning complaint turns into a dispute later.
Shop Habits and Matching the Right Part
Repeat visits usually trace to small mechanical misses: an unseated retainer, a bracket clocked a few degrees off, paint on the sensing face, filler in the hole, or a center cone aimed at hitch hardware. A clean scan can still leave a short warning, and a warning tone remains a driver aid while obstacle avoidance still sits with the driver.
Habits that protect a correct fit
- Photograph clocking before removal: Shoot each sensor and bracket so a coded left or right puck goes back in its original position.
- Mask the sensing face: Keep overspray off the face and leave filler out of the hole. A painted-over sensor can pass a scan and still read wrong.
- Label harness branches: Tag left, center, and right before the bumper leaves the stand. Write L/C/R on tape because one bumped bumper scrambles recall fast.
- Use dielectric grease only when allowed: Follow the connector maker, because grease packed into the wrong seal can trap water against the pins.
- Account for the hitch: If a towbar or receiver sits in the center cone, tell the owner to expect a shorter warning or occasional tone from that hardware. Plan sensor checks with the hitch in its normal state.
Shop note: Test the vehicle the way the owner drives it, hitch fitted, bumper clipped, ride height normal. The road decides the result.
Matching the part before anyone drills
Search by vehicle year, make, and front or rear position, then compare the connector and part number with the failed sensor and the OEM service information. Our vehicle compatibility checker helps you find the correct part for a make and model, and if the year split or bumper style is ambiguous, you can contact our parts specialists with your vehicle details and the team will help confirm compatibility. That is a better use of ten minutes than drilling on a guess.
Read the instructions packed with the part, since most of our parts come with installation instructions, and install it only on the vehicle it was sold for. If the order qualifies for extended coverage, register it on the T1A Auto website; unregistered orders are not eligible for warranty service. Check a front or rear park-aid kit against your own bumper style rather than the nearest catalog entry, because trim-level bumper changes move holes and retainers.
Use the Step 8 verification from the fitting procedure after reassembly. If one position fails there, use this matching pass to decide whether it needs a different sensor, a clocking correction, or a bracket shim rather than another scan.
Match your vehicle, bumper position, and OEM cross-reference before you order, and we'll help you avoid drilling for the wrong puck. Visit T1A Auto to search parking sensors and CAPA certified rearview cameras by vehicle, compare the connector against your failed part, and confirm fit with our parts specialists if the year or bumper style is unclear.
