


The switch works, the motor clicks, and then the rear glass drops a couple of inches into the door on a freezing morning. You can still hear the mechanism trying, but the window is tilted, jammed, or hanging loose. That's the point where a small electrical convenience becomes a glass, trim, and alignment problem.
A rear window regulator replacement is manageable for a careful DIYer, but it isn't just a matter of unbolting an old part and installing a new one. The right replacement must match the vehicle and door, the glass needs support before the regulator comes out, and climate and usage can determine whether a basic assembly lasts or repeats the same failure.
Table of Contents
- Why Rear Window Regulators Fail and What You Will Notice
- Tools, Parts, and Safety Prep Before You Start
- Step-by-Step Rear Window Regulator Replacement Procedure
- Common Failure Points and How to Spot Them Early
- Choosing the Right Replacement for Your Climate and Duty Cycle
- Troubleshooting After the Install
- Putting It All Together for a Clean First-Time Repair
Why Rear Window Regulators Fail and What You Will Notice
On the bench, the failure often starts with a simple complaint. The driver presses the rear-window switch, hears a click from inside the door, and watches the glass move slowly before it stops. On another vehicle, the window grinds on the way down, tilts toward the door frame, and then refuses to rise.
Rear regulators use the same basic principles as front units. Depending on the vehicle, the assembly may use a cable-and-pulley system, a single rail, or a scissor-style arm driven by an electric motor. Rear doors often receive less inspection and more careless use, especially when passengers slam them, children operate the switch repeatedly, or cargo presses against the trim and glass.
Symptoms that point toward the regulator
Watch the glass as it moves, not just the switch response.
- Slow travel: A tired motor, dry guide, contaminated cable, or increased friction can make the window crawl.
- Grinding or clicking: This often indicates damaged gear teeth, a fraying cable, or a pulley that's no longer keeping the cable aligned.
- Glass tilt: If the top edge leans forward or backward, a slider, guide, clamp, or regulator arm may have failed.
- A sudden drop: The glass can fall into the door when a cable breaks or a mounting point lets go.
- No movement: Silence can indicate a switch, fuse, wiring, or motor problem. A clicking sound without glass movement points more strongly toward a mechanical failure.
Water entering through the door can corrode wiring and motor contacts. In cold weather, moisture can freeze around the glass run, while thickened grease places extra resistance on the cable and pulleys. A worn nylon pulley or slider may survive normal movement, then fail when the mechanism encounters ice or a stiff channel.
Practical rule: If the glass starts slowing, tilting, or making new noise, diagnose it before the regulator completely collapses. Early attention can prevent broken glass and a burned-out motor.
For a clear explanation of the component's role, use this guide to what a window regulator does. The sooner you separate a regulator fault from a switch or wiring fault, the less likely you are to replace the wrong part.
Tools, Parts, and Safety Prep Before You Start
Put the tools on the bench before opening the door. Searching for a missing driver while the glass is unsecured is how a controlled repair turns into a rushed one.
Bench checklist
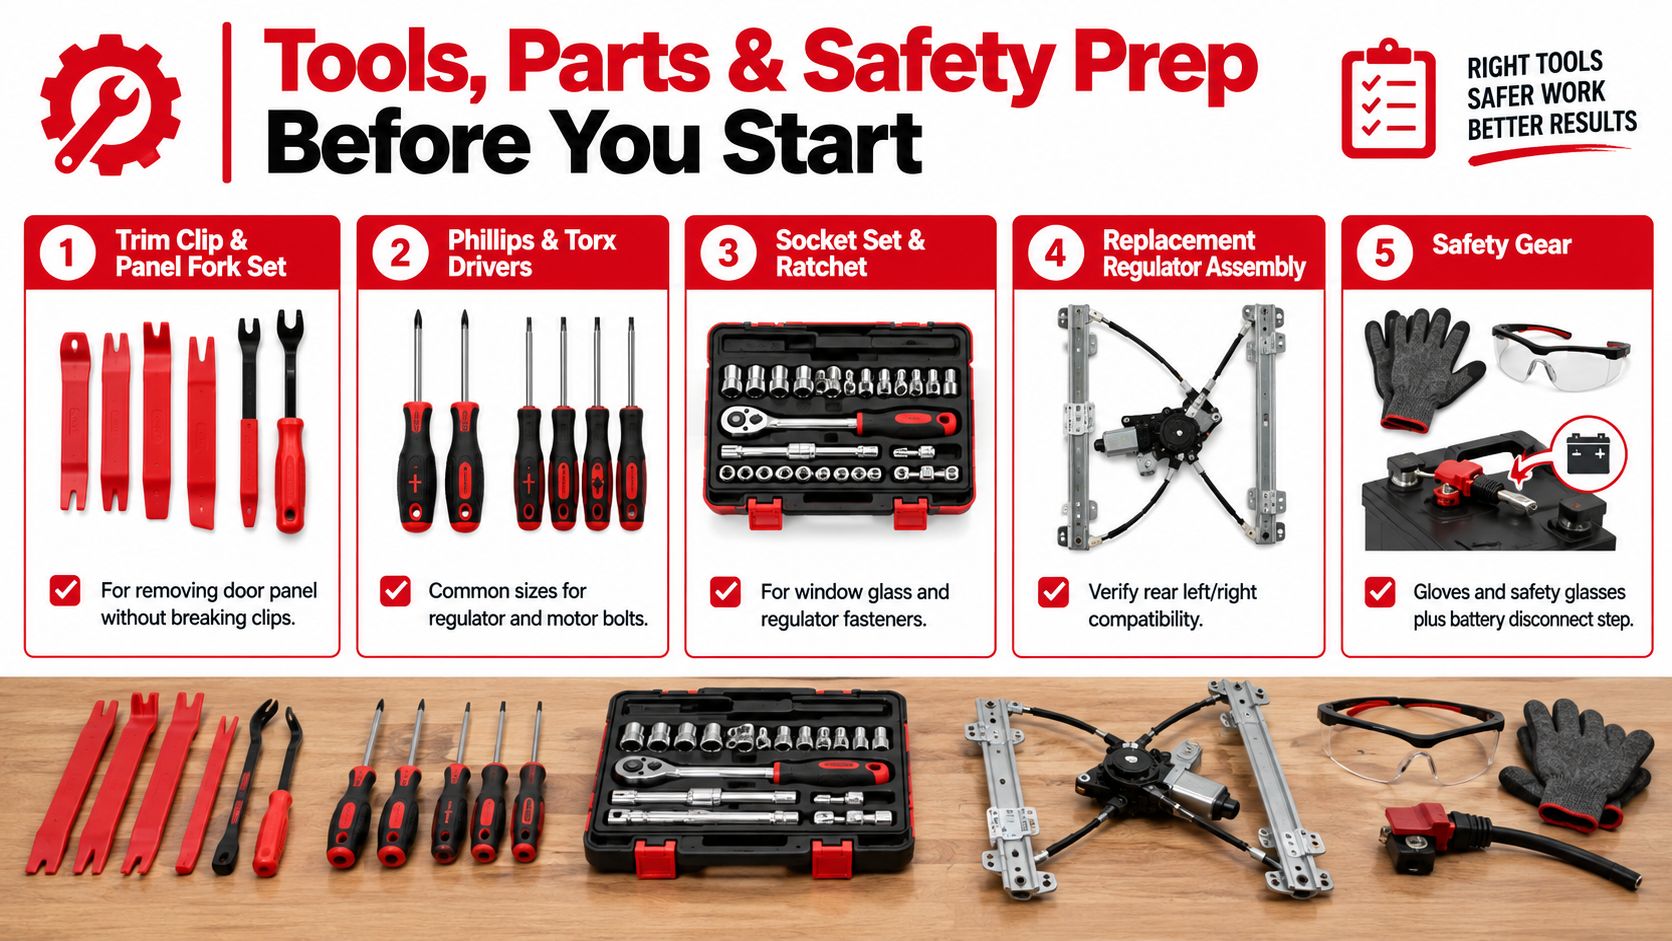
You'll usually want:
- Trim clip and panel fork set: Use these to release door-panel clips without prying against painted edges or snapping retainers.
- Phillips and Torx drivers: T20, T25, and T30 sizes are common, but check the fasteners before starting.
- 10 mm socket and short extension: Many glass clamps and regulator fasteners use 10 mm heads.
- Needle-nose pliers: Helpful for releasing harness clips and retrieving stubborn retainers.
- Magnet pickup: Door cavities collect dropped screws, and a magnet is faster than dismantling the door again.
- Painter's tape and a shop towel: Tape supports the glass, while the towel protects the trim and catches fragments.
- Butyl tape or a replacement moisture barrier: The barrier keeps water inside the door from reaching the panel and wiring.
- Dielectric grease: Apply a light film to the motor connector after checking that the terminals are clean.
Verify the part before you remove anything. Match the rear left or rear right position, motor inclusion, mounting-hole pattern, glass clip style, and vehicle fitment by VIN or exact model year. A fresh glass run channel is sensible if the original is cracked or badly hardened, and a new motor pigtail may be necessary if the existing connector is brittle or heat-damaged.
Make the door safe
Park on level ground, open the door fully, and disconnect the negative battery cable before working around the motor harness. Wear safety glasses and nitrile gloves if the glass is cracked or the regulator has already dropped it into the door.
Support the glass with painter's tape over the top of the door frame, preferably with a helper holding it while you loosen the clamps. Don't trust tape alone if the glass is heavy or unstable. Use a padded wood block inside the door where the design allows it, and keep your fingers out of the regulator's travel path.
Before choosing between a standard unit and an upgraded assembly, review the practical distinction in OEM versus aftermarket parts. The cheapest listing isn't useful if it arrives with the wrong connector or mounting arrangement.
Step-by-Step Rear Window Regulator Replacement Procedure
Start with the door panel. Pop off the screw covers, remove the exposed fasteners, and check behind the pull cup for the hidden screw that catches many first-time installers. Use a trim fork close to each clip, then lift the panel straight upward off the weatherstrip rather than pulling it outward at the top.
Disconnect the window-switch harness and any courtesy-light or lock connectors. Set the panel on a padded surface where the clips won't be crushed. If you need a general reference for the panel itself, follow this guide to remove a car door panel.
Secure the glass before loosening the mechanism
Peel the moisture barrier back slowly. Don't slice through it unless you've already planned to reseal the opening, because an unsealed barrier lets door water reach the trim and electrical connectors. Fold it out of the way while keeping the butyl adhesive clean.
Locate the access holes and position the glass so the regulator clamps or mounting bolts are visible. Have a helper hold the glass, or run painter's tape from the outer glass over the door frame in several strips. The glass must not drop when the regulator releases.
Remove the glass-to-regulator clamp bolts, commonly using a 10 mm socket. Loosen the regulator mounting bolts, leaving one loosely engaged until you're ready to control the assembly. Disconnect the motor harness, release its retainers, and feed the regulator through the access opening.
Install and align the replacement
Move the old and new assemblies side by side. Confirm the motor orientation, cable routing, guide position, mounting holes, and glass clamps. Transfer brackets only when the replacement instructions or vehicle design require it, and don't force a nearly matching part against the door sheet metal.
Feed the new regulator through the opening without kinking the cable or striking the glass. Start every mounting bolt by hand, then tighten the assembly evenly. A general working range for regulator mounting bolts is roughly 8 to 10 Nm, but verify the exact specification in the vehicle's service manual before final tightening. Excessive torque can distort the regulator or damage the door structure.
Reconnect the glass clamps and let the window sit naturally in the run channels before tightening them. Reconnect the motor plug, apply a light film of dielectric grease to the connector seal, and reconnect the battery for testing. Cycle the window slowly, watching both front and rear edges for equal movement.
Reinstall the moisture barrier with continuous butyl contact, then refit the panel. Make sure the harness is clipped into its original retainers, all screws are installed, and the weatherstrip sits over the panel rather than underneath it. Finish with a full up-and-down test and listen for binding, cable slap, or unusual gear noise.
Common Failure Points and How to Spot Them Early
A regulator can fail in several places, and the visible symptom often tells you more than the motor sound. Plastic pulley housings crack under repeated load, stranded steel cables fray where they bend around the drum, and nylon sliders wear grooves into the glass channel. The motor can also lose brush contact from corrosion or contamination even when the gearbox still looks intact.
Read the movement before removing the panel
A window that moves slowly in one direction may have a stretched or damaged cable, increased guide friction, or a motor that's losing strength. Binding at the same point in travel suggests a damaged gear tooth, bent rail, or guide problem. If the glass tilts forward near the top, inspect the slider and run channel before blaming the motor.
Tap the switch while watching and listening:
- One direction works, the other doesn't: Suspect the regulator, motor, switch contacts, or a direction-specific wiring fault.
- A relay clicks but the glass stays still: Check the motor connector and regulator drive, then inspect for stripped gear teeth.
- No sound at all: Test the fuse, switch, wiring, and motor feed before ordering a mechanical assembly.
- The glass falls or sits loose: Stop cycling it. Support the glass and inspect for a broken cable, clamp, arm, or mounting point.
The assembly itself deserves inspection as soon as it comes out. A frayed cable confirms a mechanical replacement, while clean cables paired with a dead motor may justify testing the motor separately if the design allows it.
A short visual reference can help identify the difference between a damaged cable system and a misaligned guide:
A regulator failure can also be part of a larger pattern. The 2008 Toyota power-window recall identified 662,178 potentially affected vehicles, while the estimated malfunction rate was about 5%, as documented in this history of rear window regulator failures. The lesson isn't that every regulator has a recall defect. It's that a modest failure rate across a high-volume platform can still produce substantial repair demand, and revised fitment makes VIN-level checking important.
Choosing the Right Replacement for Your Climate and Duty Cycle
The least expensive OE-equivalent regulator isn't automatically the right part. A garage-kept sedan used gently may do well with a standard replacement, while a pickup or SUV working through wet, freezing weather may expose the same weak pulley or cable design again.
Cold conditions stiffen grease and can freeze moisture in the glass channel. Snow and ice add resistance to the glass, and rear doors often receive less inspection because owners use them less frequently than front doors. If the vehicle works in a cold, wet environment, a regulator with a metal pulley or reinforced cable drum, improved sealing, and corrosion-resistant cable construction is often a more sensible choice than repeating the original design.
Match construction to use
Fleet trucks, work vans, and family SUVs that cycle the rear windows frequently need stronger hardware than a lightly used commuter car. The replacement should suit the actual door mechanism, not just the vehicle name.
| Regulator Type | Best For | Weakness | Upgrade Path |
|---|---|---|---|
| Scissor regulator | Doors using a compact arm-and-sector design | Pivot wear and bent arms can create uneven glass travel | Choose reinforced pivots and a robust motor assembly |
| Single-rail cable regulator | Doors with limited access and a guided glass path | Cable fraying or pulley damage can make the glass tilt | Look for improved cable routing and stronger pulley materials |
| Dual-rail cable regulator | Wider glass and doors needing balanced support | More guides and mounting points create more opportunities for binding | Select reinforced rails, sealed guides, and corrosion-resistant hardware |
Confirm the mounting-hole pattern, rail length, connector, glass clips, and left or right position. A part that is close but wrong can appear installable until the glass sits crooked or the regulator fails to seat flush. Compare the old and new assemblies before fitting them into the door.
T1A Auto is one option for vehicle-specific rear power window regulators, including assemblies for selected Chevrolet Silverado and GMC Sierra applications. Its catalog distinguishes upgraded metal components from standard items and provides vehicle search tools, so use the exact fitment information rather than selecting by appearance alone.
The broader service history supports this cautious approach. Toyota's 2012 worldwide recall covered more than 7.4 million vehicles, including about 2.5 million sold in the U.S., following a power-window-control fire-hazard investigation described in this Toyota recall account. A large campaign doesn't prove that a particular aftermarket regulator is defective, but it does show why small window-system components deserve careful part selection and long-term thinking.
Troubleshooting After the Install
Most post-install problems come from alignment, cable seating, or a connector that wasn't fully locked. Don't immediately assume the new regulator is defective. Recheck the basic installation sequence before pulling the assembly out again.
Crooked glass
If the glass rises at an angle, loosen the glass-clamp bolts and lower it slightly. Reseat the glass evenly in both clamps and the run channels, then tighten the fasteners to the vehicle's specification. Check that the channel isn't folded, pinched, or packed with debris.
The glass should move with even resistance along its full path. If one edge leads the other, the regulator may be mounted incorrectly, a guide may be displaced, or the clamp may be gripping the glass unevenly.
Motor noise without movement
A humming motor with stationary glass usually means the cable has jumped the spool, the clamp has released, or the drive is no longer transferring motion. Disconnect the battery, remove the regulator if necessary, and inspect the cable's position on the drum.
A cable that has come off the spool must be rewound evenly. Look for crossed strands, a damaged guide, or a pulley that caused the cable to leave its track. If the cable won't stay seated during hand operation, replacement is safer than trying to make a damaged assembly behave.
The window drops and stops
A window that moves briefly and then stops can have a partially engaged clutch, a cable that's one wrap short, or a motor struggling against a misaligned channel. With the motor disconnected, move the regulator by hand if the design permits it. Smooth travel points toward an electrical or motor issue, while a tight spot indicates mechanical resistance.
Clicking without motion may indicate stripped drive teeth in the replacement unit. It's uncommon, but low-quality assemblies can arrive with a damaged gearbox or poor cable seating. Check the supplier information and inspect the mechanism before reinstalling it.
Listen during the first cycles. A new regulator shouldn't grind, slap, or pop, and the glass shouldn't hesitate at the same point. Recheck visible fasteners after the vehicle has been used, and confirm that the door closes with the original trim and seal alignment.
Putting It All Together for a Clean First-Time Repair
A reliable rear window regulator replacement follows four decisions. Make each one before moving to the next.
Diagnose before ordering
Separate mechanical symptoms from electrical ones. A tilted or dropped glass usually directs attention toward the regulator, while a silent switch may require fuse, switch, wiring, and motor-feed checks first. Inspecting the old assembly after removal helps confirm whether the replacement addressed the actual failure.
Match the part to the vehicle's life
Choose the regulator design, connector, clips, and mounting pattern by exact fitment. Then account for use. Cold, wet conditions and frequent cycling justify looking beyond a basic plastic-heavy assembly, while a lightly used vehicle in a protected environment may not need the added construction.
Gate the installation with tests
Before sealing the barrier and reinstalling the panel, the glass should travel its full range without binding. Cycle the regulator under load five times and watch for cable slip, uneven travel, or recurring noise. Confirm that the glass stays seated, the harness retainers are clipped back into place, and the door closes with the original seal compression.
Callback prevention: Misaligned glass run channels, loose harness retainers, and over-tightened regulator bolts cause more frustration than the basic removal procedure.
Inspect the repair after use
A follow-up inspection after 30 days gives you a chance to confirm that the cable remains seated, fasteners haven't loosened, and the window still reaches its stops cleanly. Don't ignore a new click or hesitation just because the glass still moves.
Stop and call a shop if the glass is shattered, the door contains airbag hardware you can't safely isolate, the regulator is trapped under load, or the mounting sheet metal is damaged. Skill matters, but controlled glass handling and airbag safety matter more than proving you can finish the job alone.
For a replacement that fits the vehicle and matches the way it's used, visit T1A Auto and search by year, make, model, and door position. Review the regulator construction, warranty details, and connector configuration before ordering, then use the installation checks above to avoid a repeat teardown.
