


You replaced the tailgate cable, bolted it back on, and the gate still sits crooked. Or the cable frayed again right at the eyelet even though the rest of it looks fine. That usually isn't a cable problem first. It's a tailgate cable bolt, the bracket it passes through, or the captive nut behind the panel.
That's the part most quick guides skip. They tell you to swap the cable and move on. In the shop, the recurring comeback is the same: the new cable is fine, but the hardware that locates it is worn, bent, cross-threaded, or tightened wrong.
Table of Contents
- What the Tailgate Cable Bolt Actually Does
- Tools and Prep Before You Touch the Bolt
- Removing and Reinstalling the Cable Bolt
- Torque Specs and Tightening Best Practices
- Diagnosing Bolt, Bracket, and Captive Nut Issues
- Common Failure Modes and How to Fix Them
- Maintenance, Compatibility, and When to Replace
What the Tailgate Cable Bolt Actually Does
A tailgate that won't hold level or a cable that frays at the bolt end gives away the same clue. The load path at the mounting point isn't right.
The tailgate cable bolt isn't just a screw that happens to hold a cable. It's a service part with a specific geometry, usually a shoulder-style fastener that lets the cable eyelet sit where the truck was designed to carry the load. Ford lists a dedicated tailgate support cable bolt as M8 x 17MM under SKU W711291S437, and Toyota catalogs a dedicated Tailgate Support Cable Bolt for the Tundra under part number 689650C010, which shows this hardware is treated as a vehicle-specific replacement component rather than a generic fastener in major OEM catalogs (Ford tailgate support cable bolt listing).
Why the shoulder matters
The cable eyelet needs to pivot, but it also needs to stay located. That only happens when the shoulder length, shank diameter, and bracket thickness all match. If the bolt bottoms on threads before the shoulder seats, the cable binds. If the shoulder is too short, the eyelet gets pinched or sits loose.
A lot of “mystery” tailgate problems start there:
- Crooked cable after replacement: the bolt shoulder isn't passing through the eyelet and bracket correctly.
- Bolt loosens repeatedly: the wrong stack-up leaves movement where there shouldn't be any.
- Eyelet wear at one side: the bracket or bolt is forcing side load through the cable end.
Practical rule: Treat the cable bolt, the bracket, and the captive nut as one assembly. If one part is off, the cable will show the symptom.
Why vehicle-specific hardware matters
OEMs don't catalog these bolts separately for no reason. They have to match the cable eyelet, bracket shape, and tailgate geometry for that truck. That's why grabbing a “same size” hardware-store bolt usually creates a fit problem instead of solving one.
If the tailgate cable bolt is wrong, a brand-new cable can still sit unevenly. That's the diagnostic fork on this job.
Tools and Prep Before You Touch the Bolt
Truck comes in with a “bad new cable,” and the cable is straight out of the box. The problem is usually at the mount. A worn shoulder bolt, bent bracket, or captive nut that has started to twist will make a new cable sit crooked before you ever touch a wrench. Good prep helps you catch that early instead of forcing the bolt out and creating a bigger repair.
Use the right driver and support tools
Start by identifying the head correctly and checking whether the hardware looks original. Many of these bolts use a T45 Torx, but that is not universal, and previous repairs often leave you with mixed hardware. Keep T40, T45, and T50 bits on the bench so you can test fit and use the one that seats fully with no rock.
Use tools that let you feel what the fastener is doing.
- Impact-rated Torx bits: A quality bit fits deeper and resists twisting when the bolt is tight or rusty.
- 3/8-inch ratchet and a short breaker bar: Better control than jumping straight to an impact gun.
- 6-point sockets and box-end wrenches: Use them on any accessible back-side nut or support hardware.
- Long extension and a wobble adapter: Helpful when the bed side or inner panel blocks a straight shot.
- Penetrating oil and a small wire brush: Clean the exposed threads and the Torx recess before removal.
- Magnetic pickup tool: Handy when spacers or washers fall into the bed cavity.
- Plastic trim tool: Safer for access covers and trim clips than a flat screwdriver.
- Flashlight or inspection mirror: Lets you check whether the bracket is bent and whether the captive nut pocket already shows movement.
A pick or small screwdriver also helps clean packed dirt and rust out of the Torx recess. If the bit does not bottom out, the head rounds fast.
Prep the truck before you lean on the bolt
Set the tailgate down and support it so the cable is not carrying the weight of the gate. That matters for diagnosis as much as removal. With the load off, you can see whether the eyelet sits square in the bracket or whether the bolt and mount are already pulling it to one side.
Protect the paint before you start. A fender cover, folded towel, or masking tape along the edge of the bed side saves you from easy chips when the ratchet swings or the cable eyelet slips.
If the tailgate has wiring for a camera, lock, or release switch, check harness routing before removing covers or letting the gate shift. On some trucks, the cable job is simple until the harness gets stretched or pinched.
Quick checks that save you from the wrong repair
Look at the bracket before you call the cable bad. The bolt should sit square, the eyelet should not be pinched, and the bracket holes should stay round. If you see shiny wear on one side of the eyelet, a witness mark around the bracket hole, or paint cracking near the nut pocket, the problem is usually in the hardware stack-up or the mount itself.
Put a finger on the bracket and try to move the cable end by hand. Free pivot is normal. Side-to-side slop, binding, or a bracket that flexes with the cable is not.
If the bit fit is loose, the bracket is bent, or the captive nut area already looks stressed, stop and correct that first. Forcing the bolt out is how a small cable repair turns into bed-side metal work.
What not to do
Do not hammer in the nearest Torx bit and hope it grabs. Use the size that fits fully.
Do not soak the fastener and hit it immediately. Give the penetrant time to work into the threads.
Do not start with an impact on a bolt threaded into thin sheet metal or a hidden captive nut. If the nut cage breaks loose, access gets worse in a hurry. And do not thread in a generic hex bolt as a substitute. If the shoulder length or shank diameter is wrong, the cable may bolt up and still sit crooked.
Removing and Reinstalling the Cable Bolt
A lot of tailgate cable jobs go wrong after the new part is already in. The cable gets blamed, but the problem is usually at the bolt, the bracket, or the captive nut. If the bolt does not seat squarely, the cable will sit crooked and start wearing again right away.
Removal sequence that protects the bracket and captive nut
Set the tailgate down, support it, and make sure the cable is unloaded. Then get eyes on the fastener area so you can watch for bracket twist as the bolt starts to move.
Use this order:
- Clean the exposed threads and bolt head. Rust packed into the Torx recess is what strips the bit fit first.
- Apply penetrant and let it work. A few minutes matters more than another hard pull on the ratchet.
- Seat the Torx bit all the way. Hand pressure into the head keeps the bit from climbing out and rounding the recess.
- Break the bolt loose with a hand ratchet. That lets you feel whether the bolt is unscrewing normally or the captive nut is starting to move with it.
- Watch the bracket as the bolt backs out. Any flex, popping, or paint movement around the nut pocket means stop and reassess.
- Support the cable eyelet as the bolt comes free. Letting it drop can chip paint or bend a bracket that was still usable.
If you are replacing the whole assembly, not just the hardware, this tailgate cable replacement guide helps with the cable-side steps.
What to inspect with the bolt out
This is the point where diagnosis happens.
Check the bolt shoulder first. If it is grooved, rusty on one side, or polished unevenly, the cable eyelet was not riding square. Then check the bracket hole. A round hole supports the shoulder correctly. An egg-shaped hole lets the bolt lean, and that is how a fresh cable ends up sitting at an angle.
Also inspect these areas:
- Captive nut threads: rough engagement, metal dust, or a bolt that starts crooked points to thread damage
- Bracket face: any bowing or dish around the hole changes clamp load and eyelet alignment
- Cable eyelet sleeve: mushrooming or side wear means the hardware has been carrying side load
- Paint cracks around the mount: a common sign that the bracket or nut pocket has been shifting under load
Reinstalling the bolt so the cable sits straight
Start the bolt by hand and make sure it threads in cleanly for several turns. If it does not, pull it back out and correct the alignment. Using the bolt to draw the bracket into place is how threads get damaged and nut cages get broken loose.
Make sure the bolt shoulder passes through the cable eyelet and locates the stack-up correctly before final tightening. The shoulder is what keeps the cable centered. The threads only clamp it.
If the eyelet does not pivot freely once the bolt is seated, stop there. A cable that binds during install will not fix itself after torque is applied.
Use threadlocker only if the service parts call for it or the original fastener came with it pre-applied. Then cycle the tailgate open and closed a couple of times and watch the cable path. The eyelet should pivot without grabbing, and the bolt should stay square in the bracket.
Torque Specs and Tightening Best Practices
A lot of tailgate cable jobs go wrong at the last step. The new cable is on, the bolt is tight, and the tailgate still hangs a little crooked because the fastener was torqued against a bad stack-up instead of a square mount.
Tailgate cable bolt torque specs by vehicle
Use the vehicle service information first if you have it. Tailgate cable bolts are small fasteners, and the spread between “secure” and “stripped” is not wide, especially on M6 hardware threaded into a captive nut.
| Vehicle | Bolt Thread | Torque (ft-lb) | Torque (Nm) |
|---|---|---|---|
| Tacoma | M6 | 8.9 | 12 |
| Tundra | M8 | 20.7 | 28 |
| F-150 | M8 | 20.7 | 28 |
| Ranger | M8 | 20.7 | 28 |
| Silverado | not specified in verified data | 30.2 | 41 |
| Frontier | M8 | 20.7 | 28 |
The practical pattern is straightforward. M6 cable-related hardware often lands around 12 N·m. M8 hardware is commonly around 28 N·m. Some related tailgate hinge fasteners run higher, up to 41 N·m, depending on the bracket and bolt class. One documented reference for aftermarket tailgate assist hardware specifies 8 lb-ft on its fasteners, which is a good reminder not to copy hinge torque onto a smaller cable mount without checking the application first (tailgate assist hardware instructions).
What correct torque actually gets you
Correct torque does two jobs. It holds the cable hardware in place, and it preserves free movement at the eyelet.
That second part matters.
If the bolt is loose, the eyelet shifts and the bracket starts fretting around the hole. If the bolt is too tight, or the shoulder is not seated correctly, the eyelet can bind even though the wrench clicked at the right number. That is why a torque spec by itself does not solve the common “new cable still sits crooked” complaint. Bolt alignment, bracket flatness, and captive nut position still decide whether the cable tracks straight.
Best practice at the wrench
Run the bolt down by hand until the shoulder is fully seated. Then torque it with the tailgate supported and the cable in its natural position, not twisted to one side.
A few habits save threads and comebacks:
- Use a small torque wrench in the correct range: a 1/4-inch drive inch-pound wrench is usually more accurate on M6 hardware than a big 1/2-inch drive wrench.
- Watch the eyelet while tightening: if the eyelet stops pivoting freely as clamp load comes on, back it off and inspect the stack-up.
- Do not chase final angle with extra force: if the cable looks wrong at snug, more torque usually bends parts or drags the captive nut in its cage.
- Use threadlocker only when the fastener or service procedure calls for it: pre-coated bolts should go in clean and dry.
- Recheck after cycling the tailgate: one open-close cycle will show whether the cable settles square or starts walking sideways.
One more shop rule. If an M8 cable bolt is supposed to torque around 28 N·m and it keeps turning with rising resistance, stop before the click. That usually means the threads are pulling, the captive nut is breaking loose, or corrosion is galling the bolt. Tightening through that feeling is how a simple cable job turns into bracket repair.
Diagnosing Bolt, Bracket, and Captive Nut Issues
Most repeat tailgate cable repairs come back for one reason. Someone replaced the cable and never diagnosed the mounting hardware.
Start with the tailgate supported. Loosen the cable bolt just enough to relieve clamp load and watch what the cable does. If it suddenly sits straighter, the bracket or bolt alignment was forcing it into a bind all along.
To keep the checklist visual, use this inspection flow:
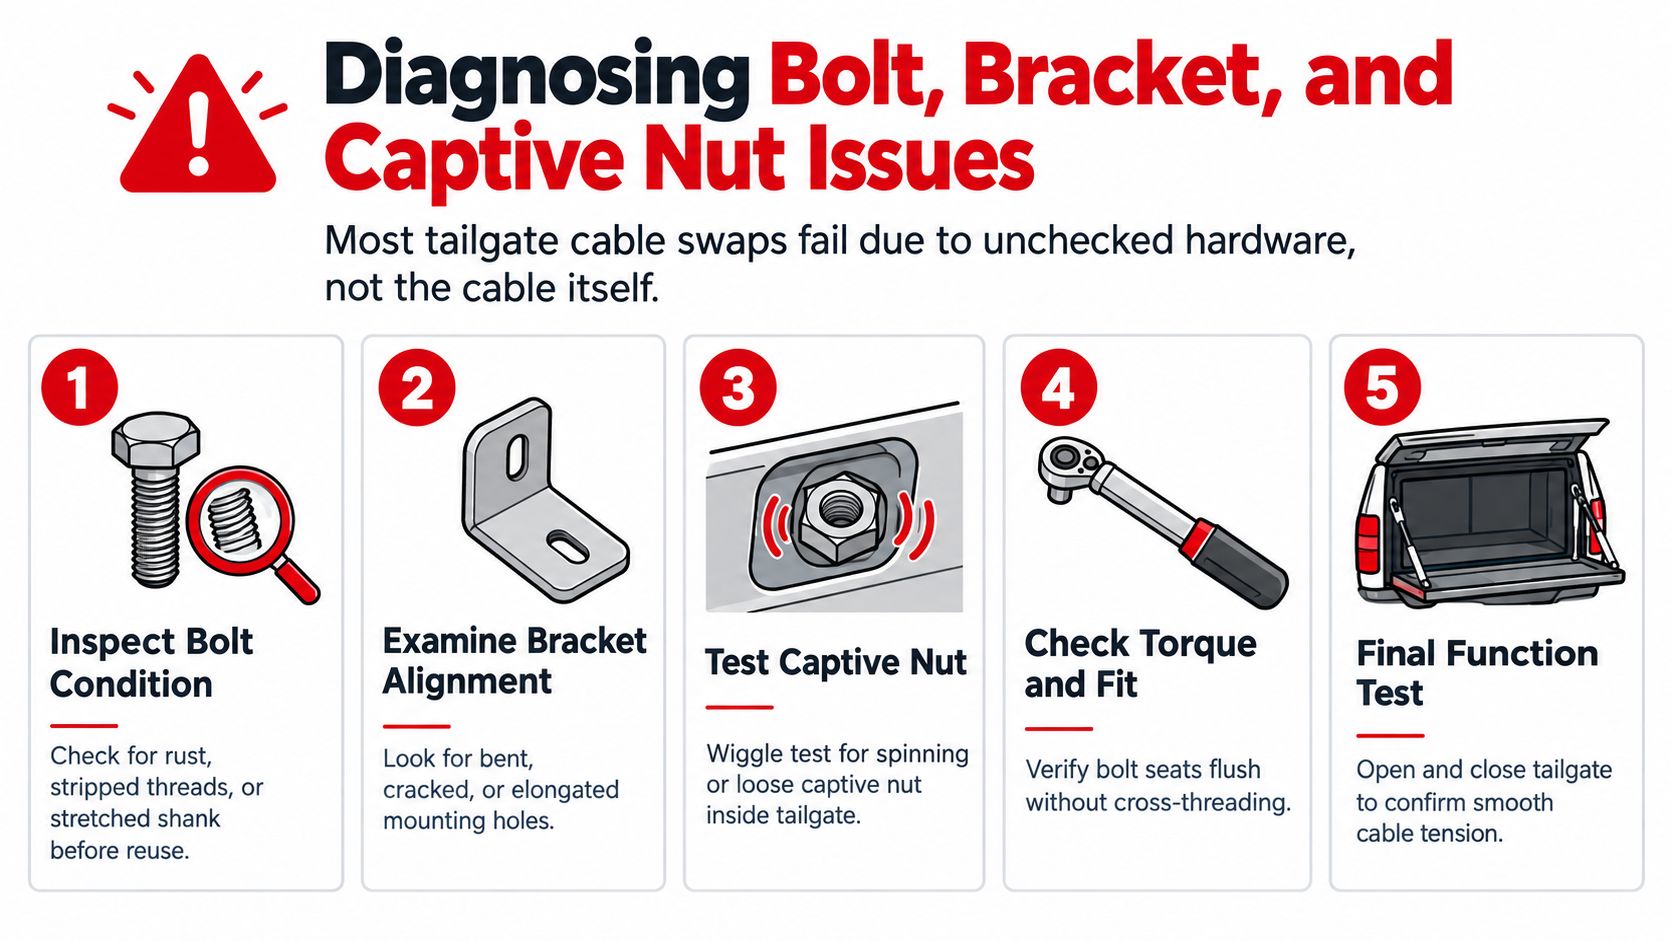
What to check with the bolt removed
Independent repair guides point out a gap in most consumer content: the issue is often the mounting bolt and bracket hardware, especially when a stepped or T45-style fastener seizes, needs back-side support, or requires loosening and realignment to stop binding (tailgate hardware installation discussion in service-style instructions).
Pull the bolt and inspect these areas closely:
- Bolt shank and shoulder: look for polishing on one side, thread damage, or a necked-down appearance from load.
- Bracket hole shape: round is normal. Egg-shaped means movement.
- Captive nut condition: if the threads are torn up or the nut shifts in the panel, the bolt wasn't the root problem.
- Cable eyelet bore: wear here tells you how the eyelet has been forced to sit.
The crooked-cable test
Set the cable in place without tightening it fully. If it naturally wants to sit off-angle, check bracket alignment and hinge position before condemning the new cable.
A tailgate that lifts unevenly by hand often points to hinge alignment pulling the cable mount sideways. That sideways load shows up at the bolt first because that's the locating point.
For a quick companion reference on another tailgate problem area, T1A Auto's article on how to fix a tailgate latch helps when the gate is fighting you from the latch side as well.
This short video is also useful for seeing the hardware area in context before you start disassembling parts:
The bolt is often the symptom. The bracket twist or failing captive nut is often the cause.
Common Failure Modes and How to Fix Them
A new cable will not fix a mount that is already moving. The repeat comeback is the tailgate that still hangs crooked because the bolt, bracket, or captive nut was the failure.
Seized bolt in a rust-prone truck
On older trucks, the exposed threads rust first and the captive nut starts to bind before the head ever feels tight. That is the point where people break the bolt and turn a 15-minute cable job into drilling, extraction, or cutting an access hole.
Brush the threads clean, soak both sides if you can reach them, and work the bolt by hand with steady pressure. Small back-and-forth movement usually saves the captive nut. An impact can shock the nut loose inside the panel, and then the job changes fast.
Snapped or rounded Torx head
This usually comes from a loose bit fit, rust packed into the recess, or a previous installer who already damaged the head. If the bit rocks, stop and clean the recess before you apply more force.
Seat the correct driver fully and turn it by hand first so you can feel whether the head is holding. If the recess is already wiped out, switch to a broken-fastener plan early. T1A Auto's guide on the best way to remove a broken bolt is a practical reference once normal removal is off the table.
Stripped or spinning captive nut
A spinning captive nut gets misread all the time. The bolt turns, but it does not walk out, and the cable eyelet stays loaded against the bracket.
That mount is done until the threads or the nut attachment are repaired correctly. Longer hardware, thread sealant, or forcing the bolt tighter only loads the bracket harder and lets the cable sit at an angle. If a new cable still wants to pull sideways after install, this is one of the first places to check.
Paint damage and bent bracket after re-torque
Cracked paint, witness marks under the bolt head, or a bracket face that no longer sits flat point to movement at the mount. Sometimes it is over-tightening. Sometimes the cable was tightened while the tailgate or hinge geometry was already pulling sideways.
Fix the metal before you reinstall anything. If the bracket hole has started to oval, replace the bracket or repair it to restore the correct bolt location, then refinish any bare metal so rust does not start under the hardware. As noted earlier, field bulletins and investigations have treated tailgate cable hardware durability as a real issue. In the bay, the practical takeaway is simple. If the mount has moved, correct the mount first or the replacement cable will fail the same way.
Maintenance, Compatibility, and When to Replace
The easiest way to avoid doing this job twice is to inspect the hardware before the cable fails. Most owners look for a broken strand and miss the mounting point that caused it.
What to inspect regularly
A quick check with the tailgate down tells you a lot:
- Fray at the eyelet end: usually points to misalignment or binding at the bolt.
- Cracked paint around the bracket: movement under the bolt head or bracket distortion.
- Side play with the gate latched: hardware looseness or wear in the mount.
- Rough pivot at the eyelet: the cable should move cleanly, not stick and release.
A dry PTFE-style lube at the pivot area helps if the design allows movement there. Skip heavy grease. It collects grit and turns the contact area into a grinding paste.
Match parts by application, not guesswork
The safest replacement path is still vehicle-specific hardware. OEM catalogs show that these bolts are matched to the application, not treated as one-size-fits-all service stock. In practical terms, keep the old hardware until the new parts are in hand so you can compare shoulder length, shank diameter, and thread start.
Here's a compact fitment reference using only verified OEM part numbers provided in the source material:
| Vehicle | OEM Part Number | Bolt Type | Notes |
|---|---|---|---|
| Toyota Tundra | 689650C010 | Tailgate support cable bolt | OEM-described as the bolt that attaches the tailgate support cable |
| Ford F-Series | W711291S437 | M8 x 17MM tailgate support cable bolt | Ford cataloged service part, package quantity listed as 4 |
If you're also sorting trailer-side hardware and trying to keep tow rig fitment straight across truck and trailer parts, the Weaver trailer compatibility guide is a useful reference point for cross-checking compatible components on the trailer end of the setup.
Replace the bolt, the cable, or both
Replace just the bolt when the threads are clean, the captive nut is solid, and the old cable shows no structural wear beyond the fastener issue.
Replace the cable assembly when the strands are frayed, corroded, or stretched. Safety matters here more than appearance. A documented GM recall found tailgate support cables on millions of pickup trucks could corrode, weaken, and fracture, allowing the tailgate to suddenly drop and creating injury and cargo-loss risk, especially if the bumper had been removed (GM tailgate support cable recall summary).
Replace both when the old failure damaged the mounting hole, battered the shoulder, or stripped the threads. If the hardware caused the cable to fail once, putting only a fresh cable back on usually buys you time, not a real fix.
If you need replacement tailgate cables or related hardware for a vehicle-specific repair, T1A Auto carries application-matched parts for common truck lines and the catalog is set up so you can search by vehicle before you order. That matters on this job, because the right shoulder bolt and cable geometry solve problems that a generic fastener never will.
