


The window is stuck halfway down, rain is blowing onto the seat, and the switch makes a useless click under your thumb. You search for a window motor, find several parts that look similar, and wonder whether the repair is a simple Saturday job or a door-panel disaster.
The honest answer depends on what failed. A power-window system includes the motor, regulator, glass run channels, guides, switches, wiring, connectors, and sometimes calibration or anti-pinch controls. A slow window might need cleaning and alignment. A silent window might have a blown fuse, failed switch, corroded connector, or dead motor. Ordering parts before testing is how a one-part repair becomes two repair sessions.
This guide treats window motor replacement as a diagnostic decision, not an automatic parts swap. You'll learn what the symptoms mean, how to test voltage and ground, how to support the glass safely, how to choose between a motor and a complete regulator assembly, and how to validate the repair before putting the door back together.
Table of Contents
- When the Window Stops Cooperating
- Reading the Symptoms Before Touching the Motor
- Tools, Workspace, and Choosing the Right T1A Auto Motor
- Voltage and Ground Tests That Save You a Parts Order
- Removing the Door Panel and Swapping the Motor
- Reassembly, Calibration, and the Mistakes That Cause Comebacks
- A Short Checklist Before You Button the Door Back Up
When the Window Stops Cooperating
A stuck window creates immediate pressure. If the glass is down, weather can enter the cabin. If it's raised but won't open, ventilation disappears and the switch may still feel as though it should work. The common mistake is to react to the position of the glass rather than the behavior of the system.
Almost every power-window failure looks similar from the driver's seat. Press the switch and the glass doesn't move. Under the door trim, however, the causes can be completely different. A broken regulator cable can leave the motor humming. A dry or damaged run channel can make a healthy motor sound weak. A failed switch or corroded connector can make a good motor appear dead.
Practical rule: Don't order a motor until you know whether the motor receives power and whether the glass mechanism can move freely.
A first-time DIYer can handle many window repairs with basic hand tools, careful labeling, and enough time to work without rushing. The difficulty rises when the door contains side-impact equipment, hidden trim fasteners, fragile clips, or a regulator that must be aligned precisely. If you can't safely support the glass or identify the vehicle's wiring, stop and use a qualified technician.
The safety side matters. Historical NHTSA research estimated 499 people were injured in power-window incidents during 1993 and 1994, with fingers the most seriously injured body part in 77% of cases. Children under age 15 represented 64% of injured people in that study, and the findings helped support changes to Federal Motor Vehicle Safety Standard No. 118. You can read the original NHTSA power-window injury study for the historical context.
The useful takeaway isn't that every repair is dangerous. It's that a window motor belongs to a safety-relevant system. A correct repair restores controlled movement, proper switch behavior, secure glass support, and any anti-pinch function fitted to the vehicle.
Reading the Symptoms Before Touching the Motor
Start with the symptom, then test the component most likely to cause it. Don't condemn the motor because the glass is stuck.
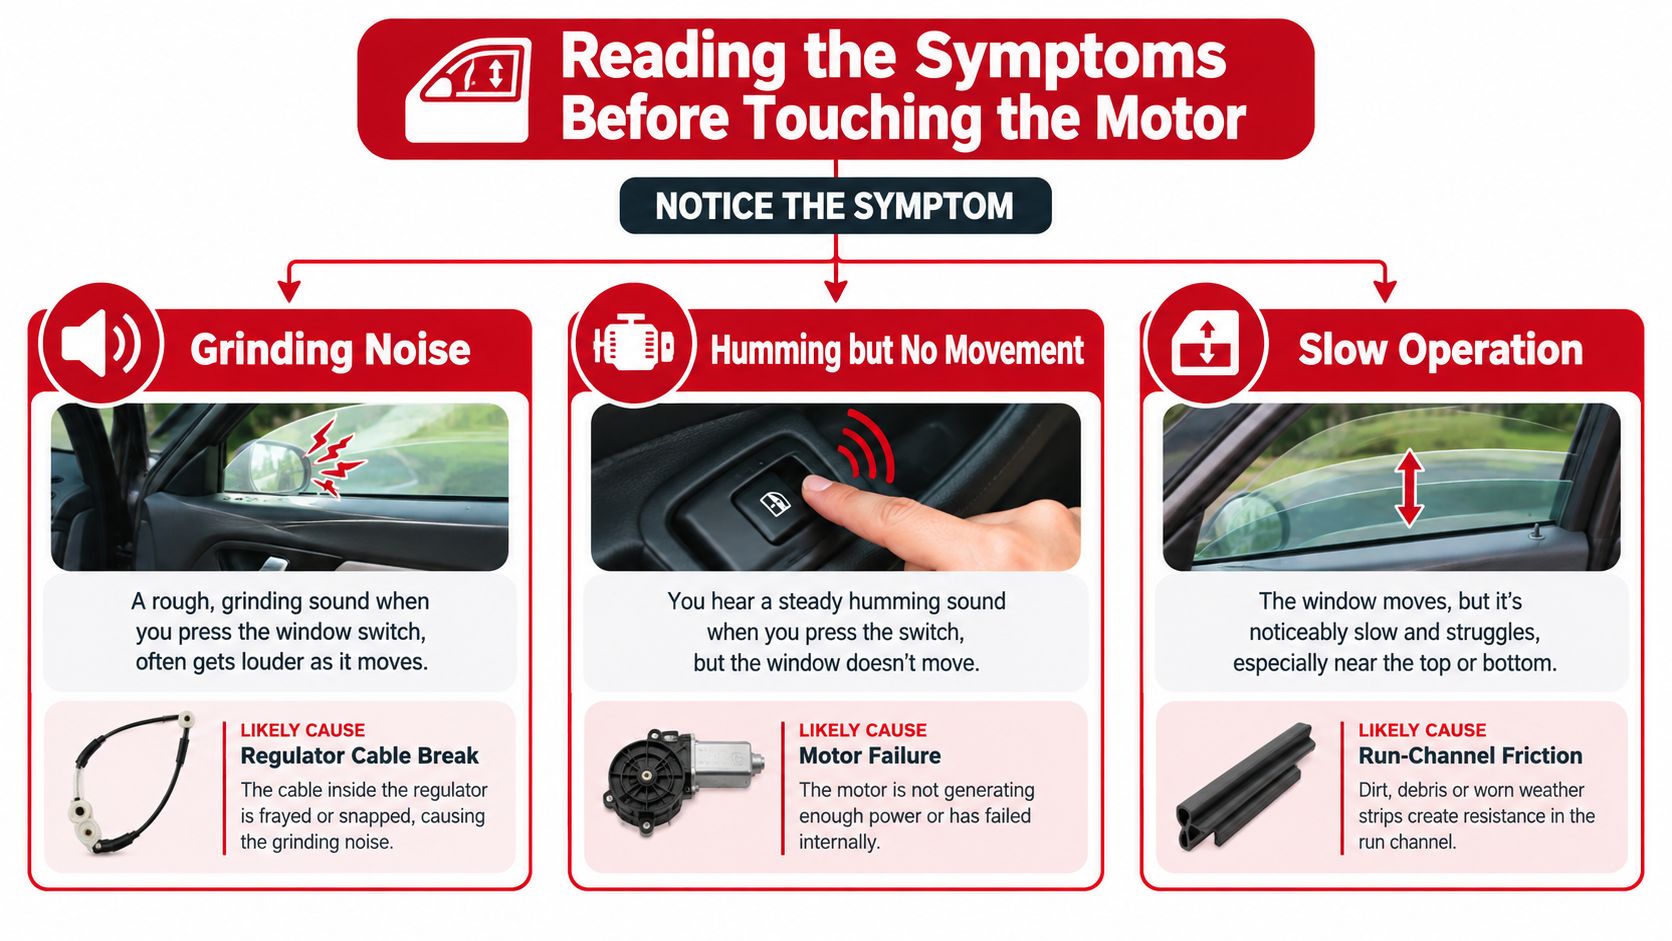
Match the sound to the failure
If you press the switch and hear grinding, popping, or rattling, the motor may still be working. A broken cable, stripped gear, detached slider, or damaged regulator track can let the motor spin without lifting the glass. Look for tilted glass, one side rising ahead of the other, or a window that drops into the door.
Your first cheap test is visual and mechanical. Watch the glass while operating the switch briefly, then stop if it binds or leans. Don't keep holding the switch against a failed regulator, because the motor can overheat and the glass can shift unexpectedly.
A hum with no glass movement points more strongly toward a regulator problem or a stripped connection between the motor and lifting mechanism. It can also indicate a motor turning without transferring force. Inspect the regulator before buying a motor.
A motor that is completely silent deserves an electrical test, not an immediate replacement. Check the fuse, test the window from the local switch and the driver's master switch, and see whether other windows operate. If the motor connector receives the correct command voltage and ground but the motor stays silent, the motor becomes a reasonable suspect.
Separate friction from electrical failure
A window that moves slowly, stops near the top, or improves when you help the glass usually has excessive resistance. Dirt, hardened felt, a distorted run channel, a misaligned regulator, or a glass guide can overload a good motor. Lubrication alone won't fix a bent channel or a cable that is coming apart.
Manufacturer procedures also show why diagnosis matters. Some require wiring and switch connections to be checked before the motor is condemned. Others call for window reinitialization first, replacing the motor only if initialization fails. Water intrusion and corrosion in the door harness or motor connector can create an intermittent failure that returns after rain.
Use this working matrix before ordering:
| What the window does | Likely area | First check |
|---|---|---|
| Grinding or popping | Regulator cable, gear, or slider | Inspect the mechanism for broken strands or detached guides |
| Motor noise with no glass movement | Regulator or motor-to-regulator connection | Watch the regulator while commanding the switch |
| Complete silence | Fuse, switch, wiring, connector, or motor | Test voltage and ground at the motor connector |
| Slow or uneven travel | Run channel, guide, alignment, or regulator | Clean the channels and look for binding |
| Works from one switch only | Switch or control circuit | Compare the master and local switches |
| Fails after rain | Harness, connector, or water management | Inspect for corrosion and moisture |
| Moves but stops at the wrong point | Calibration or anti-pinch logic | Perform the vehicle-specific initialization procedure |
If the door has water damage, electronic controls, or side-impact components, DIY diagnosis can become unsafe quickly. The repair decision should follow the test result, not the search term you used to find the part.
Tools, Workspace, and Choosing the Right T1A Auto Motor
Lay everything out before removing the first trim clip. A calm workspace prevents the most common garage mistake, which is discovering halfway through the repair that the glass has no support and the correct socket is still in the toolbox.
You'll want trim removal tools, a small screwdriver set, a socket set, a multimeter, a 12-volt test light, nitrile gloves, fabric tape or mechanic's wire, and a tray for fasteners. Keep a clean blanket nearby for the door panel and any glass you may need to remove. A service manual or vehicle-specific wiring diagram is more useful than a generic video when connector locations and switch circuits differ.
For fitment, search the supplier by vehicle year, make, model, body style, door side, and front or rear position. T1A Auto's catalog includes powered window regulator assemblies with motors, along with other door hardware. Verify the exact application before comparing price or delivery, because a part that fits the opposite door can look nearly identical while using different mounting points or connector orientation.
Before choosing motor-only, inspect the regulator. If the cable is frayed, the rail is bent, the slider is damaged, or the glass channel is distorted, a new motor won't cure the underlying load. A complete assembly costs more in parts than a motor alone, but it can reduce the chance of reopening the door when several components have worn together. For broader guidance on part quality and fitment decisions, review OEM and aftermarket parts considerations.
| Replacement option | Best for | Key tradeoff |
|---|---|---|
| Motor only | A confirmed dead motor with a healthy regulator and free-moving glass | Lower parts scope, but it requires careful transfer and alignment |
| Motor and regulator assembly | A broken cable, damaged rail, worn slider, or regulator that binds | More complete repair, but it replaces usable components too |
Check the warranty and return terms before ordering. T1A Auto states that its metal components carry a lifetime warranty, standard items carry a 3-year warranty, free standard shipping applies to orders over $75, and returns are free within 90 days. Those terms don't replace diagnosis, but they are useful when deciding between a motor-only repair and a complete assembly.
Voltage and Ground Tests That Save You a Parts Order
Electrical testing should happen before the door comes apart whenever the connector is accessible. If the glass is already trapped, remove the panel only far enough to reach the motor connector, keeping the battery and airbag precautions specific to your vehicle in mind.
Test the circuit in both directions
Find the vehicle-specific wiring diagram first. Don't infer polarity from wire color. Manufacturers change colors across model years, and a wire that appears to be ground may carry a switched signal.
Set the multimeter according to the vehicle procedure, identify the motor connector, and command the window in both directions. The motor circuit commonly reverses polarity to change direction, so the meter should show a command in one direction and a reversed command in the other. The exact reading depends on the vehicle's design, so compare the result with the service information rather than applying a generic voltage assumption.
A useful sequence looks like this:
- Check the fuse and lockout function. A blown fuse, disabled window lock, or control-module issue can affect the symptom before the motor circuit.
- Compare switches. Test the local door switch and the driver's master switch. If one operates the glass and the other doesn't, the motor probably isn't the first part to replace.
- Back-probe the motor connector. Command the window up and down while checking for the expected power and ground paths.
- Inspect the connector closely. Look for green corrosion, moisture, pushed-back terminals, damaged insulation, or a harness that changes behavior when the door moves.
- Test the motor separately only when safe. A fused jumper can energize the motor directly using the correct procedure and polarity. If it spins under direct power but not through the vehicle harness, the fault is upstream.
The most useful isolation test is simple: energize the motor directly with a fused jumper, using the vehicle procedure, and confirm whether it spins.
Direct testing can prove the motor is capable of running, but it doesn't prove the regulator is healthy. A motor may spin freely without load and stall when a bent rail or dry channel is attached. If you're unfamiliar with electrical fault isolation, this broader guide to home electrical troubleshooting offers useful fundamentals, though automotive circuits still require the vehicle's own wiring diagram and safety procedures.
For a vehicle-specific walkthrough, use this window motor testing guide. Disconnect the battery when the service information requires it, especially around doors with side-impact airbags. Don't probe blindly around airbag wiring, and don't leave a motor powered while your fingers are near the regulator.
Removing the Door Panel and Swapping the Motor
Once the diagnosis points to the motor, park on level ground, open the door fully, and disconnect the negative battery terminal when the vehicle procedure calls for it. Give the electrical system time to power down before working near side-impact equipment. Keep the window switch disconnected until you're ready for the test cycle.
Use a trim tool rather than a flat screwdriver where possible. Find hidden screws around the pull handle, armrest, speaker area, or switch bezel, then release the clips one at a time. Don't yank the panel away, because speaker leads, courtesy lights, lock cables, and switch connectors may still be attached. Lift the panel upward if it hangs on a top lip, then place it on a blanket.
For a vehicle-specific panel procedure, use this car door panel removal guide.
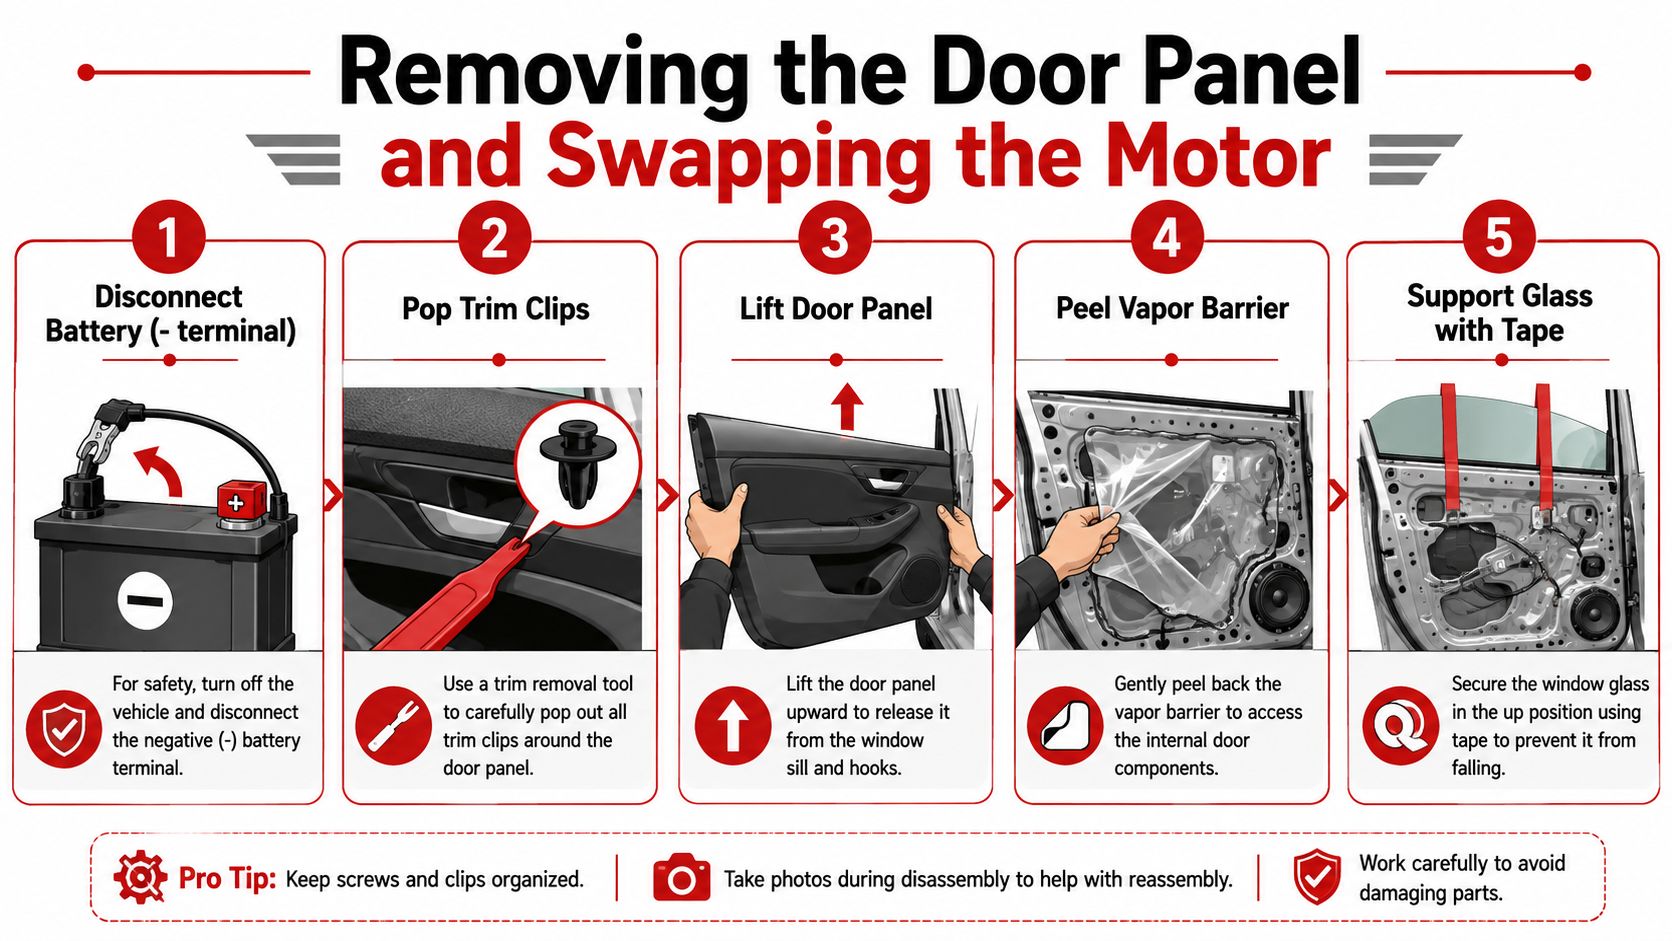
Support the glass before loosening anything
Peel the vapor barrier back slowly. Preserve the butyl seal where possible, because the barrier keeps water inside the door from reaching the trim, wiring, and connectors. If the glass is raised, secure it with wide fabric tape over the top of the door frame or use a suitable wedge. If the glass is partway down, support it before loosening the regulator or motor fasteners.
This step isn't optional. Releasing the regulator can allow the glass to drop, and broken glass clips can leave the pane unsupported. NHTSA regulatory analysis estimated approximately six fatalities and 1,955 injuries annually from vehicle power-window systems, and FMVSS No. 118 addresses accidental operation and entrapment. The analysis is available in NHTSA's power-window regulatory document.
Inspect before installing the replacement
Disconnect the motor connector and identify the motor's mounting points. Depending on the design, you may replace the motor on the regulator or remove the complete motor-regulator assembly. Photograph the original routing and mark the position of brackets before removing fasteners.
Inspect the cable strands, sliders, guide rails, carrier plate, glass clips, mounting holes, and run channels. If the regulator cable is frayed or the rail is bent, stop and choose the complete assembly rather than transferring a new motor to a failing mechanism.
Fit the replacement motor squarely against the regulator. Transfer only the hardware the vehicle design requires, then leave the mounting fasteners slightly loose so the assembly can be aligned later. Reconnect the motor connector until the locking tab clicks, but don't cycle the glass yet. The next job is alignment, tightening, calibration, and validation.
Reassembly, Calibration, and the Mistakes That Cause Comebacks
The repair often looks successful when the glass moves once. The comebacks start later, after the new motor spends every cycle fighting a dry channel, a crooked regulator, or a seal that was put back carelessly.
The quiet failures begin during assembly
One common mistake is tightening regulator bolts before the glass and rail are aligned. The assembly can sit under tension, causing the glass to tilt or drag. Another is using hand feel instead of the manufacturer's torque specification. A fastener that feels secure can still be too tight for a thin carrier plate or guide rail.
Clean the run channels before final adjustment. Remove grit and old residue, then apply only the lubricant specified for the channel material. Excessive or incompatible lubricant can attract dirt, while a dry felt channel can add enough drag to overload the motor.
A manufacturer service bulletin illustrates how precise fitment can be. One inspection requires a measurement between 24.5 and 25.5 mm, with assemblies outside that range requiring replacement. The practical lesson is broader than that single vehicle. Alignment is a measured condition, not something you can reliably judge by looking at the rail.
Calibrate before declaring victory
Reconnect the switch and motor, then operate the glass through its full travel while keeping your hands clear. Watch the seal contact, listen for cable noise, and stop if the glass tilts, binds, reverses unexpectedly, or strains near the top.
Many vehicles require a window initialization procedure after power has been disconnected or a motor has been replaced. Follow the manufacturer's method, because the sequence varies. Calibration matters especially when the vehicle uses anti-pinch logic. Skipping it can make a mechanically sound window stop early or reverse when it should close.
Run several complete cycles, pausing between them. A healthy installation should move consistently, stop at the correct points, maintain even contact with the seals, and remain quiet. If current-draw testing is available for the vehicle, compare the result with the service information rather than relying only on sound.
Reseal the door as carefully as you opened it
A vapor barrier that isn't sealed can direct rainwater onto the motor connector or harness. Replace damaged butyl or use the material specified for the door, then press the barrier firmly around the perimeter. Don't substitute ordinary household tape if it won't maintain an automotive water seal.
Before reinstalling the trim, confirm every connector is locked, every cable is routed correctly, and every clip is either in the panel or replaced. A missing clip can leave the panel loose, while a trapped wire can create a new fault when the door closes.
A Short Checklist Before You Button the Door Back Up
Save this list on your phone before starting. It keeps the job focused on proof rather than optimism.
- Confirm the root cause: Test voltage and ground at the motor connector, and compare both switch directions.
- Verify fitment: Search T1A Auto or another supplier by vehicle year, make, model, door side, and front or rear position.
- Support the glass: Secure it before loosening regulator or motor fasteners.
- Inspect the mechanism: Check the cable, sliders, rails, glass clips, mounting points, and run channels.
- Choose the right repair: Use a motor alone only when the regulator and channels are sound. Choose a complete assembly when the lifting mechanism is damaged or binds.
- Align before tightening: Leave fasteners adjustable until the glass sits correctly, then use the manufacturer's torque specification.
- Clean and lubricate: Remove contamination from the run channels and use compatible lubricant where specified.
- Reconnect carefully: Lock the motor, switch, speaker, courtesy light, and any other door connectors.
- Initialize the window: Follow the vehicle-specific calibration sequence, including anti-pinch setup where fitted.
- Cycle and inspect: Run the glass through repeated full cycles, checking noise, speed, alignment, stopping, and seal contact.
- Reseal the vapor barrier: Restore the water barrier before reinstalling the trim panel.
- Test the finished door: Confirm the window lock, local switch, master switch, ignition behavior, and other door functions.
A successful window motor replacement restores more than movement. It restores controlled travel, proper electrical behavior, water protection, and confidence that the motor isn't being forced to compensate for a damaged regulator or dirty channel. A diagnostic repair can be a single Saturday job. A guessed repair is often two.
T1A Auto offers vehicle-matched powered window regulator assemblies and other replacement door components, with fitment search by vehicle details, a lifetime warranty on metal components, a 3-year warranty on standard items, and free 90-day returns. Check the exact motor or motor-regulator assembly for your door at T1A Auto before ordering.
