


You press the window switch, hear the motor spin, and expect the glass to rise. Instead, the window drops into the door, tilts crookedly, or stops halfway with a harsh crunch. The motor may still sound healthy, which makes the repair confusing. The hidden problem is often the window regulator cable, the tensioned steel link that transfers movement from the motor to the glass.
That thin cable works with a spool, pulleys, guides, and a glass carrier inside the door. When it frays, jumps off its guide, or loses tension, replacing the switch or motor won't solve the problem. This guide explains how the system works, how to separate cable symptoms from electrical faults, how to choose the correct replacement, and when a cable-only repair isn't worth the risk.
Table of Contents
- Introduction to Window Regulator Cables
- How a Window Regulator Cable Works Inside Your Door
- Signs Your Window Regulator Cable Is Failing
- Types of Window Regulators and Cable Materials Explained
- Choosing the Right Replacement and Ensuring Perfect Fitment
- Installation Overview Safety Tips and Maintenance
- Window Regulator Cable FAQs and Next Steps
Introduction to Window Regulator Cables
A failed window regulator cable usually announces itself at an inconvenient time. You might be at a parking gate with the glass stuck open, driving in rain with the window tilted, or trying to lower it for a toll booth when the glass suddenly falls into the door. A shop technician may hear the motor turning and assume the motor is fine, but that doesn't mean the regulator is carrying the glass correctly.
The cable acts like the hidden tension system in a small lifting machine. The motor supplies rotation, while the cable pulls the glass carrier along its track. If the cable snaps or comes loose, the motor can continue spinning without moving the window. That distinction prevents a common mistake, buying an electrical part when the mechanical assembly has failed.
For a simple overview of the complete mechanism, see this explanation of what a window regulator does. The important point is that the regulator isn't just a motor. It's the complete mechanism that turns motor or hand-crank movement into controlled vertical glass movement.
What this guide helps you decide
A DIY owner needs to know whether the door panel can be opened safely, whether the glass needs support, and whether the full regulator assembly should be replaced. A professional needs a fast symptom-to-fault process that avoids unnecessary parts replacement and comebacks.
You'll learn to identify:
- Cable failure: Grinding, crunching, crooked travel, slack, or a window that falls despite a running motor.
- Motor or electrical trouble: A silent system, intermittent power, or a motor that doesn't respond to the switch.
- Fitment requirements: Vehicle year, make, model, door position, manual or power operation, and part-number matching.
- Repair limits: Why temporary cable rethreading may not deliver durable service once the cable or guides are damaged.
Early attention matters because a cable that still moves the window can be deteriorating at every pulley contact. A window that works only when you hold the switch, moves unevenly, or makes a new scraping sound deserves inspection before the glass becomes unsupported.
How a Window Regulator Cable Works Inside Your Door
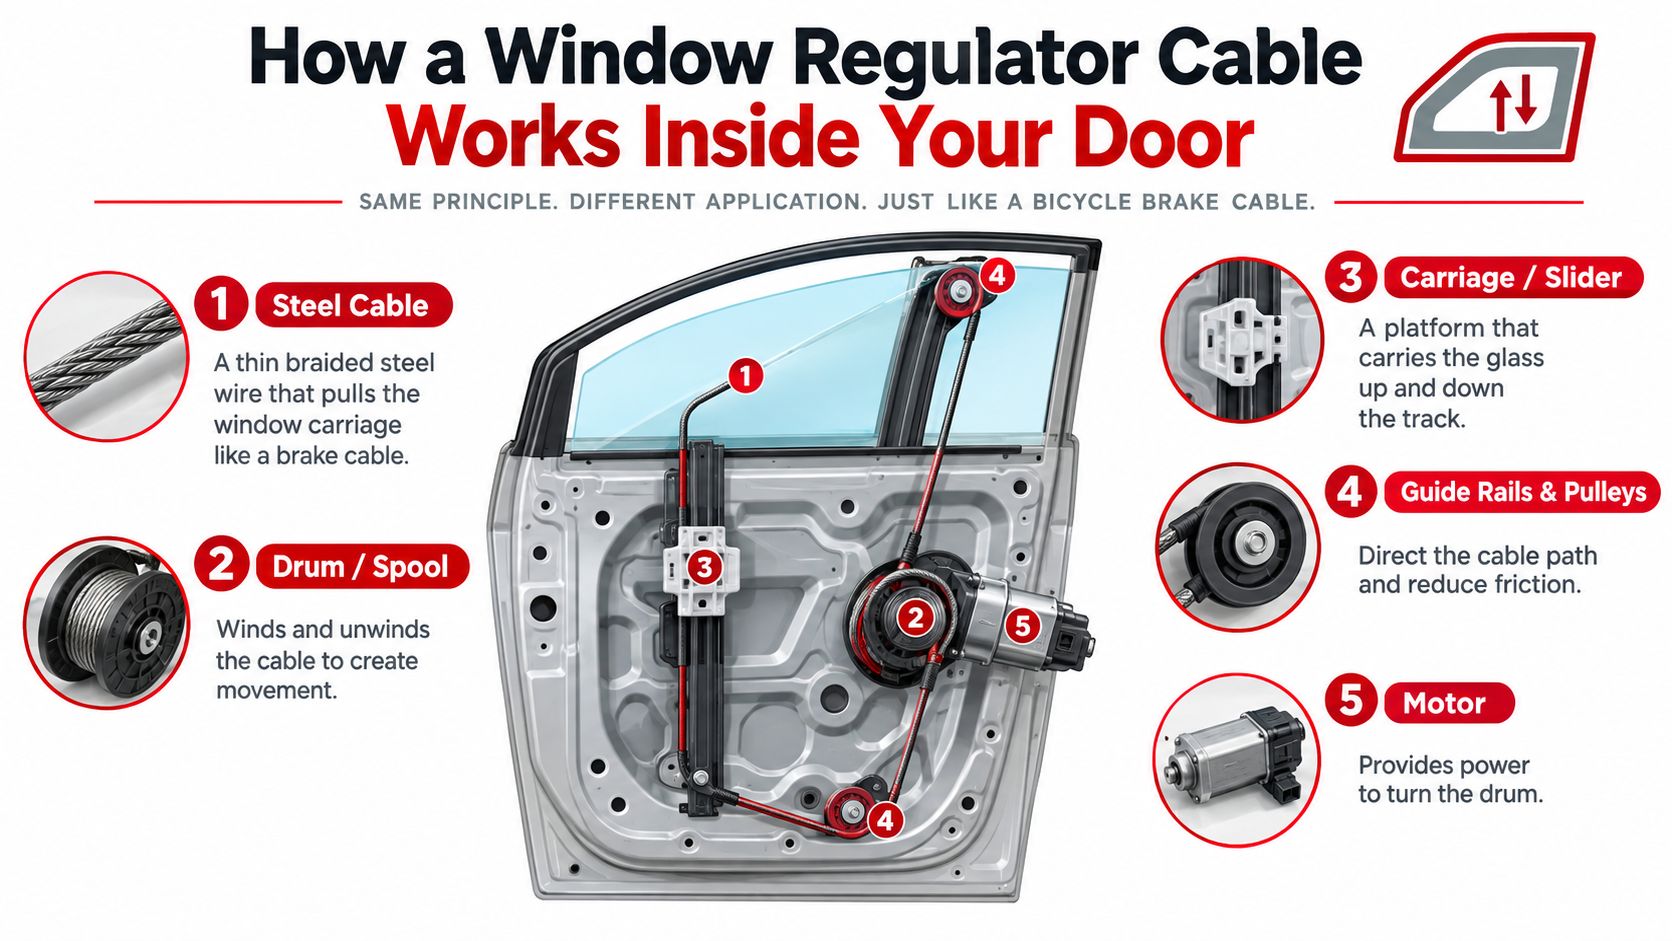
Think of a bicycle brake cable. Your hand pulls a thin cable through a housing, and that cable moves a brake mechanism at the wheel. A cable window regulator uses the same basic idea, but the direction and hardware are different. Instead of squeezing brake pads, the cable pulls a glass carrier up and down a track.
The movement path
The motor turns a small drum or spool. The spool winds one part of the cable while releasing another, creating a controlled pull. Pulleys at the ends of the track redirect the cable so the force travels through the door in a compact path.
The main parts work together like this:
- Steel cable: A flexible, braided element that carries pulling force.
- Drum or spool: Stores the cable as it winds and unwinds.
- Guide rails and pulleys: Keep the cable aligned and redirect its path.
- Carriage or slider: Holds the glass and travels along the rail.
- Motor: Provides the rotation in a power regulator.
- Crank mechanism: Provides the input in a manual regulator.
The carrier doesn't lift the glass by pushing from underneath like a jack. It moves along its guide while the cable remains under tension. That tension is essential. If the cable becomes slack, it can leave a pulley, wrap unevenly around the spool, or rub against nearby parts.
The cable and pulley system is compact because flexible cable can travel around obstacles inside a crowded door. A rigid lifting arm needs more room to swing, while a cable can route through narrow spaces between the inner door shell, glass, speakers, locks, and wiring.
Why the design became common
Window lifting technology developed over time. Historical information about window regulators records that Brose received a patent for the first manual window lifter in 1926, installed the first window regulators on production vehicles in 1928, and that the Packard-180 introduced automatic window regulators in the United States by 1940 using an electrohydraulic system.
The same historical record notes adoption of power window regulator systems by Ford Lincoln sedans, limousines, and Cadillac models in 1941, followed by the first electrically operated window lifting system on the Continental Mark II in 1956 through cooperation between Brose and Ford Motor Co. Cable layouts fit modern doors because they combine useful travel with flexible packaging.
Power and manual regulators use the same basic mechanical goal, but their inputs differ. A power unit uses a motor, switch, wiring, and often a control module. A manual unit uses a hand crank and gear mechanism. The cable, guides, and carrier still need correct alignment in either design.
Signs Your Window Regulator Cable Is Failing
A technician doesn't diagnose a window by sound alone. The useful clue comes from combining what you hear, what the glass does, and whether the motor responds. A cable problem usually creates mechanical symptoms even when electrical power reaches the motor.
Match the symptom to the likely fault
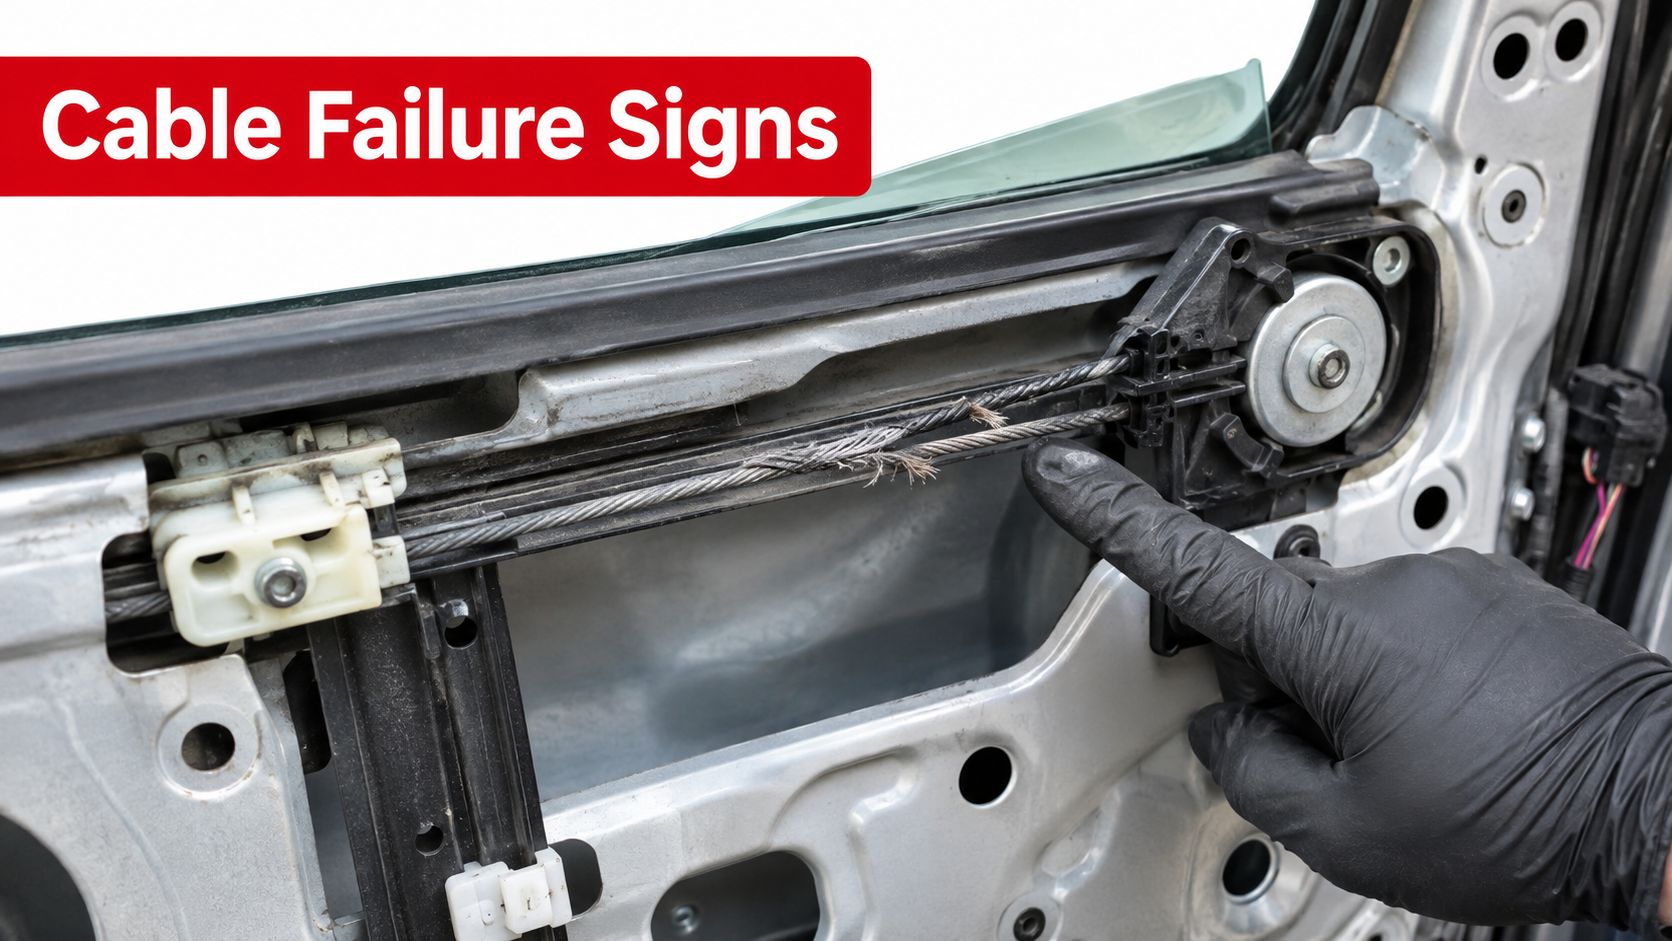
A grinding or crunching sound often means the cable is fraying, slipping, or winding badly on the spool. The noise can also come from a cable that has detached from a guide and is rubbing against the regulator frame or door structure. The documented failure pattern is clear: the motor may still run while the window grinds, moves jerkily, or drops into the door cavity. See this technical explanation of window regulator cable failure for the mechanical cause-and-effect relationship.
Crooked glass points toward a support or alignment problem. One side of the carrier may no longer be pulled evenly, or the cable may have lost tension at a pulley. Don't keep cycling the window to “see if it clears.” Uneven loading can stress the remaining cable and damage the glass run.
A window that drops suddenly is more urgent. The cable may have snapped, detached, or shed enough strands that the carrier no longer supports the glass. If the motor runs but the glass doesn't move, the motor and switch are receiving a different diagnosis from the regulator itself. The motor can turn freely after the cable has failed because the load path to the glass is broken.
Use this symptom check as a quick screen:
- Motor silent: Check the fuse, switch, wiring, connector, and motor power before condemning the regulator.
- Motor audible, glass stationary: Suspect a broken, detached, or badly wound cable.
- Grinding or crunching: Inspect the cable, spool, pulleys, and guides for mechanical damage.
- Jerky travel: Look for fraying, misalignment, binding glass, or a damaged carrier.
- Glass falls into the door: Stop operating the switch and secure the glass before opening the door.
For a stuck window that hasn't clearly failed mechanically, this guide to fixing a stuck car window can help you separate a jam from a failed lifting assembly.
A visual inspection can reveal separated strands, corrosion, slack, or a crooked cable path. Wear concentrates where the cable bends around pulleys and passes through guides. Repair guidance estimates that visible strand separation may precede complete failure by roughly 500 to 1,000 additional window cycles, so treat exposed damage as a replacement decision, not a cosmetic defect. That estimate comes from guidance on window regulator wear and inspection.
The following video can help you visualize the inspection process, but keep hands clear of moving cable and glass components.
Diagnostic rule: If the motor runs and the glass doesn't respond correctly, inspect the mechanical regulator before buying another switch or motor.
Types of Window Regulators and Cable Materials Explained
Cable regulators are popular because they use a flexible pulling element instead of a large swinging arm. Scissor regulators use crossing metal arms and a gear or motor to raise the glass. Both designs can work well, but they package differently and fail in different ways.
| Feature | Cable Regulator | Scissor Regulator |
|---|---|---|
| Main lifting element | Flexible steel cable routed around pulleys | Crossing metal lifting arms |
| Packaging | Compact and adaptable inside narrow doors | Requires room for arm movement |
| Typical mechanical concerns | Frayed cable, detached cable, pulley wear, slack | Bent arms, worn pivots, gear damage |
| Inspection focus | Cable strands, spool, guides, tension, alignment | Arms, pivots, gear teeth, mounting points |
| Replacement approach | Often supplied as a complete assembly | Often supplied as a complete assembly |
Cable-type regulators represent a significant part of the market. One market report assigns them 38.1% market share, describing their use of tensioned cables wound around pulleys or drums to control vertical window movement. The figure appears in the cable window regulator market overview.
Cable construction affects service life
Most regulator cables use braided steel because the material combines tensile strength with flexibility. Galvanized steel can provide corrosion resistance through its protective zinc coating. Stainless steel can offer stronger corrosion resistance in demanding environments, though the complete regulator design still matters. A high-quality cable won't compensate for a misaligned guide or a rough pulley.
Some assemblies use coated cable surfaces to reduce friction and protect strands. The coating can wear where the cable repeatedly bends, especially if dirt enters the guide path. Pulley material matters too. A smooth, properly shaped pulley supports the cable, while a cracked or rough pulley can create concentrated bending and strand damage.
Lubrication requires restraint. The correct lubricant on the appropriate guide or contact point can reduce friction, but spraying an unknown product onto the cable may attract dirt or affect plastic components. Follow the vehicle or part manufacturer's service guidance, and replace damaged hardware rather than trying to lubricate away a structural problem.
For a shopper, the practical lesson is simple. Choose the regulator architecture designed for the vehicle, then evaluate the quality of the cable, pulley, carrier, mounting frame, and warranty as one system. The cable is only as reliable as the parts that keep it tensioned and aligned.
Choosing the Right Replacement and Ensuring Perfect Fitment
A window regulator can look correct in a product photo and still be wrong for the vehicle. Door position, body style, production changes, manual versus power operation, and motor configuration can all affect compatibility. Fitment starts with the vehicle, not with the visual shape of the part.
Use a fitment checklist
Start with the exact year, make, model, and body configuration. Then verify whether you need the front or rear door and the driver or passenger side. “Left” and “right” are normally determined from the driver's seated position, but confirm the retailer's convention before ordering.
Next, compare the original part number with the replacement listing. An OEM number can identify the factory design, while an aftermarket number may identify a compatible replacement. The numbers should support the fitment result, not replace it.
Check whether the listing includes the motor. If your motor is reusable and the replacement is a regulator-only unit, the installation may require transferring the motor. A regulator with a motor can reduce that extra work, but it must match the connector, mounting points, and vehicle wiring.
Fitment habit: Keep the old part until the new assembly has been compared at the bench. Check mounting holes, cable routing, glass attachment points, connector shape, and door-side orientation before removing anything that can't be returned.
Material and warranty details also deserve attention. Some replacement assemblies use upgraded metal components in places where the original design used failure-prone plastic. That can matter when the failure began at a carrier, guide, or mounting piece rather than at the cable itself. A lifetime warranty on metal components and a 3-year warranty on standard items are product-policy details offered by T1A Auto, but coverage always depends on the specific listing and terms.
Collision repair shops may also look for CAPA certification when a part must meet applicable replacement-part quality requirements. That concern is separate from ordinary mechanical fitment, so verify whether the part carries the certification you need.
If you're working on a recreational vehicle or a fixed side-glass problem rather than a door regulator, a guide to motorhome side glass replacement addresses a different glass-replacement application. It can help prevent confusing stationary side-glass work with a powered window mechanism.
T1A Auto lets shoppers search its catalog by vehicle and offers product pages with fitment information, part numbers, reviews, and warranty details. Compare those details with another supplier if needed, and check shipping and return terms before purchase.
Installation Overview Safety Tips and Maintenance
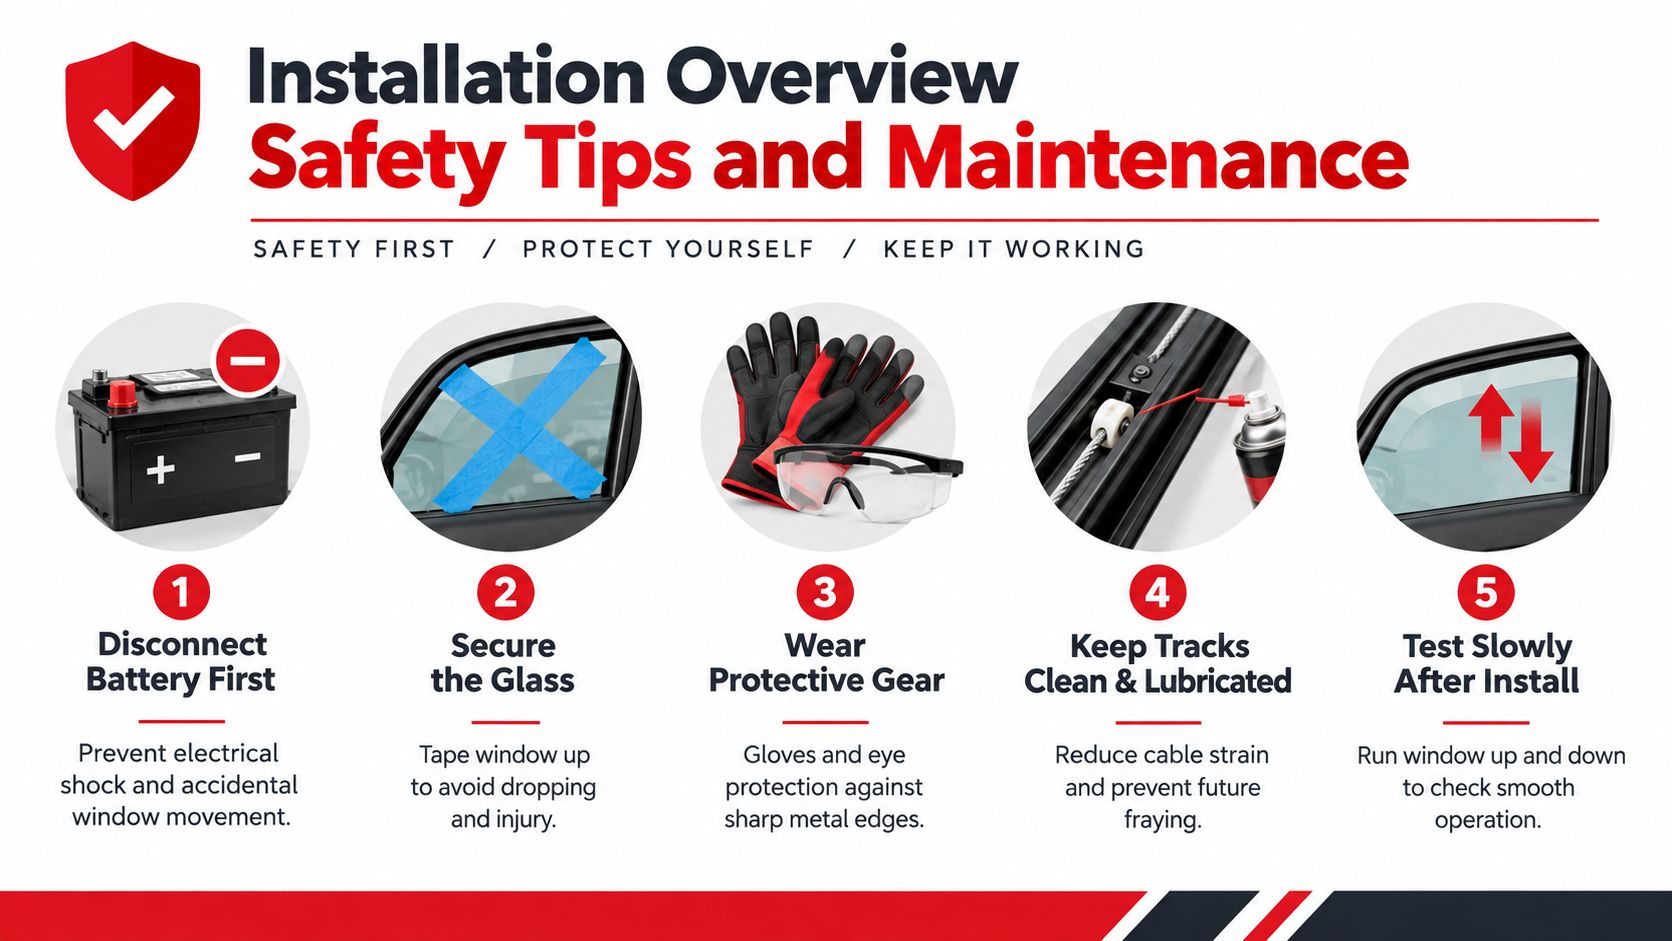
Window regulator work combines sharp door metal, heavy glass, stored tension, and electrical movement. Preparation matters more than speed. Disconnect the battery where the vehicle procedure calls for it, and secure the glass in the fully raised position with suitable tape or a support that won't damage the glass or frame.
Prepare the door before touching the regulator
Remove the door panel with trim tools rather than prying directly against painted surfaces. Keep fasteners organized, and handle the vapor barrier carefully because it helps protect the interior from water entering through the door.
Support the glass before loosening its attachment points. If the regulator has failed, the glass may be free to slide or fall as soon as the carrier is released. Wear gloves and eye protection, especially around stamped metal openings and broken cable strands.
Pay attention to the replacement's cable path. Don't force a cable over a pulley or twist the carrier to make a hole line up. Incorrect routing can create immediate noise and repeat failure. If the new assembly includes a motor, compare the electrical connector before installation. If it doesn't, transfer the original motor only when the mounting and gear interface match the replacement.
Maintenance is mostly inspection
Keep guide channels clean and use only the lubricant recommended for the regulator or glass-run material. Dirt and hardened residue increase resistance, which makes the motor and cable work harder. Inspect for rust, exposed strands, unusual slack, and glass that no longer stays parallel with the opening.
Mechanical wear commonly develops at pulley contact points and guide interfaces. Bending stress, misalignment, and inadequate lubrication can accelerate cable shedding. Once visible strand separation or corrosion appears, continued operation becomes a gamble. The repair guidance cited earlier estimates a remaining range of roughly 500 to 1,000 cycles after strand separation becomes visible, so schedule the repair promptly rather than waiting for the window to drop.
After installation, test the window slowly. Listen for scraping, watch both front and rear edges of the glass, and stop if the glass tilts or binds. Refit the vapor barrier and door panel only after the window completes its travel smoothly and the switch operates as expected.
Safety priority: If the glass won't stay supported, or the cable has wrapped around the spool, stop cycling the switch. Secure the opening and call a professional if you can't control the glass safely.
Window Regulator Cable FAQs and Next Steps
Can you repair only the cable?
A frayed or broken cable can sometimes be temporarily rethreaded, but that doesn't restore the cable's original strength, winding pattern, or guide condition. Once the cable has shed strands or damaged the spool and pulleys, the same assembly may fail again.
Repair guidance generally treats a broken cable as a full regulator replacement issue. One power window regulator testing guide explains that a motor can still run while a failed cable leaves the window binding or dropping, and notes that broken cables aren't normally replaced individually in a durable repair.
Does a running motor prove the motor is good?
It proves only that the motor is receiving enough power to make noise or rotate. The switch and motor can function while the cable, spool, carrier, or guides have failed. Test the electrical side, then inspect the mechanical movement before ordering parts.
Is a manual regulator different?
Yes. A manual unit uses a hand crank and gear input, while a power unit uses a motor and electrical controls. Both can use a cable-driven lifting mechanism, but the replacement must match the vehicle's operating system and mounting arrangement.
Should a DIYer replace the assembly?
If you can safely remove the door panel, support the glass, identify the correct part, and follow the vehicle procedure, assembly replacement may be manageable. A shop is the better choice when the glass is unstable, access is restricted, the cable has wrapped tightly, or the vehicle requires calibration after installation.
The practical decision is to confirm the symptom first, verify the part by vehicle and door position, and choose a complete assembly when the cable or its guides have failed. That approach costs less than replacing unrelated switches or motors and repeating the repair.
For a vehicle-matched replacement, T1A Auto offers powered and manual window regulators with fitment details, part-number references, warranty information, and return support. Search by your exact vehicle and compare the cable, motor, door position, and assembly specifications before ordering.
