


When your backup camera goes on the fritz, it's easy to jump to conclusions and imagine a hefty repair bill. But more often than not, the culprit is something simple. A blown fuse, a wire that’s worked itself loose, or even just a grimy lens can be all that stands between you and a clear rear view.
Before you start pricing out new cameras, let's cover the basics. A quick check of these common trouble spots can often get you back up and running without a trip to the shop.
More Than a Gadget: Why Your Backup Camera Is Essential
There's a specific kind of frustration that hits when you shift into reverse and get nothing but a black screen. That little camera isn't just a convenience anymore; it’s a core safety system. In fact, since May 2018, backup cameras have been mandatory on all new vehicles sold in the U.S., and for good reason—they prevent tragedies.
This wasn't just a random regulation. It was a direct response to the heartbreaking number of backover accidents, which tragically involve the most vulnerable: small children and elderly adults. The blind zone behind even a small car is surprisingly large, easily hiding a person from your mirrors alone.
The Real-World Safety Impact
The numbers don't lie. The data since the mandate shows just how critical a working camera is.
- After cameras became standard, pediatric trauma centers saw a massive 62% drop in backover incidents involving kids under five.
- Severe injuries from these kinds of accidents fell by almost 50%.
- For drivers over 70, who might have a harder time turning to look behind them, backup cameras cut backing crashes by an incredible 36%.
These aren't just abstract statistics. They represent real families and real situations where a simple piece of technology made all the difference. You can read the full study on the significant drop in pediatric injuries for a deeper dive.
When your backup camera stops working, you've lost more than a feature. You've lost a federally mandated safety device designed to protect the people you can't see.
Getting it fixed is a top priority. Whether you’re a weekend warrior with a toolbox or a pro, this is a repair you can handle. With the right parts and a little guidance, you can restore your vehicle's safety system and get that crucial visibility back.
Your First Diagnostic Checks
When your backup camera suddenly gives you the black screen of death, it's easy to jump to the conclusion that a pricey repair is in your future. But hold on a second. From my experience, the fix is often surprisingly simple and something you can handle in your own driveway in just a few minutes. Let's walk through the easy stuff first before we even think about grabbing any tools.
First things first, is the lens just dirty? It sounds almost too obvious, but that little camera is exposed to everything—road grime, dust, mud, and rain. A filmy layer of dirt is all it takes to make the picture blurry, foggy, or completely blacked out. Before you do anything else, grab a soft microfiber cloth and give it a good wipe. If you're dealing with caked-on gunk, you might need to put in a little more effort. We have a great guide with detailed steps on how to clean your backup camera lens if a simple wipe doesn't cut it.
Check the Fuse Box
If the screen is still black after a good cleaning, the next stop is the fuse box. Just like any other electronic part on your car, the camera system is protected by a fuse. A random power surge can pop that fuse, instantly cutting power and taking your camera offline. It’s a built-in safety measure.
Finding the right fuse is pretty straightforward:
- Grab Your Owner's Manual: This is your treasure map. It will have diagrams for the fuse boxes (most cars have at least two—one inside the cabin and one under the hood) and will tell you exactly which fuse protects the backup camera or infotainment screen.
- Inspect the Fuse: Once you've found it, use a fuse puller (often included in the fuse box) or a small pair of pliers to gently pull it out. Hold it up to a light. A good fuse has a solid little metal strip running through it. If that strip is broken or looks burnt, you've found your culprit.
A new fuse costs pocket change and takes seconds to install. More often than you'd think, this is all it takes to bring a dead camera back to life.
To make things even clearer, this flowchart breaks down the diagnostic path I always recommend. You start with the simplest, most common problems and work your way up.
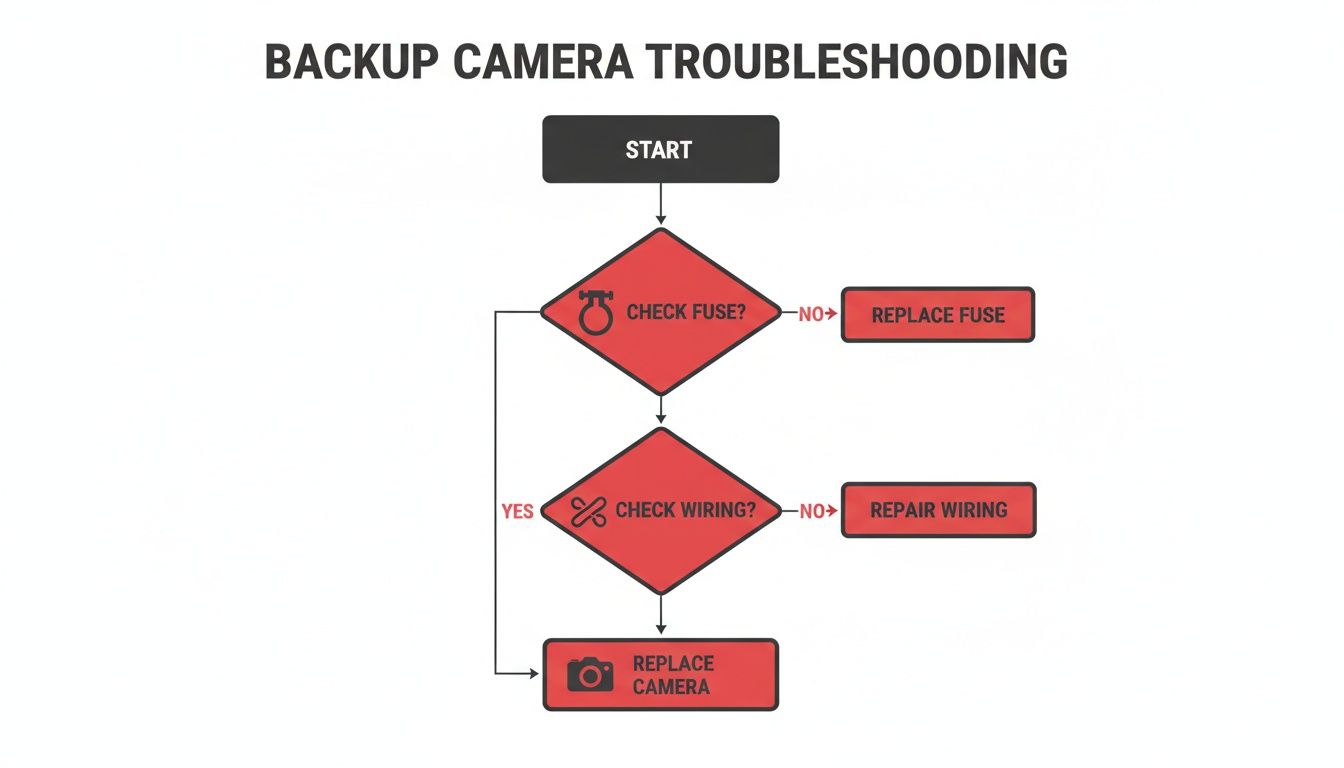
As you can see, you always want to rule out the easy fixes like fuses before diving into more complex tasks like checking the wiring harness.
To help you connect what you're seeing with what might be wrong, here's a quick reference table.
Common Backup Camera Symptoms and Likely Causes
| Symptom | Most Likely Cause | First Thing to Check |
|---|---|---|
| Black Screen | No power to the camera or monitor | Blown Fuse |
| Fuzzy or Blurry Image | Dirty or obstructed lens | Clean the Camera Lens |
| Flickering or "No Signal" | Loose wiring or bad connection | Wiring Harness Connection |
| Static or Lines | Electrical interference or damaged wire | Ground Wire & Wiring Insulation |
| Mirrored or Upside-down | Incorrect camera settings or software issue | Infotainment System Settings |
This table can be a real time-saver, pointing you directly to the most probable culprit based on the symptom.
Look for Obvious Physical Damage
Finally, do a quick walk-around and take a close look at the camera itself. This is especially important for trucks and SUVs where the camera is more exposed. Did you recently back into something? Even a light tap in a parking lot or shifting cargo in the trunk can be enough to crack the camera's housing or yank a wire loose.
Look for any visible cracks in the lens, check if the camera housing feels loose, or spot any wires dangling near the trunk lid or tailgate. Obvious physical damage is a dead giveaway that the camera unit or its connector took a hit.
If you've gone through these initial checks and are still staring at a blank screen, it's time to dig a little deeper into the system's wiring and components.
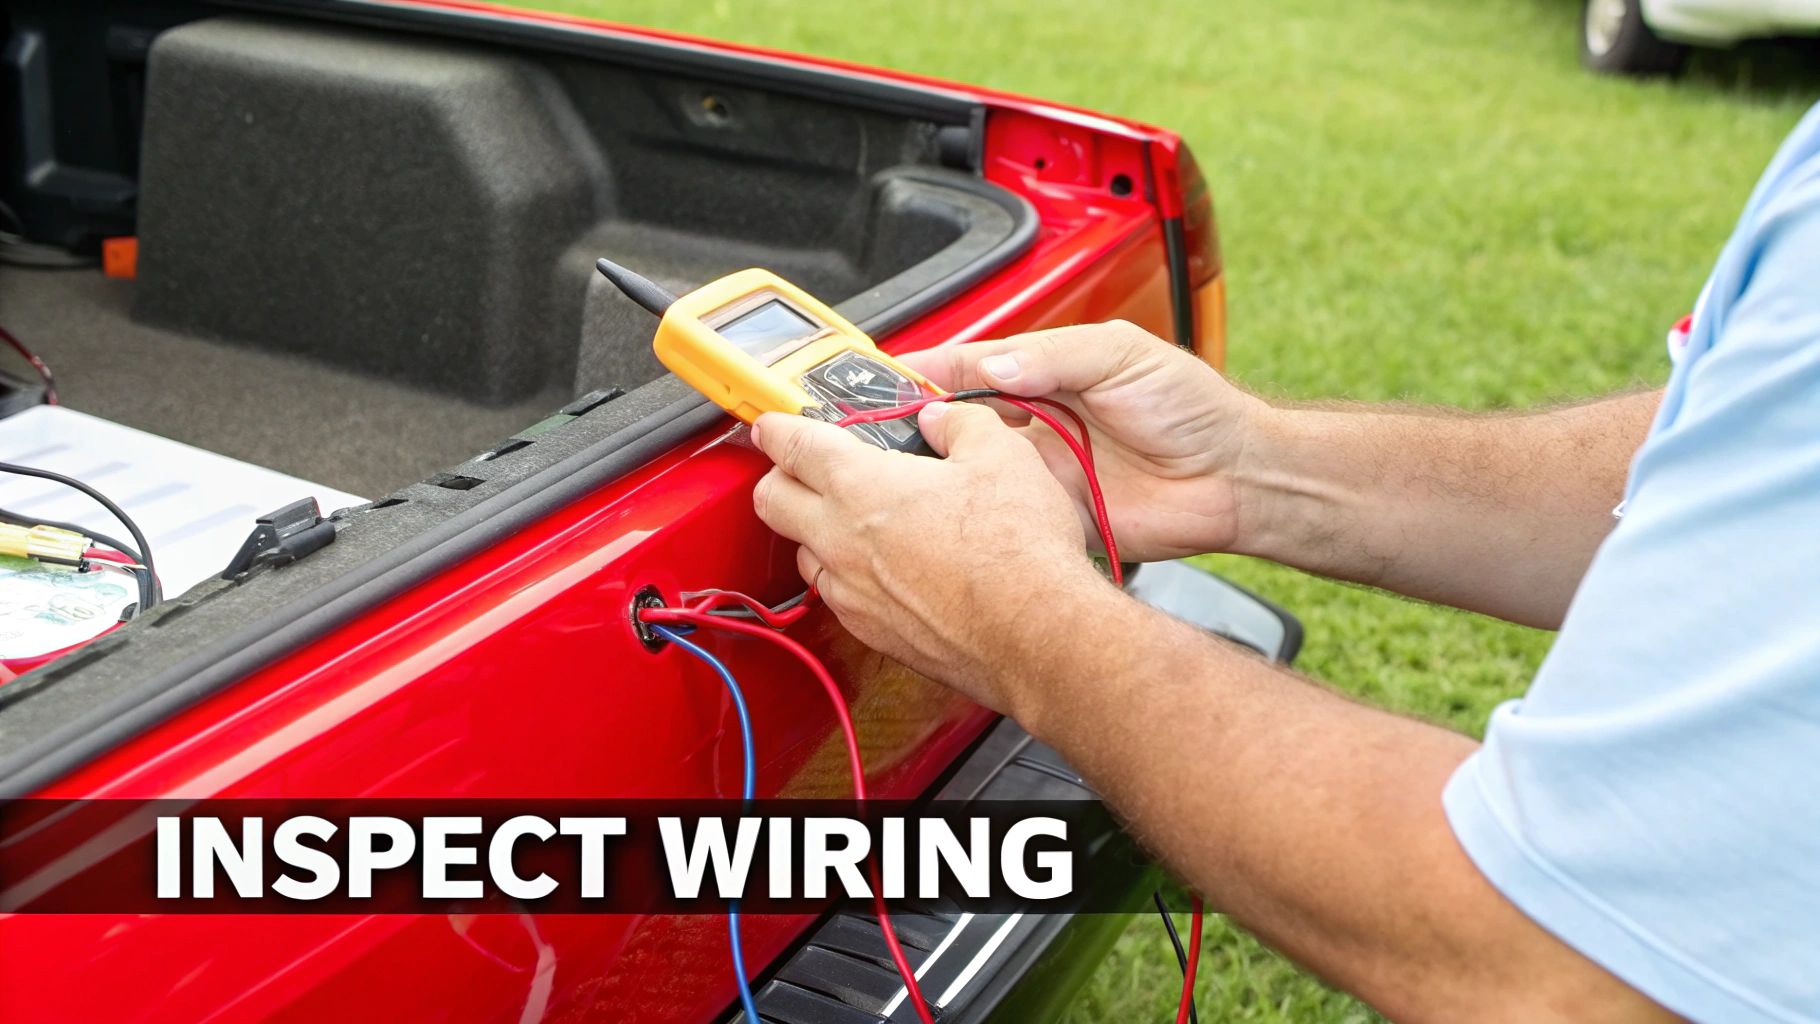
Time to Check the Wiring and Connections
If cleaning the lens and checking the fuse didn't solve the problem, it’s time to roll up your sleeves and inspect the wiring. In my experience, a huge number of stubborn backup camera failures come down to a bad wire or a connector that's worked itself loose.
Think about it: the wiring harness has to snake its way from the dashboard, often along the frame, and into a trunk or tailgate that's constantly opening and shutting. All that movement, plus exposure to road grime and moisture, is a perfect recipe for damage over time.
Where to Focus Your Search
Start by tracing the wiring harness right from the camera itself. This usually means popping off some of those interior plastic panels. A set of plastic pry tools is your best friend here—they’ll save you from scratching up your car’s interior.
Pay close attention to these common trouble spots:
- The Flexible Rubber Boot: That accordion-style tube between the vehicle's body and the trunk lid or tailgate is the number one spot for wire failure. Those wires get bent and stressed every single time you open it.
- Tailgate & Frame Entry Points: For truck owners (think F-150s, Silverados), look closely where the harness plugs into the tailgate handle camera and where it runs along the frame. These areas get hammered by road debris and wet weather.
- Connectors: Any place the harness plugs into something—the camera, the back of the stereo, or another section of wiring—is a potential weak link. Give each connector a gentle wiggle to make sure it's clicked in tight.
You're looking for any obvious signs of trouble: cracked insulation, shiny copper strands poking through, or that tell-tale green or white crusty corrosion around connector pins.
Confirming Power With a Multimeter
A visual check is a good first step, but a wire can be broken on the inside with no visible damage. This is where a multimeter is worth its weight in gold. It's the only way to know for sure if power is actually getting to the camera.
Pro Tip: A multimeter test is the moment of truth. If you have 12 volts at the camera's connector but still get a black screen, you can be pretty certain the camera itself has failed.
Grab your multimeter and set it to the DC voltage setting (look for V⎓ or DCV) on the 20V scale. You're going to probe the connector that plugs right into the camera.
- First, turn your ignition key to the "On" position (no need to start the engine).
- Set the parking brake and put the shifter in reverse. This sends power down the line.
- Carefully unplug the connector from the back of the camera.
- Now, touch the red probe from your multimeter to the power wire's pin inside the connector and the black probe to the ground wire's pin.
You should get a reading right around 12 volts. If you see 12V, your wiring is good, and it’s almost certainly a dead camera. If you get 0V or a very low number, you’ve just confirmed the problem is a break in the wiring somewhere between the camera and the fuse box.
For a more detailed walkthrough on this kind of electrical detective work, check out our guide on how to diagnose car electrical problems.
Having a basic foundation in understanding automotive electrical wiring can make these troubleshooting steps a lot less intimidating.
Isolating a Faulty Camera or Display
Alright, so you’ve confirmed the fuse is good and you’re getting a solid 12 volts at the camera connector. That’s great news. It means you’ve already ruled out some of the most common electrical gremlins that plague these systems.
Now we can narrow our focus down to the two main pieces of hardware: the camera itself or the display unit in your dash. Figuring out which one is on the fritz is usually a process of elimination based on what you’re actually seeing on the screen.
Telltale Signs of a Bad Camera
When the camera module is the problem, the symptoms are almost always isolated to the rearview image itself. Even though it's getting power, the camera is failing internally, and it shows.
Here are the classic signs I see when a camera is dying:
- The dreaded "No Signal" message: Your screen works perfectly for the radio, navigation, and everything else. But pop it in reverse, and you get "No Signal." This tells you the display is trying to show an image but isn't getting anything from the camera.
- A fuzzy or foggy picture: I’m not talking about a little dirt on the lens. This is a permanent blurriness that cleaning won't fix. It's often caused by moisture getting inside the housing and wrecking the sensor.
- Weird colored lines or static: If you see bright vertical or horizontal lines streaking across the picture only when you're in reverse, that’s a telltale sign the camera's image sensor is on its way out.
The bottom line is this: If every other function on your infotainment screen works perfectly and the only issue is the reverse image, the camera module is your number one suspect. The system is doing its job, but the camera just isn't sending a clear signal.
When the Display Is the Problem
On the flip side, if your display (or head unit) is failing, the problems usually aren't limited to just the backup camera. A glitchy screen will make its presence known across multiple functions, which is actually a helpful clue.
Think about it—if the screen freezes randomly, is completely unresponsive to touch, or shows visual artifacts while you're just listening to the radio, the problem is almost certainly centralized in the dash.
It’s also important not to overlook the software. A buggy system can make a perfectly good camera seem broken, and this is more common than you might think, even with factory systems. Ford, for instance, recently had a massive recall for over 1.4 million vehicles because of faulty rearview cameras where both software and hardware were to blame. You can read more about how widespread these OEM camera faults have become.
When a factory camera fails, whether it's the hardware or a software glitch, upgrading to a high-quality, CAPA-certified replacement is often a smarter long-term fix than simply getting another OEM part that could have the same built-in flaws.
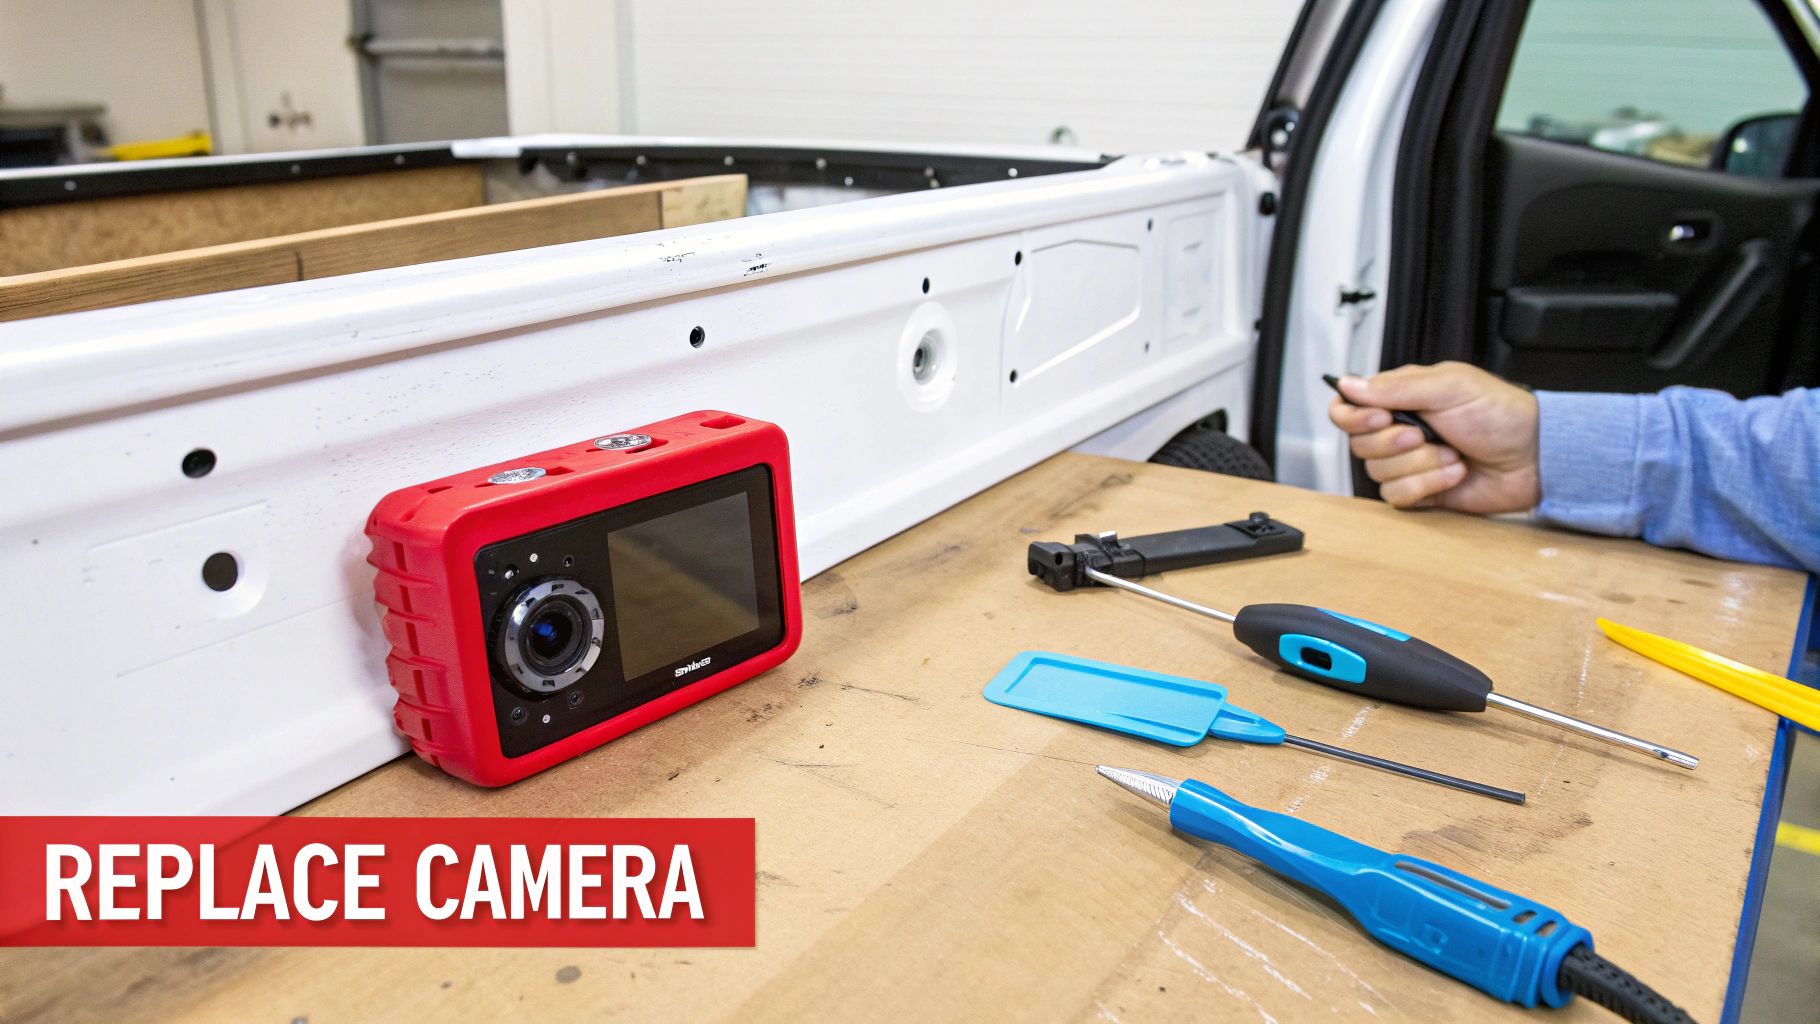
A Step-by-Step Guide to Replacing Your Backup Camera
So, you’ve done the troubleshooting and the camera itself is the culprit. Time to get your hands dirty. Replacing a backup camera can sound like a big job, but honestly, it’s a very doable DIY project for most people. Getting it done yourself can save a surprising amount on shop labor costs. All you really need are the right tools and a little bit of patience to get that critical rear view back in action.
First thing’s first: safety. Before you touch a single wire, pop the hood and disconnect the negative terminal from your vehicle's battery. This is a non-negotiable step. It prevents any accidental shorts that could fry your car’s electronics or, worse, give you a nasty shock.
Getting to the Old Camera
With the power safely disconnected, your next move is to get access to the camera. This almost always involves removing the interior trim panel on your trunk lid or tailgate. My advice? Get a set of plastic pry tools. Using a screwdriver is a surefire way to scratch the paint or crack the old plastic.
- Hunt for the Fasteners: Start by looking for screws or clips holding the panel on. You'll often find them tucked away inside grab handles or behind small, pop-off covers.
- Pry with Care: After removing any screws, grab your pry tool and gently work around the panel's edge. You’ll hear the clips pop loose as you go. Just take your time.
- Pro Tip: Take a Photo: Before you unplug a single thing, pull out your phone and snap a quick picture. Trust me, having a visual reference of how the wiring is routed can be a huge help when you're putting it all back together.
Once the panel is free, you should have a clear view of the camera and its wiring. Carefully squeeze the tab on the electrical connector to unplug it, then unbolt the old camera from its housing.
Installing the New Camera
Now for the easy part—just do everything in reverse.
Mount your new, CAPA-certified camera into the bracket. Make sure it’s snug and pointing straight. Next, plug in the electrical connector; you should hear or feel a solid "click" when it's properly seated. A loose connection here is a common reason for a new camera not to work.
Before you go through the trouble of reinstalling the entire trim panel, it’s a really good idea to test your work. Reconnect the battery terminal, turn the key to the "on" position, and put the car in reverse. If you see a clear picture on your screen, you've nailed it. It’s one of the most satisfying moments in any car repair. For a more detailed walkthrough on this process, check out our guide on how to install a backup camera.
Once you've confirmed everything works perfectly, go ahead and reinstall the trim panel, pop all the clips back in, and screw everything down. You're all set! You've just restored a key safety feature and can drive with confidence again.
Answering Your Lingering Backup Camera Questions
Even after you've pinpointed the problem, a few questions might still be nagging you. That's perfectly normal. Let's walk through some of the most common head-scratchers I hear from people dealing with a faulty backup camera.
Why Does My Backup Camera Only Work Sometimes?
An intermittent camera is incredibly frustrating, but it’s a massive clue. When a camera works one minute and is on the fritz the next, it's almost always a sign of a bad connection or a wire that's hanging on by a thread.
Think about it: every time you drive, your car vibrates. Every time you open and close the trunk or tailgate, things move. That's often all it takes to jiggle a loose connector or a frayed wire, causing it to lose contact. Your best bet is to go back and carefully inspect the entire wiring path, paying special attention to the plug at the camera itself and where it connects to your display unit.
Can I Put a Backup Camera on My Older Car?
You absolutely can, and it's one of the best safety upgrades you can make. There's a huge market for aftermarket kits designed specifically for cars that never had a camera from the factory.
These kits are usually all-in-one solutions. They come with:
- The camera module
- All the wiring you'll need
- A dedicated display screen (some are standalone, others cleverly clip right over your existing rearview mirror)
It’s a straightforward way to bring a key modern safety feature to a classic ride.
My Camera Image is Flipped or Upside-Down. How Do I Fix It?
I see this one all the time, especially with aftermarket cameras. Luckily, the fix is usually dead simple. Take a look at the camera's wiring harness—many models have a small, specific wire loop. Snipping that one wire is often all you need to do to flip or mirror the image back to the correct orientation.
No wire loop? Don't panic. The next place to look is in the settings menu of your head unit or infotainment screen. Most systems have a built-in option to digitally correct the camera's orientation.
When Should I Give Up and Call a Pro?
Knowing your limits is just as important as knowing how to use a multimeter. If you’ve gone through all the steps—you've checked the fuse, tested the wiring for continuity, and maybe even tried a different camera—but it still won't work, it might be time to tag in a professional.
This is especially true if you suspect the problem is buried deep within the car's main computer (ECU) or a complex infotainment system. A good auto electrician has specialized diagnostic tools that can talk to your car's brain and find software glitches or module failures that are impossible to spot with basic DIY tools.
If you do need replacement parts, from CAPA-certified cameras to a new tailgate handle, T1A Auto has you covered. You can find guaranteed-to-fit parts for your specific vehicle and get that camera working again by shopping at https://t1aauto.com.