


Ever heard that annoying whistle on the highway? Or maybe you've found a mysterious damp spot on your door panel after a rainstorm. Both are classic, frustrating signs that your car window rubber seal is starting to fail.
That simple rubber strip is one of the most important barriers your car has against the elements. It’s absolutely essential for a quiet, dry, and comfortable ride.
The Unsung Hero Guarding Your Cabin

Think of your car's window seal as the silent bodyguard for your interior. It's a humble component most of us never think about... until it stops doing its job. When that happens, the consequences are impossible to ignore. A bad seal isn't just an inconvenience; it's a breach in your car's defenses.
This guide will help you turn that frustration into a totally manageable DIY project. We'll break down exactly why this simple strip is so critical and walk you through everything you need to know to diagnose and replace your window seals like a pro.
Why This Small Part Matters So Much
A good window seal does a lot more than just keep rain out. It's a key player in the overall comfort and health of your vehicle, whether you're driving a daily commuter or a workhorse Ford F-150.
Here's what a healthy seal is responsible for:
- Noise Reduction: It’s the primary barrier against wind and road noise, keeping your cabin peaceful. If you're hearing that irritating whistle at highway speeds, a worn-out seal is almost always the culprit.
- Climate Control Efficiency: By blocking drafts, a tight seal helps your heat and A/C maintain the right temperature without constantly running. This means the systems don't have to work as hard, which can even save a little bit of fuel.
- Protection From Debris: The seal is also what blocks dust, pollen, and other gunk from getting into the cabin and, more importantly, into the delicate window mechanisms inside your door.
A healthy window seal is one of the cheapest and most effective ways to preserve your vehicle's interior and make your drive more enjoyable. Letting it go can lead to much bigger headaches down the road, like rust, mold, and even electrical problems inside the door.
Understanding the job these seals do is a core part of good automotive care. It’s all about keeping your vehicle protected and comfortable for the long haul. We'll show you how to get that tight, factory-fresh seal back so you can enjoy lasting protection and keep your interior looking great for years.
What Your Car Window Seal Actually Does
Ever looked at that black rubber strip around your car window and thought it was just for looks? Think again. That humble seal is the unsung hero of your vehicle's cabin, a high-performance gasket that stands guard between you and the elements. It’s a lot more than just trim; its job is a triple-threat of protection that directly affects your car's comfort, longevity, and even safety.
When a seal starts to go bad, it’s not a simple cosmetic flaw. It’s a serious functional failure. Once you understand what this little component is responsible for, you'll see why replacing a worn-out one is so important.
Your Car's First Line of Defense
Every time you get behind the wheel, that rubber seal is quietly doing three critical jobs at once. Each one is designed to protect your vehicle and everyone inside it.
- Blocking Out Water: This is the most obvious one. A good seal is perfectly designed to create a channel that guides rain and moisture away from the window opening and safely down the outside of the door. When that seal fails, water gets inside the door panel, and that's when the real trouble starts—rust, mold, and damage to your window motors and speakers.
- Keeping Things Quiet: A snug-fitting car window rubber seal is a huge factor in your car's interior noise levels. It acts as a buffer, absorbing vibrations from the road and glass while cutting down on that annoying wind noise you hear at highway speeds. The result is a much quieter, more relaxing ride.
- Maintaining the Climate: By stopping drafts in their tracks, the seal helps your car's interior maintain a stable temperature. This means your AC and heater work more efficiently because they aren't constantly battling air leaking in from the outside.
This small part is so crucial that the automotive window sealing market has become a massive industry. It's projected to grow from USD 20.25 billion in 2024 to USD 29 billion by 2035, with door and window seals leading the way. For popular trucks like the Toyota Tundra and GMC Sierra, properly functioning seals are responsible for preventing up to 70% of water intrusion issues reported by mechanics.
More Than Just a Piece of Rubber
To do its job right day in and day out, a window seal can't be made from just any old rubber. Most are crafted from an advanced synthetic compound called EPDM (Ethylene Propylene Diene Monomer). This material is specifically chosen for its incredible durability and its ability to stand up to just about anything the environment throws at it.
A car window seal is an engineered defense system. It’s designed to withstand extreme temperatures, resist degradation from UV radiation and ozone, and maintain its flexibility for tens of thousands of miles. When it fails, the protection it offers is completely lost.
To really get a feel for how vital these seals are, it helps to know a little about waterproofing materials in general. The basic science of creating a durable, flexible barrier against moisture is the same, which helps explain why you can't just stick any rubber strip in there and call it a day. For a closer look at how the seal works with other components, check out our guide on the different car window parts.
How To Spot a Failing Window Seal
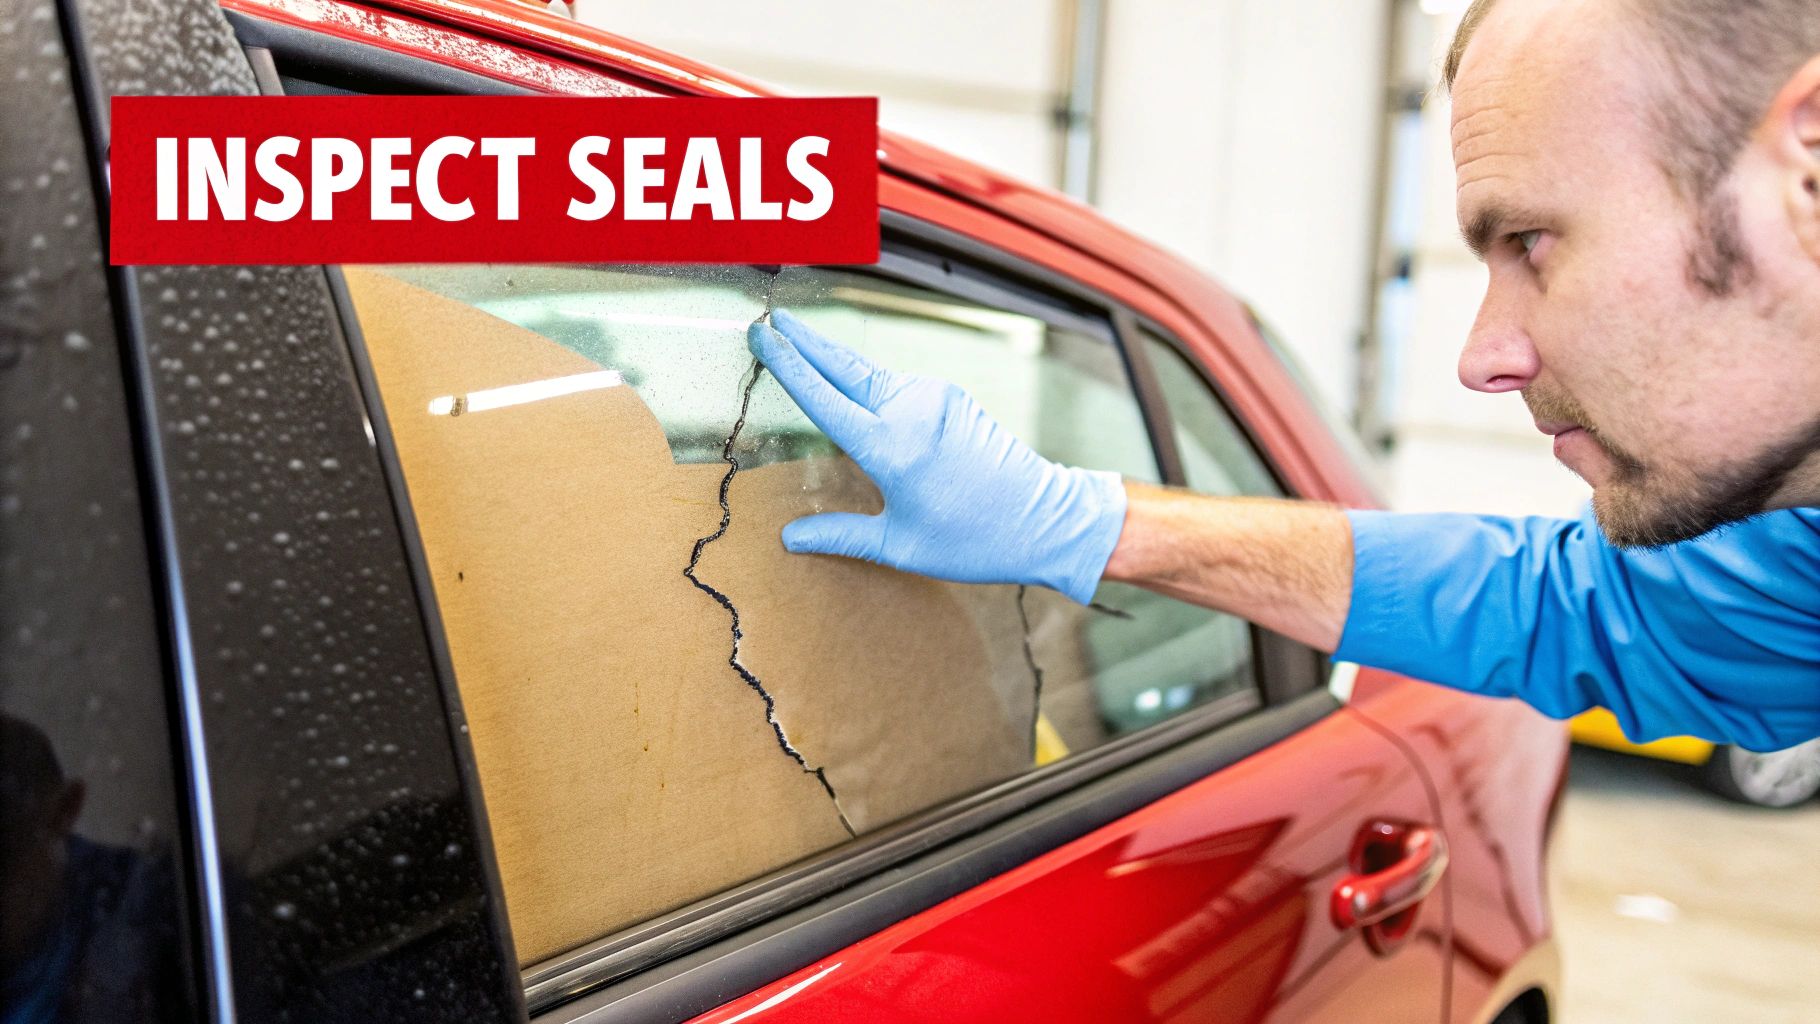
Your car window rubber seals rarely fail overnight. They usually give you plenty of warning signs—some subtle, some not so much—that they’re on their way out. The good news is you don’t need to be a professional mechanic to play detective; you just need to know what to look for.
By paying attention to what you see, hear, and feel, you can catch a bad seal before it leads to bigger headaches like water damage, rust inside your doors, or that annoying whistling sound on the highway.
Visual Clues You Can See
The quickest way to check your seals is just to look at them. This is where the most obvious signs of age and damage will appear first. Take a walk around your car and give the rubber trim around each window a close inspection.
You're searching for any sign that the rubber isn't in perfect shape. Even tiny flaws can be enough to let wind and water sneak through.
- Cracks and Dry Rot: Look for a network of tiny cracks or a spiderweb-like pattern on the surface. That’s a textbook sign of dry rot, where the rubber has become brittle from years of sun exposure.
- Shrinking or Pulling Away: Pay special attention to the corners of the window frame. A worn-out seal will often shrink over time, pulling away from the corners and leaving a noticeable gap.
- Discoloration and Fading: Healthy rubber should be a consistent, deep black. If your seals look chalky, gray, or faded, UV damage has taken its toll, and the rubber is losing its flexibility.
- Missing Chunks: This one is hard to miss. If you can see pieces of rubber that are torn away or completely missing, the seal has failed and needs to be replaced right away.
Audible and Physical Symptoms
Sometimes, the first clue isn't what you see—it's what you hear. These symptoms often sneak up on you, getting slightly worse over time until you finally notice them.
Pay attention to any new noises coming from your windows, especially when you're driving at higher speeds. Your ears can often pick up on a problem long before your eyes do.
Here’s what to listen and feel for:
- Increased Wind Noise: This is the most common complaint. If you suddenly hear a new whistling sound or just a lot more wind noise than you used to, it's a sure bet that air is finding its way through a gap.
- Water Leaks and Stains: After a rainstorm or a trip through the car wash, run your hand along the inside of your door panel and check the floor mats. Any damp spots or water stains are a dead giveaway that your seal is no longer waterproof.
- Rattling Window Glass: A good seal holds your window glass tight in its track. If the glass rattles when you hit a bump or shut the door, the seal has probably hardened and shrunk, leaving too much space for the glass to move around.
Diagnosing Your Window Seal Issues
Not sure which symptom points to which problem? This quick reference table can help you connect the dots between what you're observing and what it means for your vehicle.
| Symptom | What to Look For | Potential Vehicle Impact |
|---|---|---|
| Whistling on the Highway | Gaps in the seal, especially along the top or front edge of the window. | Annoying noise, reduced cabin comfort, potential for minor water entry during heavy rain. |
| Damp Carpet or Door Panel | Cracks, shrinkage in corners, or sections of the seal that are flattened. | Water damage, mold and mildew growth, potential for rust inside the door frame. |
| Window Rattles Over Bumps | Hardened, brittle, or shrunken rubber that no longer grips the glass tightly. | Annoying noise, increased stress on the window regulator, risk of glass damage over time. |
| Visible Cracks or Fading | Gray, chalky appearance or a network of fine lines on the rubber surface. | Early warning sign of seal failure; reduced effectiveness against wind and water. |
Catching these signs early doesn't just save you from the annoyance of a noisy or leaky car—it also makes the repair much simpler. Replacing a seal before serious water damage occurs is always the better option.
Choosing the Right Replacement Window Seal
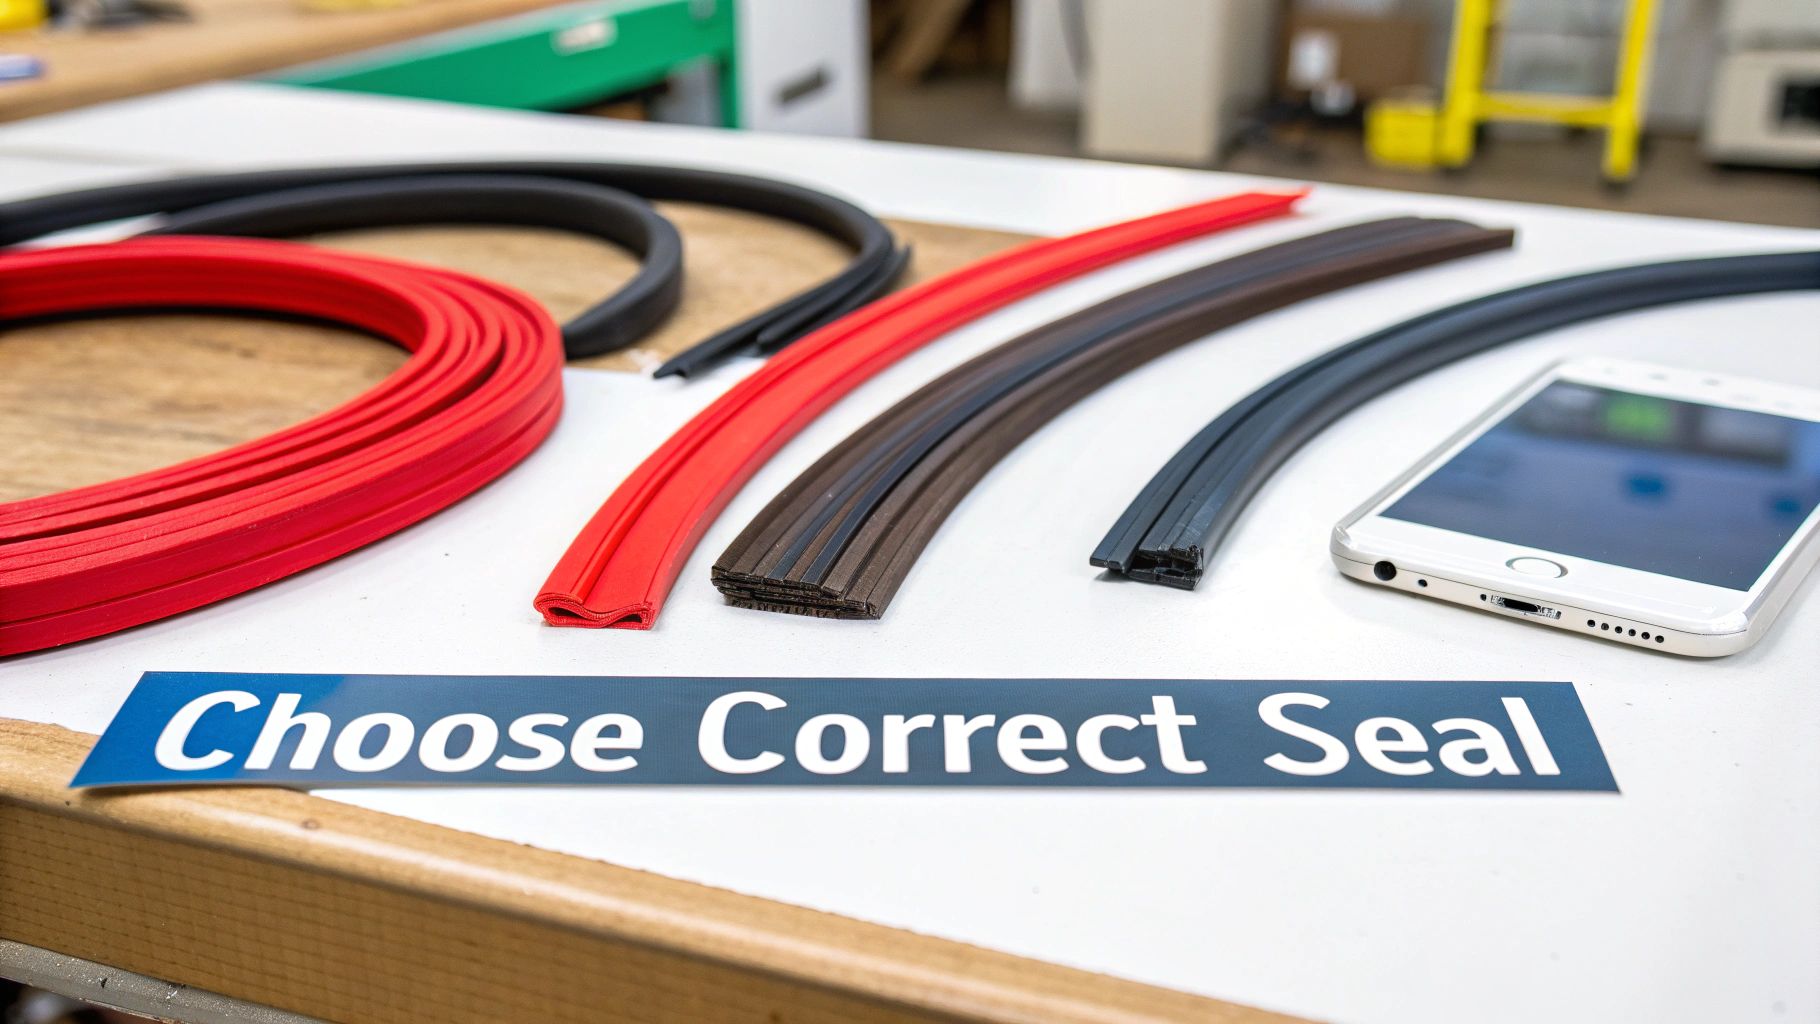
Getting the right replacement seal for your vehicle is hands down the most critical part of this job. If you get it wrong, you're signing up for frustration, leaks, and doing the entire repair all over again. It’s like buying a key for a lock—"close enough" just doesn't work. You need a perfect match to get a proper seal.
Think of this section as your personal buyer's guide. We’ll walk through the different types of seals, explain why the material is a non-negotiable part of the decision, and show you the simplest way to track down the exact part for your car or truck.
Decoding the Different Types of Seals
Not all window seals are the same, and their specific names can get a little confusing. The two you'll run into most often are the glass run channels and the beltline weatherstrips. Knowing which is which makes it much easier to pinpoint what’s failed on your vehicle.
-
Glass Run Channels: This is the big one. It's the main seal that lines the inside of your window frame. It forms a U-shaped track that the window glass glides up and down in, keeping it snug and secure. This seal is what stops the glass from rattling and creates that weatherproof barrier when the window is all the way up.
-
Beltline Weatherstripping: You probably know these as "window sweeps" or "dew wipes." They're the flat strips that run along the top edge of your door, both on the inside and the outside. Their job is to wipe away rain, dew, and dirt as you roll the window down, stopping all that gunk from getting inside your door panel.
A simple car window rubber seal is part of a massive industry. The automotive sealing market is growing fast, pushed by the sheer number of cars being built and ever-tighter safety regulations. Glass run channels are a huge piece of that pie, making up 48.4% of the market in 2023. That number shows just how essential they are for keeping water and wind noise out.
Interestingly, commercial vehicles accounted for a 64.9% market share, because fleet managers need durable seals on trucks like the Silverado and Sierra that can handle punishing daily use. If you're curious about market trends, you can find more details in this automotive sealing market report from Grandview Research.
Why Material Matters Most
When you're shopping for a replacement, the material it’s made from tells you everything you need to know about how long it will last. For high-quality seals, the gold standard is EPDM rubber (Ethylene Propylene Diene Monomer), and for a very good reason.
EPDM is a synthetic rubber engineered specifically to survive the brutal environment on the outside of a car. Cheaper materials will crack and fall apart, but EPDM is built to resist the three biggest enemies of any exterior part:
- UV Radiation: It won't get brittle or chalky after years in the sun.
- Ozone: It stands up to the oxidizing effects of ozone in the air, which chews up lesser rubbers.
- Temperature Extremes: It stays flexible and effective whether it's freezing cold or baking hot.
Choosing a seal made from high-grade EPDM rubber is an investment in longevity. It ensures the part will perform like the original—or better—and won't need to be replaced again in just a few years.
Finding Your Perfect Fit
Once you know what you're looking for, finding the exact seal is pretty straightforward. The most reliable way is to use a Year, Make, and Model lookup tool, which you'll find on any good auto parts website. Just punch in your vehicle’s details, and the system filters out everything that won't fit.
This is where a quality aftermarket brand really shines. Companies like T1A Auto design their seals to meet or even exceed the original factory specs. They often use tougher materials and guarantee a direct-fit replacement that installs without any wrestling or modifications. That combination of a perfect fit and better materials gives you a lasting repair that brings back that quiet, protected ride.
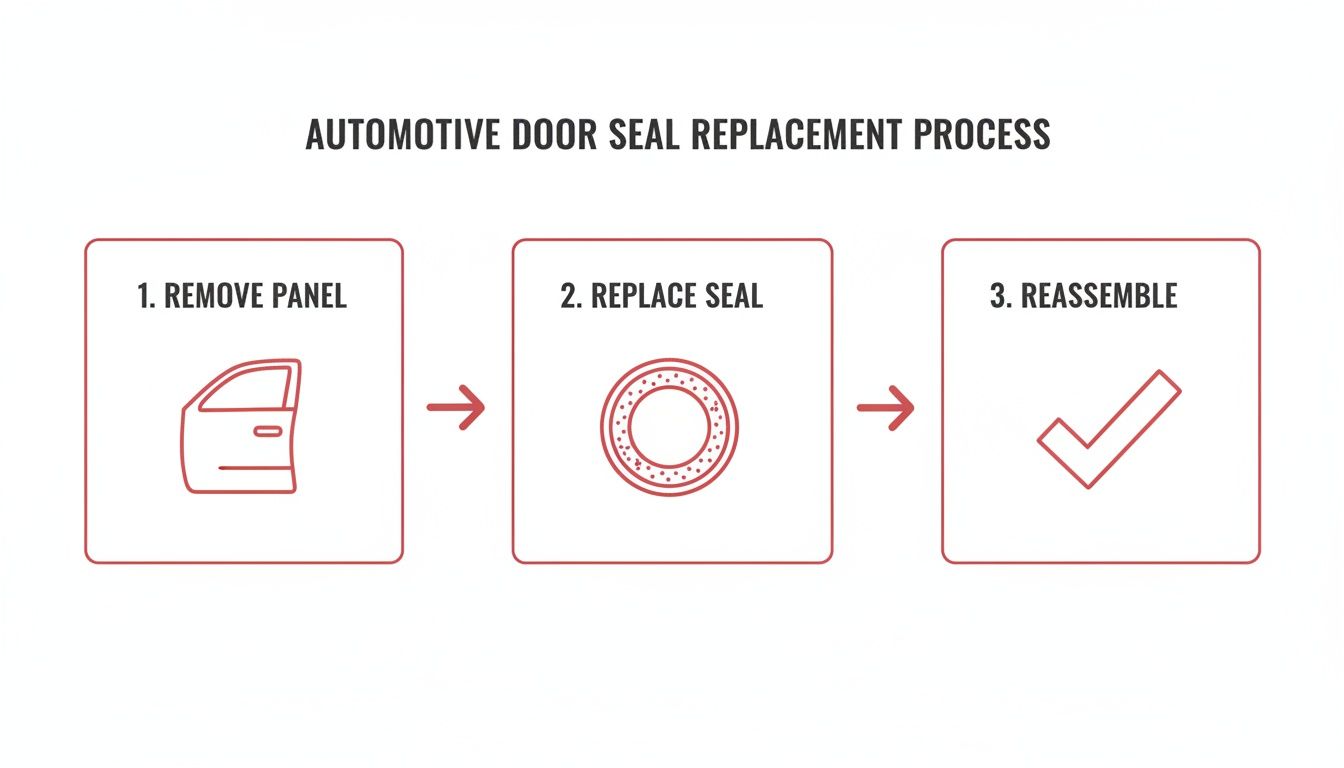
Your Step-By-Step Seal Replacement Guide
Replacing a car window seal might sound intimidating, but it’s one of those surprisingly doable DIY jobs if you just take it one step at a time. I’ll walk you through the whole process right here, from grabbing your tools to doing the final inspection. A little bit of patience is all it takes to get that perfect, quiet, and watertight fit back.
The key to a professional-looking job that lasts for years is working carefully, especially when you get to the interior parts of your vehicle. Don't rush it.
Phase 1: Assembling Your Toolkit
Before you even think about touching the car, get your tools laid out and ready to go. Trust me, having everything you need within arm's reach makes the job ten times smoother and keeps you from getting frustrated halfway through. You don’t need a professional garage—just a handful of basics.
Here’s what you should have on hand:
- Plastic Trim Removal Kit: This is non-negotiable. Using plastic pry tools instead of a metal screwdriver is the difference between a clean job and a door panel full of ugly scratches and gouges.
- Screwdriver Set: You'll almost certainly need both Phillips and flat-head screwdrivers for the various screws holding the door panel and its components in place.
- Socket Set: Some cars use small bolts to secure things like the armrest or door handle, so having a basic socket set ready is a smart move.
- Gloves: A good pair of work gloves will protect your hands from the inevitable dirt, grease, and surprisingly sharp metal edges you'll find inside a door frame.
- Cleaning Supplies: Grab some shop towels or microfiber cloths and a bottle of rubbing alcohol or a mild degreaser. A clean channel is critical for the new seal.
- Silicone-Based Lubricant: A quick spray of silicone can be a real lifesaver, helping the new rubber seal slide into place without bunching up or fighting you every step of the way.
Phase 2: Door Panel and Old Seal Removal
Alright, this is where your patience really pays off. The main goal here is to get the interior door panel off without breaking any of the plastic clips or damaging the wiring.
-
Lower the Window: First things first, roll the window all the way down. This gets the glass completely out of your workspace and gives you a clear shot at the old car window rubber seal.
-
Hunt for Fasteners: Time for a little detective work. Look for all the screws holding the panel on. They love to hide behind little plastic covers—check inside the armrest pull, behind the door handle lever, and along the panel's outer edges. Gently pop those covers off with a trim tool to reveal the screws.
-
Pop the Panel Off: With the screws gone, grab your plastic pry tool and start working your way around the perimeter of the door panel. Slide it between the panel and the metal door frame and gently pry. You'll hear a series of "pops" as the hidden clips release. For a more in-depth look at this, our guide on how to remove a car door panel is a great resource.
-
Disconnect Everything: Don't just yank the panel off! It’s still attached by wires for your power windows and locks, and maybe a mechanical cable for the door handle. Carefully pull the panel back just enough to see what's connected and disconnect each plug and cable.
-
Pull Out the Old Seal: Now for the satisfying part. With the panel off, you have full access to the old, worn-out seal. Just grab a corner and start pulling it out of the window channel. If it’s really old and dry-rotted, it might crumble and come out in pieces, so just be methodical.
Pro Tip: Before you unplug a single wire, snap a quick photo with your phone. It creates a perfect visual roadmap for when you're putting everything back together and can save you a huge headache.
Phase 3: Prep and New Seal Installation
You can’t skip this step. A clean surface is everything. Any little bit of old adhesive, dirt, or rubber left in the channel will stop the new seal from seating properly, and you’ll be right back where you started with leaks and wind noise.
-
Scrub the Channel: Use your shop towels and some rubbing alcohol to give the entire channel a thorough cleaning. Get in there and make sure it’s completely free of gunk. Let it dry completely before moving on.
-
Line Up the New Seal: Grab your new car window rubber seal. Start at a top corner and lay it against the channel. Most new seals are molded to the exact shape of your window frame, so double-check that you have the orientation right before you start pressing it in.
-
Press It In: Starting at your corner, use the palm of your hand to firmly press the seal into the channel. Work your way around the entire frame, making sure the seal’s lip goes deep into the groove. You should feel a satisfying "thump" or click as it seats correctly.
-
Lubricate if Necessary: If you hit a stubborn spot, especially around a tight corner, that silicone spray will be your best friend. A very light mist inside the channel is all you need to help the rubber slide home.
-
Final Checks and Reassembly: Once the new seal is in, run your finger along the entire length. Feel for any high spots or areas that don't seem fully seated. Roll the window up and down a few times to make sure it glides smoothly. If it all looks good, reconnect the panel's wiring, snap it back onto the door, and put all the screws back in. You're done
How To Maintain Your New Window Seals
So, you've gone through the work of installing a brand-new car window rubber seal. The cabin is quiet, the leaks are gone, and everything feels tight again. Great job! Now, let's talk about how to make sure that seal lasts as long as possible.
A little bit of upkeep goes a long way. Even top-tier EPDM rubber, the go-to material for modern seals, needs some attention to fight off the elements and stay flexible. Think of it like conditioning a leather baseball glove—you want to keep it from drying out and cracking.
The first and easiest thing you can do is keep the seals clean. Dirt, road grime, and salt are abrasive and will slowly chew away at the rubber. Every so often, just wipe them down with a soft microfiber cloth using a simple mix of water and a gentle, pH-neutral soap. This quick wash gets rid of the gunk without using harsh chemicals that could do more harm than good.
Protect and Preserve Your Seals
Cleaning is step one, but protection is where you really extend the life of your seals. The biggest enemy of any rubber part on your vehicle is the sun. Its UV rays are relentless, causing the rubber to harden, fade, and eventually crack. A good protectant acts like sunscreen for your seals.
Here’s what you can do:
- Apply a Rubber Conditioner: A couple of times a year, treat your seals to a quality water-based rubber conditioner. This helps the rubber stay supple and prevents it from getting brittle over time.
- Use a UV Protectant: Look for a product specifically made to block UV rays. If you live in a sunny state, this is non-negotiable. It's the best defense against constant sun exposure.
The installation you just finished is the foundation for a long-lasting seal, and this simple maintenance routine will protect that investment.
It’s no surprise that in high-UV markets across the U.S., side window seal failure rates jump by 25% after a vehicle hits 100,000 miles. This problem is especially common on workhorses like the Ford F-Series and Chevy Silverado. We've come a long way since the days of natural rubber; the shift to EPDM after WWII stretched the average lifespan of a seal from 5 years to over 15 years, a testament to using the right materials. If you want to dive deeper, you can read the full research about automotive sealing systems.
Keeping your seals in good shape goes hand-in-hand with caring for other exterior parts. For related tips, check out our guide on car window trim repair.
Got Questions About Window Seals? We've Got Answers.
Even after walking through the steps, you might still have a few things on your mind about replacing your car window rubber seals. That's perfectly normal. Let's tackle some of the most common questions that pop up for both first-time DIYers and seasoned pros.
Think of this as the final check before you roll up your sleeves and get to work.
Can I Just Glue or Patch a Cracked Window Seal?
It's tempting to reach for some rubber-safe adhesive for a small tear, thinking it'll be a quick fix. But honestly, it's a temporary patch at best. Adhesives harden over time, becoming brittle and cracking all over again. They just can't restore the flexibility and consistent pressure that a proper seal needs to do its job.
Once a seal is cracked, its structural integrity is shot. For a real, lasting fix that keeps water and wind out for good, you really have to replace the whole thing.
What's the Cost to Replace a Window Seal?
This really comes down to whether you pay a pro or do it yourself. A good-quality aftermarket seal will typically run you somewhere between $20 and $100+, depending on the make and model of your vehicle.
If you handle the job yourself, that's pretty much your only major cost. But if you take it to a shop, you can expect to add $75 to $200 in labor for each window, mostly because they have to pull the interior door panel off. Doing it yourself can save you a serious chunk of change.
There's a real satisfaction in doing this repair yourself. Not only do you save money, but you also get to know your car a little better. It's a completely doable project for most car owners with basic tools and a bit of patience.
Do I Need a Bunch of Special Tools for This?
Nope, you can leave the highly specialized gear on the shelf for this one. A basic home mechanic's toolset is all you need for most cars.
You'll want to have these on hand:
- A decent set of Phillips and flat-head screwdrivers
- A basic socket set for any bolts
- A plastic trim removal kit—I can't recommend this enough. It helps you pop off door panels without scratching or breaking anything.
A little trick of the trade is to use some silicone spray. A quick spritz helps the new seal slide into its channel smoothly without bunching up. The most important tool, though, is patience. Take your time, and you'll get it right.
Should I Insist on OEM Seals, or Are Aftermarket Ones Okay?
OEM (Original Equipment Manufacturer) seals are the same ones your car was built with. High-quality aftermarket seals, however, are designed to meet or even beat those original specs, and they almost always cost less.
What’s more, some of the best aftermarket brands actually identify weak points in the original design—like a plastic clip that always breaks—and engineer their version with better, more durable materials. With guaranteed fitment and solid warranties, a premium aftermarket seal is a smart buy that delivers great value and reliability.
For a guaranteed fit and performance you can count on, T1A Auto has you covered. Find the perfect replacement window seal for your car or truck and get your ride sealed up tight.
