


The handle lifts, you hear something move inside the gate, and the tailgate still won't swing. Or it drops open on the on-ramp with a load of lumber in the bed. Both versions of that morning usually end the same way: a longer pry bar, a harder slam, and a bent pawl that turns a twenty-minute job into a latch replacement.
A tailgate isn't one mechanism. It's a release chain (handle, cable, rod, sometimes an actuator), an engagement pair (striker and latch jaws), and a set of pivots that have to move freely against spring tension. A fault in any one of those makes the other two look guilty, which is why so many people replace a perfectly good latch and still can't open the gate.
Sorting out which part is stuck takes about ten minutes and no special tools. Work through it in order and you'll usually find the problem before you've taken anything apart.
Table of Contents
- Find Which Part Is Stuck Before You Force It
- How to Test the Release Without Forcing the Handle
- Powered Tailgates, Water and Electrical Faults
- How to Realign the Striker and Latch
- Freeing Cables, Rods and Pivots That Bind
- Confirm the Latch Engages Before You Drive
Find Which Part Is Stuck Before You Force It
Start with what the gate is doing, not with what it looks like. The tailgate latch stuck shut is a symptom with three possible sources: the release isn't actuating, the release works but the latch and striker aren't engaging, or the mechanism is binding on corrosion, wear, or dirt.
| Symptom | Likely cause | First check |
|---|---|---|
| Handle clicks but tailgate stays shut | Striker misaligned or latch jaws not engaging | Inspect striker position and gap on both sides |
| Handle moves with no click and no latch movement | Broken cable or rod, or failed actuator | Check cable and rod ends at the latch |
| No click and no response on a powered tailgate | Blown fuse, loose connector or failed switch | Check fuse, connector and switch |
| Stiff, sticky or needs force to open | Corrosion at the pawl or cable, dry pivots | Clean and lubricate the latch pivots and cable |
| Pops open or won't stay latched while driving | Striker misalignment, worn plastic slides or actuator limiter fault | Stop driving, check alignment and look up recalls |
| Works, then fails after rain or washing | Water in the electronic release switch | Dry the connector and inspect for corrosion |
A click with no release is the most common pattern and the least frightening. The pawl is doing its job, so the fault sits at the other end of the system: a striker that drifted after a load shift, jaws that no longer meet it squarely, or a gate that has dropped on worn hinges. Owners blame the latch because that's the part that makes the noise.
A handle with no click at all points the other way. If the handle swings with no resistance, the cable has snapped, popped off a rod clip, or the actuator has quit. Pulling harder on a dead cable accomplishes nothing except bending the handle arm.
Why the latch you can see is rarely the only suspect
The visible latch can look untouched while a connected component fails. On July 19, 2018, FCA determined that certain 2015-2017 Ram 1500, 2500, and 3500 pickups required a voluntary recall, identified by NHTSA as 18V-486, involving a limiter tab inside the power-lock actuator control assembly. When that tab fractured, the lock-rod control bracket could over-travel, pull the locking rods, and release the tailgate latches unexpectedly. NHTSA estimated that approximately 1,429,000 vehicles were affected, and the remedy was a stop block installed to restrict excessive pivot-arm movement, as set out in the NHTSA recall report for 18V-486.
That's the lesson worth carrying into any diagnosis: latch symptoms originate in actuator, rod, and control parts as often as in the latch body, and a small plastic limiter can cause consequences across more than a million trucks.
Safety first: a gate that pops open or won't stay latched at speed is a cargo problem, not a comfort problem. Unrestrained cargo leaving the bed is a hazard to everyone behind you. Park it until it latches.
Find the row that matches, run that check, and only then reach for a wrench.
How to Test the Release Without Forcing the Handle
Most stuck tailgates can be tested without removing a single panel. Testing first is what stops you from forcing the part that was working all along.
- Park on level ground, set the parking brake, switch off the ignition and remove the key. A twisted bed loads one latch harder than the other, and a vehicle that rolls or a powered gate that wakes up mid-test is how fingers get caught.
- Take the load off the latch. Support the gate with a helper or a stable prop before you touch the handle, because pressure against the striker keeps the pawl loaded and the release can't travel. This single step solves more "seized" tailgates than any lubricant.
- Press the handle or release switch and listen and feel for a click or actuator movement. That click is the dividing line in the whole diagnosis. A manufacturer service procedure filed with NHTSA tells technicians to make exactly this split first: verify whether pressing the handle or switch produces an audible click or tactile actuator movement (service bulletin MC-11024711).
No click means electrical or actuator trouble, not alignment. Don't touch the striker until the release makes a sound or you've proven the actuator is dead.
- If nothing moves, check the tailgate fuse against the fuse diagram in your owner's manual, and replace it only with the same rating. A larger fuse hides the short that blew the original.
- Inspect the connector and ground near the hinge area for corrosion or looseness. Oxidation at the connector and along the cable causes difficult opening or closing, so clean the contacts and protect the joint with heat-shrink tubing once it's dry.
- On a powered gate, disconnect the battery negative cable before probing wiring or the actuator. Reconnecting power without testing can hide a shorted switch that will blow the new fuse.
- Cycle the handle three times slowly and watch whether the gate moves at all. Slow cycles show you whether the release is dragging or not connected.
Here's the sequence laid out as a visual you can keep on your phone while you work.
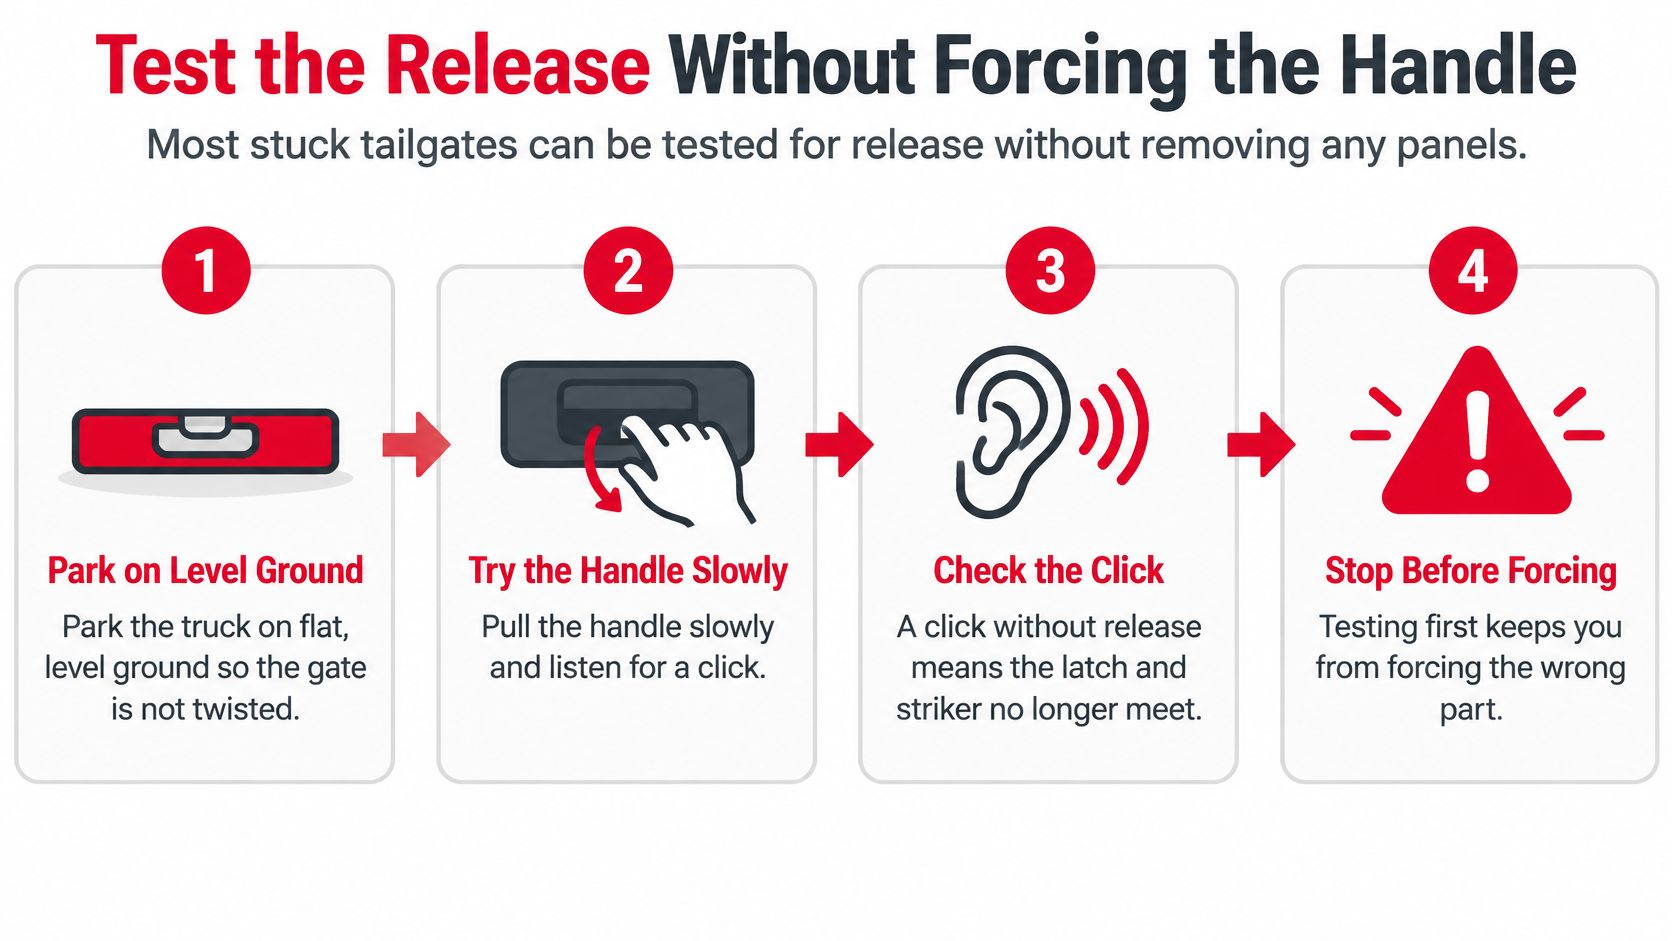
What a healthy release looks like
A working system gives you a clear click, smooth handle travel with light spring resistance, and a gate that lifts on its own weight without catching on either side. If the handle feels spongy, the cable is stretching or the sheath is kinked. If it clicks sharply but the gate stays put, the release is healthy and the problem is downstream at the striker.
Powered Tailgates, Water and Electrical Faults
A powered gate can sit electrically dead and feel exactly like a seized latch. Prying on it while the motor still has current strips the plastic gears and slide blocks. Those parts are what pull the latch open.
Water reaching the electronic gate-release switch has caused real failures. In the 2024 Chevrolet Silverado HD and GMC Sierra HD recall, water could reach that switch and short it, so the gate unlatched in Park and loose cargo became a road hazard, and a 2025 report in the same file described damaged plastic slides that left excess free play and incomplete latching in a tailgate-cover latching system, per the NHTSA recall notice for 24V-060. A latch can look whole and still fail to hold.
Drying a corroded connector belongs with the release test, not as a second job here. With the battery negative already off, stay on the powered pieces: switch continuity, the actuator click, and slide play.
| Check | Pass | What a fail means |
|---|---|---|
| Switch continuity, connector unplugged | Circuit closes only while the switch is pressed | A shorted switch can drop the gate by itself. Replace the switch before you cycle the gate again. |
| Actuator click | One clear click, with no live wires probed | Silence after a known-good fuse points at the actuator or its feed. I would stop there and let a shop trace it. |
| Slide and rod play by hand | Slides track with little free play | Extra play matches the damaged-slide failures. The cover latch will not hold until those slides are replaced. |
- Unplug the release switch and meter continuity.
- Command the actuator once and listen for the click.
- Move the slides and rods by hand.
- Leave the gate latched before the truck moves.
Rain, a car wash, or standing water can make the fault come and go. Test at the load, not at the fuse box, and wiggle the harness while you watch the meter, using the method in this guide to diagnosing automotive electrical problems. If the gate still unlatches on its own after it has dried, call a dealer or a specialist. Forcing a wet switch only wears out the mechanism you still need.
How to Realign the Striker and Latch
You shut the tailgate and one corner stays proud of the bedside. The handle moves, but the jaws never take a full bite. That is the striker path, separate from a dead release and separate from a cable that will not pull. A striker that sits a few millimeters off can stop the latch from seating.
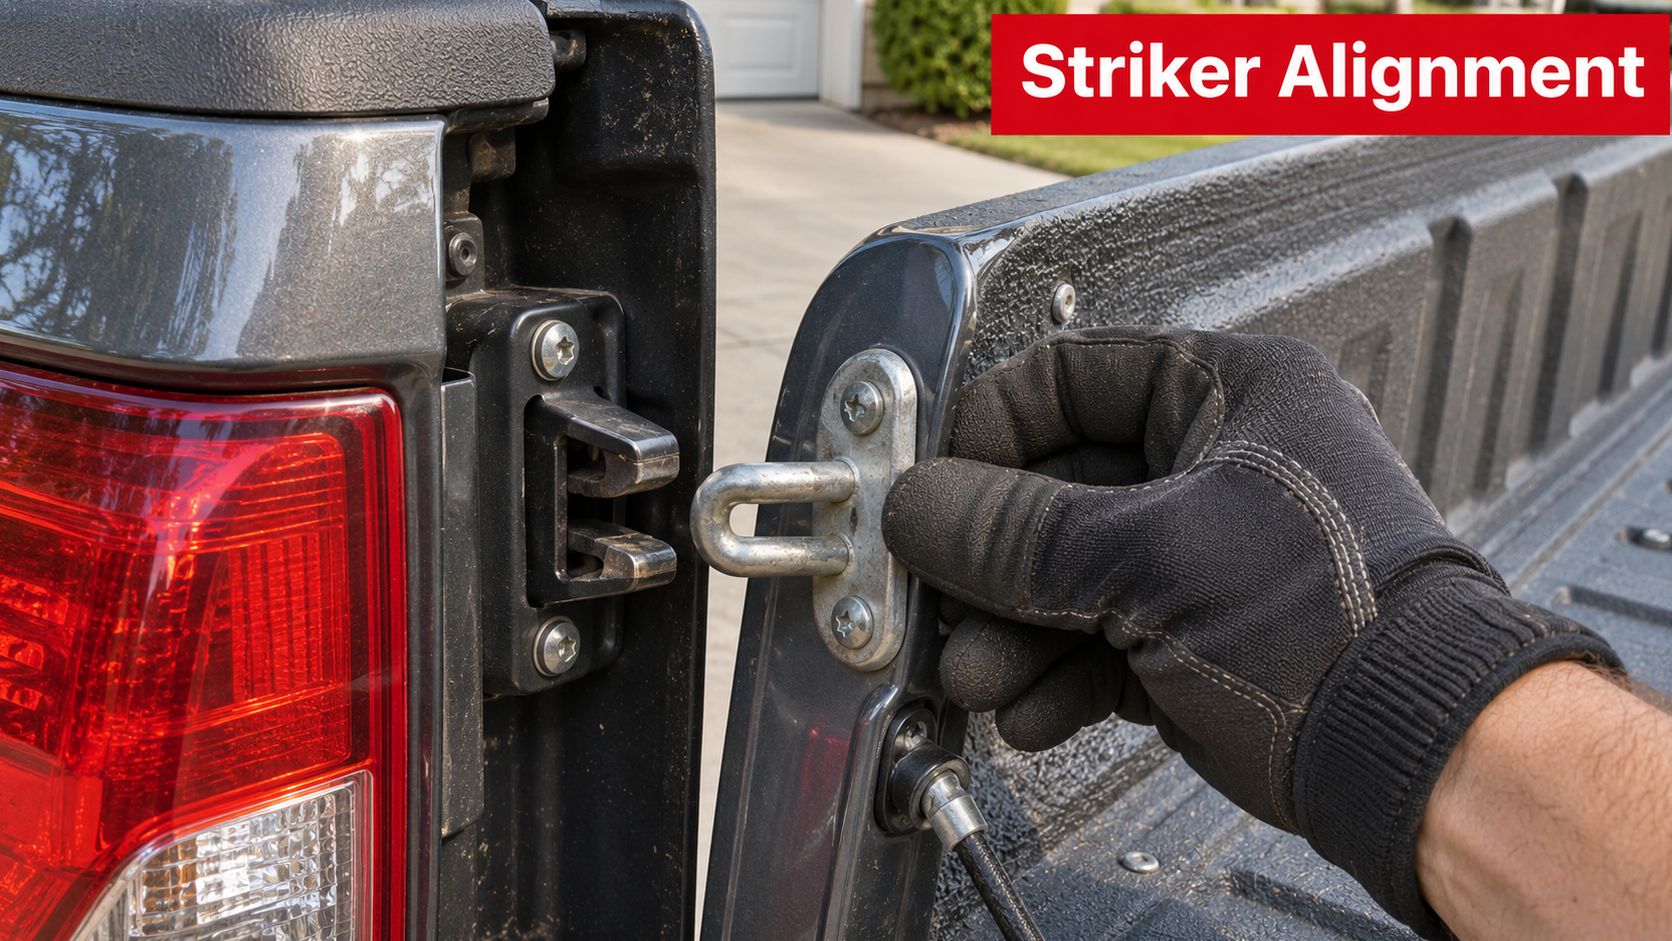
NHTSA recall 22V-904 documents striker misalignment as a cause of failed latching: the NHTSA recall report for 22V-904 covers approximately 1,234,650 Ram 1500, 2500, and 3500 pickups from the 2019-2022 model years, where one or both tailgate strikers were misaligned with the box latch, which could prevent proper latching and allow unintended opening while the truck was moving or stationary. FCA's remedy was to inspect striker alignment relative to the box latch and adjust it when necessary. The same check applies to most pickups on the road.
Mark the baseline before you loosen anything
Record where the striker started. A grease pencil line around the striker washer takes ten seconds and gives you a mark to return to if the gate ends up worse than it began.
- Mark the existing striker position with a grease pencil on the body side of the mounting plate.
- Loosen the striker bolts just enough to let it move. Stripping a captured nut inside the pillar is a much bigger job than the one you are doing.
- Adjust in small increments and check how the striker enters and centers in the latch after each nudge.
- Balance gap and flushness on both sides of the tailgate. A gate that is flush on the left and proud on the right will latch on one side only.
- Tighten and test that both latches release together when you pull the handle slowly.
- Cycle the gate at least five times and confirm it latches firmly with no abnormal effort.
The same geometry shows up on a door. This guide to adjusting door alignment covers bolt position, gap, and flushness on a smaller panel.
The video below shows the adjustment on a pickup.
The three mistakes that ruin a striker adjustment: moving only one side, shifting the striker without recording its baseline, and slamming a misaligned gate to seat it. That last one damages the pawl and peens the striker until nothing lines up.
A new latch will not fix a striker in the wrong place. If the striker or the tailgate position stays off, the replacement latch fails the same way within a month. Alignment is right when the striker enters the latch centrally and the jaws seat with a firm, quiet close instead of a rattle. I would call a shop if the captured nuts spin, the bedside is bent, or both strikers still miss after a careful baseline adjustment.
Freeing Cables, Rods and Pivots That Bind
A handle that travels while the latch stays shut is a binding problem in the linkage. Yanking harder only bends the rod or frays the cable. Manual gates, and plenty of power-lock gates, still run a cable or rod from the handle to the latch arm. Dirt, a kink, or a popped clip can use up that travel before the pawl opens.
Start at the latch with the gate down and a flashlight on the cable end. Pull the handle slowly and watch that end. If the sheath twitches and the latch arm never moves, the motion is dying in the run or at a clip. If the arm moves a short way and stops gritty, the pivot is the bind.
Trace the cable along the bedside next. Cargo, a tiedown, or a dented rail will kink the sheath within a few inches of either end, where the cable flexes most. A split sheath lets water in, and the inner wire frays from there. A rod that has walked out of a cracked clip still lets the handle move, but the latch arm never gets pushed far enough to release. Seat the rod straight in a sound clip before you blame the latch itself.
Clean before you grease. Wipe the old film off the pawl and both pivot points with a rag. A thin coat of silicone or white lithium grease on the pivots and the pawl face is enough. Cycle the handle about ten times. The arm should snap back on its own. If it creeps or hangs, grit is still in the joint, or the return spring is packed with dirt. Work that out and grease again, still thinly.
Over-greasing is a real failure mode. A thick bead of grease on the pawl collects sand and grit until the latch binds worse than it did dry. A thin film on the pivot points is the target, and keep it off the rubber striker seal.
I treat a cable that will not return, or a rod that will not sit straight after the pivots are free, as a parts job rather than more grease. Compare length and end fitting to the old piece before you order, because a wrong fitting will bind the new cable the same way. Routing and end fittings are covered in this walkthrough on replacing a tailgate release cable. A cracked plastic handle arm is often what starts the chain, so check that housing while the linkage is exposed.
Confirm the Latch Engages Before You Drive
A gate that feels closed can still be resting on the striker with the pawl released. Confirm the jaws before you load cargo or put anyone behind the bed.
Close the tailgate by hand from the outside. Do not slam it. Pull the gate back gently. You should feel the jaws grab and hold with no slack. If a light tug pops it free, the latch did not engage, and the bed is not secure.
Check open recalls for your VIN on NHTSA's recall lookup. Tailgate latch faults have prompted large campaigns, and a dealer remedy can be free when your truck is covered. After the hand pull holds, take one slow lap on a quiet road and watch the gate in the mirror. Movement over a bump means the pawl is not staying seated.
Know when a part is finished. Replace the latch when the housing is cracked or the pawl is visibly worn or chipped. Replace the cable or rod set when it fails the release tests. Age by itself is not the reason. Replace a striker only after a careful alignment refuses to hold. Match the part number on the new component to the old one before you order, since trim level and bed configuration change the fit.
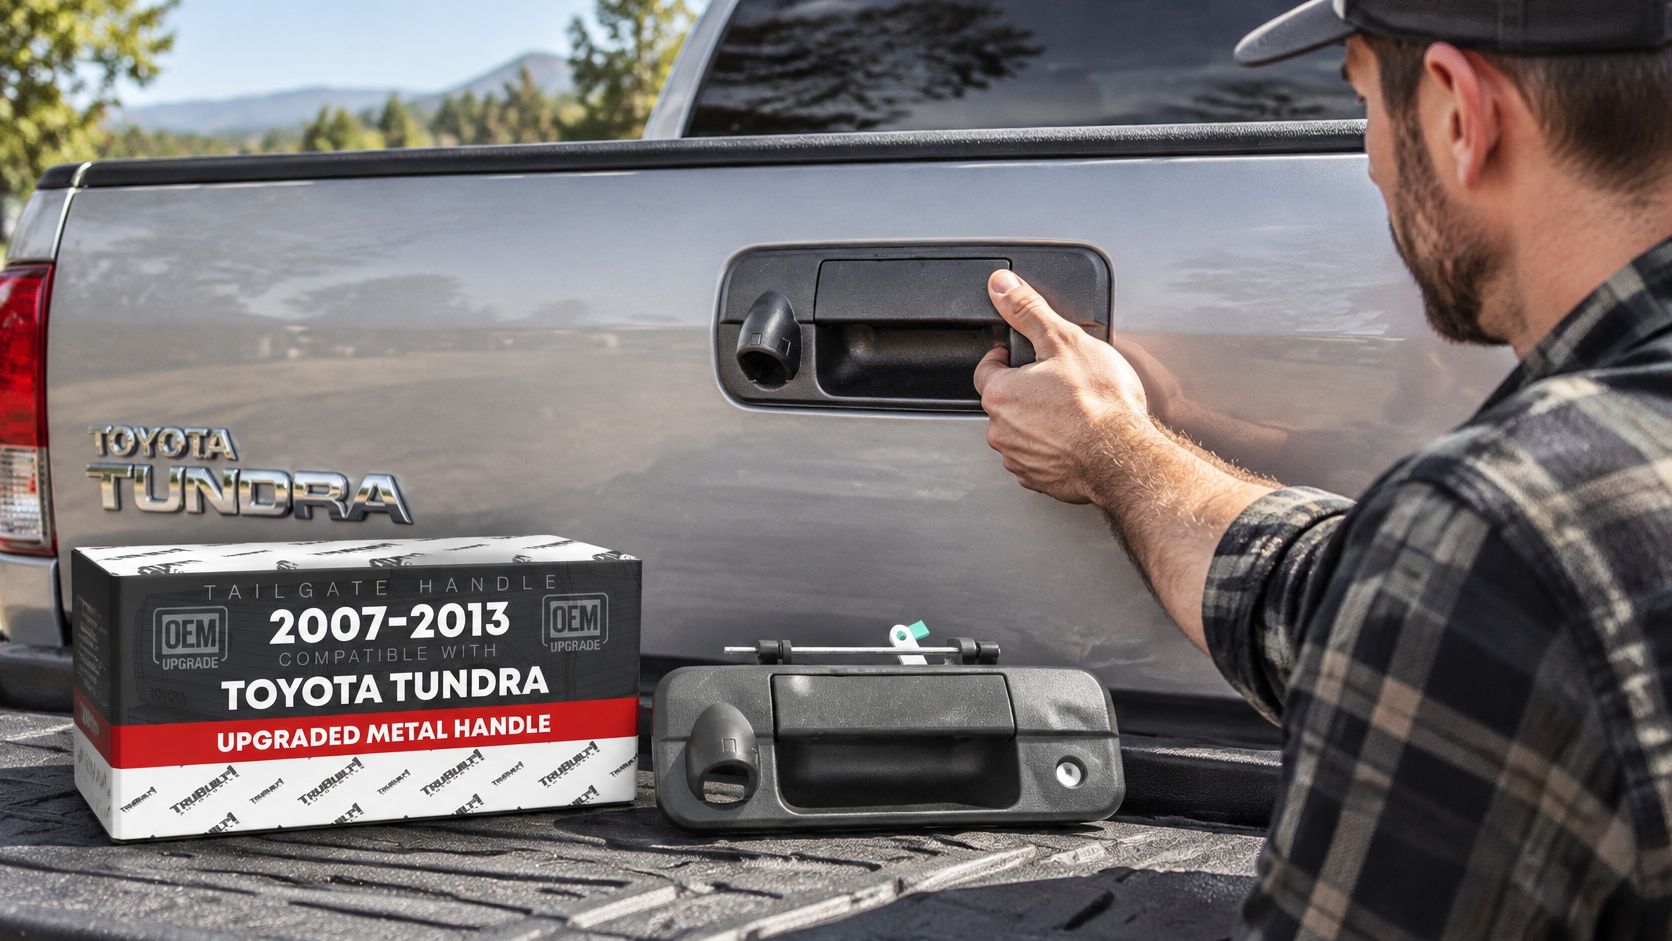
Handles and clips are the lower-cost end of that list, and they are worth changing while the gate is apart. For a 2007-2013 Toyota Tundra, this Toyota Tundra tailgate handle assembly uses an upgraded metal body in textured black, fits OEM 69090-0C050, and carries a lifetime warranty on its metal components. A set of 5 pairs of left and right rod clips for the 1999-2007 Chevy Silverado and GMC Sierra runs $8.97. A tailgate that doesn't latch is a cargo safety hazard.
T1A Auto carries the parts this check usually points to, including upgraded metal tailgate handles, release cables, hinges, latches, and rod clips. Search by vehicle so the fitment matches the truck in the driveway. Visit T1A Auto after the test has shown which part has to come off.
