


You pull the tailgate handle, feel more travel than usual, and nothing happens. Maybe one corner drops while the other stays locked. Before ordering a replacement tailgate release cable, stop and identify the mechanism on your truck. The same symptom can come from a stretched cable, a displaced cable stay, a damaged latch, or an electronic release fault on a power-unlatching tailgate.
The safe approach is simple: verify the symptom, check the VIN and build configuration, look for an open recall, then replace only the part the diagnosis supports. A cable that looks right in a product photo can still be wrong for a manual gate, a power-release setup, or a truck with a different left and right cable geometry.
Table of Contents
- Why Your Tailgate Won't Open and What to Check First
- Common Tailgate Cable Problems and What They Actually Mean
- Tools, Parts, and Fitment You Need Before You Start
- Step-by-Step Tailgate Release Cable Replacement
- Replace One Cable or Both and Why It Matters
- Adjustment, Testing, and Verifying a Clean Repair
- Quick Recap and Common Tailgate Cable Questions
Why Your Tailgate Won't Open and What to Check First
Start with the tailgate closed only if it still opens safely. Pull the handle gently and pay attention to three things: how far the handle moves, whether it returns to its resting position, and whether both latch sides release together. Excessive travel usually points toward cable elongation, a loose sheath, or a cable stay that has pulled out of its retainer. A handle that feels loose may instead have a detached linkage or damaged handle connection.
If the gate opens only when you lift it while pulling the handle, don't assume the cable is automatically broken. Latch alignment, corrosion, a displaced cable housing, or a latch that is binding can create the same behavior. Once open, support the tailgate so its weight isn't hanging on the cables while you inspect the assembly.
The driveway checks that prevent a wrong parts order
Use a flashlight and inspect both sides before removing trim. Look for:
- Frayed wire: Broken strands near the latch or handle indicate mechanical damage.
- Crushed sheath: A flattened or sharply bent housing can stop the inner wire from moving freely.
- Missing retainers: If the outer sheath isn't clipped into its factory bracket, pulling the handle may move the housing instead of the latch lever.
- Unequal movement: One latch releasing later than the other suggests uneven cable tension, routing trouble, or latch misalignment.
- Unexpected power operation: If the tailgate unlatches without a normal handle command, treat that as an electronic safety issue, not a routine cable replacement.
Check the vehicle identification number and build data before ordering. Confirm whether the truck has a manual release, a manual gate with power lock and release, or a power-unlatch system. A useful reference for the mechanical latch inspection is this tailgate latch repair guide, but the vehicle-specific service information still controls the procedure.
Practical rule: Don't close the gate after a repair until you can prove both latch mechanisms release together with the gate open.
Also check the manufacturer or NHTSA recall database before spending money. A power-unlatching fault may require a recall remedy, and a replacement mechanical cable won't correct water intrusion at an electronic switch or a faulty actuator.
Common Tailgate Cable Problems and What They Actually Mean
A tailgate cable is a simple-looking part with a demanding job. It transfers handle movement to the latch while the outer sheath stays fixed in its retainers. When the inner wire stretches, the sheath shifts, or an end fitting corrodes, the handle can move without producing enough latch travel.
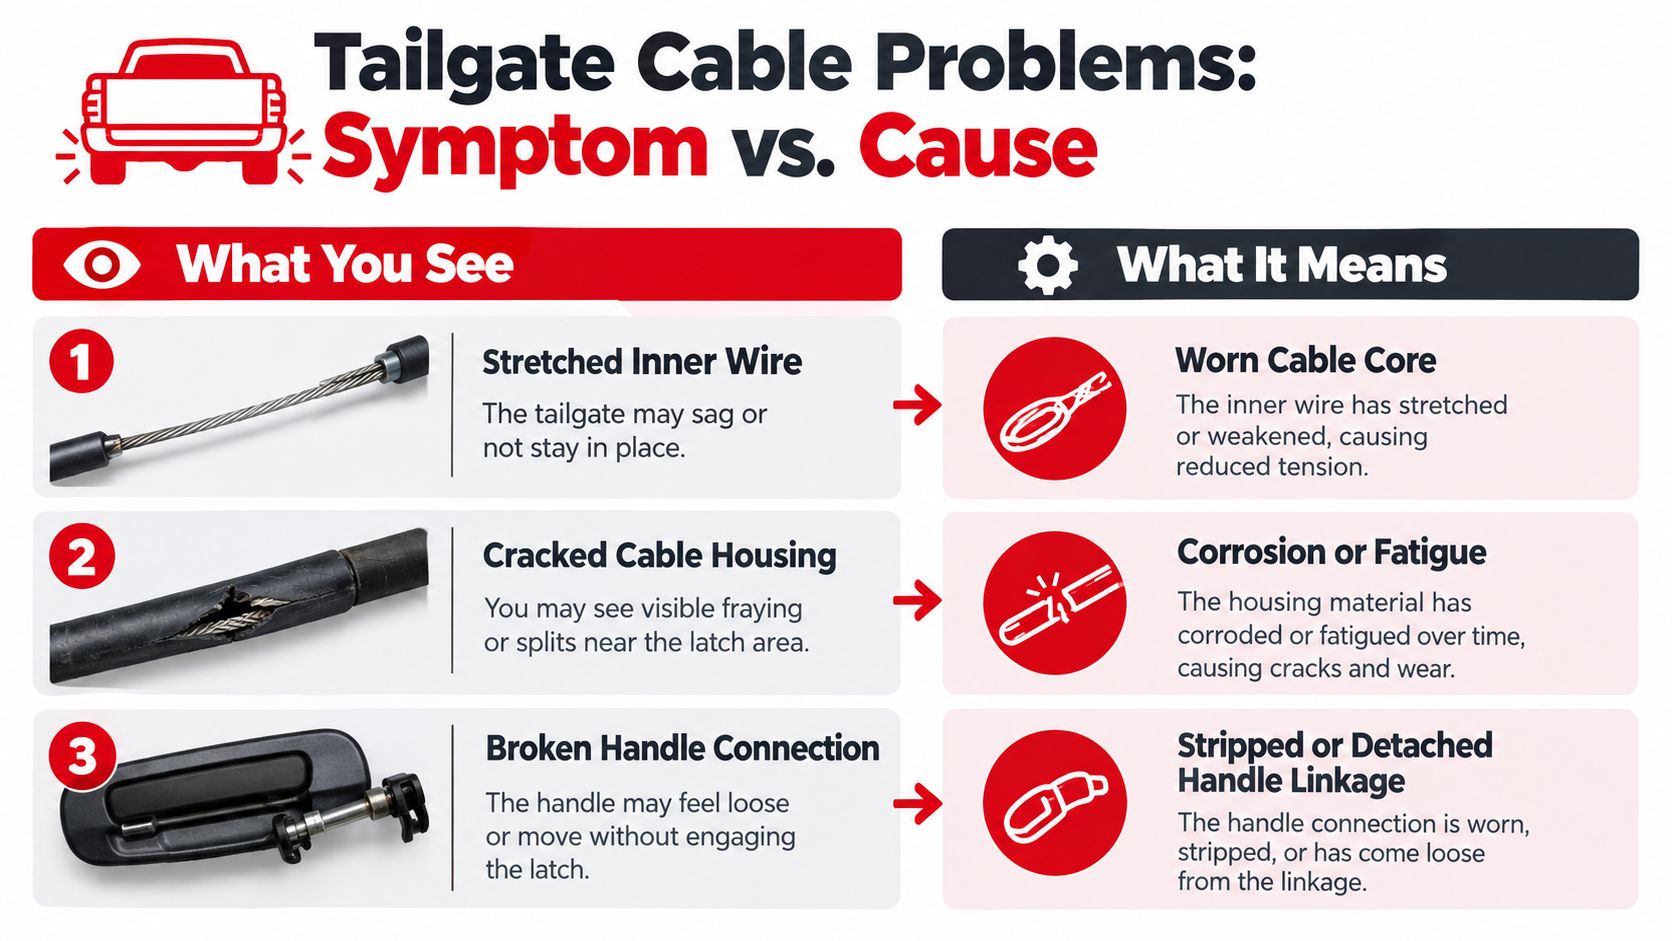
Match the symptom to the likely fault
Extra handle travel commonly means the inner cable has elongated, the sheath has moved out of its clip, or an end fitting has started pulling through. If the handle reaches the end of its movement before both latches release, inspect the cable path rather than adding force.
One-sided release deserves a close comparison of the left and right cable runs. A loose cable stay, a bent latch lever, or different cable tension can let one side release first. Don't keep pulling harder. That can damage the handle or latch housing.
Visible rust or broken strands means the cable assembly is no longer trustworthy. Corrosion is a known concern on pickups exposed to moisture, road salt, and repeated loading. In March 2004, General Motors announced a recall covering roughly 3.7 million Chevrolet Silverado and GMC Sierra pickups, after steel support cables could corrode and break. The recall included 134 reported minor injuries, as reported by the Los Angeles Times coverage of the GM recall.
A loose handle with little cable movement points toward the handle connection, a detached cable end, or a broken bracket. A latch housing can also fail while the cable remains intact. That distinction matters because a new cable can't restore a cracked housing or a seized latch.
For cable-end and fastener condition, inspect the attachment point carefully rather than relying on appearance alone. A tailgate cable bolt guide can help identify the hardware involved, but use the correct vehicle-specific dimensions and service instructions.
When the cable isn't the problem
Power-unlatching trucks add a second diagnostic path. If the tailgate opens without a normal handle command, or if the handle feels normal but an electronic release behaves erratically, check the switch, wiring, actuator, and recall status. A generic mechanical cable swap is the wrong repair for an electronic release fault.
Tools, Parts, and Fitment You Need Before You Start
Put the parts on the bench before you remove the trim. You'll want plastic trim tools, a small pick, a flashlight, screwdrivers or sockets that match the tailgate fasteners, replacement clips for any damaged retainers, and the vehicle's torque information for handle or latch fasteners. Keep a container for fasteners. Tailgate trim screws have a habit of disappearing into the bed.
The replacement cable is the critical item. Search by year, make, model, bed configuration, release type, and build data, not just by a photograph. Bed length, trim package, manual versus powered release, actuator arrangement, and left or right cable geometry can change the correct part. If the catalog supports vehicle lookup, enter the full vehicle information and compare the old cable's length, end fittings, sheath clips, and latch connection before installing it.
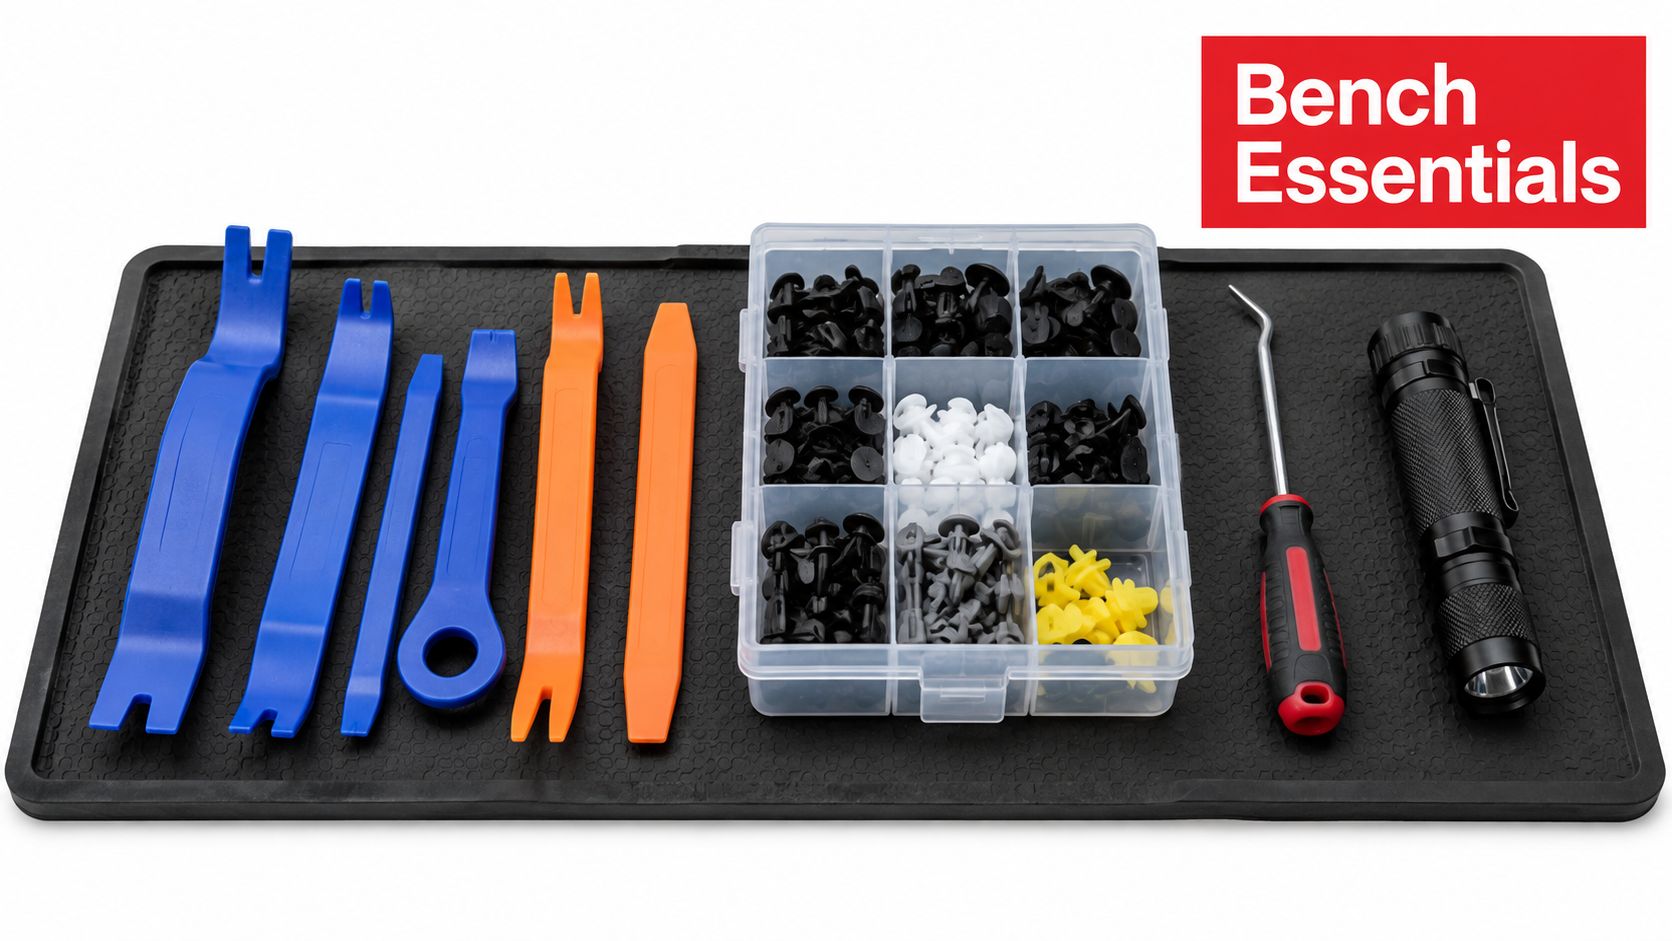
Build a parts-check routine
- Record the configuration: Note whether the gate is manual, power released, or power unlatched.
- Compare the sides: Photograph the left and right routing before disconnecting anything.
- Match the attachment points: Check cable ends, sheath stops, clips, and latch-lever fittings.
- Confirm the return policy: Fitment errors are easier to correct when the seller offers clear returns.
- Check warranty terms: Metal replacement components and standard items may carry different coverage, so read the product listing before ordering.
T1A Auto is one vehicle-parts source that lets shoppers search by vehicle for tailgate cables and related hardware. Its catalog also distinguishes upgraded metal components from standard replacement items, which is useful when the original failure involves a cracked plastic part. Compare that option with the factory part and other reputable suppliers rather than choosing on price alone.
A tailgate hardware kit can be useful when the existing bolts, clips, or retainers are damaged, but don't replace hardware blindly. The objective is a secure, correctly routed cable, not a pile of new parts.
Step-by-Step Tailgate Release Cable Replacement
Work with the tailgate open and supported. Use a proper prop or a helper, and keep fingers clear of the latch jaws. The cable should not carry the gate's weight while you're disconnecting it.
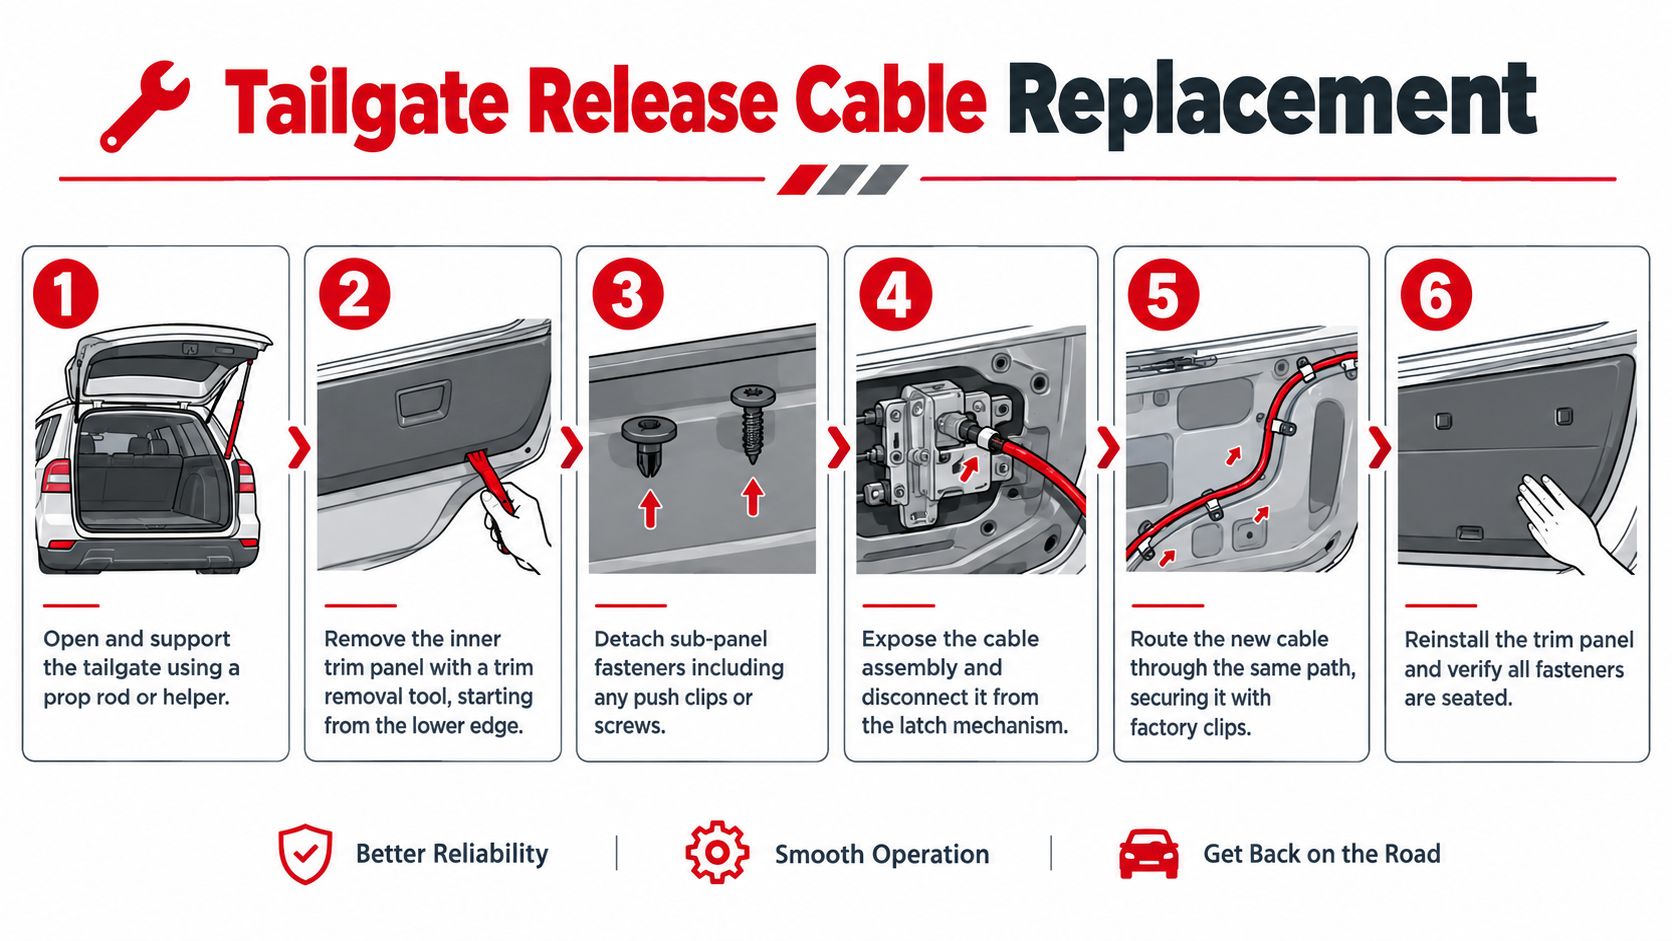
- Open and support the gate. Remove cargo and stabilize the tailgate before touching the cable. If the gate won't open, access may require a model-specific latch-release procedure, so don't pry against painted edges.
- Remove the inner trim. Start at the lower edge with a plastic trim tool. Release clips gradually instead of twisting the panel. Set each screw and clip aside in order.
- Expose both cable runs. Don't inspect only the side that feels loose. Photograph the routing, sheath clips, cable stays, brackets, and latch-lever connections on both sides before disconnecting anything.
- Release the handle and latch connections. Move the handle only as needed to unload the cable. Detach the inner wire from the latch lever, then release the outer sheath from every factory retainer. A pick helps remove a retaining clip without bending it.
- Compare old and new parts. Lay the replacement beside the removed cable. Check total length, end shapes, sheath stops, clips, and left or right designation. If any connection differs, stop and verify fitment.
- Install through the original route. Follow the photographed path exactly. Keep the sheath away from sharp bends, moving latch parts, and pinch points. Seat every clip before connecting the inner wire.
- Reconnect and operate the handle. With the gate still open, pull the handle repeatedly. Both latch mechanisms should release at the same time, and the handle should return fully without binding.
- Refit the trim only after testing. Replace damaged clips, tighten fasteners to the vehicle's specification, and confirm that the panel doesn't pinch the cable.
Model procedures can differ substantially. Stellantis service information may direct technicians to replace only the cable showing the symptom. Ford latch work can require inspection of the latch housing, not just the cable. Tesla's procedure specifically calls for releasing the latching bracket and cable stay, removing the cable-retaining clips, then reinstalling the assembly with the stays and brackets fully seated before the inner cover goes back on, as shown in the Tesla Cybertruck service procedure.
Replace One Cable or Both and Why It Matters
Replacing both sides feels like preventative maintenance, but it isn't a universal rule. The correct choice depends on the platform, the inspection results, and the cable design.
| Vehicle platform | Cable configuration | Recommended approach | Watch-out |
|---|---|---|---|
| Stellantis platforms covered by service guidance | Separate left and right mechanical cables | Replace the cable showing the symptom | Installing both service cables can worsen the condition |
| Trucks with visibly damaged cables on both sides | Two exposed mechanical support or release cables | Replace both when inspection confirms damage | Match each side and preserve factory routing |
| Power-release or power-unlatch configurations | Mechanical cable combined with electronic components, or electronic release only | Verify the exact build and diagnose the electrical system first | A visually similar mechanical cable may be the wrong repair |
| Any platform with damaged latch housing | Cable connected to a compromised latch assembly | Repair the latch condition before final cable adjustment | New cable tension won't correct a cracked or distorted housing |
Stellantis technical bulletins specifically instruct technicians to replace only the cable showing the symptom, often the longer or loose left-side cable, and warn that replacing both can make the condition worse. The relevant Stellantis technical bulletin should take priority over a generic tutorial when it applies to your truck.
Lower the gate and compare both sides at the same latch position. Look for slack, frayed strands, kinks, crushed sheath ends, missing retainers, corrosion, or a cable end that has pulled out of its lever. If one side is clearly loose and the other is properly seated, replace the affected side and retest.
A second teardown may be worthwhile when both cables show the same corrosion exposure or physical damage. It isn't worthwhile when the platform's service guidance warns that matched replacement cables can create excessive tension or worsen release behavior.
Adjustment, Testing, and Verifying a Clean Repair
Most failed tailgate repairs aren't caused by the new cable. They're caused by a sheath that wasn't clipped in, a stay that isn't seated, or a latch that wasn't tested before the trim panel went back on.
Keep the tailgate open and cycle the handle repeatedly. Watch both latch levers, listen for simultaneous release, and check that the handle returns to rest each time. The inner wire should move smoothly without a sharp bend, and the outer sheath should remain stationary inside every factory retainer.
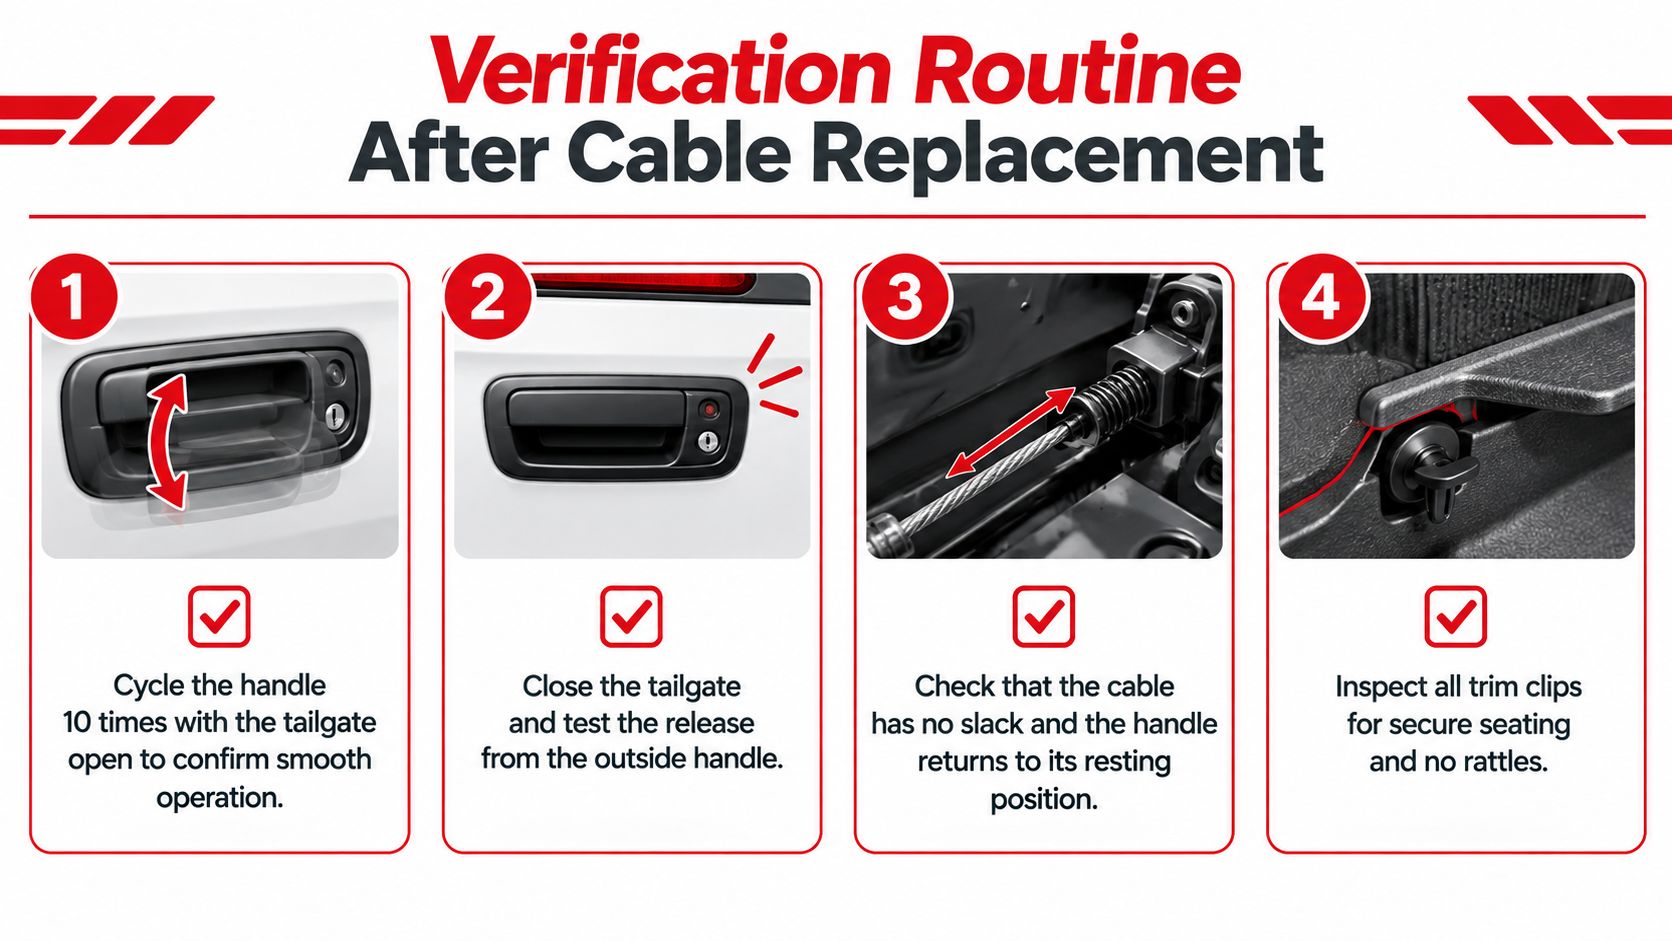
Test in stages
- Open-gate test: Confirm both latches release together and neither lever hesitates.
- Closed-gate test: Close the tailgate gently, then operate the outside handle without standing in the gate's path.
- Alignment check: If one side releases late, inspect latch alignment and cable seating before adjusting anything else.
- Trim check: Make sure clips and fasteners are secure, with no panel contact against the cable.
Don't load the bed immediately after a questionable test. Perform a controlled close and open cycle first. If the handle still has excessive travel, look for cable elongation, a displaced sheath, or incorrect routing. If the handle feels normal but one latch remains locked, focus on the latch, bracket, or alignment rather than tightening the cable at random.
A successful repair feels consistent from pull to pull. The handle has normal resistance, both latch mechanisms release together, the gate opens without lifting assistance, and the mechanism re-engages cleanly when closed.
Quick Recap and Common Tailgate Cable Questions
Use this short checklist before calling the job complete:
- Verify the symptom: Separate cable movement from latch, handle, and electronic faults.
- Check recalls: Search by VIN before buying parts.
- Confirm fitment: Match the manual, power-release, or power-unlatch configuration and build data.
- Choose the repair scope: Replace one cable unless inspection or platform guidance supports replacing both.
- Test open and closed: Confirm simultaneous latch release before carrying a load.
- Document the result: Record the final handle feel, latch operation, and any remaining noise.
How long does replacement take? The time depends on access, trim design, corrosion, and whether the gate opens normally. A straightforward cable swap is usually a focused repair, while a stuck gate or damaged latch can turn it into a diagnosis and access job.
Are metal replacement cables worth considering? They can make sense when the original failure involves a weak plastic component or recurring exposure damage. Confirm that the upgraded part is engineered for your exact cable path and latch geometry.
What if the truck has a power-unlatching tailgate? Don't order a mechanical cable based only on the symptom. NHTSA's 2024 GM recall covered certain 2020–2024 Chevrolet Silverado and GMC Sierra HD vehicles with the manual gate, power lock and release configuration identified by RPO QT5. Water could trigger an unintended unlatch while the vehicle was in Park, so owners should verify recall status and build data before replacing parts through the GM recall notice.
For shops managing mixed mechanical and electronic repairs, electronics repair shop software can help keep vehicle notes, inspection findings, and follow-up work organized alongside the parts record.
If your tailgate cable is stretched, corroded, or pulling unevenly, start with the VIN and a careful side-by-side inspection instead of guessing from a photo. T1A Auto offers vehicle-specific tailgate cables, related hardware, and fitment-focused parts support for common Toyota, Ford, Chevrolet, and GMC applications. Visit T1A Auto to match the replacement to your truck before you put the trim back on.
